
For 36 bucks delivered halfway around the planet, you can get a remarkable pile of gadgetry:

With a bit of persuasion, it can become a 3D printer controller based on a RepRap RAMPS 1.4 shield or serve as a generic stepper / servo motor driver with three honkin’ MOSFET power switches, two thermistor inputs, a variety of I/O bits from the Arduino Mega PCB, and a monochrome LCD with a knob.
The persuasion includes un-bending various header pins:

Correcting bowlegged pin strips:

And clipping offending pins:

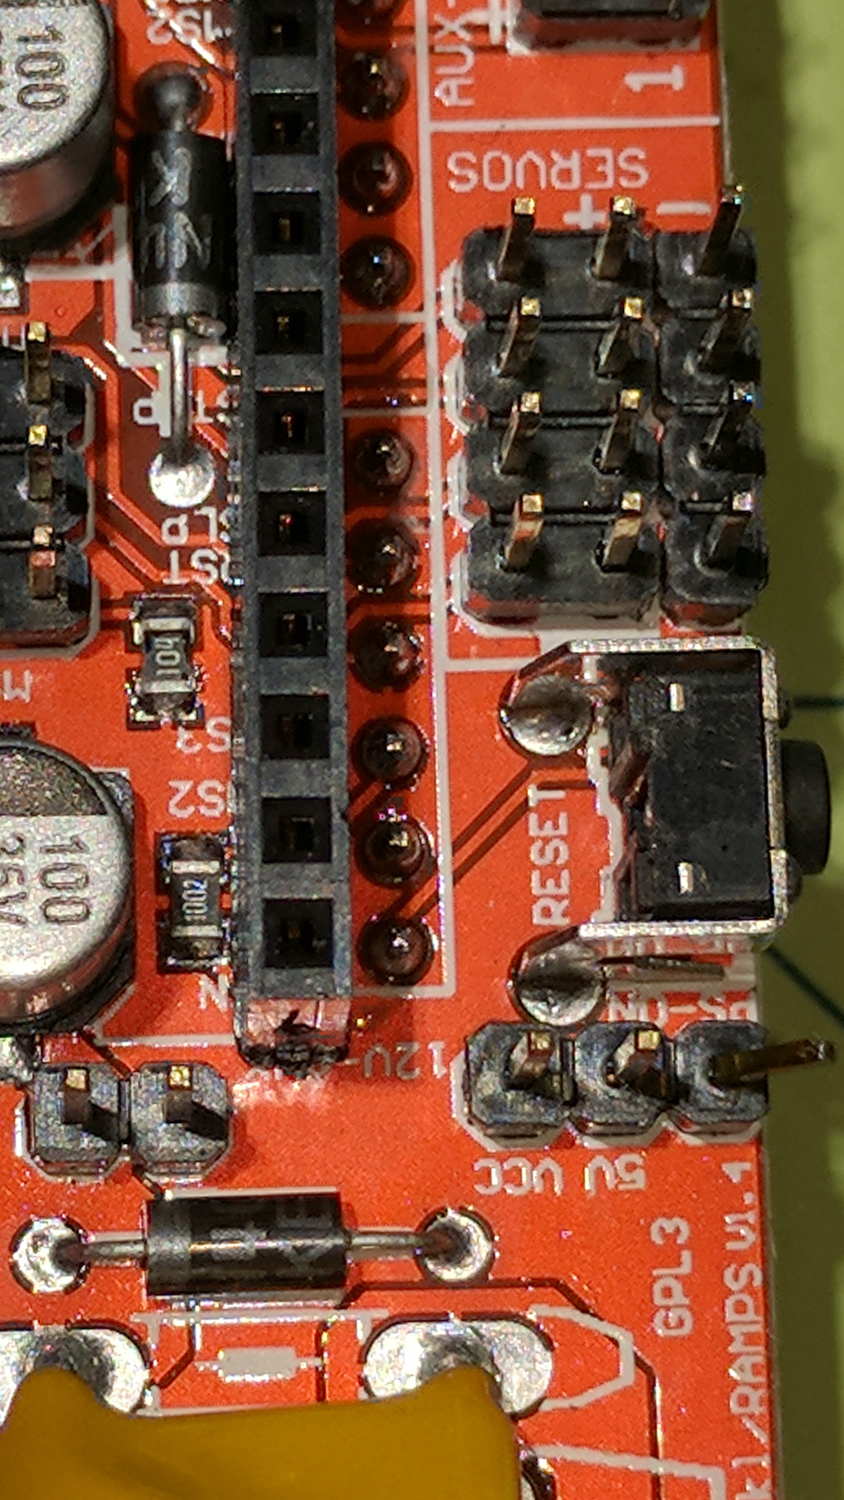
The interference between the bottom of the RAMPS power connector pin and the top of the Arduino Mega coaxial power jack seems baked right into the original PCB layout, which is puzzling. If you don’t trim the pins, this is as close as the boards will get:

Well, of course, you could just jam all those headers together and bend the RAMPS PCB.
The bent pin near the Reset button connects to the PS_ON output used to enable ATX-style power supplies. You connect the supply’s 5V_SBY always-on output to the VCC pin, which powers the Mega and most of the logic, but not the stepper motor outputs or the heaters.
To make that work, remove D1 from the board where it’s snuggled along the header strip:
D2, next to the fuse near the bottom of the picture, provides reverse-polarity protection for the RAMPS board.
The servo motor power comes from the 5V pin. If you don’t need the PS_ON output and 5V_SBY input, then jumper the VCC and 5V pins together. Otherwise, you could solder-blob those pins on the bottom of the board, which means the servos are always powered.
Configuring the latest 1.1.x version of Marlin should be straightforward …

I have what I assume is the original – since the Arduino, RAMPS board and display came with my packages 3D printer, however…..the 5V LD regulator on the Arduino appears to be much too marginal in capacity/cooling to be able to supply the combination of the RAMPS plus the display plus the backlight.
How do I know……? Last week I found my printer sitting with the nozzle stuffed into a part printed item and a display with all pixels lit. Turning the power off brought the display back (connected through the USB as well). A swift look revealed that the 5V rail was running at 7.2V and a closer look showed a reglator with a hole in the top…
In theory they can be short circuited for ever (cf data sheet) but obviously being driven to close to their max output with no forced cooling doesn’t kick the protection modes in.
20 devices from up the roadwere rather more expensive that from the other side of the world but the arrived the following day – and I can now do this a further 19 times….
The new device was fitted with a spare stepper driver heatsink in the hopes that it will last longer than the year the old one survived.
May be worth ensuring forced cooling or an alternative 5V source for the display stuff.
My 2€c… :-)
Simon
The genuine Arduino boards have actual thermal vias to a copper-side pour, but the heatsinking remains marginal for anything other than trivial off-board loads. On the other paw, it gives me something to rant about in my Arduino Survival Guide presentations … [grin]
RAMPS 1.4 and Pololu drivers are designs that by any reasonable standard should never work and yet, somehow, they both work and work quite well – the mind boggles.
I did chuck a small piece of sheet metal to the bed MOSFET to keep it in check – 250W @ 16V was pushing it a bit too hot – and after considerable troubleshooting found out that active cooling is a must to avoid random hangs/reboots, but beyond that I have no real issues with it. A single 50 or 60mm fan running undervolted and pointed in a general direction of Ramps + MEGA stack made it rock solid… at least until the super high esr caps on chinesium boost converter providing said 16V literally blew their cans off :)
I believe the diode Ed mentions also need to come out if you plan to use higher than 12V supply on the motor drivers.
Assuming all the tolerances will just stack up in the right direction sometimes works perfectly. With that in mind, though, I’ll epoxy the stepper heatsinks in place with a big-enough blob to extract heat from the leads, not just the case, and definitely power the RAMPS board separately.
It’ll be a G-Code demo board, not a printer controller, and should lead a low-stress life.
Don’t bother, provided micro heatsinks wirk just fine with double sided thermal tape (of dubious origin). I’m not sure about A4988 drivers, but DRV8825 variety simply throttles down when it overheats and it never happened to me.
The usual snippets of “thermal tape” were conspicuous by their absence: epoxy it shall be!
The chips sport HR4988SQ markings, the datasheet from Jiaxing Heroic Electronic Technology looks like a direct rip of Allegro’s A4988, and there’s “thermal shutdown circuitry” which might actually do something. We shall see how this plays out …
Completely off topic… did someone try using silicone heater pads of Aliexpress (seller Ali brothers or some such)? I got to testing one yesterday and it stinks like crazy when hot. Other silicone heaters I’ve had were all well used before they found their way to me, so I don’t know if this is something that evaporates after few hot-cold cycles or not. As it is, I can’t stand to come within 3 feet of it and that’s testing outdoors – turning it on inside the room is out of the question.
Thanks
Exactly this budget setup has been the heart of my 3D printer – a Reach 3D – for over a year. It just works, though it looks like it shouldn’t. Only thing that doesn’t work is the reset button, and the display ribbon cable needed a damaged bit cut out to work. Runs all lovely from a Raspberry Pi 2 and OctoPrint. Some Reach 3D users have complained about the HL-340 serial chip on the board, but it works like champ for me.
“It just works” is high praise in these parts!
There’s an Octoprint Pi hovering over the M2 so I can test out the Pi camera and suchlike, but I haven’t yet set it up for printing.