Because the Sherline mill can’t cut all the way around a 4 inch OD coaster clamped to its table, I set up the 4-jaw chuck on the rotary table and centered the nicely round fixture:
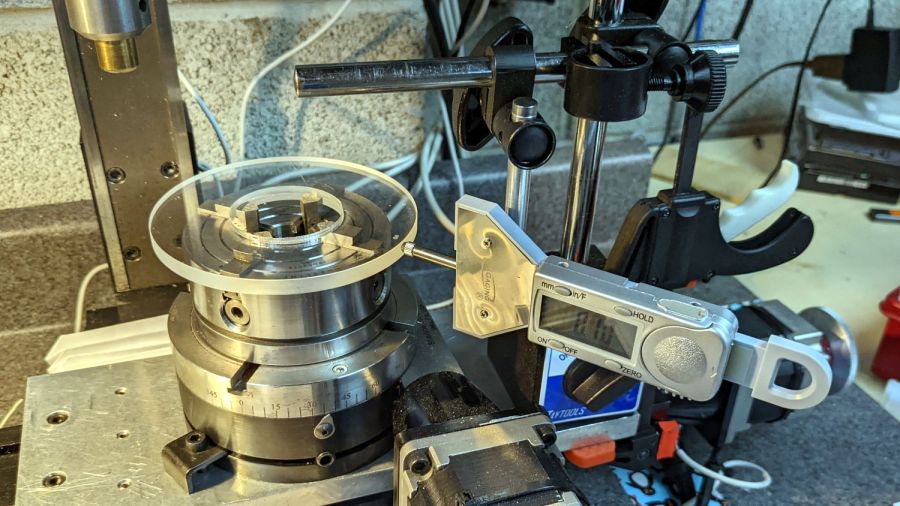
Admittedly, the centering need not be so precise, but practice makes perfect.
A few strips of double-stick tape affixed the test coaster, with too many clamps applied to settle it in place:
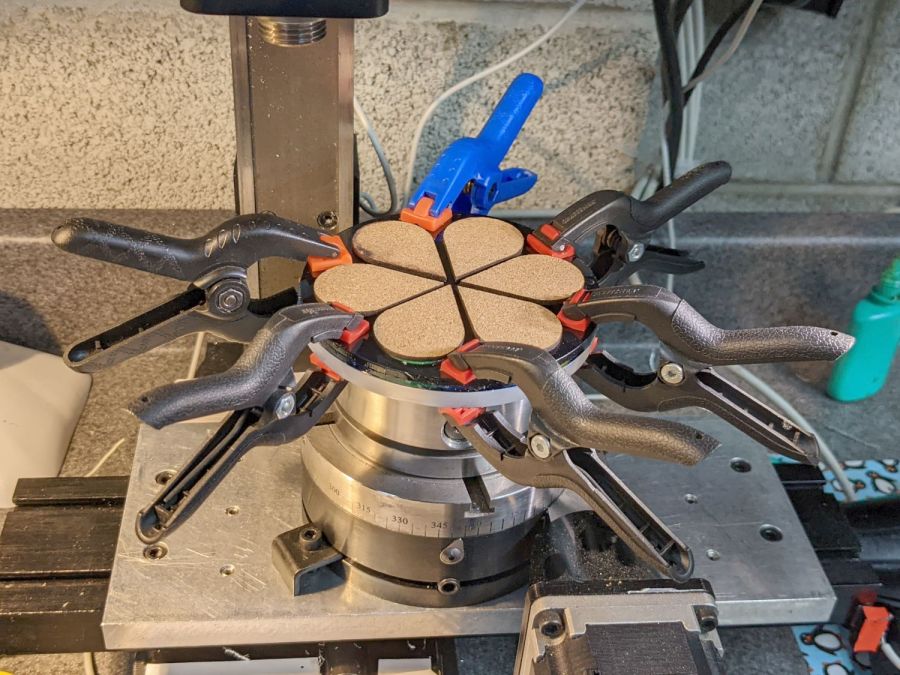
A few sissy cuts demonstrated the tape lacked sufficient stickiness to hold the coaster in place against the milling cutter’s uplift. I managed to mill most of the perimeter with those clamps in place, moving each one from just ahead of the cutter to just behind the cutter.
That way lies both madness and organic damage.
There are better tapes and better adhesives, all trading off a really sticky fixture against difficulty extracting an undamaged part.
A more complex circular fixture with built-in mechanical edge clamps extending around a major part of the perimeter seems like entirely too much of a diversion for a couple of obscene-gerund coasters.
A live center in a lathe tailstock applies pressure in exactly the right place to hold a circular object against a fixture while slicing off the entire perimeter, with the only problem being centering the object.
Maybe shimming the fixture against one chuck jaw will suffice?

Comments
9 responses to “Acrylic Coasters: Edge Finishing, Round 2”
I’m thinking of having something ferrous below (which may well already be the case), some high friction material, then the coaster, then a big magnet on top.
Good idea!
Turns out the top of the coaster sits maybe 20 mm above the steel chuck body, so distant that my finger-crushing neo bar magnets barely align themselves with the jaws and an old 3 inch OD ferrite ring has no mojo.
I think magnets would work perfectly through a much thinner paper-ish coaster atop a steel fixture, with gunk in between. A handful of neo magnets and low-speed turning would do the trick.
Maybe build neo magnets into the fixture, then clamp with a steel sheet?
Thanks for the suggestion!
I eventually did it on the lathe, so I’m documenting all my screwups in the hopes of not making those mistakes again …
centre on a lathe 3 jaw chuck in the same manner as you did for the mil rotary table using a bit of double sided tape to retain ‘enough’. Transfer to the lathe and swiftly support with the tailstock chuck.
Should be ‘good enough’ for the task!
Simon
Aye!
The real solution is a 4-jaw lathe chuck, but I didn’t have one on hand. I’m explaining my misadventures, because somebody’s gotta serve as a Bad Example™.
It’s my turn in the barrel this week. [sigh]
Remove the 4 jaw from the rotary table and grab it with the three jaw in the lathe.
Stay tuned for Part 4!
That it took me nigh onto two days to get there (the deed is longer in the telling than the doing) says something I’m unwilling to admit in public. [grin]
If you run a left-handed cutter you can turn your uplift into downlift, which should be easier to resist…
I didn’t buy a bunch of downcut router bits for the MPCNC when I realized I would never use it as a router. If I had some around, I’d have likely blown yet another day discovering yet another way to not get this done. [heavy sigh]
[…] it’s easy enough to center the fixture, stick the coaster in place with reasonable accuracy, then tweak the Sherline chuck to center the […]