A pair of torchiere lamps lit the living room for many, many years:

During their tenure, they’ve gone from 100 W incandescent bulbs to “100 W equivalent” CFL curlicues to “100 W equivalent” warm-white LED bulbs. The LEDs aren’t up to the brightness of the original incandescents, but you can get used to anything if you do it long enough.
After so many years, the plastic shades / diffusers became brittle:
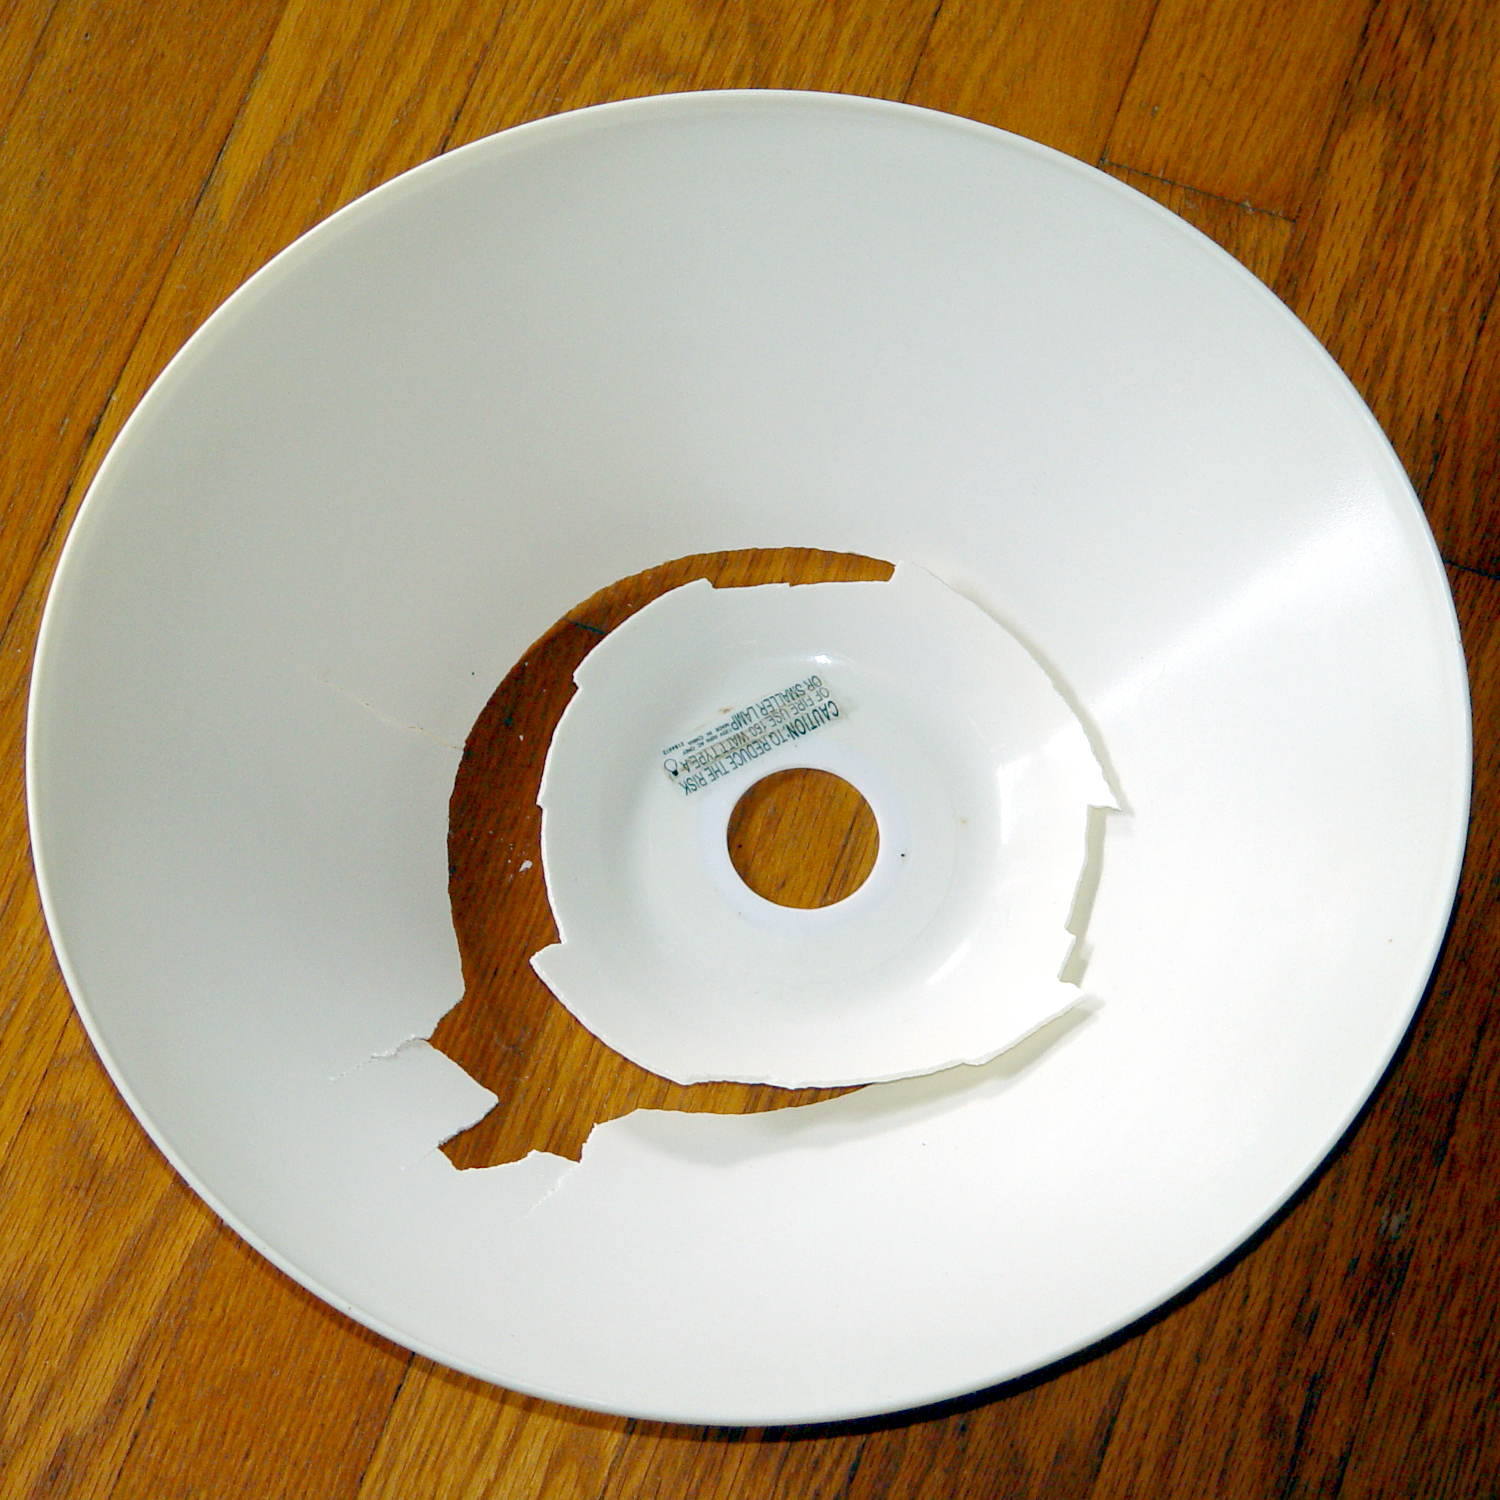
That’s after a bump, not a fall to the floor. So it goes.
Some casual searching didn’t turn up any likely replacements. The shade measures 14 inch = 355 mm across the top, far too large for the M2’s platform, but maybe a smaller shade in natural PETG would work just as well.
ACHTUNG! This is obviously inappropriate for the original incandescent bulbs and would be, IMO, marginal with CFL tubes. Works fine with LEDs. Your mileage may vary.
OpenSCAD to the rescue:

That’s a section down the middle. The top is 180 mm across, leaving 20 mm of general caution on the 200 mm width of the platform. The section above the sharply angled base is 90 mm tall to match the actual LED height, thereby putting them out of my line-of-sight even when standing across the room.
I ran off a short version, corrected the angles and sizes for a better fit, tweaked the thickness to fuse three parallel threads into a semitransparent shell, and …
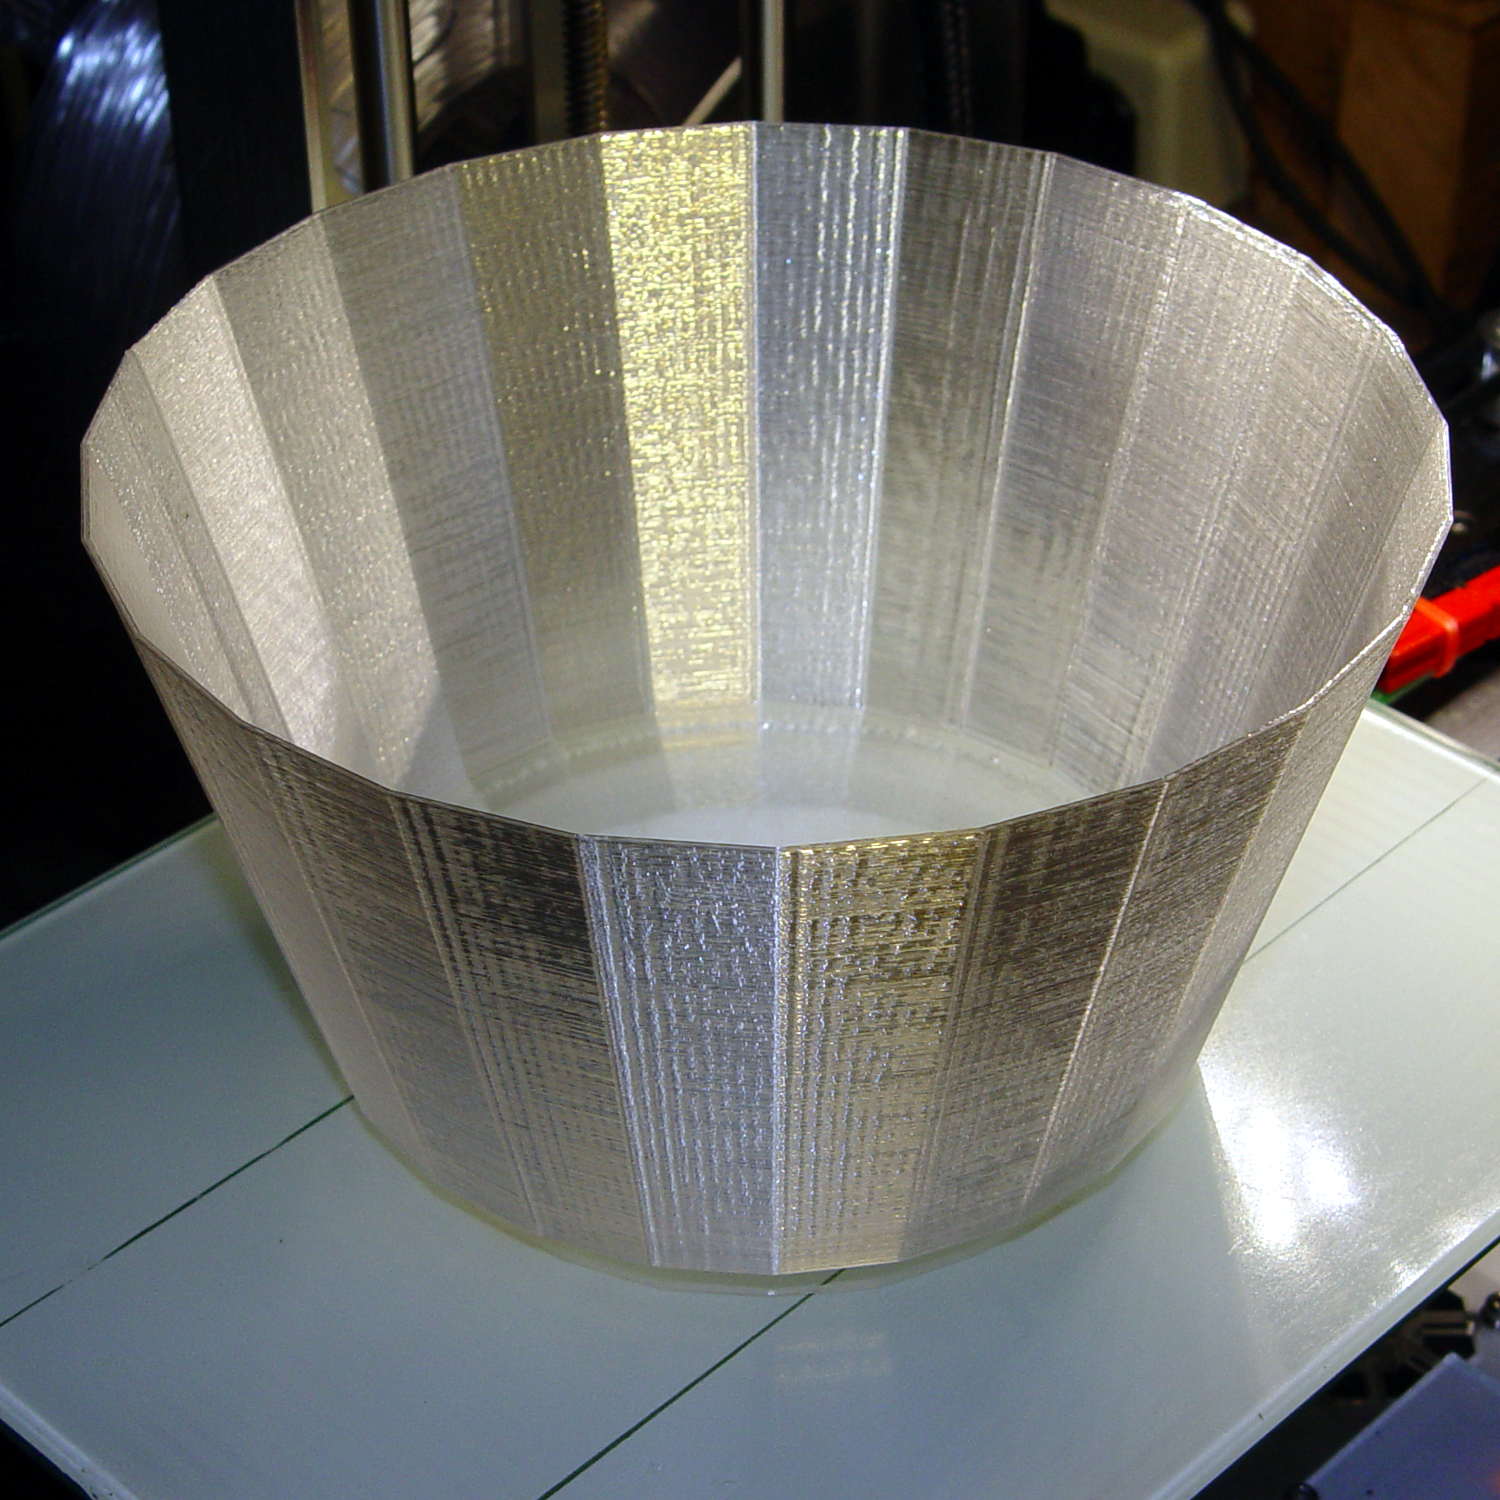
Producing what looks like thin flowerpot required just shy of seven hours of print time, as it’s almost entirely perimeter, goin’ down slow for best appearance. The weird gold tone comes from the interaction of camera flash with warm-white CFL can lights over the desk.
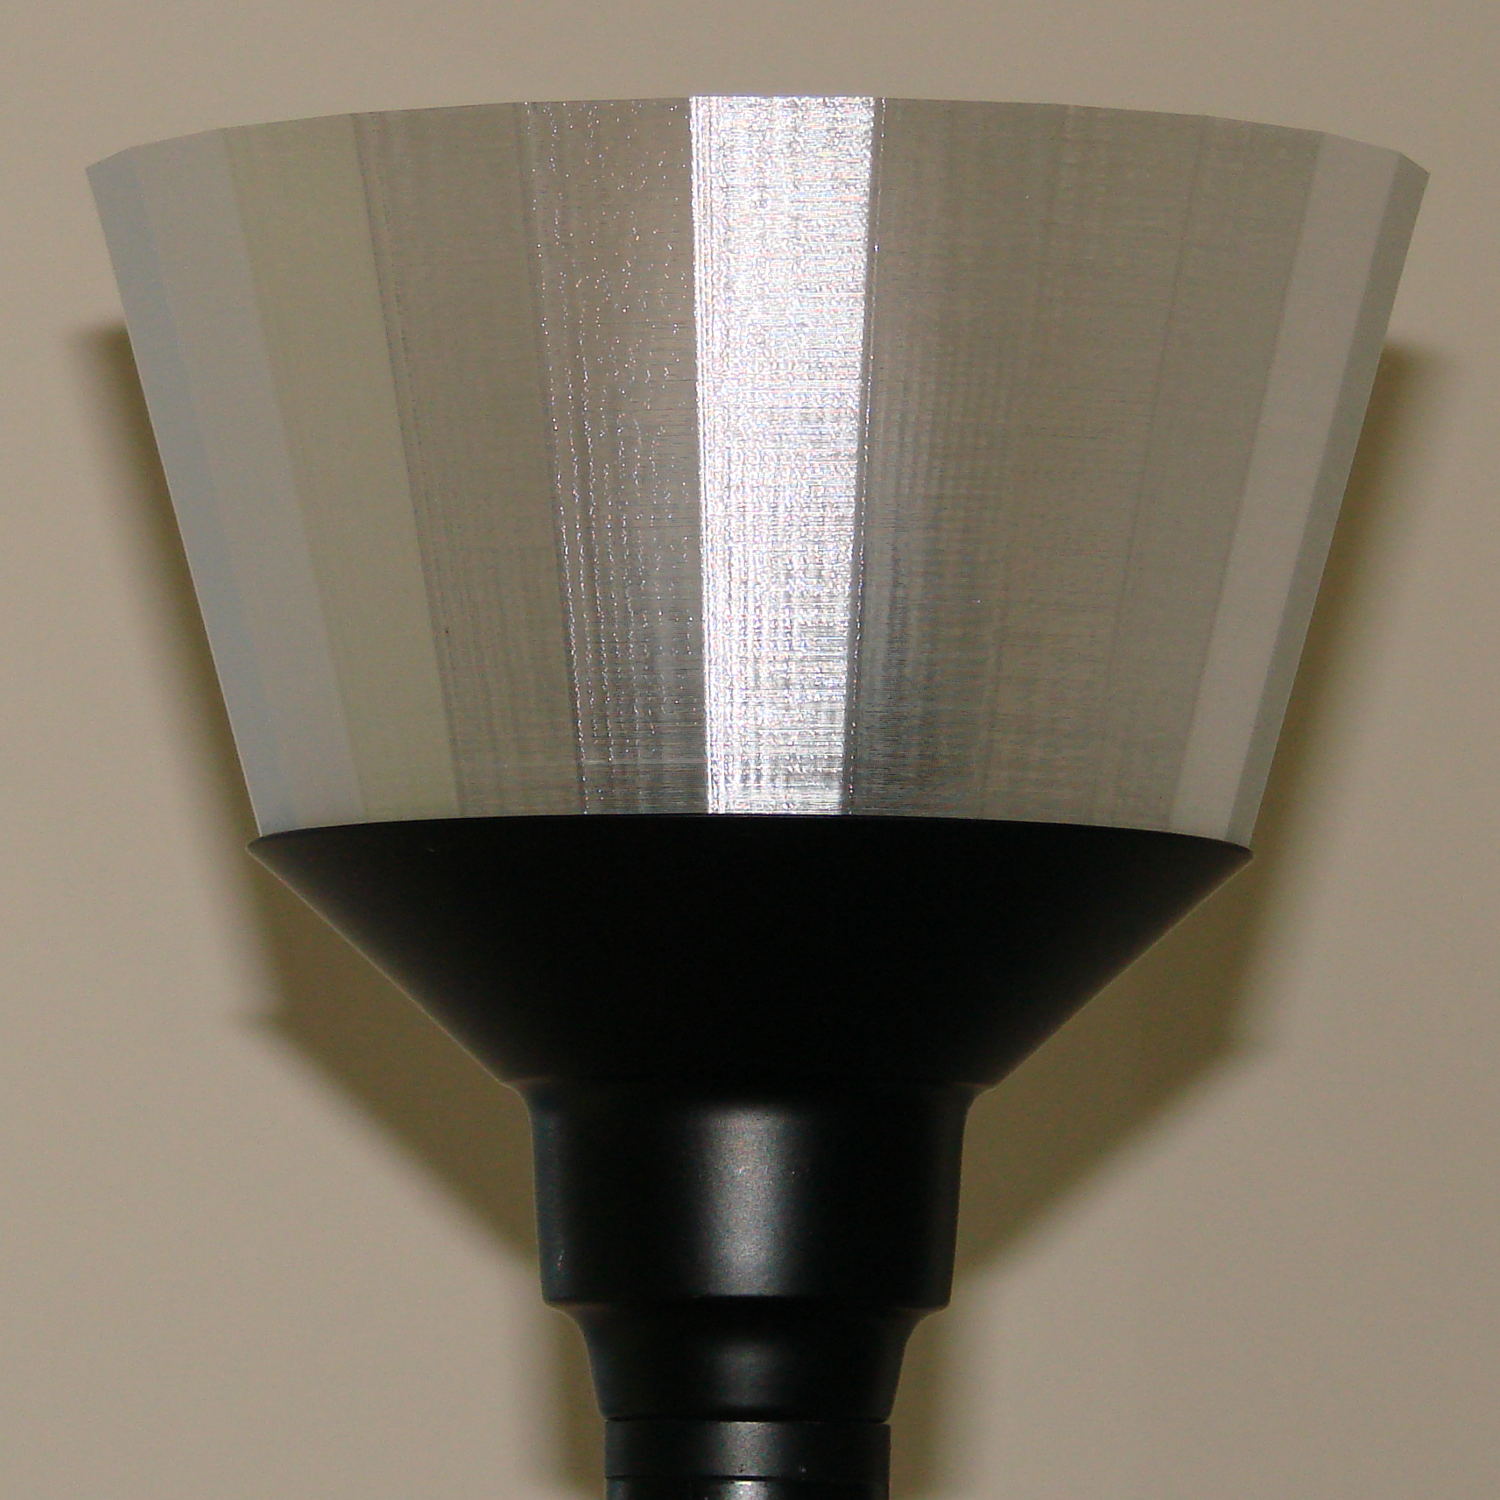
If you hadn’t met the original, you’d say the new shade grew there:
It’s definitely a Brutalist design, not even attempting to hide its 3D printed origin and glorying in those simple geometric facets.
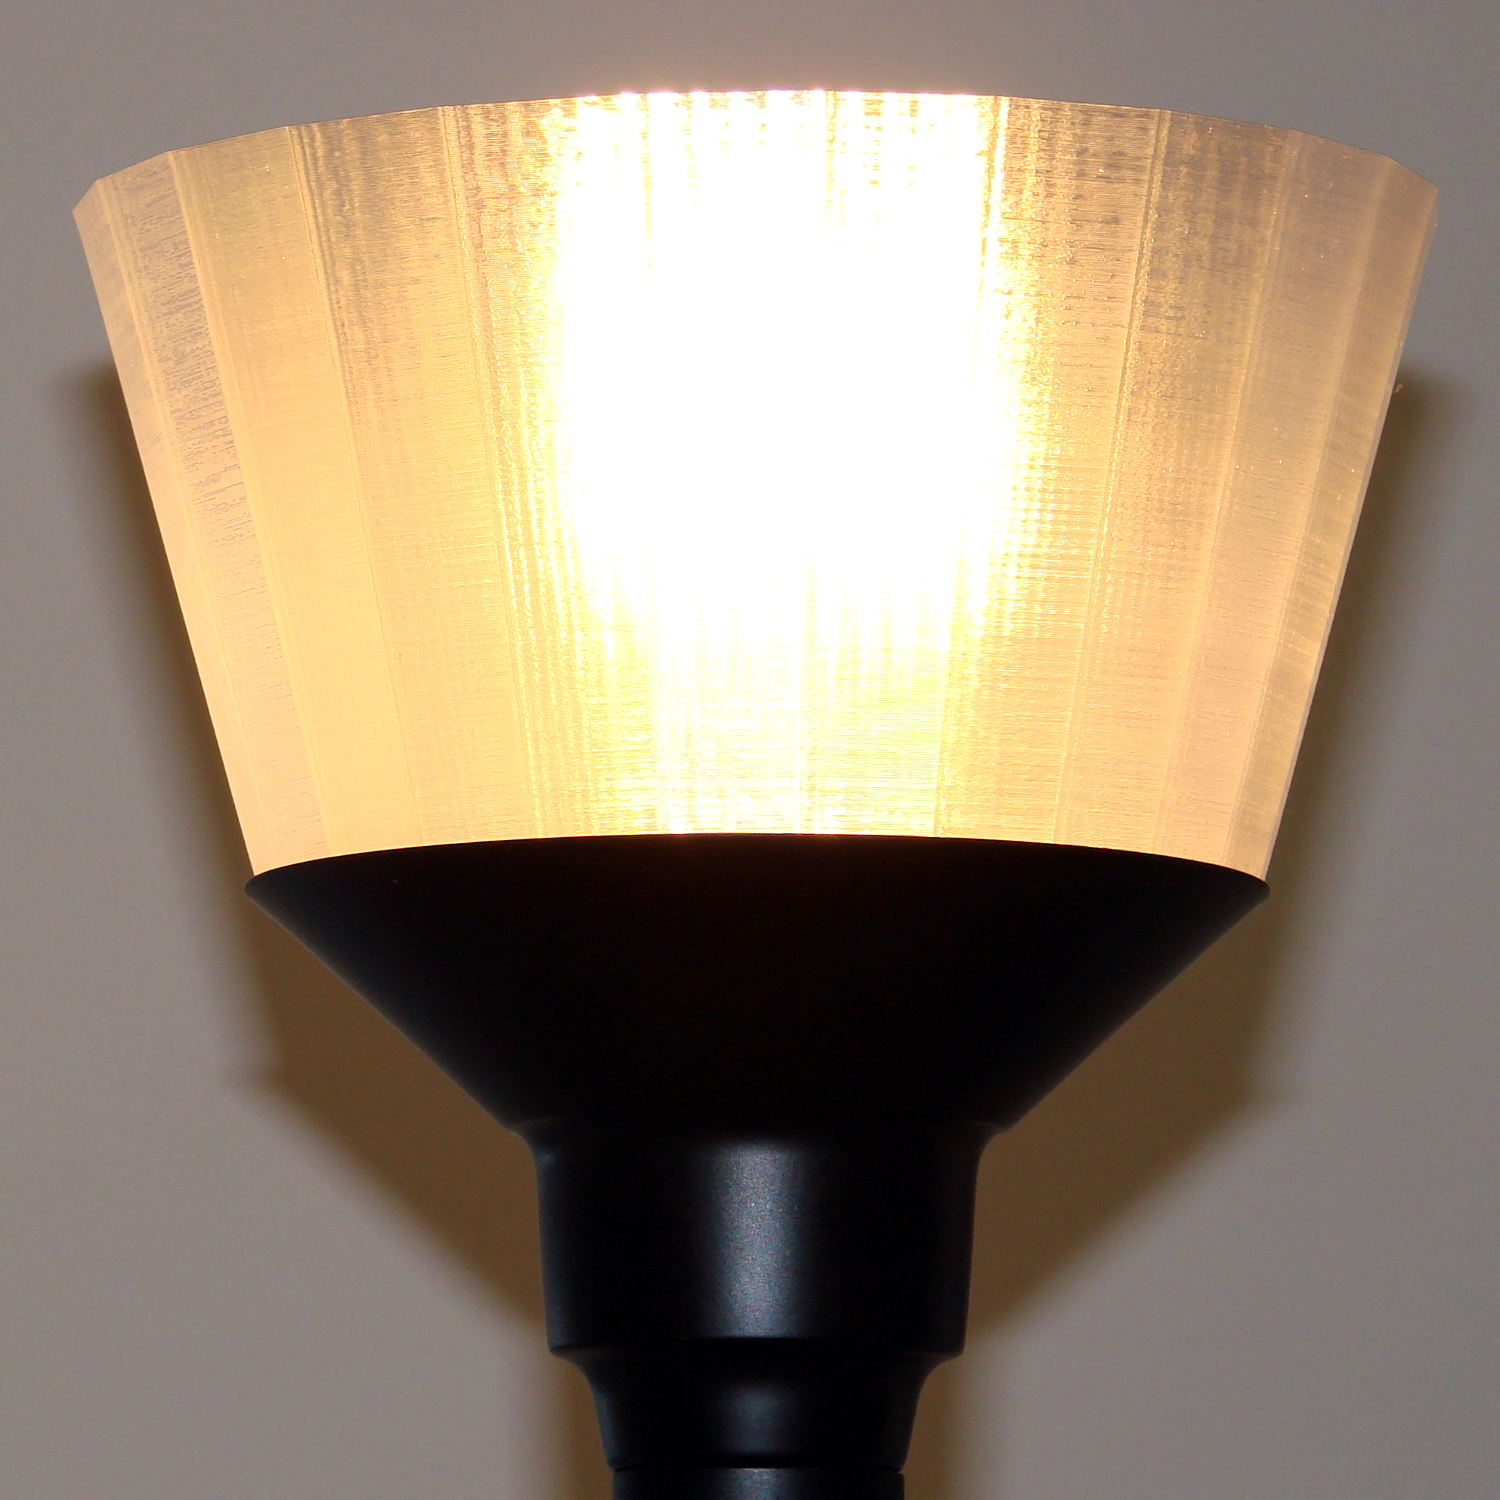
Those three threads of natural PETG makes a reasonably transparent plate, clear enough that the bulb produced an eye-watering glare through the shade:
So I returned it to the Basement Laboratory, chucked it up in the lathe (where it barely clears the bed), dialed the slowest spindle speed (150 rpm according to the laser tach, faster than I’d prefer), and slathered a thin layer of white-tinted XTC-3D around the inside:
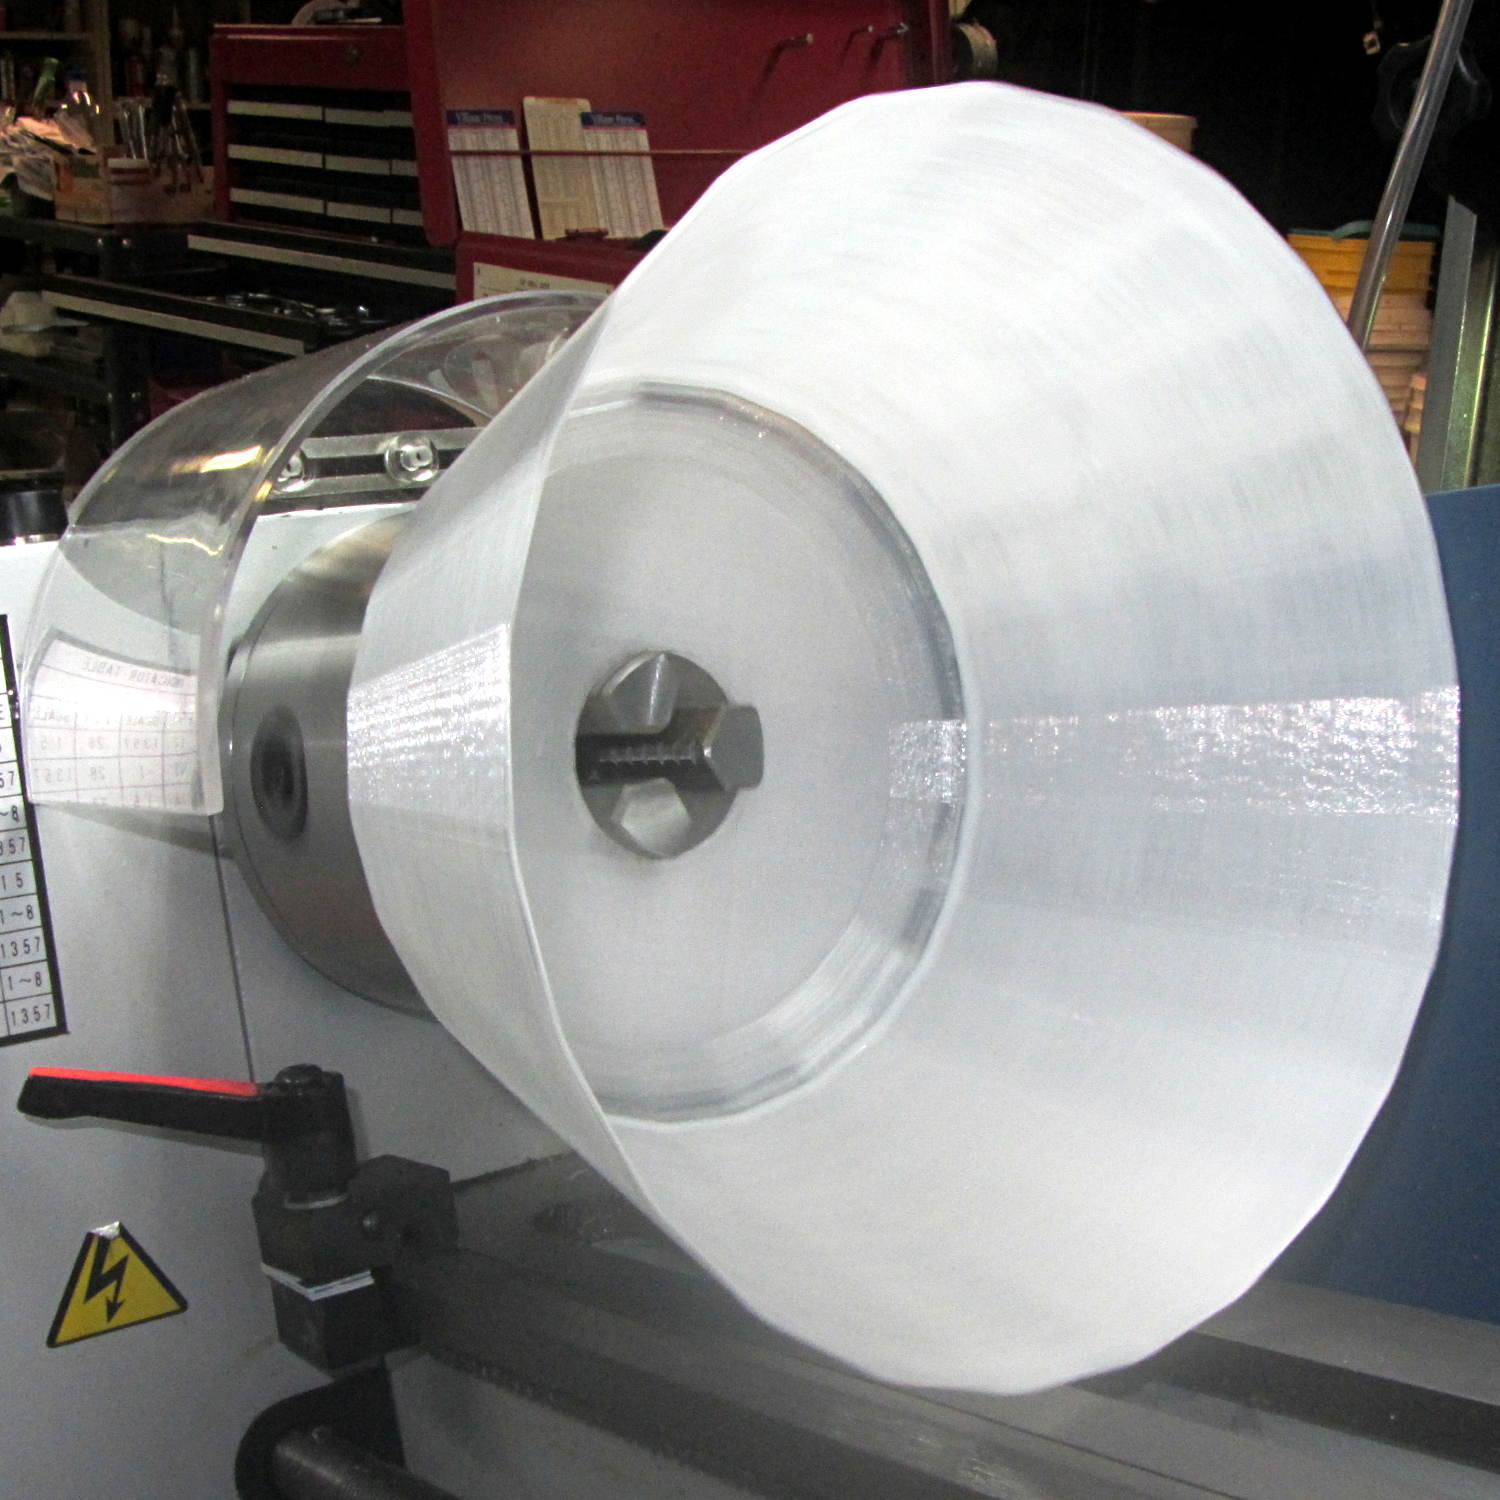
For lack of anything smarter, I mixed 2+ drops of Opaque White with 3.1 g of Part A (resin), added 1.3 g of Part B (Hardener), mixed vigorously, drooled the blob along the middle of the rotating shade, spread it across the width using the mixing stick, smoothed it into a thin layer with a scrap of waxed paper, and ignored it for a few hours.
If the lathe perspective looks a bit weird, it’s perfectly natural: I raised the tailstock end enough to make the lower side of the shade just about horizontal. Given the gooey nature of XTC-3D, it wasn’t going anywhere, but I didn’t want a slingout across the lathe bed.
The lit-up result isn’t photographically different from the previous picture, but in person the epoxy layer produces a much nicer diffused light and no glare.
I might be forced to preemptively replace the other shade, just for symmetry, but we’ll let this one age for a while before jumping to conclusions.
The OpenSCAD source code as a GitHub Gist:
| // Torchiere Lamp Shade | |
| // Ed Nisley KE4ZNU – July 2017 | |
| /* [Build] */ | |
| Section = false; | |
| Shorten = false; | |
| //- Extrusion parameters – must match reality! | |
| /* [Hidden] */ | |
| ThreadThick = 0.25; | |
| ThreadWidth = 0.40; | |
| function IntegerMultiple(Size,Unit) = Unit * ceil(Size / Unit); | |
| Protrusion = 0.01; | |
| HoleWindage = 0.2; | |
| //- Dimensions | |
| ID = 0; | |
| OD = 1; | |
| LENGTH = 2; | |
| /* [Dimensions] */ | |
| ShadeThick = 1.2; // perpendicular thickness | |
| BaseAngle = 42; // lamp base angle wrt vertical | |
| BaseTopDia = 131.0; // lamp ID at top | |
| ShadeBaseThick = 6*ThreadThick; // horizontal bottom thickness | |
| SeatDepth = 10.0 + ShadeBaseThick; // shade bottom to base top | |
| SeatDia = BaseTopDia – 2* SeatDepth / tan(BaseAngle); // lamp ID at seating depth | |
| ShadeTopDia = 180.0; // top OD, limited by printer platform width | |
| ShadeHeight = 90.0; // height above lamp base | |
| ShadeHoleDia = 36.0; // central hole dia | |
| ShadeAngle = atan(ShadeHeight / ((ShadeTopDia – BaseTopDia)/2)); | |
| echo(str("Shade angle: ",ShadeAngle)); | |
| ShadeHThick = ShadeThick / sin(ShadeAngle); | |
| echo(str(" horiz thickness:",ShadeHThick)); | |
| NumSides = 6*4; | |
| $fn = NumSides; | |
| //- Build it | |
| render(convexity=2) | |
| difference() { | |
| union() { | |
| cylinder(d1=SeatDia,d2=BaseTopDia,h=SeatDepth); // section within lamp base | |
| translate([0,0,SeatDepth]) | |
| cylinder(d1=BaseTopDia,d2=ShadeTopDia,h=ShadeHeight); | |
| } | |
| translate([0,0,SeatDepth]) // inside of upper shade | |
| cylinder(d1=BaseTopDia – 2*ShadeHThick, | |
| d2=ShadeTopDia – 2*ShadeHThick, | |
| h=ShadeHeight + Protrusion); | |
| translate([0,0,ShadeBaseThick]) // seating base | |
| cylinder(d1=SeatDia – 2*ShadeHThick, | |
| d2=BaseTopDia – 2*ShadeHThick, | |
| h=SeatDepth – ShadeBaseThick + Protrusion); | |
| translate([0,0,-Protrusion]) // socket clearance | |
| cylinder(d=ShadeHoleDia,h=2*ShadeHeight); | |
| if (Section) | |
| translate([0,-ShadeTopDia,0]) | |
| cube(2*ShadeTopDia,center=true); | |
| if (Shorten > 0) | |
| translate([0,0,(ShadeTopDia + 2*SeatDepth)]) | |
| cube(2*ShadeTopDia,center=true); | |
| } | |

Comments
12 responses to “Torchiere Lamp Shade”
LEDs not bright enough? Consider a Y-shaped adapter.
https://www.lowes.com/pd/Project-Source-660-Watt-Ivory-Medium-Light-Socket-Adapter/3776005
Use two 60W-eqivalents or even two 100s.
Trudi’s living room has a table lamp which formerly used a 250w “Reader” incandescent bulb. Those bulbs are no longer available. With a “Christmas tree” arrangement of three adapters, the lamp was upgraded to /four/ 60w-equivalent LEDs. The light is diffuse and the lamp runs cool. We like it.
I used three of these to put 4 100W-equivalent LED bulbs in my garage to replace the 300W compact fluorescent that recently burned out (none of these new bulbs come even close to the promised lifetime). The work well, but it was a pretty pricey solution.
We replaced the incandescent bulbs in the house when we moved in; 2003. Ended up with the FEIT bulbs from Costco, mostly 13W ones in overhead fixtures, and 23W (1600 lumens) in table lamps. When LEDs got affordable (with help from a subsidy from the local power company at first), we swapped out the CFLs for LEDs. The 23W CFLs ended up in service in the barn/shop, and the 13W bulbs in some fixtures in a workroom in the shop.
For what it’s worth, we’ve had zero failures of the LED bulbs; variety of vendors, including Sylvania, FEIT, and Phillips. Note that some of these bulbs aren’t supposed to be used in enclosed fixtures; the warning is usually in fine print (Flyspeck 3 font). I suspect these are the ones that use a marginal oscillator for the LEDs. I’ve also noticed a lot of heat from the CFL bases, especially the 23W bulbs.
On longevity on CFLs. My 23W bulbs are hanging from the trusses, about 13 feet up. I’ve learned a little about care and feeding to keep from having to swap them out. [grin]
A. clean power really helps. We had horrible lifespan with these bulbs before Pac Power put in a new substation. Had a bread maker go toes-up in mid batch, too.
B. Vibration is a killer. I replaced the house roof when we still had CFLs. I already knew lifespan in service in vibration was short (my worklight lasted a few minutes when sitting on the mill-drill stand), but I had to replace several ceiling bulbs after doing the roof.
C. Heat can be a problem, but not severe. Usually. Cold, not so much. I keep the barn at 38F in the winter (measured about 6′ from the floor), and while the bulbs are dim at first, they work OK. I’m getting 80-90 F in the barn this summer, but the 23W bulbs are in open holders. On average, I’m losing one 23W bulb (out of 6 on the trusses) per year.
My biggest problem is with the shop lights and the electronic ballasts. Looks like the caps have hit end of life on several (after about 10-12 years). When I get to it, I have a case of LED tubes that will go in de-ballasted fixtures. I use these for task lighting, and the lower output isn’t too much of a problem.
I don’t have strict data on most of the failures. I bought some 100W equivalent Cree bulbs. They appear to be beautiful pieces of engineering. Most of them lasted less than a year in open fixtures. A few that were in closed fixtures lasted much longer (though they looked much worse). I took one that burned out and tore it apart. After removing all the potting, I found scorched components suggesting it wasn’t the LEDs that failed but the control board. We had some significant lightning events that took out a few electronic things in the house and I think those may have also damaged the LED bulbs. Clean power is an absolute necessity for our new, all-electronic houses. A whole house surge suppressor (really just a big can of MOVs) is on the list of to-dos this summer. I imagine that will have to be replaced from time to time.
Now that I look, it seems one can get “250 W equivalent” LED bulbs! They dissipate 30 W, though, at a bit over a buck a watt, so we’ll wait until these bulbs die off.
The 30W bulbs look interesting. I see several on Amazon, with some prices down to $19 each, though the vendor ain’t a big name. [grin]. I wonder about the heat from the base. When I get the round tuit, I might try a couple in the barn. Tripling the light output would be nice. Amusing to see the return of the twisty bulb in the 30 watters.
Four 60w-equivalent bulbs produce a lovely diffused light. Moreover, they are an economical solution. I have been disappointed by the short service life of $5 Cree bulbs. By contrast, “Brand X” LED bulbs bought at Home Depot for $0.89 have performed flawlessly. {$0.89 was a super-whoopie sale price. I bought dozens!}
You should try two non-joined perimeters, with large air gap between them, say 10-20mm. Sort of like serial-connected diffusors.
Oh, and I’d definitely dial the the side count on those cylinders to at least 96 or maybe even 384, but Romans said it: De gustibus non est disputandum :)
Alas, the M2 doesn’t have enough bed for that: embiggening the shade would put the inner surface too close to the bulb. The LEDs run far cooler than incandescents & CFLs, but still too hot for (my) comfort with a thermoplastic shell only an inch away.
And, hey, if low-vertex-count polygons are good enough for Tiffany, they’re good enough for me! [grin]
Tiffany lamp shade images
Couldn’t resist linking to this https://www.youtube.com/watch?v=gfQ4RpjpiFY
Maybe for your second lamp :)
I’m hoping the other one doesn’t need a shade for a looooong time! [grin]
OpenSCAD’s
surface()function would fall over dead on something that large: thanks for the pointer![…] slathered XTC-3D on some 3D printed parts, but have no idea how durable it is; this should serve as an accelerated survival test under rather […]