The stock Makergear M2 hot end uses a 100 kΩ thermistor for temperature sensing. A wrap of Kapton tape holds it against the brass nozzle, with a stretchy fiberglass-lined tube for protective insulation and a bit of pressure. This picture shows the tape pocket around the thermistor, with my thumbnail on the left:

Peeling back the tape a bit shows the thermistor against the nozzle, with the glass bead reflecting the LED ringlight around the macro lens adapter:
The RAMBo board in the M2 has four thermistor inputs and no thermocouple inputs, which surely drove the decision to use themistors. I want to use thermocouples with the LinuxCNC controller, because they’re more compact and happier at higher temperatures.
So I unwrapped the nozzle and lined up a thermocouple beside the thermistor:

Where a dab of JB Weld firmly bonds them to the nozzle:

As nearly as I can tell, the JB Weld that I used on the Thing-O-Matic is still going strong. I think the trick is to not apply mechanical force to the bond when it’s hot; secure the leads firmly and use the epoxy only as a thermal connection. Yes, you can get fancy higher-temperature adhesives, but this seems to work well enough.
For the moment, I’m using ordinary cotton cloth secured with Kapton tape as insulation:

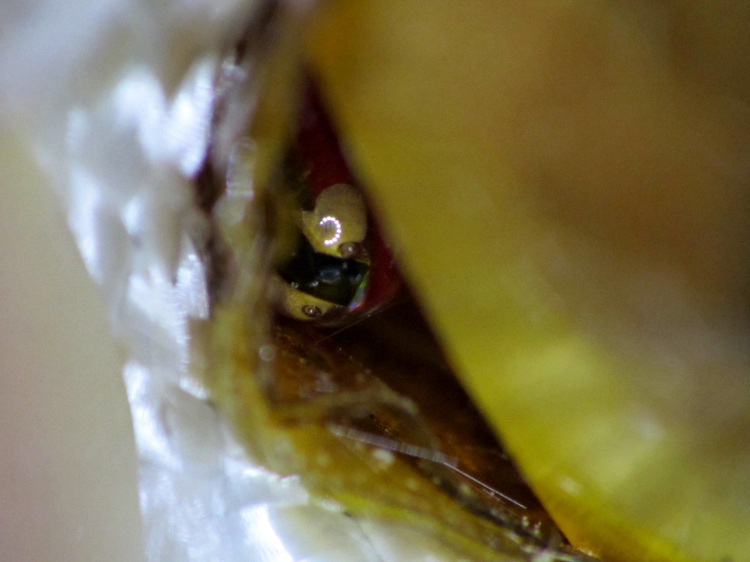
The brown dot that looks like a bead is actually a flat stain on the nozzle.
The insulation should become something more suited for high temperatures, perhaps the ceramic fiber I used on the Thing-O-Matic, but cotton will suffice for now.
Now, wisely is it written that a man with one thermometer knows the temperature, while a man with two thermometers is never certain…

Comments
7 responses to “Makergear M2: Nozzle Temperature Sensing”
Is 3 the magic number of of temperature probes for comparison?
The real question is, by what method are you reading the thermocouple?
Max6675, MAX31855, AD595/597, or complex anolog filter and ADC conversion?
If they’re of different types and on different amps, then three should give you reasonable confidence there’s no systemic error.
I have a Fluke dual-channel meter with their thermocouples that I probably trust far too much and a TC4 quad thermocouple Arduino shield with some custom firmware that I’ll describe in short order.
I’ve never convinced myself that I could set up a standard environment that would be any more accurate than just verifying that all the thermocouples give pretty nearly the same answer at the same temperature. It’s easy to freeze or boil water, but it’s tough to make sure everything stabilizes at a known temperature.
I don’t know exactly what your hot end looks like, but I have to take mine apart too much to be able to epoxy a thermal sensor onto the nozzle. Do you have a different hot-end design or more faith than I do about frequency of disassembly for cleaning and repair?
It’s a stock Makergear hot end, with their assembly instructions showing the innards.
Well, I had to do it once already, which led to this whole epoxy-the-thermocouple thing… [grin]
That said, the nozzle is basically a hex nut that now has four wires protruding from it. I’ll eventually trim the thermocouple wire and put a male K connector on it, but even as it stands I can get a wrench on the flats and unscrew the nozzle without too much trouble. I’ll take the whole filament drive assembly off the motor anyway, so it’s an in-hand operation.
If you need small quantities of ceramic fiber, try a place that offers repair parts for wood stoves. I have some loosely woven door gasket stock in 3/4″ diameter, as well as a flat tape about 3/4″ wide. Easy to cut with shears. Mine came in 6′ lengths, and are un-coated. (I also use fire brick from the stove place when I’m doing gas torch work. At the rate I use them, a dozen bricks will last me a lifetime.)
There’s a box of oil burner combustion chamber lining with the potential to become a treasured family heirloom, sitting on the shelf waiting for its next opening. I used a few snippets on the Thing-O-Matic, but it’s a big box.
The stuff is hygroscopic and remains damp and form-able until it’s heated well above boiling, at which point it steams like crazy and becomes a brittle ceramic jacket. I fear it’ll shed little ceramic particles unless it’s well sealed inside a Kapton wrap, so I’m stalling as long as I can before going that route. The cotton may last for the life of the M2…
I like the door gasket idea, though: a length of that would probably fit around the heater.
[…] the stock thermistor and my added thermocouple epoxied to the M2′s nozzle, I stepped the temperature upward, let it settle, and recorded the temperature from the Pronterface […]