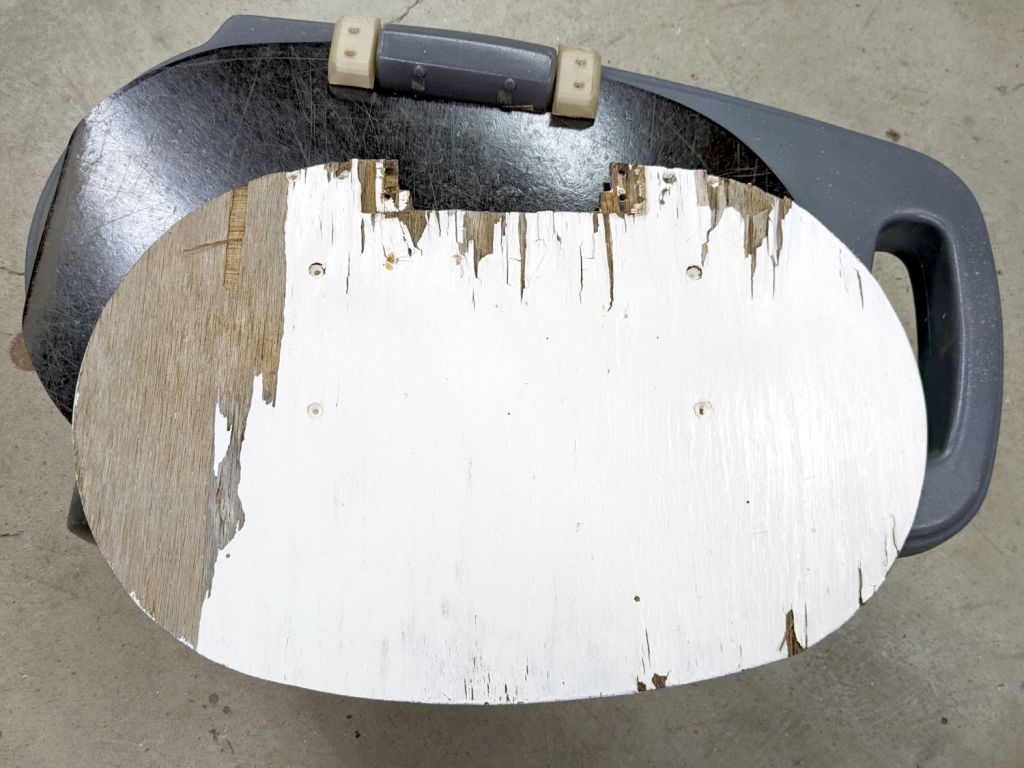
The Smell of Molten Projects in the Morning

Ed Nisley's Blog: Shop notes, electronics, firmware, machinery, 3D printing, laser cuttery, and curiosities. Contents: 100% human thinking, 0% AI slop.

Category: Home Ec

Things around the home & hearth

  • Humana Email Unsubscribe FAIL: Redux

    Around this time last year, Humana was spamming me with emails sporting a misconfigured unsubscribe link, so that I could not get myself off their mailing list.

    This year, they have the unsubscribe link set up properly, except …

    Humana email unsubscribe rejection
    Humana email unsubscribe rejection

    Apparently my email address was good enough to get their junk email to me, but it’s not good enough for them to stop sending junk.

    I was pretty sure this was deliberate last year. Now, I’m certain.

    And they want me to trust them?

    You can’t make this stuff up.

  • Hand Shower Mounting Bracket

    Hand Shower Mounting Bracket

    For reasons not relevant here, a hand shower will come in mmm handy for a while in a month or two. The threads on its plastic diverter valve pretty nearly match those on the 70 year old iron pipe in the front bathroom, although the original brass shower head may have been installed by John Henry the Steel-Drivin’ Man.

    In any event, you’re supposed to drill two screw holes in the wall for the holder, which is just not happening. Instead, scan the bottom of the holder and blow out the contrast for the next step:

    Hand Shower bracket - scan
    Hand Shower bracket – scan

    Yes, those holes are off-center in their molded bosses. They’re centered in their front recesses and I cannot imagine how, in this day and age of CAD everything, a designer could misalign the front and the back, but there it is.

    A little cleanup produces a reasonable mask:

    Hand Shower bracket - mask
    Hand Shower bracket – mask

    The holes are centered in the outline, as you’d expect.

    Import it into LightBurn, trace the perimeters, put those vectors on a tooling layer, and hand-draw a much simpler / smoother outline on the cutting layer. One of the vintage acrylic sheets is 1/4 inch thick, just enough for the shortest M4 brass inserts, so wrap the holes around the inserts:

    Hand Shower bracket – LB layout

    Some acrylic adhesive goops the inserts in place, although I’m not convinced it has enough pull strength in those slick holes:

    Hand Shower bracket - mounting plate
    Hand Shower bracket – mounting plate

    When if it fails, I’ll rebuild the plate with an engraved ring around the back of each hole, along the lines of the earrings, and epoxy the inserts in place.

    Double-sided foam tape will eventually stick the holder to the tile above the tub, but finding the proper location requires UX research.

  • Dell Sound Bar Under-Shelf Mount

    Dell Sound Bar Under-Shelf Mount

    A bedroom rearrangement displaced the Dell Sound Bar attached to the streaming music player from its accustomed perch, so I conjured a mount from the parts bin to hang it from a shelf:

    Dell sound bar mount - installed
    Dell sound bar mount – installed

    The sound bar originally fit below any Dell monitor with the appropriate lugs under the bezel, but a bit of bandsaw work and hand filing produced a reasonable facsimile from an aluminum sheet:

    Dell sound bar mount - plate installed
    Dell sound bar mount – plate installed

    The bar’s plastic bits require a few millimeters of clearance above the sheet, now provided by a matching plywood shape:

    Dell sound bar mount - parts
    Dell sound bar mount – parts

    A trial fit showed all the parts would fly in formation:

    Dell sound bar mount - trial fit
    Dell sound bar mount – trial fit

    A laser-cut cardboard template maintained alignment and spacing while I stood on my head screwing the mount in place.

    All’s well that ends well!

  • Laser-cut Plywood Can Rack

    Laser-cut Plywood Can Rack

    On occasion I will do something practical:

    Salmon can storage boxes
    Salmon can storage boxes

    It’s not that we needed a rack for those cans, but it did get a laugh from Mary and that’s what counts.

    The magic URL encoding all the parameters to generate a rack, using a recent addition to the wonderful boxes.py collection:

    https://www.festi.info/boxes.py/CanStorage?FingerJoint_angle=90.0&FingerJoint_style=rectangular&FingerJoint_surroundingspaces=0.0&FingerJoint_edge_width=1.0&FingerJoint_extra_length=0.0&FingerJoint_finger=2.0&FingerJoint_play=0.0&FingerJoint_space=2.0&FingerJoint_width=1.0&Stackable_angle=60&Stackable_height=2.0&Stackable_holedistance=1.0&Stackable_width=4.0&fillHoles_bar_length=50&fillHoles_fill_pattern=no+fill&fillHoles_hole_max_radius=15&fillHoles_hole_min_radius=5&fillHoles_hole_style=hexagon&fillHoles_max_random=1000&fillHoles_space_between_holes=10.0&fillHoles_space_to_border=15.0&top_edge=%C5%A0&bottom_edge=%C5%A1&canDiameter=80&canHight=115&canNum=6&chuteAngle=5.0&thickness=3.2&format=svg&tabs=0&debug=0&labels=0&labels=1&reference=0&inner_corners=loop&burn=0.04&render=0
    

    In order from left to right, the three successive racks represent:

    • A good laugh
    • Finding that a burn correction parameter of 0.04 produces a much better fit than 0.05.
    • Discovering that I must orient finger joints along the same axis to minimize small axis scale errors errors

    The Burn Correction Factor encapsulates many physical effects and, much like 3D printing’s Extrusion Multiplier, must be determined empirically.

    The axis scale error, however, took me by surprise.The X axis travels on the order of 0.2 mm more along 250 mm, about 0.08%, than the Y axis, even after my tedious calibration. I must do that calibration again, because, as Miss Clavel observed in a different context, Something Is Not Right.

    And, yes, that tiny difference is enough to misalign the last few fingers with their holes, to the extent of requiring somewhat more than Gentle Persuasion with a plastic mallet.

  • Epson ET-3830 Refilling

    Epson ET-3830 Refilling

    Although the blurb for the Epson ET-3830 All-In-One scanner / printer says “up to 2 years of ink in the box”, the black ink hit the bottom line of the tank near the end of August:

    Epson ET-3830 - refilling black ink
    Epson ET-3830 – refilling black ink

    Refilling is totally without drama, which is worth a couple of bucks right there.

    Being that type of guy, I keep track of ink vs. time:

    Epson ET-3830 - ink status
    Epson ET-3830 – ink status

    In round numbers, it looks like we use nearly all of a 127 ml bottle of black ink and a bit more than half of an 70 ml bottle of color ink every eight months.

    I find it much easier to read long articles and tech documents while slumped in the Power Chair than to scroll through them on big or little screens, so we go through much more ink and paper than most folks.

  • Champion Hose Nozzle

    Champion Hose Nozzle

    An old brass hose nozzle emerged from my garden hydraulics toolbox when a much newer plastic nozzle failed. Unfortunately, this one leaked a bit too much to serve as a replacement, so I grabbed it in the vise while pondering how to disassemble it:

    Champion brass hose nozzle - disassembly
    Champion brass hose nozzle – disassembly

    It turns out the knurled ring is threaded into the nozzle and, even at this late date, responds well to gentle persuasion with a Vise-Grip:

    Champion brass hose nozzle - parts
    Champion brass hose nozzle – parts

    The washer is a lost cause, but I managed to find an O-ring that fit perfectly in the space available. Clearing some crud around the nozzle hole and buffing up the matching conical section improved its sealing ability, so I’ll call it a win.

    The word ITALY stamped opposite CHAMPION suggests this thing might be as old as I am; it’s been a while since either brass or Italy was competitive in the world of cheap manufactured goods.

  • Layered Paper Coaster

    Layered Paper Coaster

    A long-forgotten pad of Art Paper in assorted colors came to the surface:

    Layered Coaster - tweaked
    Layered Coaster – tweaked

    An angled view shows off the layering a little better:

    Layered coaster - side view
    Layered coaster – side view

    Done manually with LightBurn’s Offset tool: shrink the frame’s interior openings (which lie outside the frame) by 1 mm per step, then cut each shape into a different color. The black layer is a complete disk, stuck atop a plain chipboard disk for stiffening.

    In the cold light of day, I think I offset the green layer by 2 mm.

    It’s not a particularly useful coaster, because you want a flat surface under your drink, but it does look pretty. Nowhere close to that good, but I like it.

    The next time around, I’ll automate the process by stepping the sash width by 1 mm and saving each SVG image separately.