Ed Nisley's Blog: Shop notes, electronics, firmware, machinery, 3D printing, laser cuttery, and curiosities. Contents: 100% human thinking, 0% AI slop.
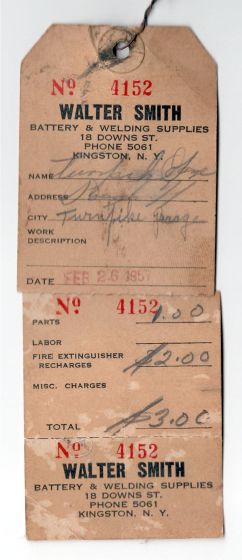
I know it’s still good, because the label has its 4 lb 7 oz refilled gross weight stamped into it, which is exactly what it weighs today.
Walter Smith Welding Supplies may still be in business, perhaps in Poughkeepsie, but their former 18 Downs St location in Kingston has become Noble Gas Solutions:
Noble Gas Solutions – 18 Downs St Kingston – 2019
Back then, you could call Smith Welding at a four digit phone number in Kingston: 5061. Nowadays, you must call Noble Gas with three more digits: 338-5061. As Charles Stross observed, something like 70% of the future is already in place, because infrastructure is so tenacious.
Heck, just look at that Quonset hut!
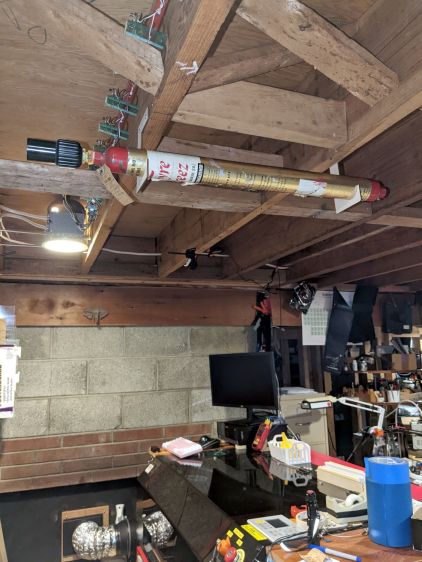
Keep calm and extinguish on:
Fyre Freez extinguisher – step 4
Two thoughts spring to mind:
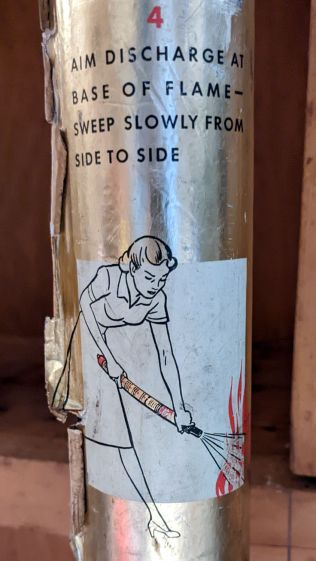
Most kitchen fires start waist-high (it’s the late 1950s: where else would she be?)
She’s gonna lose skin on that metal tank
Seems to me a Fyre Freez will get cold enough to freeze skin while discharging, but I admit to not having actually tried it.
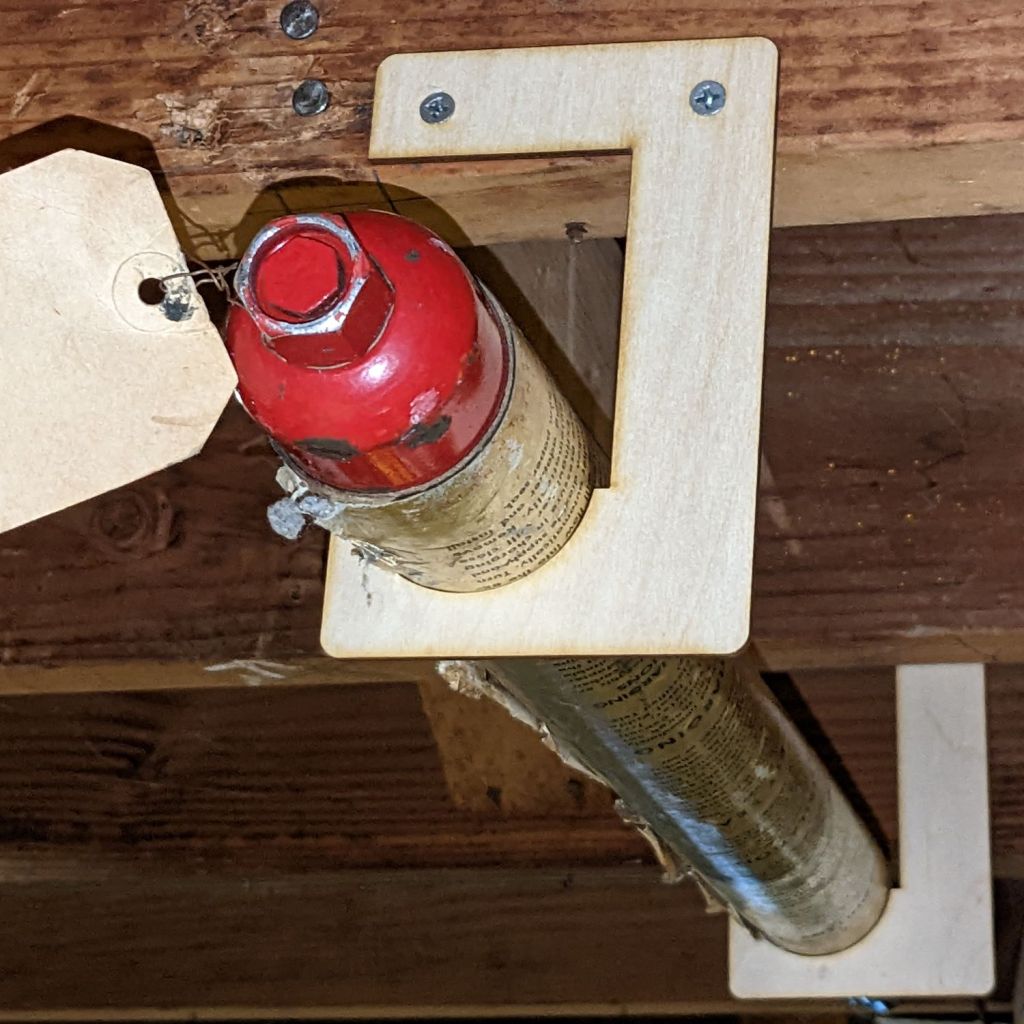
Anyhow, given the overall basement decor, the brackets have the right general style:
Fyre Freez extinguisher – bracket detail
Here’s hoping its future will be as dull as its past …
This conversation started during the few hours when I had to turn off my phone’s incoming-call whitelist filter:
Cash Home Sale SMS
Seems to me a cash-for-house buyer who believes anything the seller says about the property is both new to the “real estate” biz and not destined for a long career. Obviously, the whole exchange attempts to increase my engagement and make me agree with everything going on.
Now, should you happen to be moving to the Mid-Hudson Valley and need a really nice shop with an attached house, let me know: we can work out a better deal.
Protip: if you’re in a position to stack seven thousand Benjamins on our kitchen table, don’t get between us and and the horizon.
There is a reason all my calls and texts go through a whitelist filter.
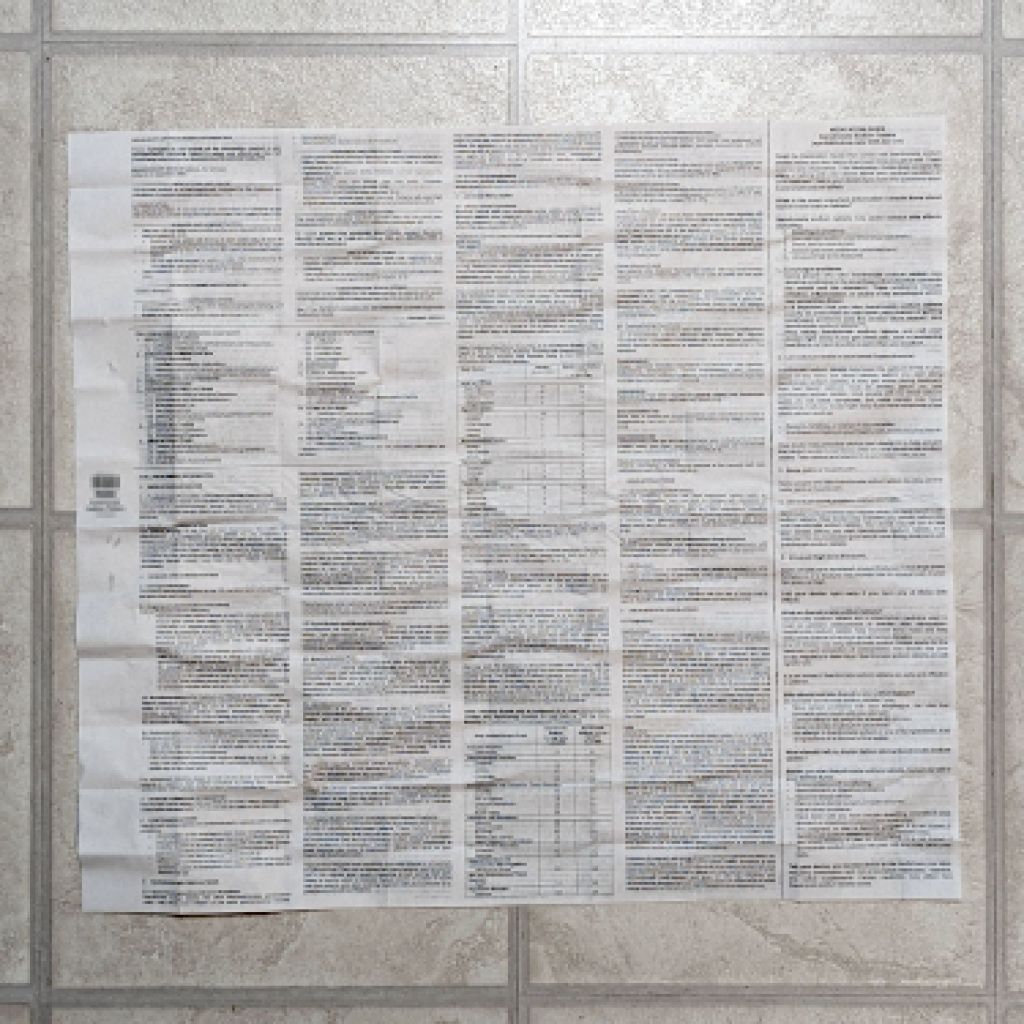
For reasons not relevant here, a new medication has entered the house, accompanied by its Drug Fact Sheet (blurred because you do not have a Need To Know):
Drug Fact Sheet
The background squares are a scant one foot across.
The other side of the sheet is equally dense.
One should review this with each refill to check for new or changed information. Of course, there are no change bars or similar hints.
It might kill ya or cure ya, but you’ll never figure it out from that torrent of verbiage: just like software EULAs, nobody can possibly read and comprehend that stuff.
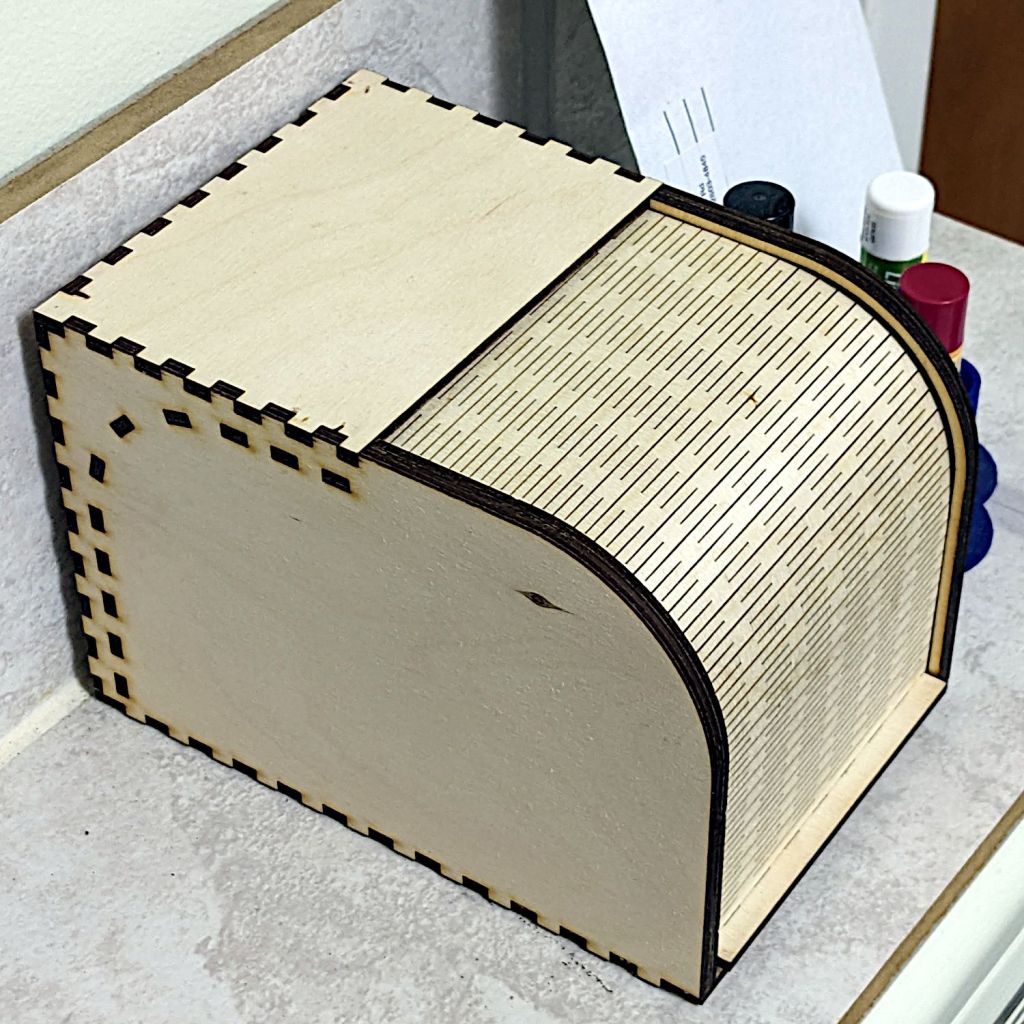
It’s actually the sample Bread Box, sized just about right for a cupcake or two:
Rolltop cupcake box – closed
Even if I have a soft spot for cupcakes, it’s also the right size to corral the batteries we use on the bikes:
Rolltop cupcake box – open
I’d never done anything with flexible plywood sheets, so I started by cutting the door all by itself. Turns out 3 mm plywood flexes wonderfully well, which led to cutting the rest of the box.
The zit on the left side is a knot on the “bad” side of the plywood, visible due to not reversing that piece to put its “good” side downward. I also had to re-cut the curved door guides along the front edge (using the paper support) after they fell through the stock (up on spikes) and got torched during subsequent cuts:
Rolltop cupcake box – cutting guides
The instructions recommend applying wax to the sliding surfaces and that’s a very good idea; although I used cutting wax, paraffin should work. In addition, I filed off the projecting edges of the guide plates around the interior curve, if only to be sure the door couldn’t possibly catch after it was permanently assembled.
I glued it in about five stages to keep everything aligned, starting with the right rear corner stabilized by the bench block and eventually coaxing the left side over all those fingers.
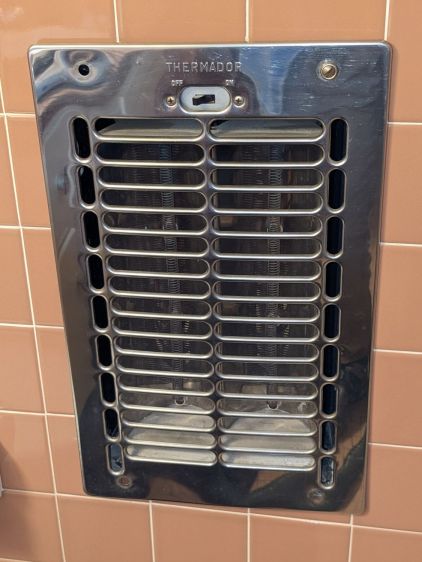
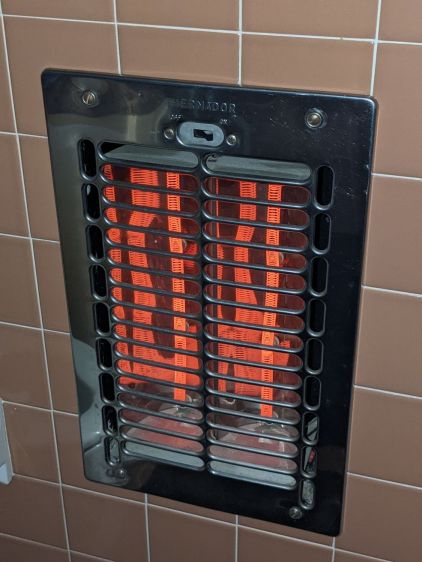
Our house dates back to 1955 and features several fancy items not found in contemporary dwellings. Take, for example, the Thermador in-wall heater in the front bathroom:
Thermador In-Wall Heater
It has a finger-friendly design apparently intended to admit a small finger through the grille, where it can easily contact the resistance heating coil, so while we were moving in I snapped a GFI circuit breaker into that slot in the breaker panel. We advised our (very young) Larval Engineer of the hazard and had no further problem; as far as I know, that breaker never tripped and no fingers were damaged.
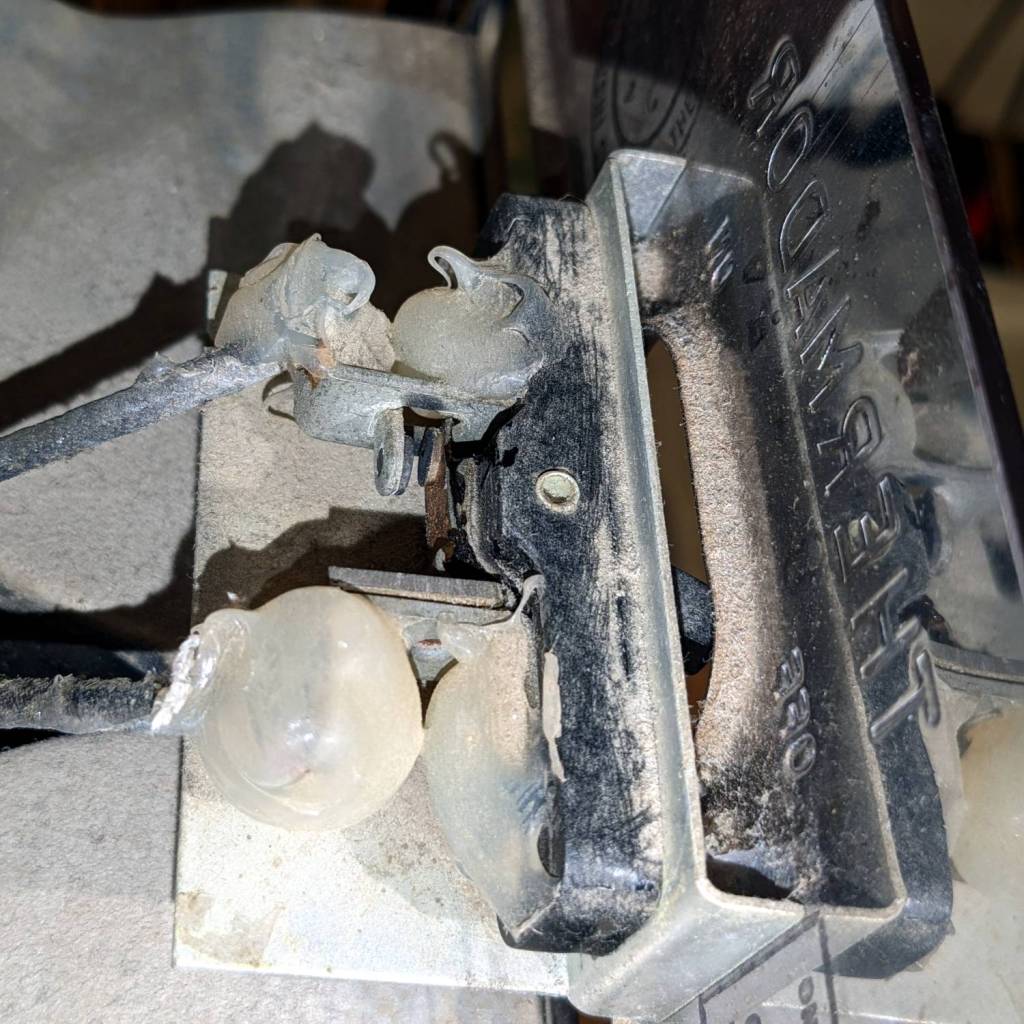
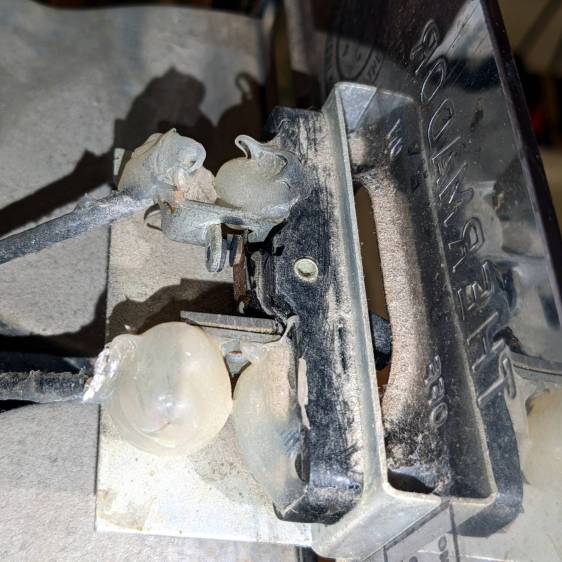
Back then, while adding that breaker and cleaning the first half-century of fuzz out of the thing, I evidently blobbed silicone rubber on the screw terminals of the switch:
Thermador In-Wall Heater – switch contacts
They don’t make switches like that any more.
For reasons not relevant here, we’ll be using it for the first time since we moved in, so I spent a while cleaning / blowing / brushing another two decades of fuzz out of it.
Minus the fuzz, the heater no longer smells like a house on fire:
It did, however, dry the tubing and the construction was Pretty Close™ to being the proper size.
Making the stand from acrylic sheet eliminates the MDF stench:
CPAP Dryer filter – acrylic stand – fitting end
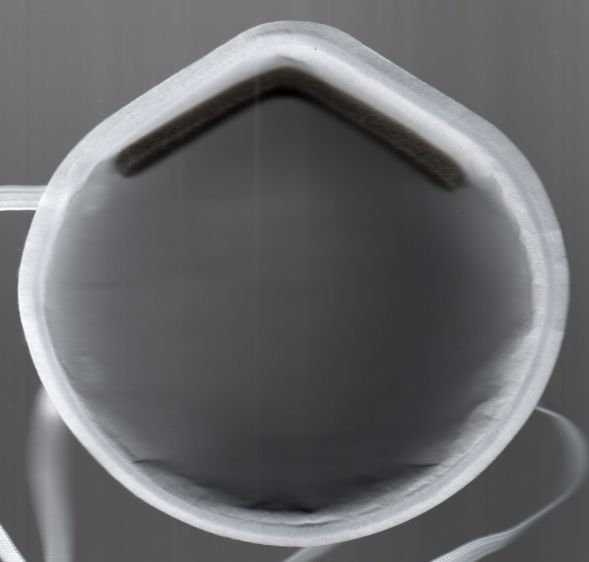
Incoming air passes through a dome-style N95 mask:
CPAP Dryer filter – acrylic stand – filter end
The mask sets the overall size of the stand:
CPAP Dryer – Filter holder – LB layout
Given that we’re not talking Level 4 Biohazard, any filter would work equally well. A dome mask has a nicely defined and self-supporting shape with a flange around the edge.
The flange provides a convenient way to build the clamp ring, starting with a scan from the face side:
Demetech Dome Mask – interior scan
Tracing the flange outline using GIMP’s Scissor Select tool and doing a little cleanup in Quick Mask mode produced a selection suitable for becoming a binary mask of the N95 mask:
Demetech Dome Mask – perimeter mask
Ex post facto, I realized the mask has a sufficiently regular outline to fit a much simpler Beziér spline:
CPAP Dryer – Filter holder – LB splines
That began in LightBurn as a circle fitting the lower part of the mask, converted to a path, then tweaked with the Node Editor to fit the top of the nose and add two nodes to pull the path inward on either side. In the unlikely event I make another bottle stand, the cut will be irrelevantly smoother.
The hole in the clamp comes from insetting that path by the flange width of 4 mm, whereupon the N95 mask pretty much self-centers in the hole:
They’re shortened by 1 mm (from the original length shown in the upper right) to fit 1 mm of mask sandwiched inside a pair of 3 mm acrylic sheets:
CPAP Dryer filter – Rivnut installed
The glowy edge-lit acrylic sheet has 4.8 mm holes for a snug push fit and the white clamp ring has 5.1 mm holes for a loose alignment fit. I drilled out the laser-cut holes for nice smooth sides.
I picked a bottle large enough to also hold the mask’s elbow, so that it would dry in the same stream of clean air. So far, the elbows dry well enough on their own, but the bottle remains a convenient size for fitting the mask on its end.
On the other end of the bottle, the lid gets a hose fitting turned from PVC pipe:
CPAP Dryer – filter hose fitting glue rings
The Official ResMed fittings on the masks and the AirSense 11 machine are about 20 mm long and just over 22 mm OD with a slight taper. The unheated hose has silicone rubber ends fitting very snugly around those cylinders, so I made the pipe fittings 25 mm long and 21 mm OD to ensure a low-effort, but still secure, fit.
The grooves cut into the fitting anchor a generous hot-melt glue blob sealing it to the lid:
CPAP Dryer – filter hose fitting inside
Yes, the foam disk and the hole through the lid were both laser-cut. Making perfect circles in thin organic material with zero drama is wonderful.
The downstream / mask end of the heated ClimateLine hose (left) is physically identical to the unheated hose ends, but the machine / upstream end (right) sports an electrical connector for the spiral heating element and the thermistor (in the white stud protruding into the mask end lumen):
ResMed ClimateLine heated hose ends
Yes, that does look a lot like a naked USB connector, as does the main power connection on the machine, and you can actually slide a Type A USB connector around it. The ResMed manual pointedly notes:
•Do not insert any USB cable into the AirSense 11 device or attempt to plug the AC adaptor into a USB device. This may cause damage to the AirSense 11 device or USB device. •The electrical connector end of the heated air tubing is only compatible with the air outlet at the device end and should not be fitted to the mask.
The four ribs inside the upstream end slide over a 23.5 mm cylinder, which is enough larger than the 22 mm cylinder on the machine to wiggle the not-USB connector into place. Without a connector to worry about, I turned a sleeve adapting the smaller fitting to those ribs:
CPAP Dryer filter – heated hose bushing
It’s 27 mm long to keep the lip of the silicone seal away from the setscrew, 23.5 mm OD to exactly fit between the ribs, and a 21.5 mm ID slip fit over the bottle snout.
The tiny M3 setscrew lives in a hole tapped into the inner tube, because the sleeve is only 1 mm thick:
CPAP Dryer filter – acrylic stand – bushing center drill
The setscrew turns outward into a clearance hole drilled in the sleeve to lock it in place.
The outer PVC pipe in the vise is a simple cylinder fixture bored to match the sleeve, so I could grab it in the lathe chuck / vise without distortion. Just the force from a normal grip squishes the fixture enough to keep the sleeve from turning / moving / getting annoyed.
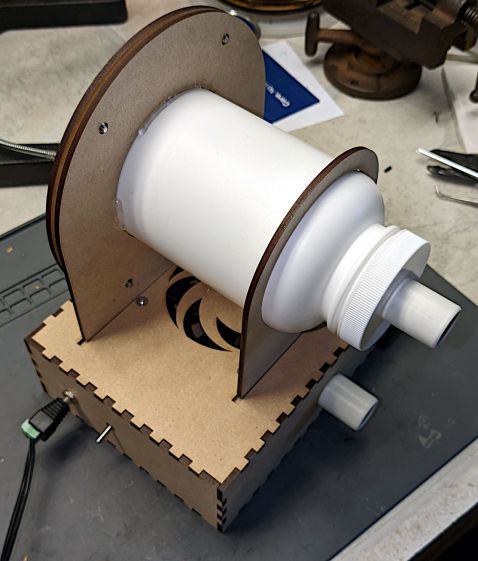
Improving the MDF fan box awaits a few parts, but, being downstream, isn’t on the critical path for drying hoses. The only trick is keeping the bottle inlet upstream of the fan exhaust.
For all the usual reasons, we’re now confronted with the need to dry a freshly washed CPAP hose:
CPAP Dryer – water droplets in hose
Those droplets might not seem like much, but I am reliably informed they produce over-humid air and sprinkle when they migrate into the mask during the night.
Commercial drying machines are available, but seem grossly overqualified and require proprietary foam filters. I wondered if simply pulling air through the hose for a few hours would work:
CPAP Dryer – dried hose
Why, yes, it does.
That test took two hours and another with a different hose required about five, but simply “hanging the hose up to dry” consistently produced poor results after three days, so we count a few hours as a win.
Stipulated: MDF is absolutely the wrong material for an air-handling project, because laser-cut MDF stinketh unto high heaven. This was the first pass using cheap material to see how well, if at all, the idea worked.
The CPAP hose goes between the fittings on the bottle and box, with air entering the bottle through a hole drilled in what was its bottom:
CPAP Dryer – filter bottle cutout
An air filter seemed like a Good Idea™, if only to keep ordinary room fuzz out of the bottle and hose. In this Third Pandemic Year, I could simply pull a least-favorite N95 mask from the stockpile and fit a clamp ring around it:
CPAP Dryer – filter clamp installed
The motivation for pulling air through the tube, rather than pushing it, came when I realized I could build a much cleaner intake structure by starting with an ordinary HDPE bottle than I could possibly assemble from random parts.
So the fan in the box pulls air through the fitting on the side of the box and blows it out the swirl on top:
CPAP Dryer – fan box
The box contains a coaxial power jack, the switch, and an 80 mm fan extricated from the Box o’ MostlyFans. I briefly considered an LED, but it’s obvious when the fan runs. The box and swirl cutting patterns come from the invaluable festi.info.
The two slots give the bottle somewhere to stand while idle. In use, the hose is sufficiently unwieldy to require standing the bottle wherever it wants to be, rather than insisting on putting it anywhere in particular.