The Smell of Molten Projects in the Morning

Ed Nisley's Blog: Shop notes, electronics, firmware, machinery, 3D printing, laser cuttery, and curiosities. Contents: 100% human thinking, 0% AI slop.

Tag: Repairs

If it used to work, it can work again

  • Miniblind Roller Repair

    The rod along the left side of our miniblinds turns a shaft spanning the length of the housing which pulls-and-releases three pairs of cords tilting the blades, with one roller for each pair. The cords loop over, pass under, and are secured to a tab on the roller with metal ferrules, thusly:
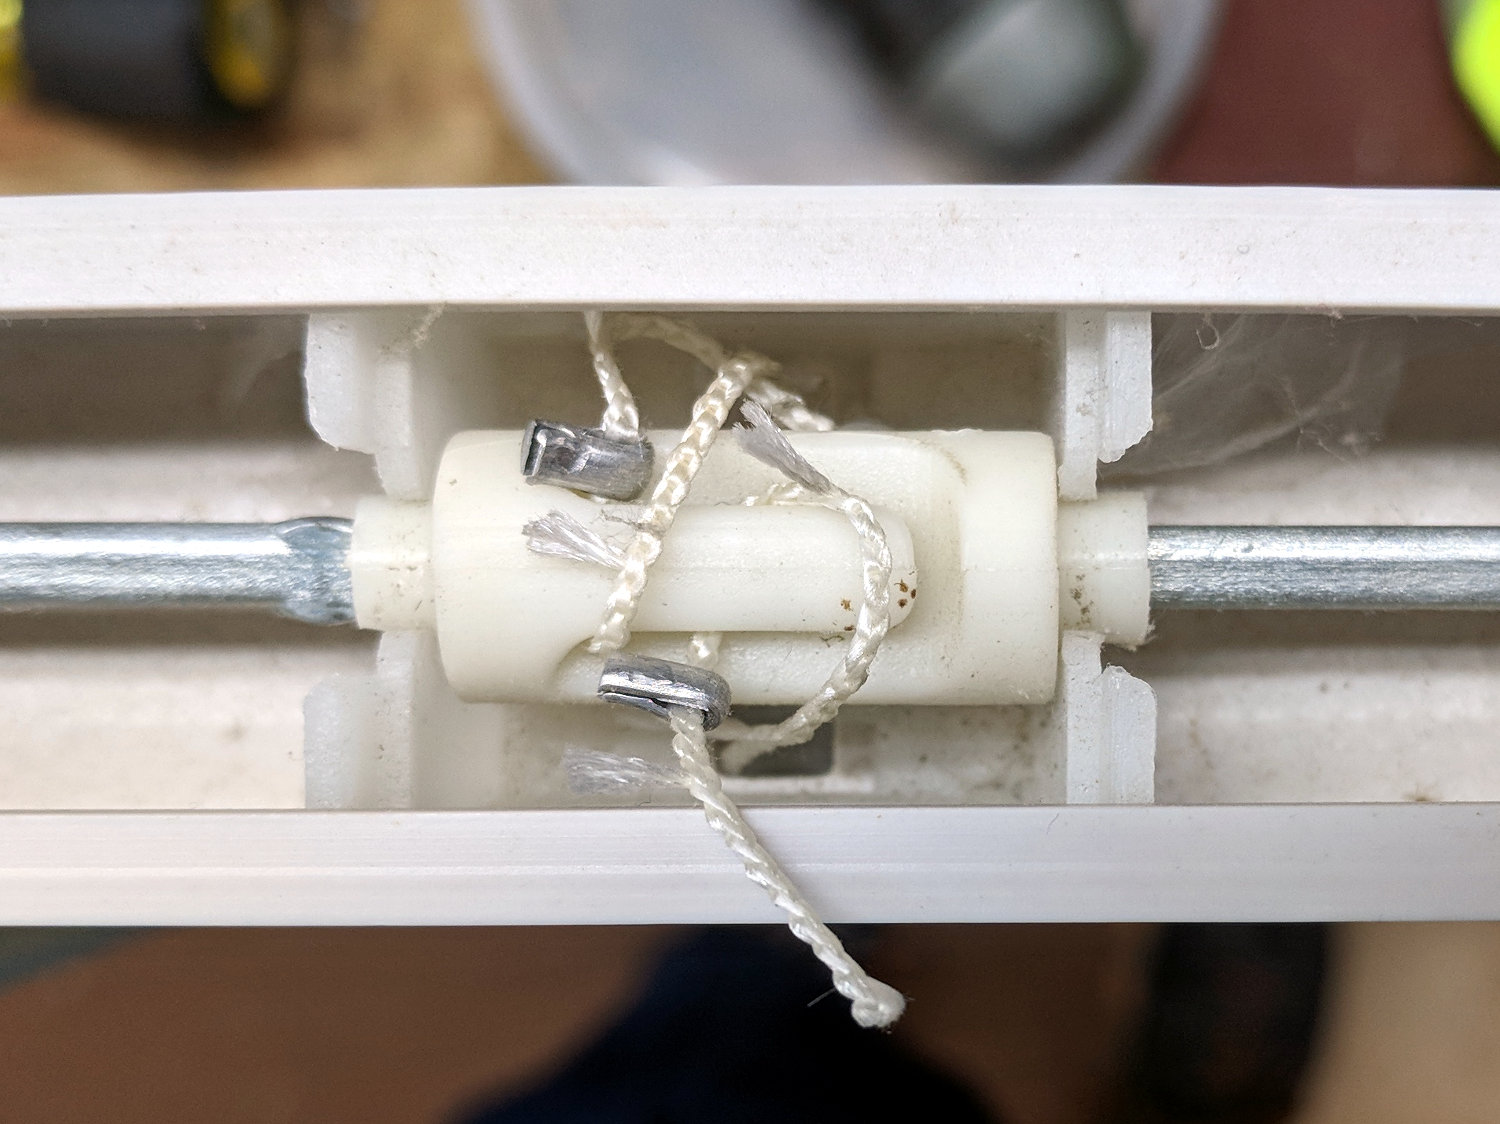
    Miniblind roller - intact
    Miniblind roller – intact

    One day, the middle section of all the blades on one miniblind stopped tilting, prompting this discovery:
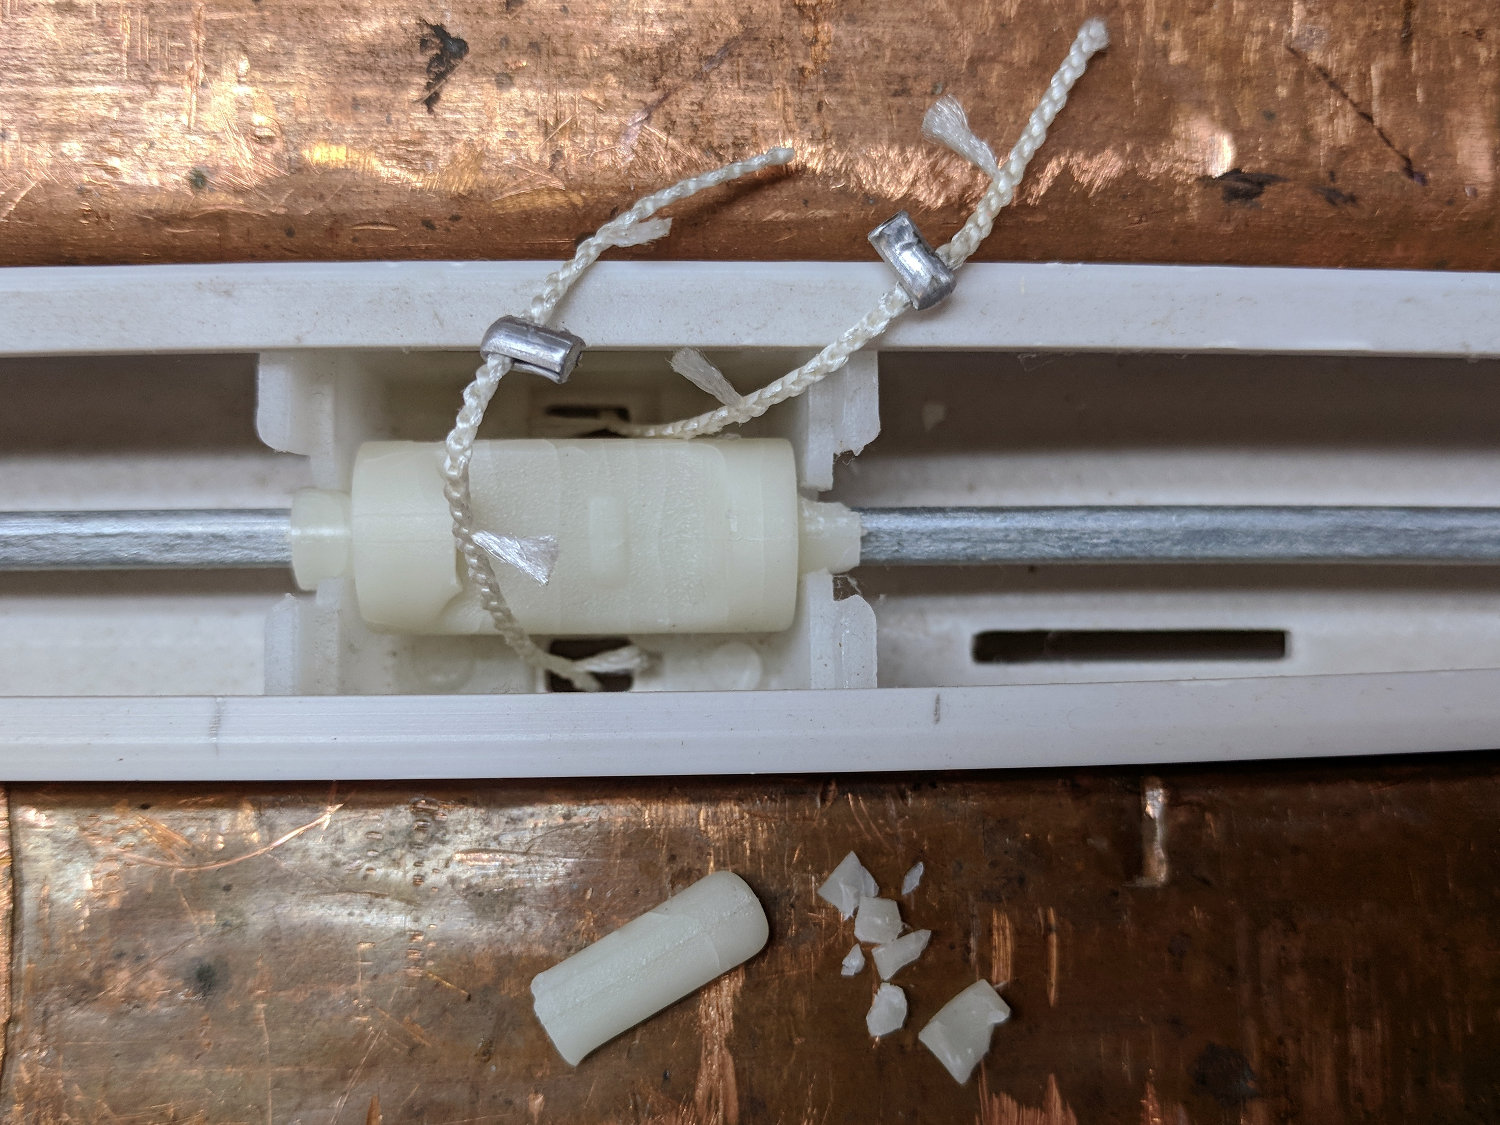
    Miniblind roller - broken tab
    Miniblind roller – broken tab

    The correct solution is, of course, to replace the entire miniblind, but our 1955 window frames don’t match up well with contemporary miniblind hardware and I was unwilling to reinvent that particular wheel for this occasion.

    So I laid the cords in place, put the broken tab atop them, and held the mess together with a strip of the obligatory Kapton tape:
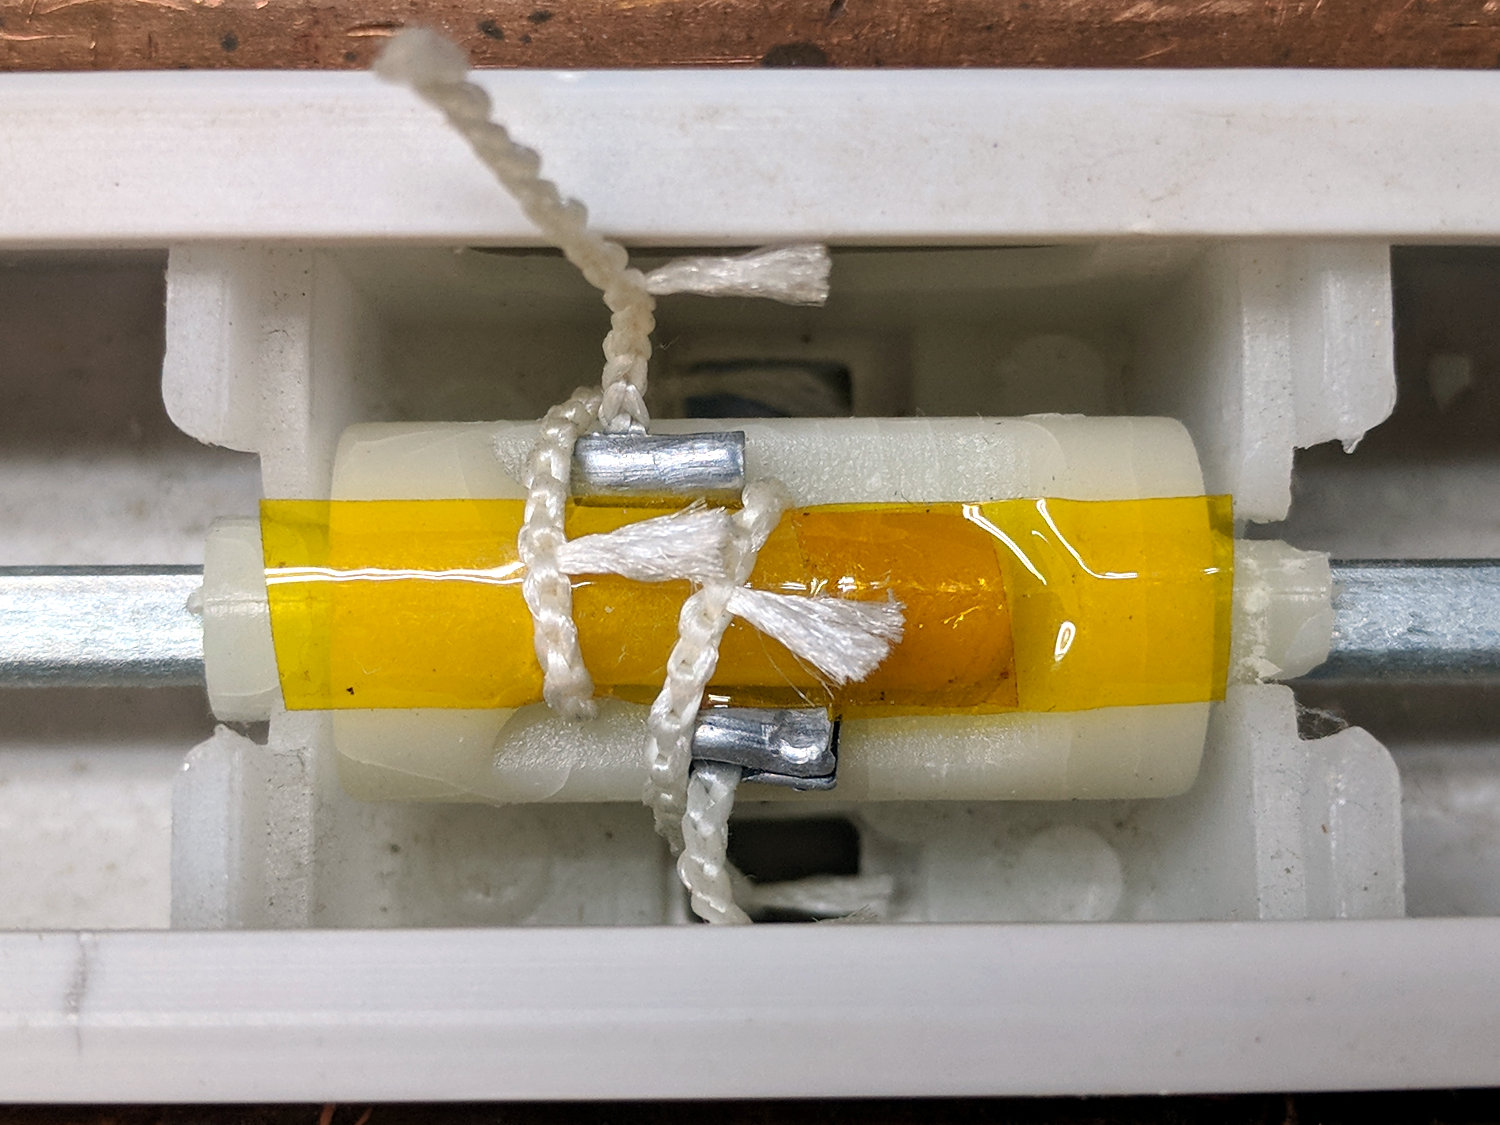
    Miniblind roller - repositioned tab
    Miniblind roller – repositioned tab

    Easing some epoxy under the tab and soaking the cords atop the tape held everything together in approximately the original layout:

    Miniblind roller - epoxy backfill
    Miniblind roller – epoxy backfill

    Two days after I reinstalled the miniblind, a second roller broke and was restored by a similar treatment. While I had the thing on the bench clamped in the bench vise, I preemptively slobbered epoxy on the intact roller in the hope of reinforcing it.

    So far, so good!
  • Refurbished LED Panels

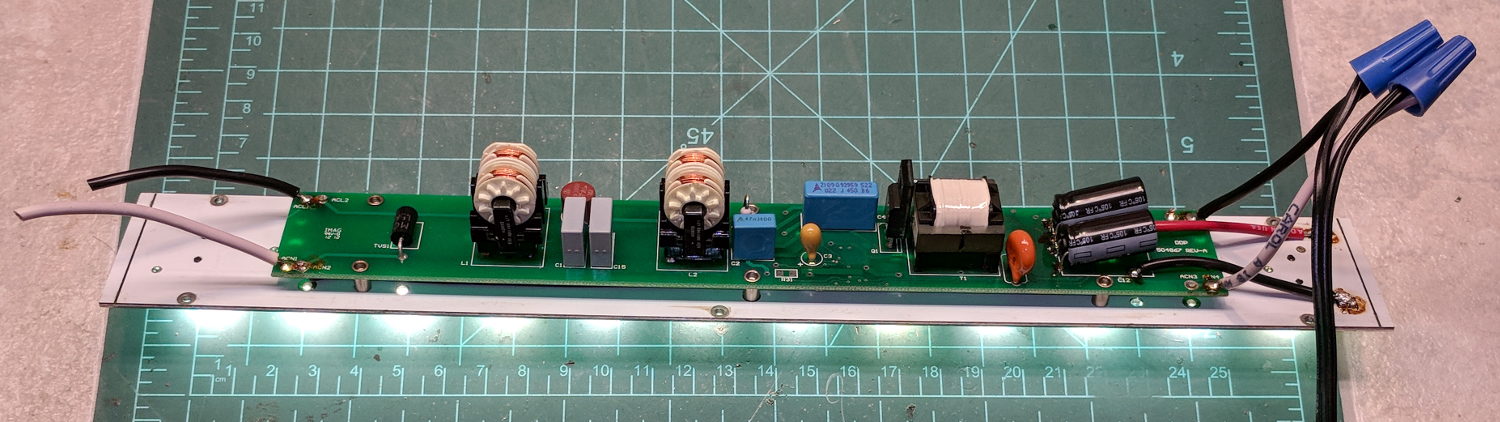
    A recent Squidwrench meeting produced a treasure trove of discarded LED lighting, including a shoplight-style fixture in a narrow, finned aluminum extrusion. It was in “known-bad” condition, so I extracted the four LED panels, connected each one to a widowmaker cord, and determined I had two good ones, a mostly working one sporting some dead LEDs, and a corpse.

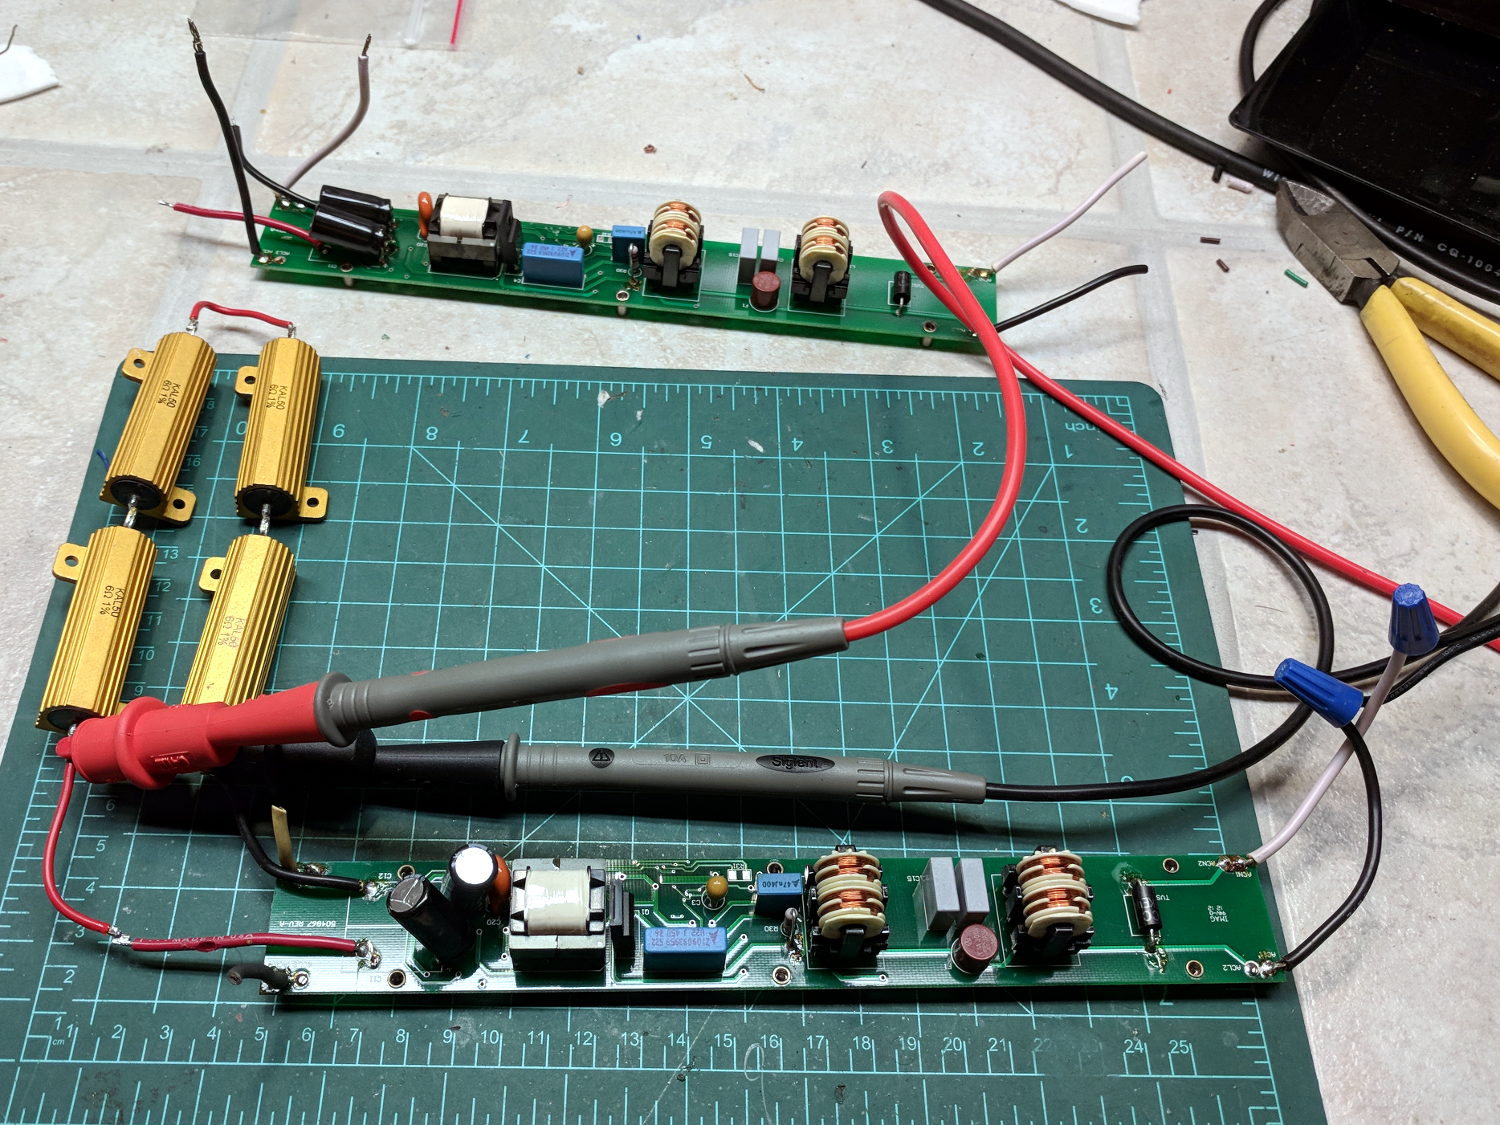
    The working panels showed the power supplies produced about 19 V across two parallel strings of six LEDs, with each string running at 350 mA for a total of 700 mA = 13 W. I wired up a quartet of 6 Ω power resistors to check out the power supplies from the suspect panels:

    LED Panel - power supply test setup
    LED Panel – power supply test setup

    The supply in the background is truly dead. I can’t tell whether it killed the LEDs or the gaggle of failing LEDs dragged it down with them.

    Some multimeter probing revealed enough live LEDs to restore the partially working panel. A rather sweaty interlude at the SqWr hot-air rework station transplanted the good LEDs, whereupon combining it with the live supply gave me a third fully functional panel:

    LED Panel - restored
    LED Panel – restored

    I did the test firing in the Basement Laboratory, because I’m nowhere near crazy enough to deploy a widowmaker line cord on the SqWr Operating Table in public.

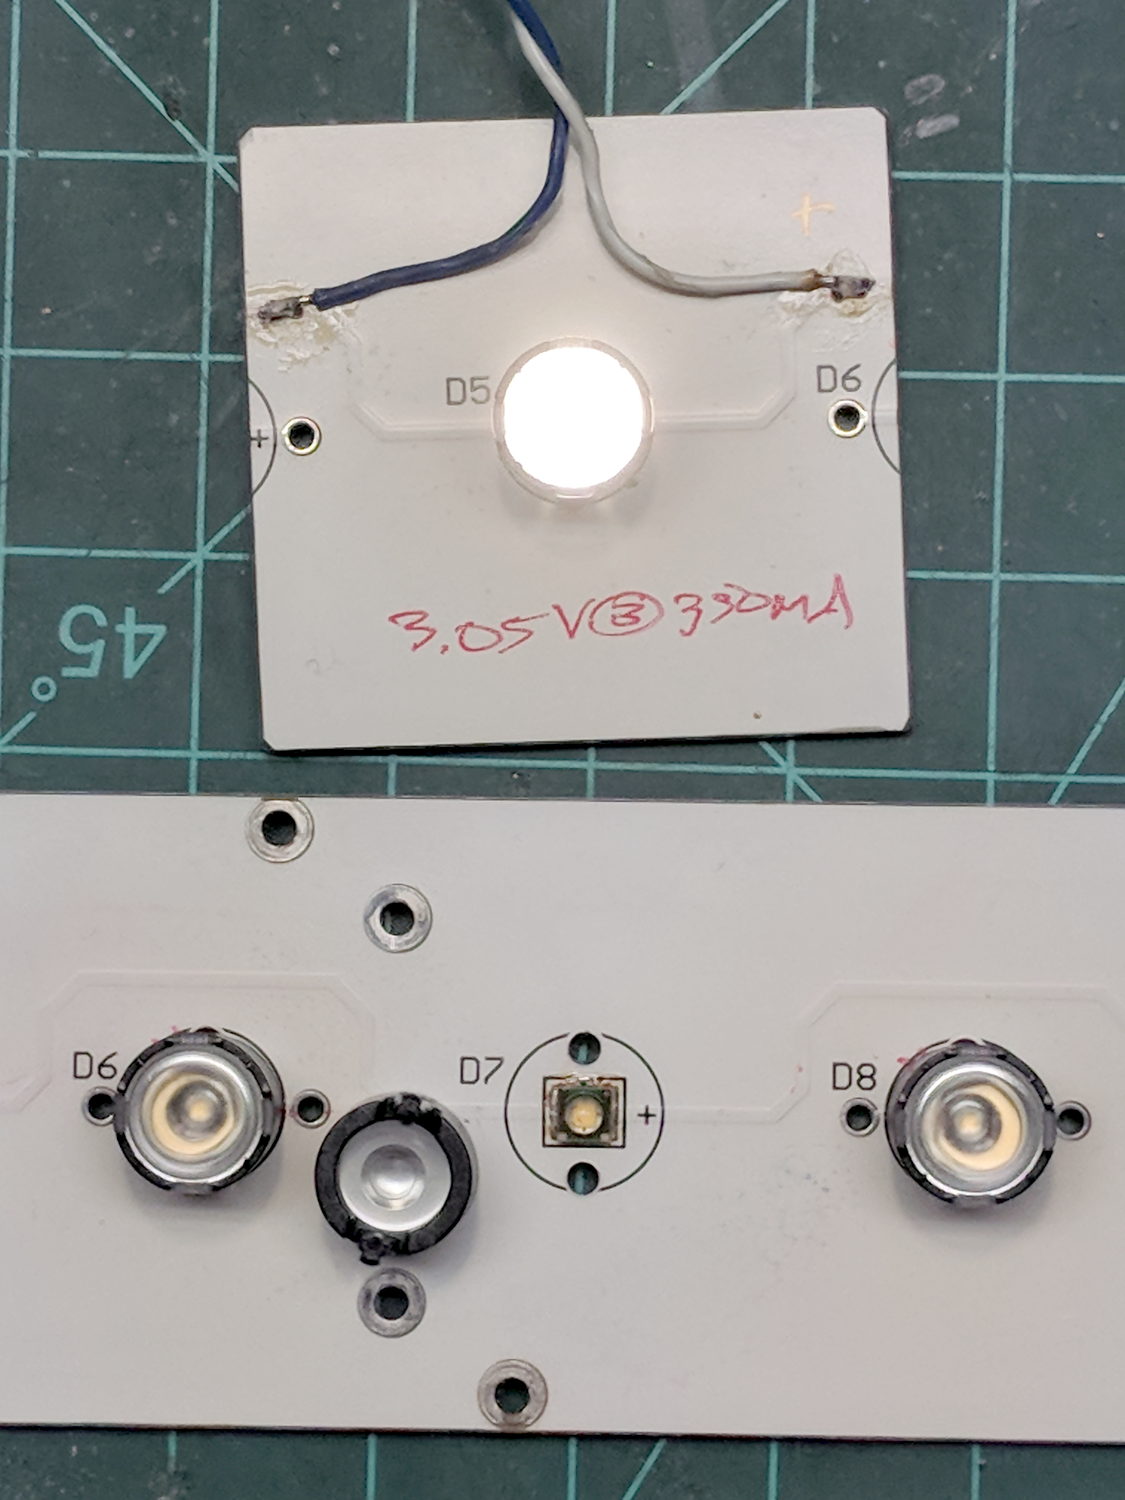
    I bandsawed the last working LED from the gutted donor panel:

    LED Panel - single LED test
    LED Panel – single LED test

    The SMD LEDs mount on traces applied to and electrically insulated from the aluminum sheet, so unsoldering them required way more heat than you (well, I) might expect at first glance. A snap-on condenser lens over each LED concentrates the light into a nice cone, producing a narrow sheet of light from each panel.

    The elaborate aluminum extrusion seems much too heavy for the individual panels, but those open-frame supplies definitely need more than casual protection. Now that LEDs are more common than when these panels came off the assembly line, I should probably replace the supplies with enclosed constant-current drivers and be done with it.

  • GIMP Menu Verbiage

    GIMP seems to set up its menu structure during installation, with sensible, if lengthy, hardcoded addresses and menu names for your remote (network) scanner based on its host and USB port location:

    (proc-def "xsane-net-3a-plex760-2e-local-3a-genesys-3a-libusb-3a-002-3a-002" 2
    … snippage …
    (menu-path "<Image>/File/Create/Acquire/XSane/net:plex760.local:genesys:libusb:002:002")
    

    Should you happen to plug the scanner into a different PC or USB port, perhaps while replacing a failed system, then you must change those hideous strings all by yourself.

    So, for example, plugging the aforementioned scanner into a randomly chosen USB port on a new-to-me Dell Optiplex 9020 showing up as plex9020.local on the network produces this identification string:

    [ed@shiitake ~]$ scanimage -L
    device `net:plex9020.local:genesys:libusb:003:003' is a Canon LiDE 120 flatbed scanner
    

    GIMP’s ~/.gimp-2.8/pluginrc file defines the device address:

    (proc-def "xscanimage-net-3a-plex9020-2e-local-3a-genesys-3a-libusb-3a-003-3a-003" 2
    

    The -3a- string seem to be an escape sequence for the colon symbol separating parts of the address. Why we need so many different escape sequence standards mmm escapes me at the moment.

    The menu-path string defines the text appearing in the GIMP UI, so you can use a somewhat more readable generic name:

    (menu-path "<Image>/File/Create/Acquire/xscanimage/Plex9020-scanner")
    

    The ~/.gimp-2.8/menurc file contains GIMP’s keyboard accelerators, which (apparently) must match the revised proc-def strings:

    ; (gtk_accel_path "<Actions>/plug-in/xscanimage-net-3a-plex9020-2e-local-3a-genesys-3a-libusb-3a-003-3a-003" "")
    

    A keyboard accelerator for the scanner wouldn’t save any appreciable amount of time or effort, so (I think) the semicolon marks it as Disabled in the UI.

    It is remarkably easy to make a one-character typo while doing this, particularly if you’re using sed to change All. The. Strings. at once.

    There is, AFAICT, no documentation, which almost certainly means I don’t know where to look.

  • Amazon Product Puzzlement

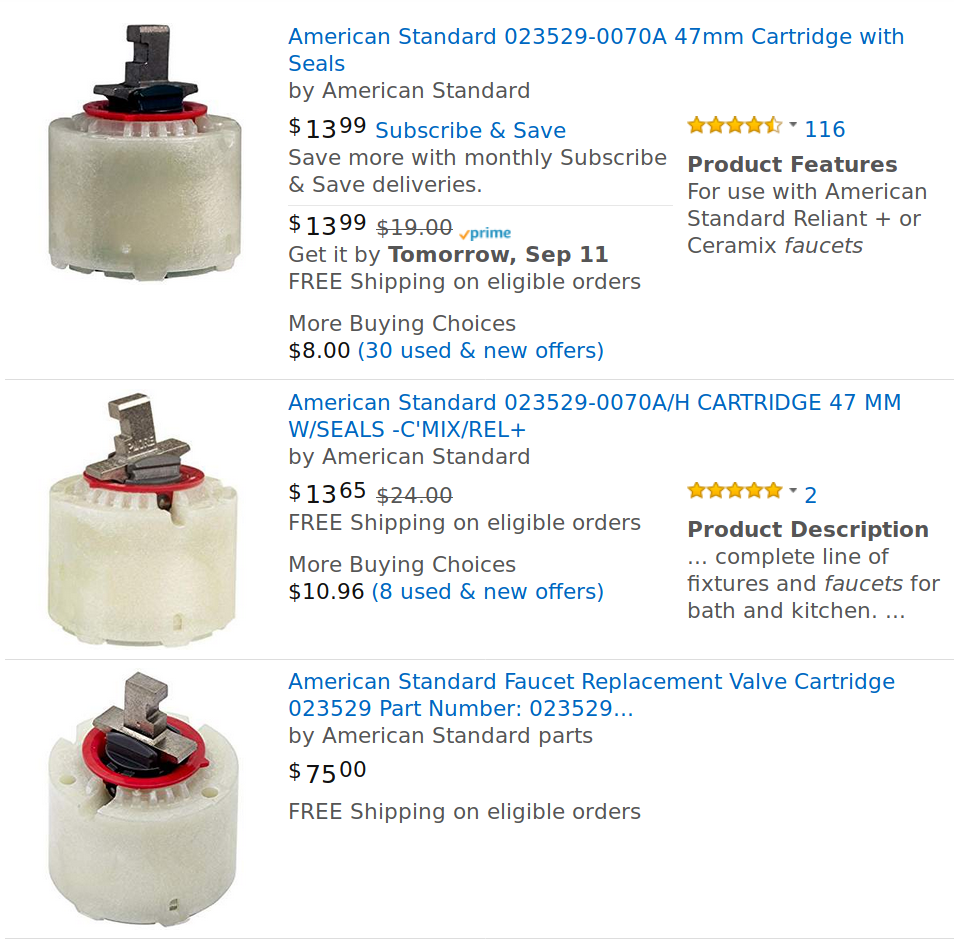
    Amazon’s top three offerings for American Standard 023529-0070A:

    Amazon - American Standard Faucet Valves
    Amazon – American Standard Faucet Valves

    They’re all “by American Standard”, but you must check each item to discover where it’s coming from:

    • “Ships from and sold by Amazon.com”
    • “Ships from and sold by Gatzies“
    • “Ships from and sold by moneyworldstore“

    Although I’ve done my fair share of repairs to this faucet, I don’t need a cartridge every month and, in any event, signing up for Subscribe & Save doesn’t promise much in the way of savings.

    The second listing has the best price by a small margin. I’m content to pay half a buck more to have Amazon handle the entire transaction, rather than deal with some random Amazon Marketplace vendor.

    The third listing seems to be a bizarre algorithmically priced corner case, a no-stock placeholder, or a money-laundering scheme. Judging from the pricing of other “moneyworldstore” offerings, their business model doesn’t include retail sales.

    So much weirdness from one simple item …

  • LibreOffice 5.3+ vs. Adobe Type 1 Fonts

    LibreOffice from 5.3 onward (Xubuntu 18.04 uses LO 6.0) no longer supports Adobe Type 1 fonts, which comes as a surprise to those of us who actually bought fonts, back in the day, and have been using them ever since. Apparently, Windows dropped Type 1 font support some time ago.

    Based on some hints, I set up the Adobe Font Development Kit for OpenType. It’s a Python thing, preferably running in a virtual environment to avoid screwing up the rest of one’s system with bizarre dependencies. It seems one (“I”) must not update pip using pip after installing python-pip using apt-get; recovering from that mess was good for another hour of flailing.

    The default AFDKO installation spat out an error message about ufolib (I am not making this up) being at 2.1.1, instead of the required 2.3.1. In for a penny, in for a pound, I updated ADFKO with the “prerelease” option:

    pip install -U afdko --pre
    

    Which fetched ufolib 2.3.1, apparently from wherever Python keeps its prerelease stash. I have NFC what’s going on with any of this.

    An Adobe blog post on the AFDKO tx tool suggested it can convert Type 1 fonts to CFF (a.k.a. Adobe Type 2) fonts and some poking around suggested CFF also figures in OTF fonts.

    tx -cff -n -N -A awb_____.pfb
    --- Filename: awb_____.pfb
    --- FontName: ACaslon-Bold
    tx: --- awb_____.pfb
    tx: (cfw) unhinted
    tx: (cfw) unhinted
    tx: (cfw) unhinted
    tx: (cfw) unhinted
    tx: (cfw) unhinted
    tx: (cfw) There are 222 additional reports of 'unhinted'.
    

    The -A option replaces the bizarre Adobe 8.3 file names with actual font information:

    awrg____.pfb ⇒ ACaslon-Bold.cff
    awbi____.pfb ⇒ ACaslon-BoldItalic.cff
    awi_____.pfb ⇒ ACaslon-Italic.cff
    awrg____.pfb ⇒ ACaslon-Regular.cff
    awsb____.pfb ⇒ ACaslon-Semibold.cff
    awsbi___.pfb ⇒ ACaslon-SemiboldItalic.cff
    

    Regrettably, CFF files don’t actually work as fonts, at least as far as LibreOffice 6.0 (or whatever it uses as a font engine) is concerned.

    Although it’s possible to convert fonts locally with fontforge, doing it one-by-one is tedious and the learning curve for its Python scripting feature seems rather steep. I fired the most vital fonts at Convertio, an online converter running fontforge in the background, got a matching pile of OTF fonts, and installed them in /usr/share/fonts/custom/type1 to indicate their heritage.

    Whereupon LO rammed into a problem I’d had before. The solution this time required sorting the various Caslon and American Typewriter fonts into different “font families” and forcing the TTF names to match their new families. The difference between Medium and Regular seems to have Gone Away.

    I should just use Comic Sans and be done with it …

  • Fireball Island Figures

    A cousin asked if my 3D printer could replace some figures gone missing from their old Fireball Island game board, a classic apparently coming out in a new & improved version.

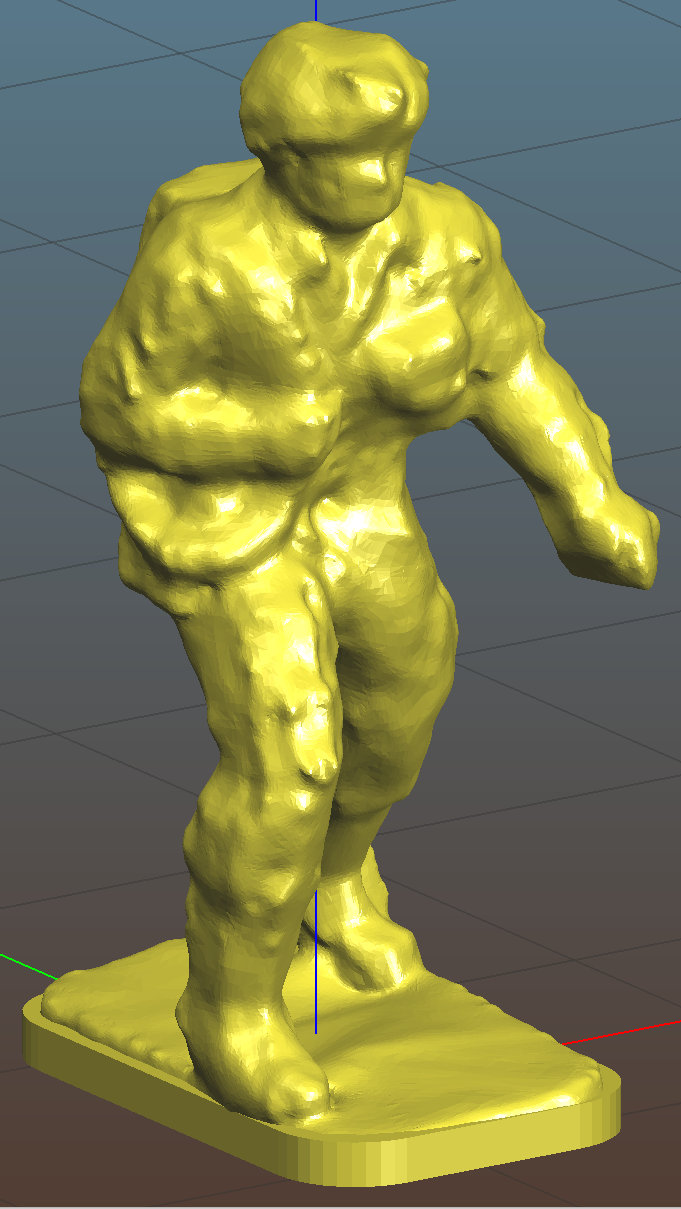
    Fortunately, solid models exist on Thingiverse:

    Fireball Island figure - Thingiverse 536867
    Fireball Island figure – Thingiverse 536867

    Unfortunately, the left arm requires support, which Slic3r supplies with great exuberance:

    Fireball Island figure - Slic3r support
    Fireball Island figure – Slic3r support

    The vast tower on the figure’s right side (our left) seemed completely unnecessary, not to mention I have no enthusiasm for the peril inherent in chopping away so much plastic, so I replaced it with a simple in-model pillar:

    Figure Support Mods
    Figure Support Mods

    The pillar leans from an adhesion-enhancing lily pad and ends one layer below the left hand, with all dimensions and angles chosen on the fly to make the answer come out right.

    Works like a champ:

    Fireball Island Figures - orange - on platform
    Fireball Island Figures – orange – on platform

    The dark band down the middle comes from the Pixel’s shutter.

    They emerged with some PETG hair, the removal of which I left as an end-user experience.

    I mailed a small box containing figures printed in my (limited!) palette of four colors, some spares Just In Case™, and a few QC rejects showing the necessity of lily pads.

    Game on!

    The OpenSCAD source code as a GitHub Gist:

    // Adding support under Fireball Island figure arm
    import("/mnt/bulkdata/Project Files/Thing-O-Matic/Fireball Island/Fireball Island figure – 100k.stl", convexity=5);
    translate([6.5,-4.0,0]) {
    intersection(){
    translate([-10/2,-10/2,0])
    cube([10,10,11.6],center=false);
    rotate([0,-5.0,0])
    rotate(180/6)
    cylinder(d=4.0,h=30,$fn=6,center=true);
    }
    translate([8/4,0,0])
    rotate(180/6)
    cylinder(d=8,h=0.2,$fn=6);
    }
  • Tektronix AM503 Current Probe Amplifier: Failed Electrolytic Capacitor

    The same Tektronix AM503 current probe amp with the slightly disconnected JFET developed a nasty 120 Hz hum, which can mean only one thing:

    Tek AM503 - corroded capacitor
    Tek AM503 – corroded capacitor

    Dunno how I missed that while I had the cover off, but there it is. For future reference it’s C165, 47 µF 50 V, with an 8709 date code.

    This being a PCB made back in the old days, likely with self-adhesive tape strips, the component pads inside ground and power pours lack thermal isolation decorations.

    The solder joints on the bottom side looks better than these, honest:

    Tek AM503 - replaced capacitor
    Tek AM503 – replaced capacitor

    The new cap is 56 µF 50 F, which seems Close Enough.

    The other caps have reasonable ESRs, but I must lay in a stock of high-voltage ‘lytics, as the “new” one is definitely old enough to know better, too.

    Now that I check, the amp still produces a very low amplitude 2 MHz sine wave on its 1 mA/div and 2 mA/div settings, suggesting Something Is Not Right™ in the front end, but it works well enough to let me defer that fix until later.