The Smell of Molten Projects in the Morning

Ed Nisley's Blog: Shop notes, electronics, firmware, machinery, 3D printing, laser cuttery, and curiosities. Contents: 100% human thinking, 0% AI slop.

Tag: Repairs

If it used to work, it can work again

  • Cheapnified Brother TZ Label Cartridge

    Cheapnified Brother TZ Label Cartridge

    After four years, I finally had occasion to use the blue label cartridge, only to have the tape refuse to feed. The mess on the tongue sticking out shows the result after I forcibly pulled the tape from the cartridge:

    Cheapnified Brother Label Cartridge - exterior
    Cheapnified Brother Label Cartridge – exterior

    The proximate cause was a fold in the imaging tape takeup path causing the driven spool to stop turning:

    Cheapnified Brother Label Cartridge - folded dye tape
    Cheapnified Brother Label Cartridge – folded dye tape

    Some delicate unspooling, unfolding, and respooling put things back in order.

    However, with the cartridge opened on the desk, it became obvious this was the cheapnified version:
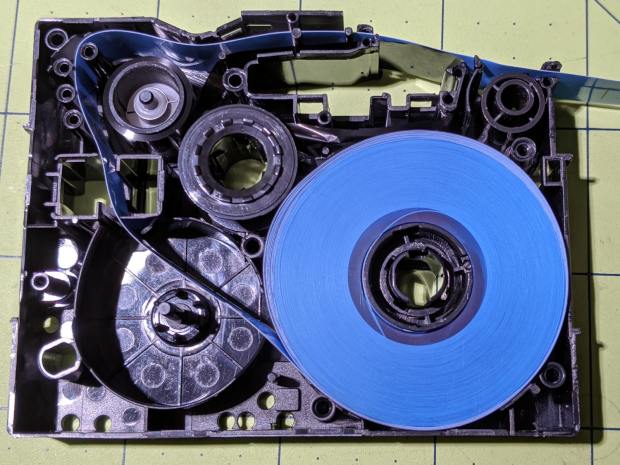
    Cheapnified Brother Label Cartridge - overview
    Cheapnified Brother Label Cartridge – overview

    Compare with a genuine Brother cartridge:

    Brother P-Touch TZ tape cartridge - detail
    Brother P-Touch TZ tape cartridge – detail

    In the genuine cartridge, the base tape (with the sticky side and the colored side) feeds from the lower right directly into the assembly pressure roller. The transparent cover tape feeds from the spool in the lower left, up around the imaging tape supply spool, has the image fused to it, and is then pressed against the base tape on the assembly roller.

    Update: Per david’s comment, the cartridges are even more complex than I thought! The printer has sense pins matching a group of cartridge holes to determine (at least) the tape size & orientation. See the pix added below.

    Despite using the same cartridge body, the cheapnified tape path is entirely different. The base tape now feeds from the spool in the lower right through what should be the cover tape supply reel, around the imaging film supply spool, has the image fused directly to it, then passes out through the assembly pressure roller.

    The cover tape is completely missing!

    It turns out the cheapnified cartridges don’t bother with lamination. Instead, the printhead presses the imaging film against the top of the base tape, leaving the black image exposed to the elements. The assembly roller does nothing, apart from pulling the base tape through the cartridge.

    Now that I know what to look for, the visible difference is the orientation of the base tape. A cartridge with the correct innards feeds the base tape with the colored side + image facing away from the long side of the cartridge. A cheapnified cartridge has the color + image facing the long side, with the major benefit of making the advertising look more appealing:

    Fake Brother TZ cartridge - Amazon image
    Fake Brother TZ cartridge – Amazon image

    A genuine Brother cartridge would print the image on the bottom of the tape in that picture, so you’d see the blank side of the tape in that picture.

    The “Amazon Marketplace” being what it is, I assume any pictures will not, in general, have much in common with what you actually receive, but at least I now know which ones to reject out of hand.

    Update: The PT-1090 label printer has cartridge sensing pins:

    Brother PT-1090 Labelmaker - sense pins
    Brother PT-1090 Labelmaker – sense pins

    And the cartridges have corresponding holes, although the printer doesn’t sense all of them:
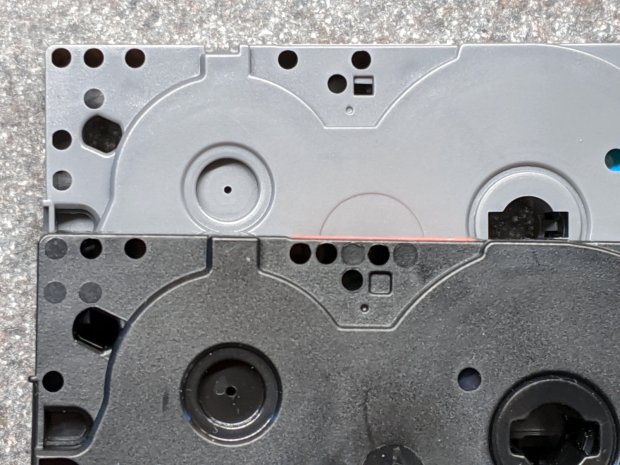
    Brother PT-1090 Labelmaker - cartridge ID holes
    Brother PT-1090 Labelmaker – cartridge ID holes

    Despite that, cheapnified cartridges are still cheapnified.

    I learn something new every day around here! Thanks!
  • Backyard Utility Pole: Anchor Clamp Hardware

    Backyard Utility Pole: Anchor Clamp Hardware

    This also appeared while clearing the forsythia:

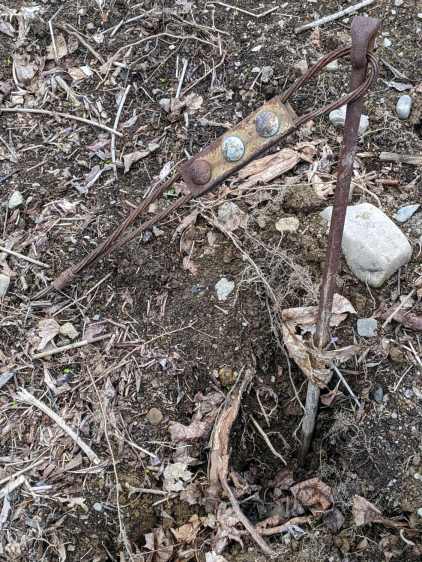
    Pole anchor - abandoned in place
    Pole anchor – abandoned in place

    It’s the guy line anchor for the fallen utility pole, abandoned in place when the crew installed the new pole.

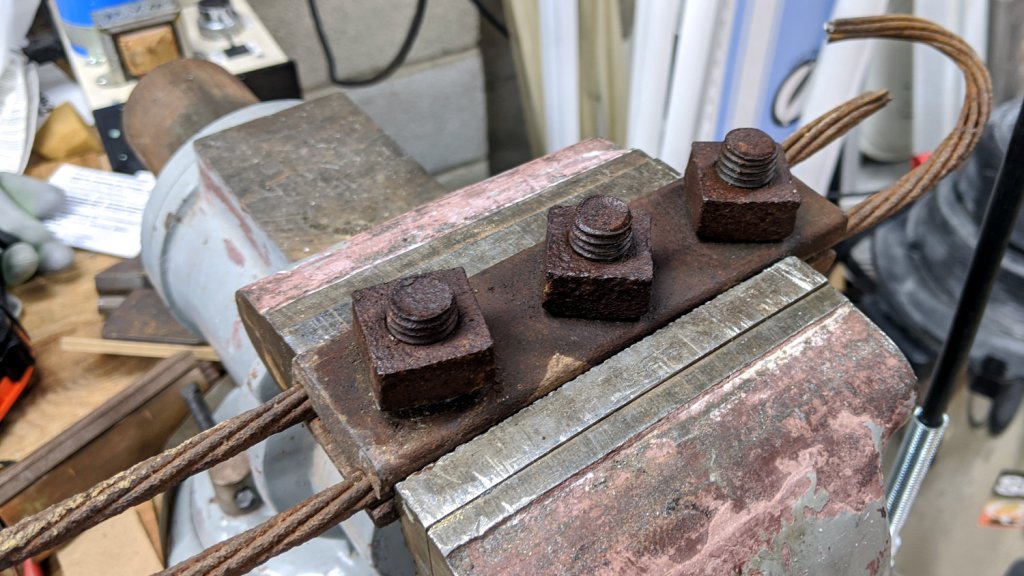
    The rod turned freely in its underground anchor, but the nut is apparently frozen to the rod. I deployed the bolt cutter on the cable and hauled the carcass into the Basement Shop:

    Pole anchor - nut loosening
    Pole anchor – nut loosening

    Steeping the nuts with Kroil for a few hours relaxed them enough to submit to gentle suasion, whereupon the cable sproinged as the last nut released the clamping force:

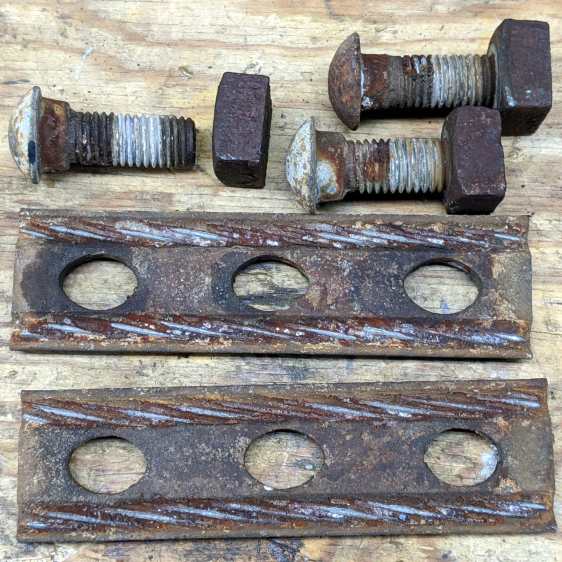
    Pole anchor - hardware
    Pole anchor – hardware

    As far as I can tell, the clamp hardware dates back to the pole’s original installation in 1940 and is in fine, if not pristine, shape.

    The bolt shanks have an oval section matching the holes in the plate, so the bolts don’t turn and the crew needs only one wrench. They don’t make ’em like they used to!

    I have no idea what I’ll do with these things, but they’re entirely too nice for the steel recycling bucket.

  • Tour Easy: Baofeng Radio PTT Cable Glitch

    Tour Easy: Baofeng Radio PTT Cable Glitch

    The signal from the Baofeng UV-5R HT tucked behind the seat of my Tour Easy became exceedingly choppy on recent rides. Here’s an earlier version to give you an idea of the situation:

    Radio in seat wedge pack in bottle holder
    Radio in seat wedge pack in bottle holder

    Of course, it worked perfectly in the garage and only failed while on a ride. The clue turned out to be having it fail more on rough roads and crappy scab patches (courtesy of NSYDOT) than on relatively smooth asphalt.

    That led me to wiggle of All The Cables while crouched beside the bike in the garage, listening to another HT, and watching the transmit LED. After about five minutes of this, I found wiggling the 3.5 mm connector between the cable from the PTT button on the handlebar and the radio blinked the transmit LED: ah-HA!

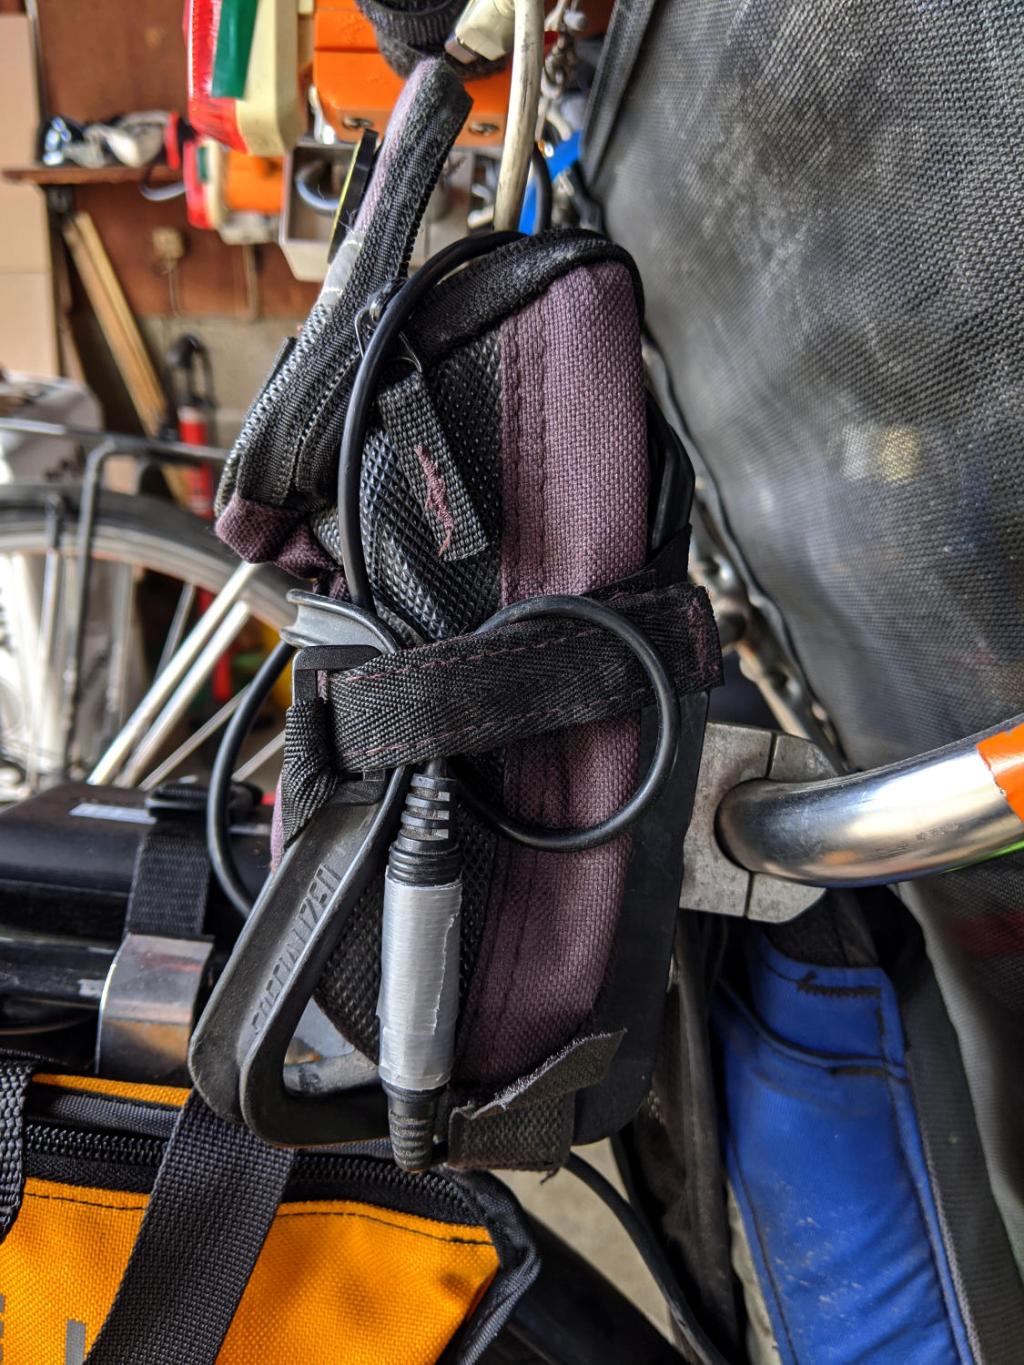
    The connector had worked itself loose from the straps holding the radio pack in place, pulled some slack in the cable, and was bouncing around in mid-air. A wrap of duct tape now holds the connector halves together, the upper loop passes around the Velco-ish strap, and the lower loop (from the PTT button) goes through the bottom of the repurposed bottle holder:

    Tour Easy - Baofeng PTT cable connection
    Tour Easy – Baofeng PTT cable connection

    No trouble on the next two rides, so we’ll call it fixed.

    Protip: it’s always the connector.

  • Cheese Slicer Re-wiring

    Cheese Slicer Re-wiring

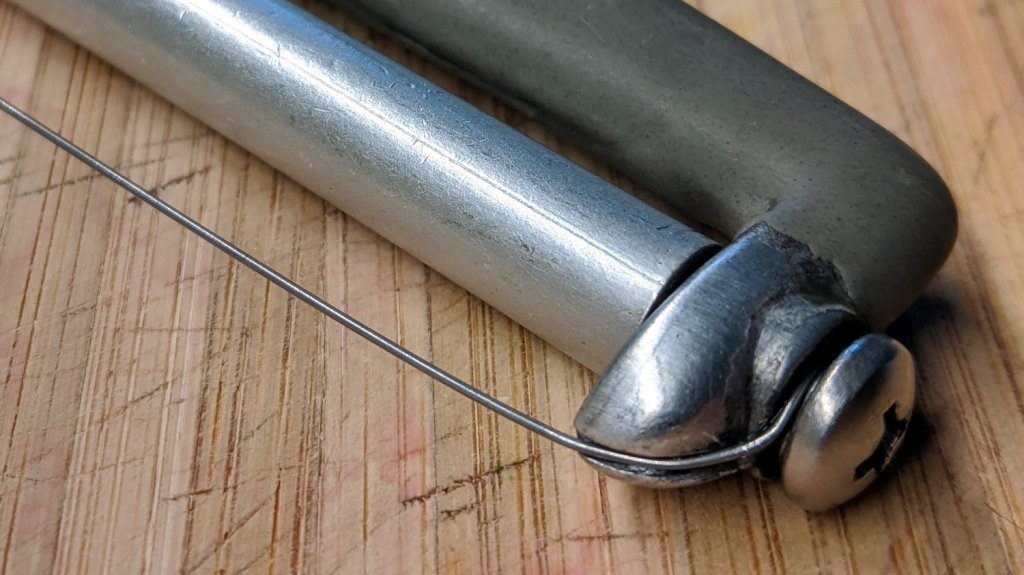
    This happens occasionally:

    Cheese slicer - snapped wire
    Cheese slicer – snapped wire

    Repairing it with a length of 20 mil = 0.5 mm music wire didn’t take long:

    Cheese slicer - new wire
    Cheese slicer – new wire

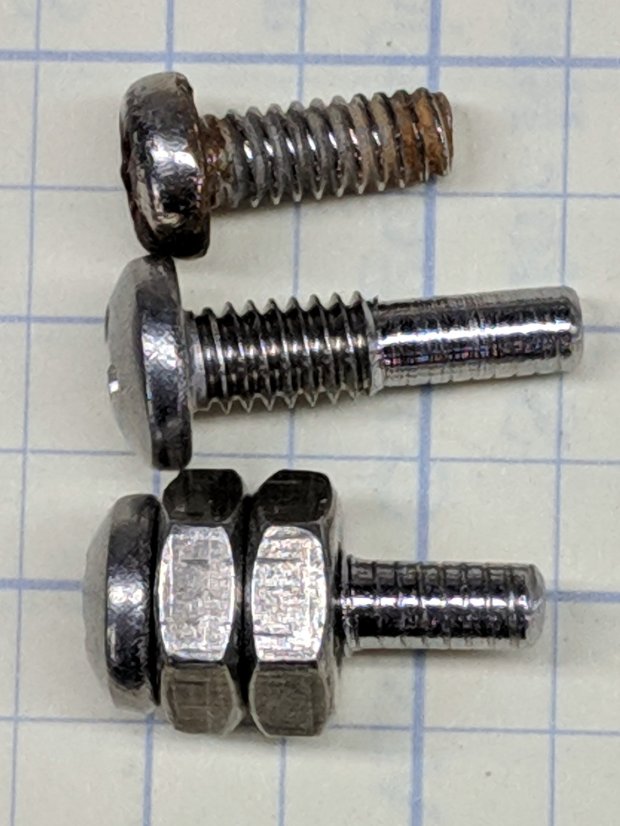
    What did take a while was removing one of the screws, turning off another millimeter of thread, and sticking it back in again. The new wire is slightly thinner, stacks up just slightly less under the screw head (maybe I used two turns instead of three?), and let the thread stick into the Delrin bushing I put inside the aluminum roller.

    Imagine the middle screw with a slightly longer smooth end and you’ve got the idea:

    Cheese slicer - screw shafts
    Cheese slicer – screw shafts

    That was easy …

    It’s worth noting the JB Weld epoxy coating remains in as-applied condition after well over a year.

  • Round Soaker Hose Splint

    Round Soaker Hose Splint

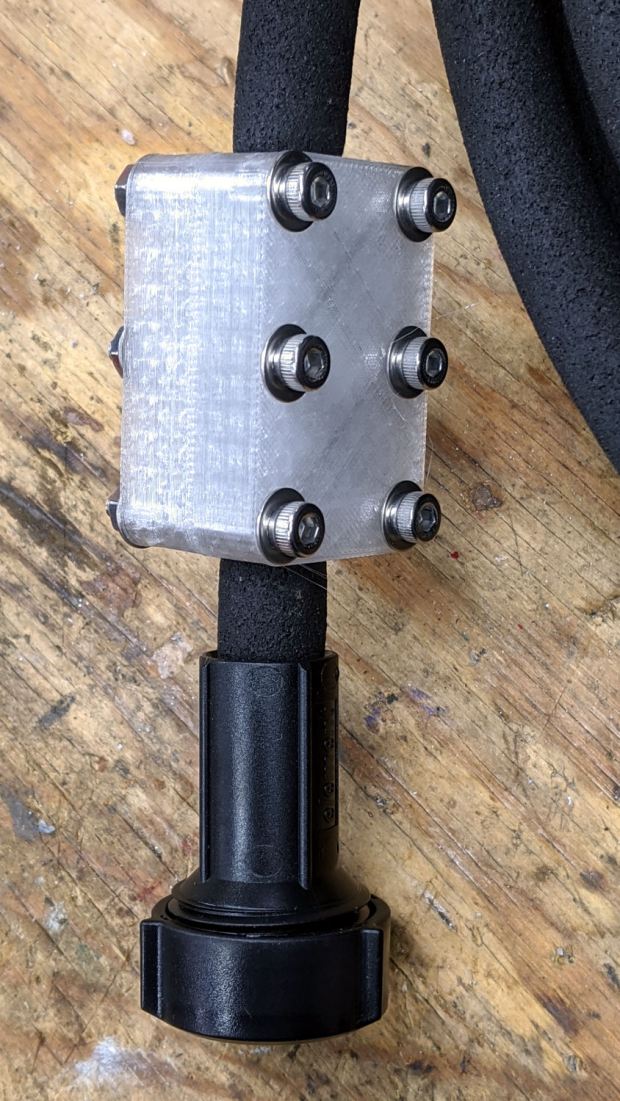
    One of two new round rubber soaker hoses arrived with a slight crimp, enough to suggest it would crumble at an inopportune moment. Rather than return the hose for something that’s not an obvious failure, I clamped the crimp:

    Round Soaker Hose Splice - top
    Round Soaker Hose Splice – top

    Unlike the clamps for the punctured flat soaker hoses, this one doesn’t need to withstand much pressure and hold back a major leak, so I made the pieces a bit thicker and dispensed with the aluminum backing plates:

    Round Soaker Hose Splice - bottom
    Round Soaker Hose Splice – bottom

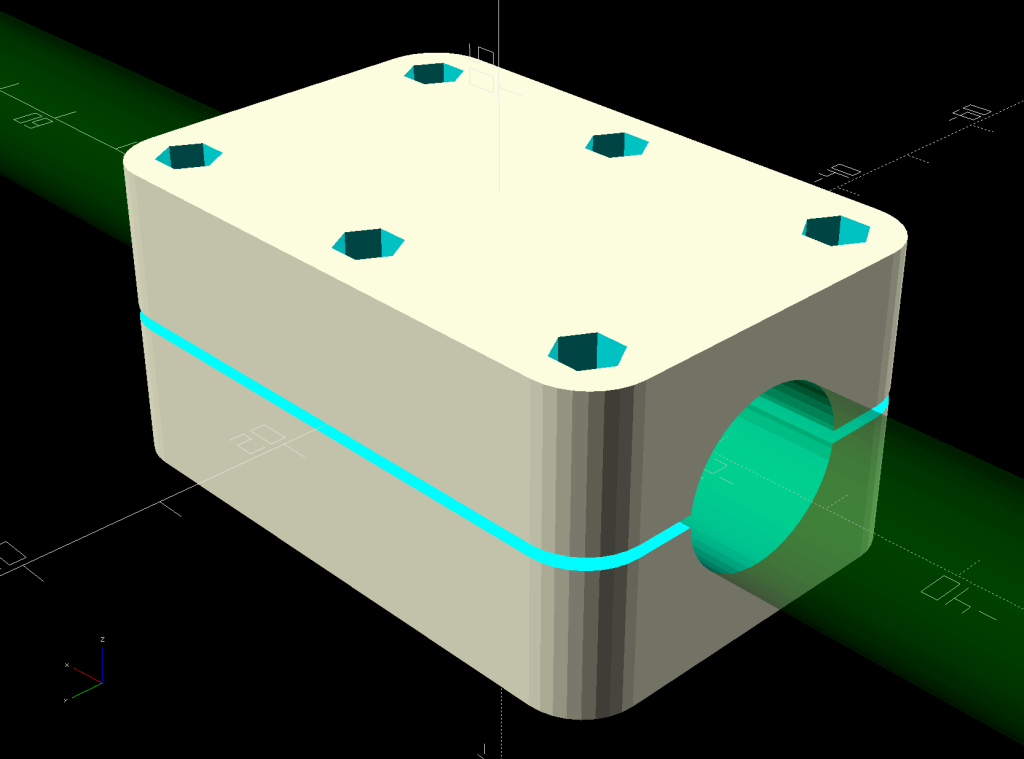
    The solid model is basically the same as for the flat hoses, with a slightly oval cylinder replacing the three channels:

    Round Soaker Hose Splice - OpenSCAD model
    Round Soaker Hose Splice – OpenSCAD model

    The OpenSCAD source code as a GitHub Gist:

    // Rubber Soaker Hose Splice
    // Ed Nisley KE4ZNU 2020-03
    Layout = "Build"; // [Hose,Block,Show,Build]
    TestFit = false; // true to build test fit slice from center
    //- Extrusion parameters must match reality!
    /* [Hidden] */
    ThreadThick = 0.25;
    ThreadWidth = 0.40;
    HoleWindage = 0.2;
    Protrusion = 0.1; // make holes end cleanly
    inch = 25.4;
    function IntegerMultiple(Size,Unit) = Unit * ceil(Size / Unit);
    ID = 0;
    OD = 1;
    LENGTH = 2;
    //———-
    // Dimensions
    // Hose lies along X axis
    Hose = [200,14.5,13.6]; // X = longer than anything else
    // 8-32 stainless screws
    Screw = [4.1,8.0,3.0]; // OD = head LENGTH = head thickness
    Washer = [4.4,9.5,1.0];
    Nut = [4.1,9.7,6.0];
    Block = [50.0,Hose.y + 2*Washer[OD],4.0 + 1.5*Hose.z]; // overall splice block size
    echo(str("Block: ",Block));
    Kerf = 1.0; // cut through middle to apply compression
    CornerRadius = Washer[OD]/2;
    NumScrews = 3; // screws along each side of cable
    ScrewOC = [(Block.x – 2*CornerRadius) / (NumScrews – 1),
    Block.y – 2*CornerRadius,
    2*Block.z // ensure complete holes
    ];
    echo(str("Screw OC: x=",ScrewOC.x," y=",ScrewOC.y));
    //———————-
    // Useful routines
    module PolyCyl(Dia,Height,ForceSides=0) { // based on nophead's polyholes
    Sides = (ForceSides != 0) ? ForceSides : (ceil(Dia) + 2);
    FixDia = Dia / cos(180/Sides);
    cylinder(d=(FixDia + HoleWindage),h=Height,$fn=Sides);
    }
    // Hose shape
    // This includes magic numbers measured from reality
    module HoseProfile() {
    NumSides = 12*4;
    rotate([0,-90,0])
    translate([0,0,-Hose.x/2])
    resize([Hose.z,Hose.y,0])
    cylinder(d=Hose.z,h=Hose.x,$fn=NumSides);
    }
    // Outside shape of splice Block
    // Z centered on hose rim circles, not overall thickness through center ridge
    module SpliceBlock() {
    difference() {
    hull()
    for (i=[-1,1], j=[-1,1]) // rounded block
    translate([i*(Block.x/2 – CornerRadius),j*(Block.y/2 – CornerRadius),-Block.z/2])
    cylinder(r=CornerRadius,h=Block.z,$fn=4*8);
    for (i = [0:NumScrews – 1], j=[-1,1]) // screw holes
    translate([-(Block.x/2 – CornerRadius) + i*ScrewOC.x,
    j*ScrewOC.y/2,
    -(Block.z/2 + Protrusion)])
    PolyCyl(Screw[ID],Block.z + 2*Protrusion,6);
    cube([2*Block.x,2*Block.y,Kerf],center=true); // slice through center
    }
    }
    // Splice block less hose
    module ShapedBlock() {
    difference() {
    SpliceBlock();
    HoseProfile();
    }
    }
    //———-
    // Build them
    if (Layout == "Hose")
    HoseProfile();
    if (Layout == "Block")
    SpliceBlock();
    if (Layout == "Show") {
    difference() {
    SpliceBlock();
    HoseProfile();
    }
    color("Green",0.25)
    HoseProfile();
    }
    if (Layout == "Build") {
    SliceOffset = TestFit && !NumScrews%2 ? ScrewOC.x/2 : 0;
    intersection() {
    translate([SliceOffset,0,Block.z/4])
    if (TestFit)
    cube([ScrewOC.x/2,4*Block.y,Block.z/2],center=true);
    else
    cube([4*Block.x,4*Block.y,Block.z/2],center=true);
    union() {
    translate([0,0.6*Block.y,Block.z/2])
    ShapedBlock();
    translate([0,-0.6*Block.y,Block.z/2])
    rotate([0,180,0])
    ShapedBlock();
    }
    }
    }

  • bCNC Rounding vs. G-Code Arcs: GRBL Error 33

    bCNC Rounding vs. G-Code Arcs: GRBL Error 33

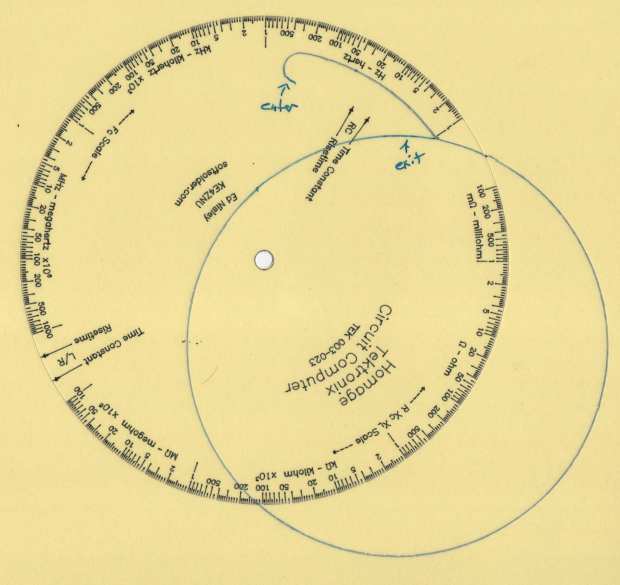
    While cutting the top deck of the Pickett-flavored Tek Circuit Computer on the MPCNC, this happened:

    Tek CC - top deck - failed arcs
    Tek CC – top deck – failed arcs

    I traced the off-center circle with a marker to make it more visible, as it’s the drag knife cut that should have been the exit move after completing the window.

    Huh. It never did that before …

    The bCNC plot looked fine, but the Terminal log showed three Error 33 reports:

    Failed arc command - bCNC screen - terminal and plot
    Failed arc command – bCNC screen – terminal and plot

    The GRBL doc has this to say about Error 33:

    The motion command has an invalid target. G2, G3, and G38.2 generates this error, if the arc is impossible to generate or if the probe target is the current position.

    The error messages don’t occur immediately after the failing G2/G3 command, because bCNC sends enough commands to keep the GRBL serial input buffer topped off. After GRBL sends the error message, it continues chewing its way through the buffer and, when bCNC notices the first error, it stops sending more G-Code commands and shudders to a stop.

    The great thing about Free Software is that when it breaks, you have all the pieces. Looking into the GRBL source code provides a definition of Error 33:

    // [G2/3 Offset-Mode Errors]: No axis words and/or offsets in selected plane. The radius to the current
    //   point and the radius to the target point differs more than 0.002mm (EMC def. 0.5mm OR 0.005mm and 0.1% radius).

    Which doesn’t quite match the code, but it’s close enough:

    // Compute difference between current location and target radii for final error-checks.
                float delta_r = fabs(target_r-gc_block.values.r);
                if (delta_r > 0.005) {
                  if (delta_r > 0.5) { FAIL(STATUS_GCODE_INVALID_TARGET); } // [Arc definition error] > 0.5mm
                  if (delta_r > (0.001*gc_block.values.r)) { FAIL(STATUS_GCODE_INVALID_TARGET); } // [Arc definition error] > 0.005mm AND 0.1% radius
                }

    I’ve drag-knifed maybe a dozen top decks with no problem, so figuring out what broke took a while.

    The key turned out to be in the Terminal log, where all coordinates in the G-Code commands had, at most, two decimal places. The GCMC program producing the G-Code emits three decimal places, so bCNC rounded off a digit before squirting commands to GRBL.

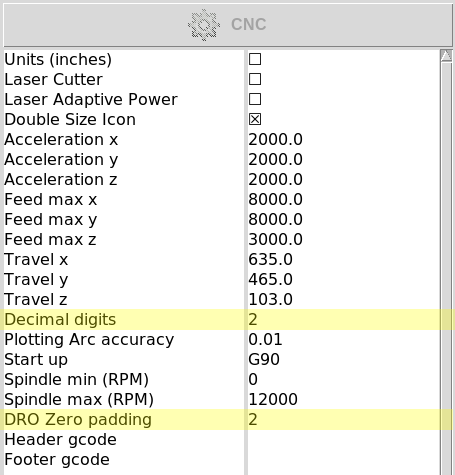
    After more searching, it seems I’d told bCNC to do exactly that:

    bCNC Config - Round 2 digits - highlighted
    bCNC Config – Round 2 digits – highlighted

    Perhaps I’d mistakenly set “Decimal digits” instead of “DRO Zero padding” when I reduced the DRO resolution from three decimals to two? It’s set to “2” in the CNC 3018XL configuration, so this seems like a typical one-off brain fade.

    GRBL doesn’t execute invalid commands, so the tool position remains at the end of the window’s outer perimeter while the next two arc commands fail, because their center offsets produced completely invalid radii.

    The three failed arc commands should have cut the right end of the window, the inner side, and the left end, but left the tool position unchanged. The final arc command should have withdrawn the blade along the outer side of the window, but became a complete circle, with the commanded end point equal to the leftover starting point at the same radius from the deck center.

    The same G-Code file fails consistently with Decimal digits = 2 and runs perfectly with Decimal digits = 3, so at least I know a good fix.

    Protip: Keep your hands away from moving machinery, because you never know what might happen!

    This seems sufficiently obscure to merit becoming a Digital Machinist column. More analysis is in order …

  • Craftsman Hedge Trimmer: Laying on of Hands Repair

    Craftsman Hedge Trimmer: Laying on of Hands Repair

    It being the season for hacking down decorative grasses, our ancient Craftsman Hedge Trimmer woke up dead, a decade after I fixed its switch and predicted it’d be good for another decade.

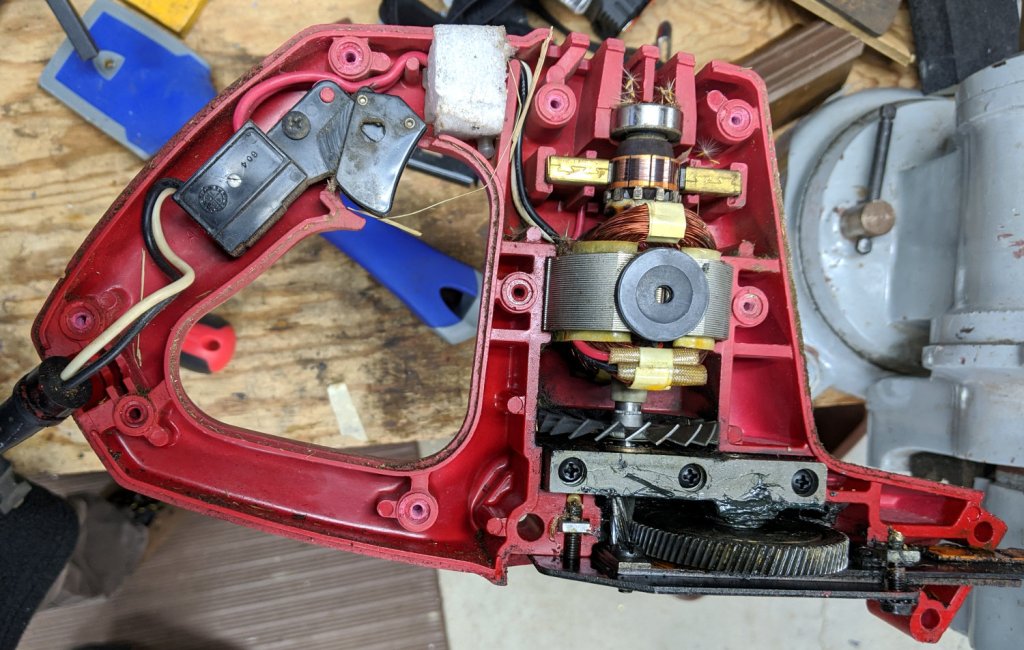
    After verifying the failure isn’t in the wall outlet or the extension cord, haul it to the Basement Laboratory Repair Wing, clamp the blade in the bench vise, remove a myriad screws, and pop the top:

    Craftsman Hedge Trimmer - innards exposed
    Craftsman Hedge Trimmer – innards exposed

    I should have removed the screw in the extreme lower right corner and loosened the similar screw at the rear of the bottom plate; they’re two of the three machine screws engaging nuts embedded in the shell. Everything is greasy enough to let the nuts slide right out of the plastic and no harm was done, but that need not be so.

    After poking around a bit and finding nothing obvious, I checked the resistance across the plug: open-circuit with the switch OFF and nearly shorted with the switch ON.

    Huh.

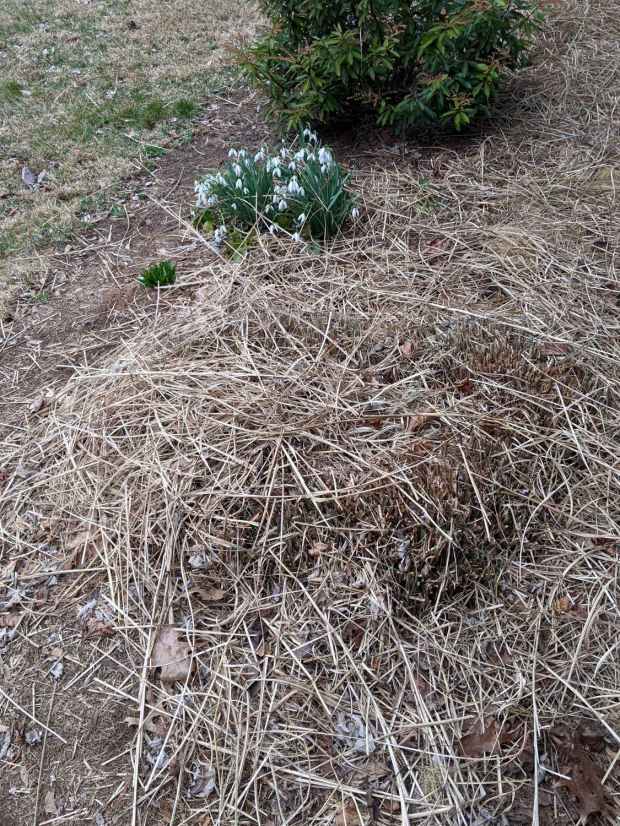
    Put the case back together with just enough screws to prevent heartache & confusion, unclamp the blade, plug into the bench outlet, discover it works fine again, reinstall the rest of the screws, and continue the mission:

    Decorative grass bunches - early spring clearcut
    Decorative grass bunches – early spring clearcut

    We moved the Praying Mantis oothecae to nearby bushes for science!