One of the cold shoe mounts I made for the photo lamps cracked:
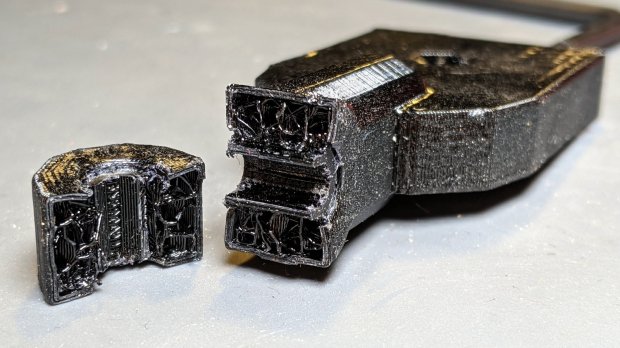
It’s done in PETG with my more-or-less standard two perimeter threads and 15% 3D honeycomb infill, which is Good Enough™ for most of my parts. In this case, there’s obviously not nearly enough plastic in there!
Redoing it with three perimeters and 50% infill should improve the situation, even though it looks identical on the outside:

I didn’t replace the other mount. If it breaks, it’ll get the same 50% infill as this one. If this one breaks, I’ll try 75%.
An easy fix!

Comments
11 responses to “Photo Lamp Mount: Moah Plastic!”
Another perimeter might be more effective than more infill – CNC Kitchen (on YouTube) did some studies with strength testing.
Two perimeters suffices for most situations, three produces just over a millimeter of solid plastic, and neither can withstand a dropped bike.
In this case, the clamp screw puts an absurd amount of pressure on the disk and probably crushed the perimeters inward before the whole thing fractured, so more infill may resist the crushing.
Seeing as how the thing endured eight months of abuse, 150% perimeter thickness combined with three times the infill should toughen it up pretty well. It’s not as if I’m applying finite element modeling to the problem … [grin]
Do you really need all that stickout and all the joints? It seems like you could delete the paddle part of your print, remove the middle hinge contraption and mount the lamp directly to your part.
You could also make the ring part that broke with substantially bigger diameter. That would give it more leverage and it seems you can spare the space.
The lamp needs an offset from the arm pivot to accommodate its base screw and the bizarre hinge thing fit a standard camera shoe, soooo … the paddle happened.
It puts plenty of torque on that poor pivot and the all-around adjustability doesn’t buy much.
How about this: should it break again, I’ll (try to) rebuild it along your notion.
Thanks for the nudge …
I’d probably try to mill it out of aluminum, but I know you don’t like me putting ideas like that in your head :)
I swear I didn’t see your milling comment below before posting :)
Ya gotta get up pretty early to get out of bed around here!
I’ll relate today’s horror story after the dust settles …
Layer orientation appears to have been a factor, here. Print it flat so the strands run the same direction of the longest dimension. My son’s science fair projects says that will make a substantial difference in strength. Though, maybe the hole will just split at the top, then.
I printed it standing on the flat end of the shoe slot with the pivot disk on the top and the threads oriented in the worst possible direction.
Vedran’s suggestion should provide a better orientation, perhaps with the disk flat on the platform and the rest of the mount sticking out to the sides.
Or I could machine it from aluminum and move on … [sigh]
Have you seen the gradient infill? https://hackaday.com/2020/01/20/gradient-infill-puts-more-plastic-where-you-want-it/
News to me!
I think a few more perimeter threads would get you most of the way to the goal with a whole lot less fuss-and-bother, though, so that’s what I’d try first. Well, with more infill, too.