Ed Nisley's Blog: Shop notes, electronics, firmware, machinery, 3D printing, laser cuttery, and curiosities. Contents: 100% human thinking, 0% AI slop.
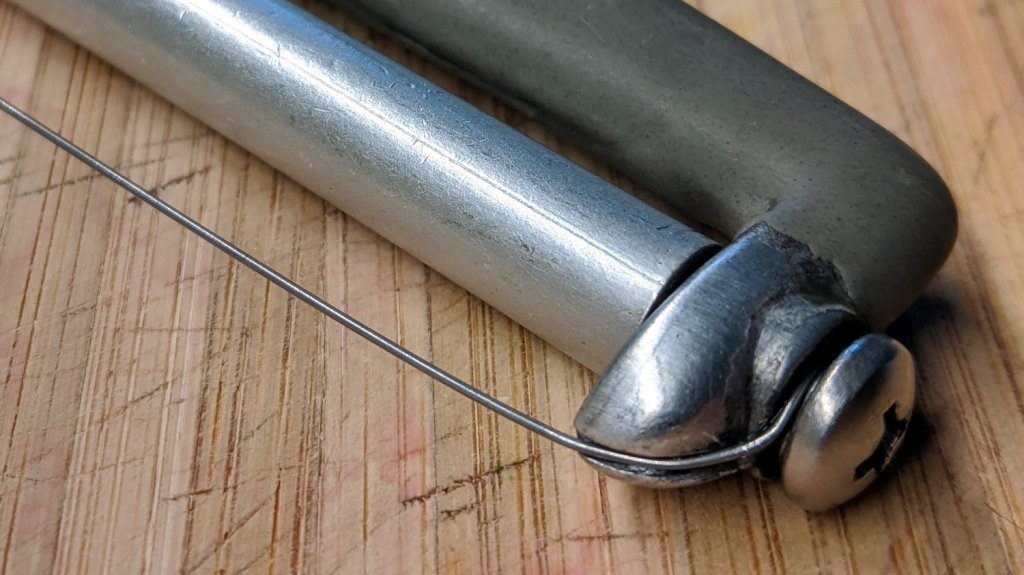
Repairing it with a length of 20 mil = 0.5 mm music wire didn’t take long:
Cheese slicer – new wire
What did take a while was removing one of the screws, turning off another millimeter of thread, and sticking it back in again. The new wire is slightly thinner, stacks up just slightly less under the screw head (maybe I used two turns instead of three?), and let the thread stick into the Delrin bushing I put inside the aluminum roller.
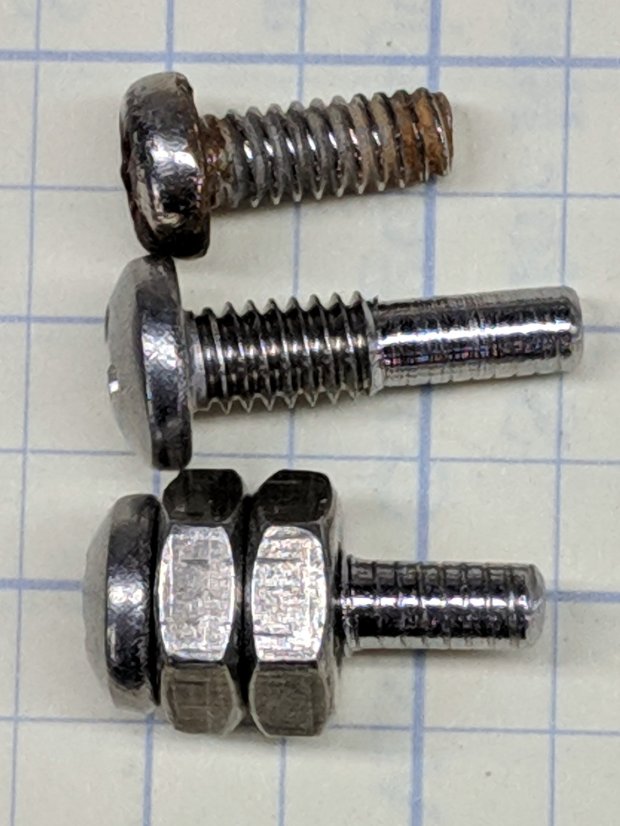
Imagine the middle screw with a slightly longer smooth end and you’ve got the idea:
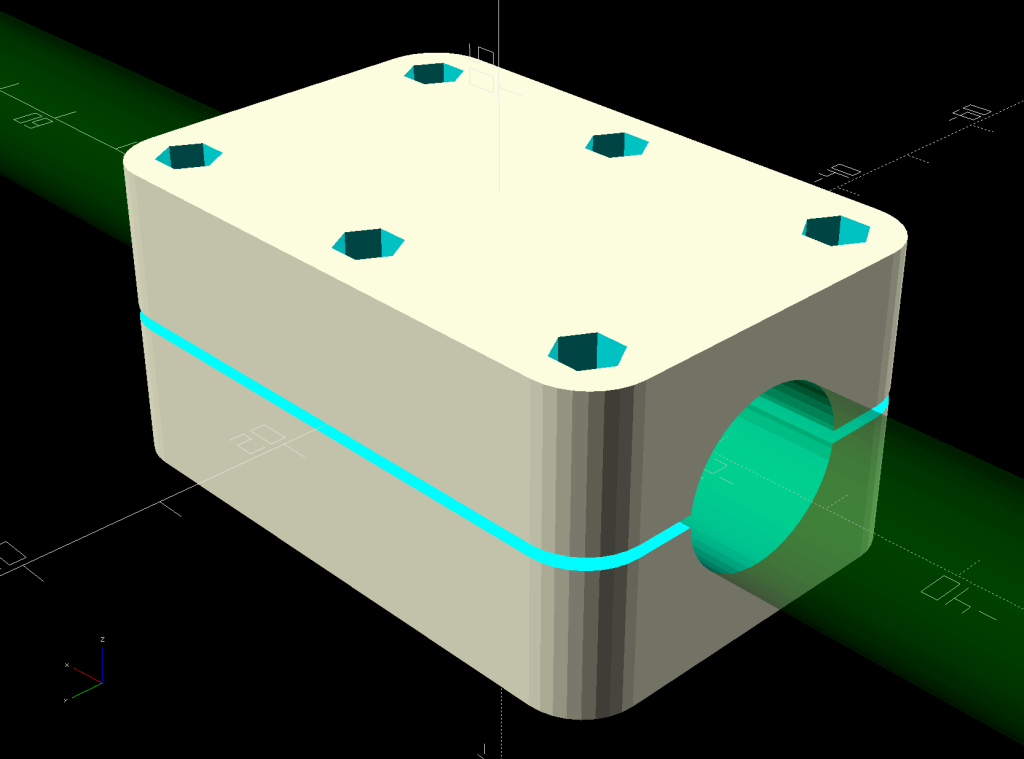
One of two new round rubber soaker hoses arrived with a slight crimp, enough to suggest it would crumble at an inopportune moment. Rather than return the hose for something that’s not an obvious failure, I clamped the crimp:
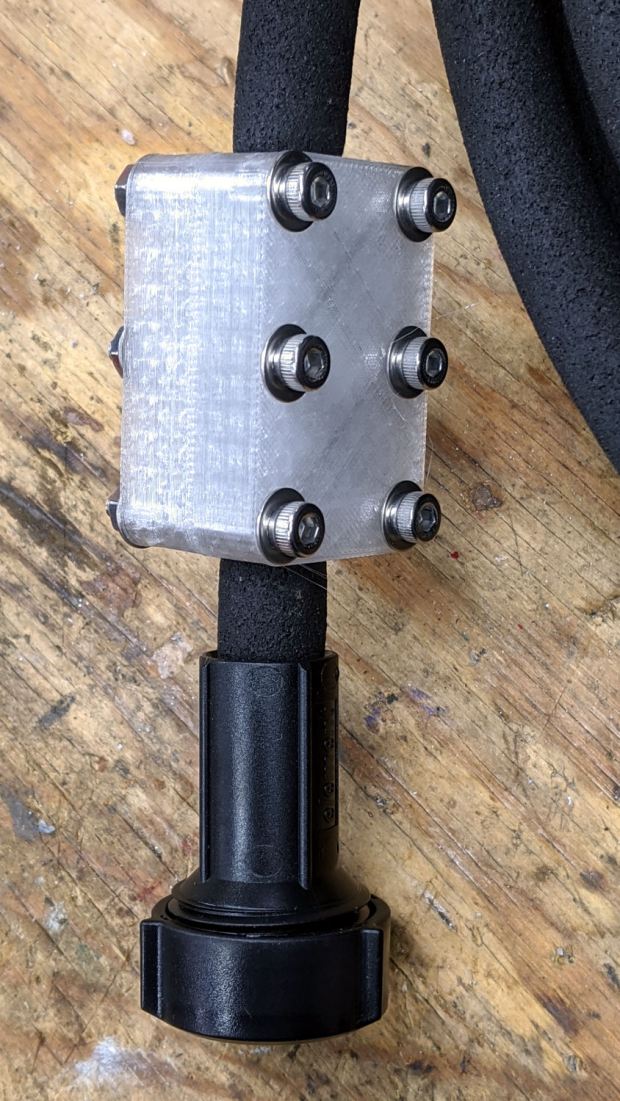
Round Soaker Hose Splice – top
Unlike the clamps for the punctured flat soaker hoses, this one doesn’t need to withstand much pressure and hold back a major leak, so I made the pieces a bit thicker and dispensed with the aluminum backing plates:
This file contains hidden or bidirectional Unicode text that may be interpreted or compiled differently than what appears below. To review, open the file in an editor that reveals hidden Unicode characters.
Learn more about bidirectional Unicode characters
I traced the off-center circle with a marker to make it more visible, as it’s the drag knife cut that should have been the exit move after completing the window.
Huh. It never did that before …
The bCNC plot looked fine, but the Terminal log showed three Error 33 reports:
Failed arc command – bCNC screen – terminal and plot
The GRBL doc has this to say about Error 33:
The motion command has an invalid target. G2, G3, and G38.2 generates this error, if the arc is impossible to generate or if the probe target is the current position.
The error messages don’t occur immediately after the failing G2/G3 command, because bCNC sends enough commands to keep the GRBL serial input buffer topped off. After GRBL sends the error message, it continues chewing its way through the buffer and, when bCNC notices the first error, it stops sending more G-Code commands and shudders to a stop.
The great thing about Free Software is that when it breaks, you have all the pieces. Looking into the GRBL source code provides a definition of Error 33:
// [G2/3 Offset-Mode Errors]: No axis words and/or offsets in selected plane. The radius to the current
//   point and the radius to the target point differs more than 0.002mm (EMC def. 0.5mm OR 0.005mm and 0.1% radius).
Which doesn’t quite match the code, but it’s close enough:
// Compute difference between current location and target radii for final error-checks.
            float delta_r = fabs(target_r-gc_block.values.r);
            if (delta_r > 0.005) {
              if (delta_r > 0.5) { FAIL(STATUS_GCODE_INVALID_TARGET); } // [Arc definition error] > 0.5mm
              if (delta_r > (0.001*gc_block.values.r)) { FAIL(STATUS_GCODE_INVALID_TARGET); } // [Arc definition error] > 0.005mm AND 0.1% radius
            }
I’ve drag-knifed maybe a dozen top decks with no problem, so figuring out what broke took a while.
The key turned out to be in the Terminal log, where all coordinates in the G-Code commands had, at most, two decimal places. The GCMC program producing the G-Code emits three decimal places, so bCNC rounded off a digit before squirting commands to GRBL.
After more searching, it seems I’d told bCNC to do exactly that:
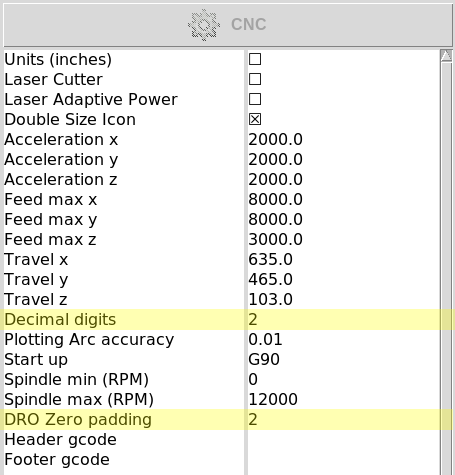
bCNC Config – Round 2 digits – highlighted
Perhaps I’d mistakenly set “Decimal digits” instead of “DRO Zero padding” when I reduced the DRO resolution from three decimals to two? It’s set to “2” in the CNC 3018XL configuration, so this seems like a typical one-off brain fade.
GRBL doesn’t execute invalid commands, so the tool position remains at the end of the window’s outer perimeter while the next two arc commands fail, because their center offsets produced completely invalid radii.
The three failed arc commands should have cut the right end of the window, the inner side, and the left end, but left the tool position unchanged. The final arc command should have withdrawn the blade along the outer side of the window, but became a complete circle, with the commanded end point equal to the leftover starting point at the same radius from the deck center.
The same G-Code file fails consistently with Decimal digits = 2 and runs perfectly with Decimal digits = 3, so at least I know a good fix.
Protip: Keep your hands away from moving machinery, because you never know what might happen!
This seems sufficiently obscure to merit becoming a Digital Machinist column. More analysis is in order …
It being the season for hacking down decorative grasses, our ancient Craftsman Hedge Trimmer woke up dead, a decade after I fixed its switch and predicted it’d be good for another decade.
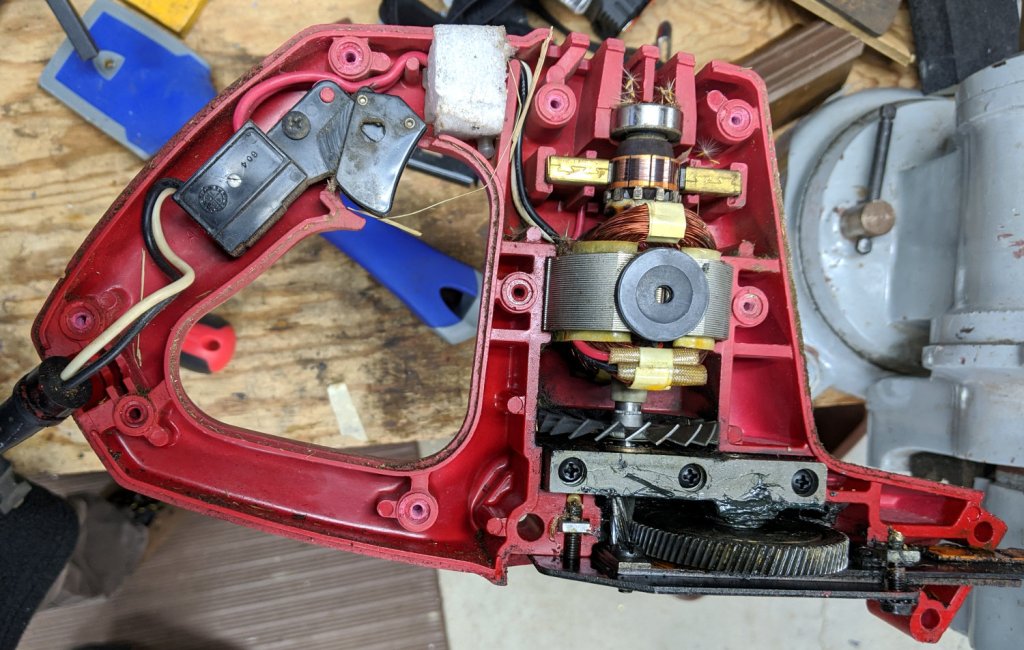
After verifying the failure isn’t in the wall outlet or the extension cord, haul it to the Basement Laboratory Repair Wing, clamp the blade in the bench vise, remove a myriad screws, and pop the top:
Craftsman Hedge Trimmer – innards exposed
I should have removed the screw in the extreme lower right corner and loosened the similar screw at the rear of the bottom plate; they’re two of the three machine screws engaging nuts embedded in the shell. Everything is greasy enough to let the nuts slide right out of the plastic and no harm was done, but that need not be so.
After poking around a bit and finding nothing obvious, I checked the resistance across the plug: open-circuit with the switch OFF and nearly shorted with the switch ON.
Huh.
Put the case back together with just enough screws to prevent heartache & confusion, unclamp the blade, plug into the bench outlet, discover it works fine again, reinstall the rest of the screws, and continue the mission:
The orange curve is the last surviving (“least dead”) Wasabi battery from the 2017-08 batch and the dark green curve just above it is another DOT-01 from 2019-02. The problem is not so much their reduced capacity, but their grossly reduced voltage-under-load that triggers a premature camera shutdown.
The Batmax batteries measure better than the craptastic Wasabi batteries, worse than the STK batteries, and should survive the next year of riding. As before, I have zero belief that Amazon would send me a “genuine” Sony NP-BX1 battery, even at six times the nominal price, nor that it would perform six times better.
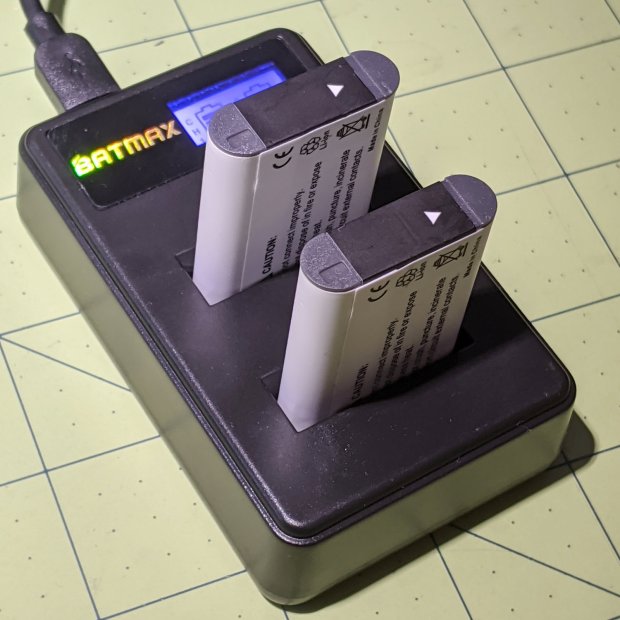
Batmax is one of many randomly named Amazon Marketplace sellers offering seemingly identical NP-BX1 batteries: Newmowa, Miady, Powerextra, Pickle Power, LP, Enegon, and so forth. Mysteriously, it’s always cheaper to get a handful of batteries and a charger, rather than just the batteries, so I now have a two-socket USB charger:
Batmax NP-BX1 – USB dual charger
Despite the “5 V 2 A – 10 W” and “4.2 V 0.6 A – 5 W” label on the back, charging a pair of batteries after a ride started at 700 mA from a USB 3.0 port. The charger makes no claims about USB 3 compliance, so I’d expect it to top out around 1 A from a generously specified port.
Our CVS blood pressure meter (a relabeled Microlife unit) ran its pump for a few seconds this morning, gave up, and spat out Err 3, which translates into “Inflation of the cuff takes too long”. Not surprising, as the motor wasn’t running.
The AA alkaline cell quartet has plenty of mojo and no corrosion, but the motor doesn’t even turn over. The display is fine and the pressure release valve clicks, so it’s not completely dead.
This unit is sufficiently old to have the compelling advantage of transferring data through a USB (mini-B) connection, rather than a Bluetooth link through some sketchy Internet cloudy Android app, so it’s worth at least a look inside. Four screws and some internal snaps along the sides hold the case together; it’s a surprisingly easy teardown.
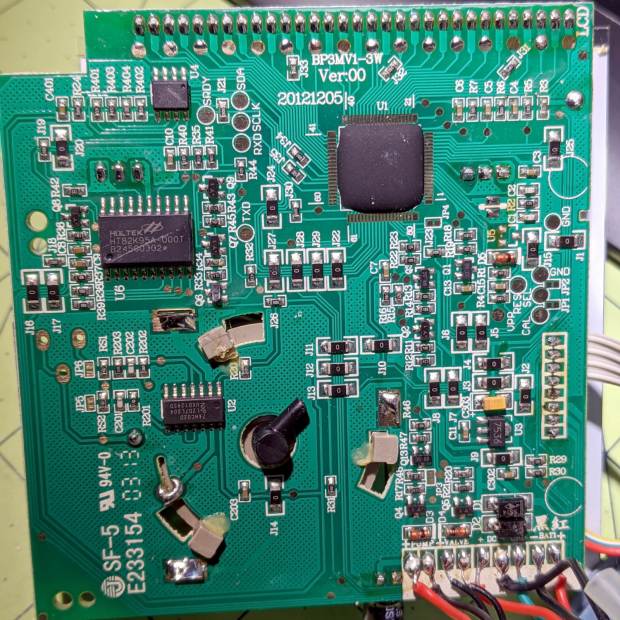
The business side of the PCB looks good:
CVS Blood Pressure Monitor – PCB
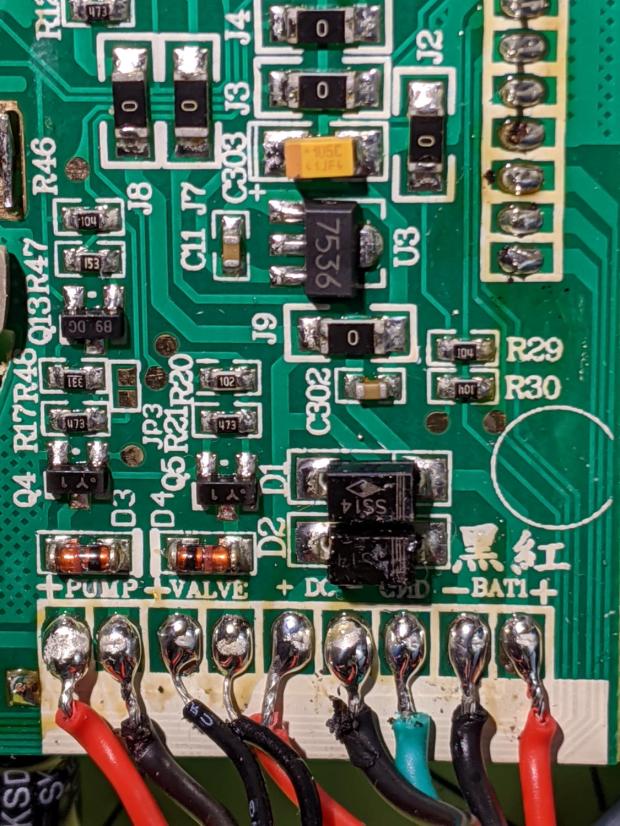
The various wires and solder joints for the “high current” parts look OK, although the wires likely don’t go all the way through the PCB:
CVS Blood Pressure Monitor – PCB detail
Q4 and Q5 look like they switch the compressor pump motor and pressure-release valve. D3 and D4 should tamp down the inductive energy, but they look like they’re in series with the outputs. Yes, the Valve wires are both black.
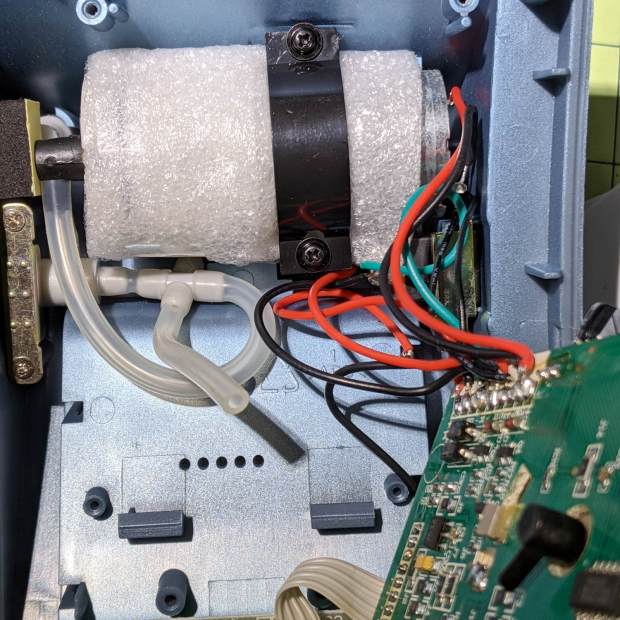
The motor has a foam vibration isolation wrap, which is a nice touch. Although you can’t see them well, all its wires & solder joints look like they’re in good shape:
CVS Blood Pressure Monitor – pump
The hose sticking out toward you plugs into the black right-angle fitting in the lower right corner of the picture. It’d help to have smaller fingers than mine, but I managed to get the hose off and on the fitting with only minor muttering.
Seeing nothing obviously wrong, I installed the same batteries, poked the switch to start a measurement, and the motor ran fine. Of course, the measurement failed because the cuff & pressure sensor weren’t connected.
Connect the hose, plug in the cuff & wrap it around my arm, poke the button, and everything works fine.
Reassemble everything and it still works fine.
I still think there’s a bad wire or solder joint in there somewhere, so this delightful “repair” can’t possibly last very long …
You’d hope the original owner would tape a key inside each file cabinet before donating it to charity; ours arrived unlocked and without keys. Fortunately, eBay sellers have All The Keys and I ordered replacement keys for each cabinet.
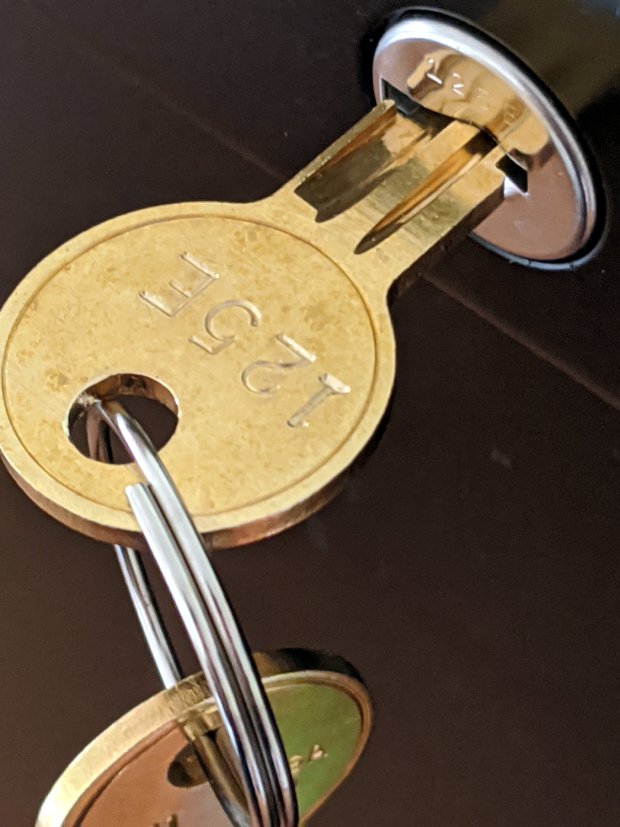
One pair of new keys fit into their lock, but the shoulder didn’t seat properly and the key didn’t turn:
HON Lateral File – 125E key insertion
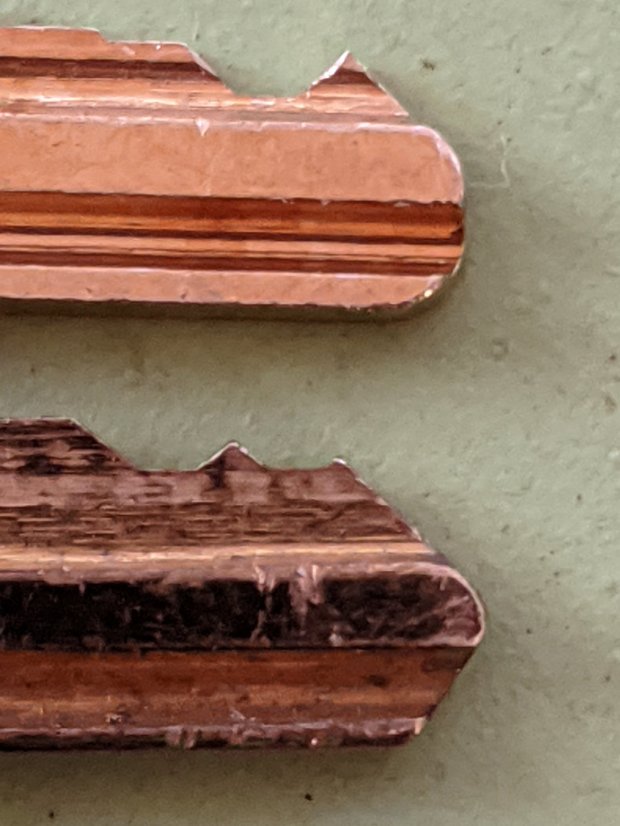
Compared with a key for the other cabinet (on the bottom), it seems the tip profile wasn’t quite the same:
HON Lateral File – 125E key tip
Perhaps the underside of the tip hadn’t been cut? Stacking the two keys makes it even more obvious:
Key 125E tip shaping – vs Key 101E
The eBay seller suggested the lock cores have changed over the years, as other (unaltered) keys fit current cabinet locks. Perhaps HON used fussy high-quality lock cores back in 2004 when they built these cabinets.
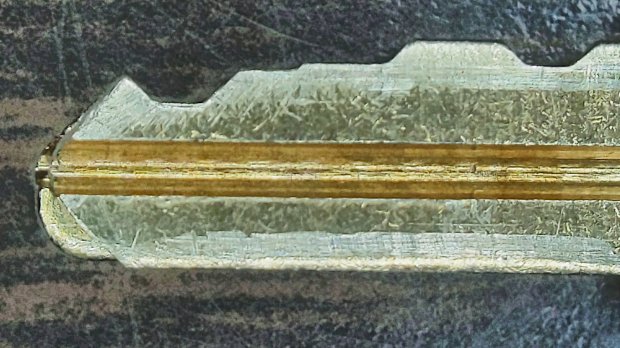
I gingerly filed the 125E key’s tip to match the 101E key and, after several iterations, the shoulder seated firmly in the lock and the core turned smoothly. Flushed with success, I marked the other key of the pair, filed to the mark, and it worked on the first try.
Mary doesn’t plan to store any secret fabrics in her new cabinets, but now I can declare victory and move on.