Ed Nisley's Blog: Shop notes, electronics, firmware, machinery, 3D printing, laser cuttery, and curiosities. Contents: 100% human thinking, 0% AI slop.
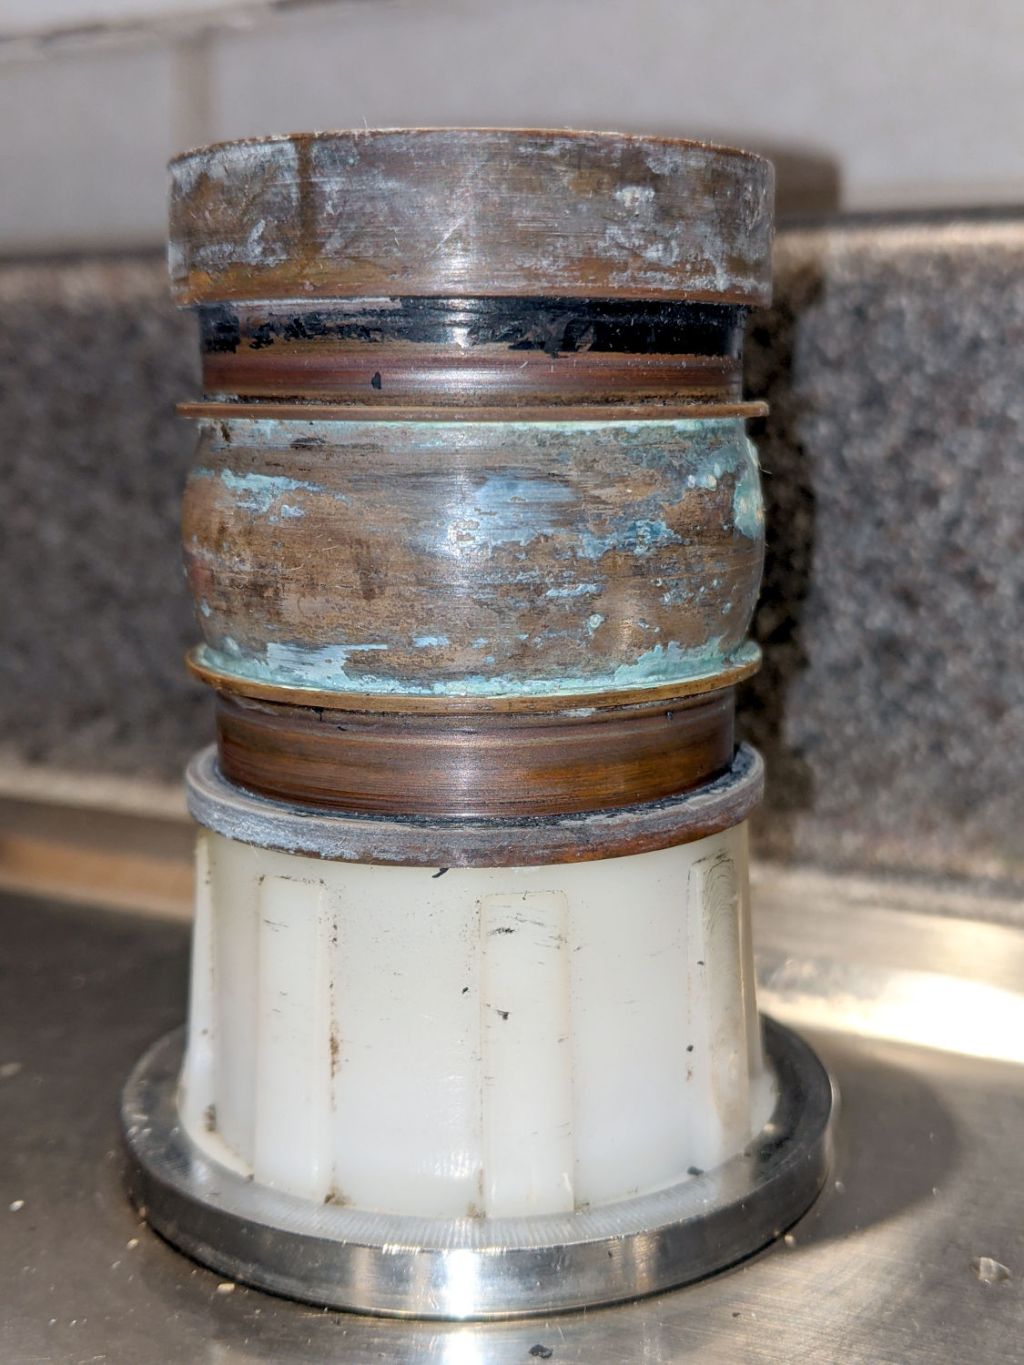
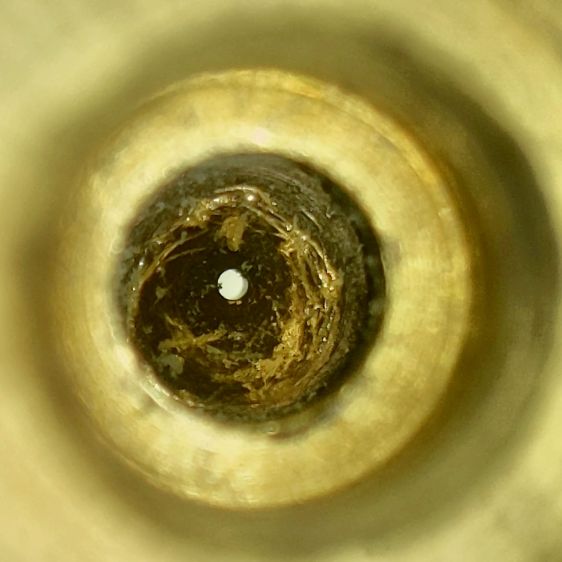
My alleged improvement to the upper bearing ring in our American Standard Elite kitchen faucet didn’t survive nearly as well as I hoped and began leaking through the o-ring seals after the usual year. The 0.4 mm polypropylene shim ring apparently stuck to the nylon bearing ring, wore down to a 0.1 mm thick ribbon against the base, then let the o-ring wear out as usual.
The black gunk around the top of the upper seal area has the consistency of hard plastic paint, although it’s most likely rubber particles from the o-ring burnished against the bronze base by the sliding PP shim ring:
American Standard Elite faucet – base
Remember Nisley’s First Rule of Plumbing: Never look inside your water supply pipes.
As before, the o-rings wear on their inner diameters, indicating that they turn with the spout around the base.
For lack of anything smarter, I removed as much of the debris as feasible, installed new seals, reassembled the faucet in reverse order, and ordered another set of parts.
If I hadn’t done such a great job of reinforcing the underside of the sink deck around the mounting rings, to the extent I’m not sure another faucet base else would fit, I’d be far less reluctant to start over.
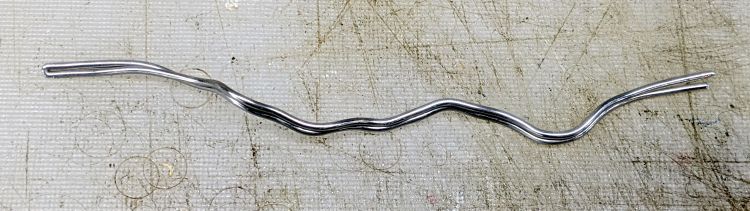
The wire comes off the roll in dead-soft condition, so I can straighten (and slightly harden) it by simply rolling each wire with eight fingertips across the battered cutting board. The slightly wavy wire shows its as-cut condition and the three straight ones are ready for their masks.
Although nearly pure aluminum wire doesn’t work-harden quickly, half a year of mask duty definitely takes its toll. This sample came from my biking mask after the edges wore out:
Armature wire – work-hardened
We initially thought using two wires would provide a better fit, but more metal just made adjusting the nose seal more difficult after each washing. The wire has work-hardened enough to make the sharper bends pretty much permanent; they can be further bent, but no longer roll out under finger pressure.
Although we’re not yet at the point where we must reuse wires, I took this as an opportunity to improve my annealing hand: heat the wire almost to its melting point, hold it there for a few seconds, then let it cool slowly. The usual technique involves covering the aluminum with something like hand soap or permanent marker ink, heat until the soap / marker burns away, then let it air-cool. Unlike steel, there’s no need for quenching or tempering.
Blue Sharpie worked surprisingly well with a propane torch:
Armature wire – annealed straightened
As far as I can tell after a few attempts, the pigment vanishes just below the annealing temperature and requires another pass to reach the right temperature. Sweep the flame steadily, don’t pause, and don’t hold the wire over anything melt-able.
Those wires (I cut the doubled wire apart) aren’t quite as soft as the original stock, but they rolled straight and are certainly good enough for our simple needs; they’re back in the Basement Laboratory Warehouse for future (re)use.
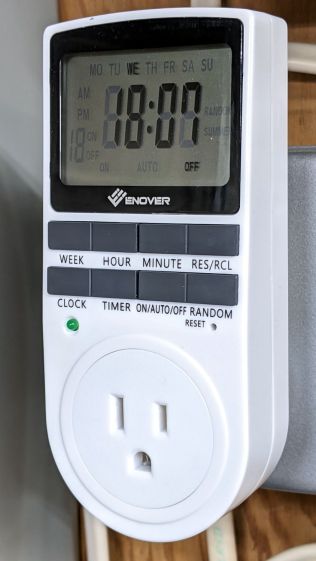
This being the season of lights, I deployed some outlet timers to turn them on at dusk and off at bedtime. The timers spend much of the rest of their lives plugged into outlets in the Basement Laboratory to keep their internal NiMH backup batteries charged, although they’re not controlling anything:
Enover outlet timer – overview
This one is labeled ENOVER, but it’s essentially identical to all the others sporting random alphabetic names; I have a few more labeled UKOKE in the same plastic case. The current crop uses a different case and has one fewer button, but don’t expect any real difference.
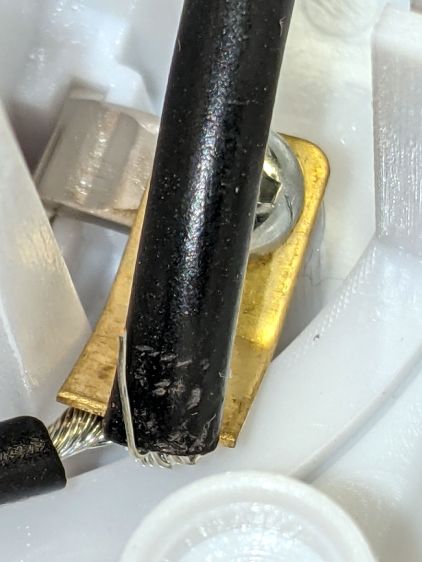
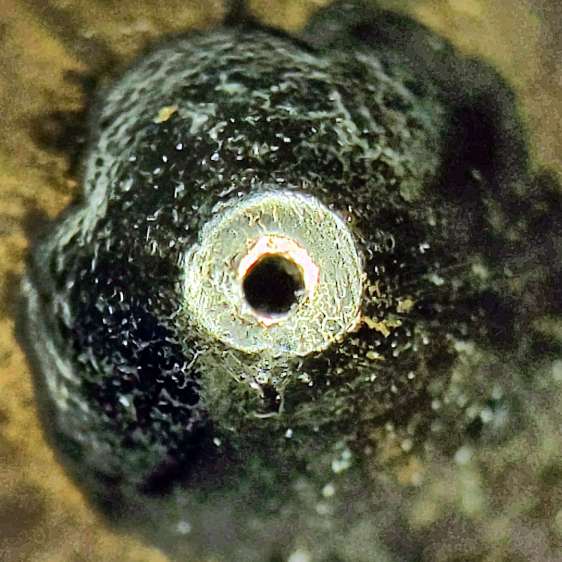
One of the timers had a blank display and didn’t respond to button pushes or a pin punch poked in the RESET hole, so I dismantled it to see what was inside.
Both the hot and neutral terminals had stray wire strands:
Enover outlet timer – stray wire strand
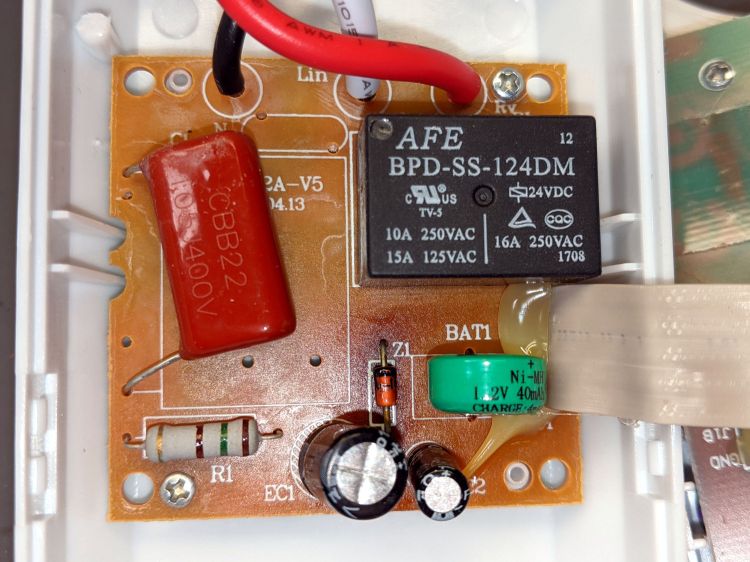
The power board had the usual missing components, suggesting it had been cheapnified after passing whatever regulatory inspection it might have endured to get a CE mark on its dataplate:
Enover outlet timer – power board – overview
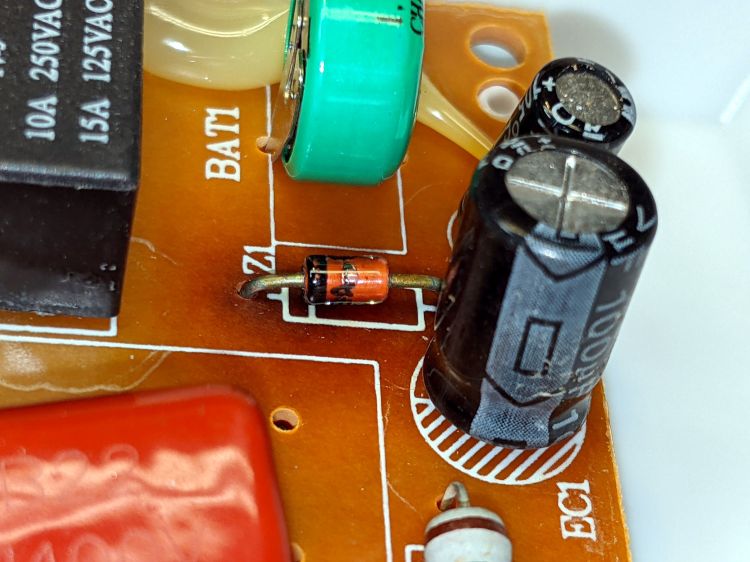
The alert reader may have already noticed the mmmmm smoking gun:
Enover outlet timer – scorched diode
Incredibly, Z1 has a part number wrapped around it! A quick lookup shows a 1N4749A is a 24 V 1 W Zener diode, neatly matching the 24 V relay. The datasheet gives a 10.5 mA test current and a 38 mA maximum regulator current, with a caveat: “Valid provided that electrodes at a distance of 10mm from case are kept at ambient temperature”
The relay datasheet says 8.3 mA nominal coil current, a mere 200 mW, which is much easier to dissipate in wire wrapped around a steel core than in a little diode.
Evidently the poor diode ran rather hot before becoming a dead short, because a phenolic PCB (definitely not at ambient temperature) ought not discolor like that.
Indeed, measuring Z1 in another, still functional, Enover timer showed 25 V and a similarly discolored patch around Z1, suggesting the circuit design requires a bit more disspation from the diode than it can comfortably deliver.
I replaced it with a 1N970B from the Basement Laboratory Warehouse, rated for only 0.5 W in a seemingly identical case, buttoned the whole thing up, and left it in the middle of the concrete basement floor overnight. It wasn’t smoking and continued working in the morning, so I defined things to be no worse than before and declared victory.
Should when the next one fails the same way, I’ll epoxy a small heatsink to that poor diode and its leads to reduce its overall temperature.
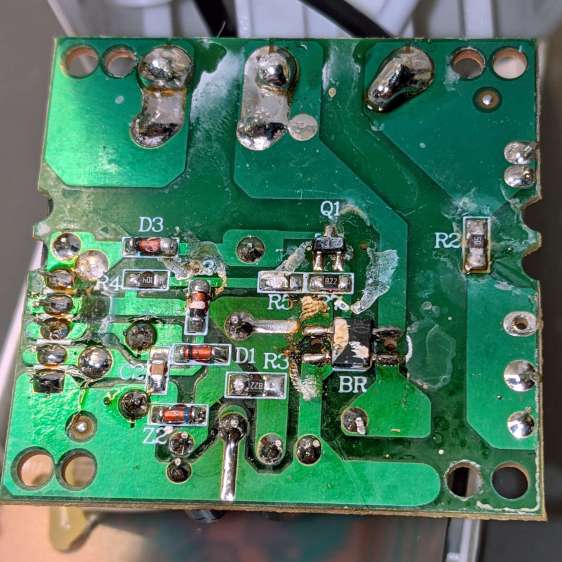
For future reference, the underside of the PCB shows a distinct lack of post-soldering flux cleanup:
Enover outlet timer – power board – solder side
I swabbed it with denatured alcohol, although doing so certainly didn’t make any change to its behavior.
Memo to Self: no-clean flux is a thing.
It’s worth noting no other components show signs of overheating, despite the diode becoming a short circuit, so R1 (a big power resistor) is most likely the shunt regulator’s dropping resistor and can survive the additional power.
Should the diode fail open, the rest of the circuitry will be toast.
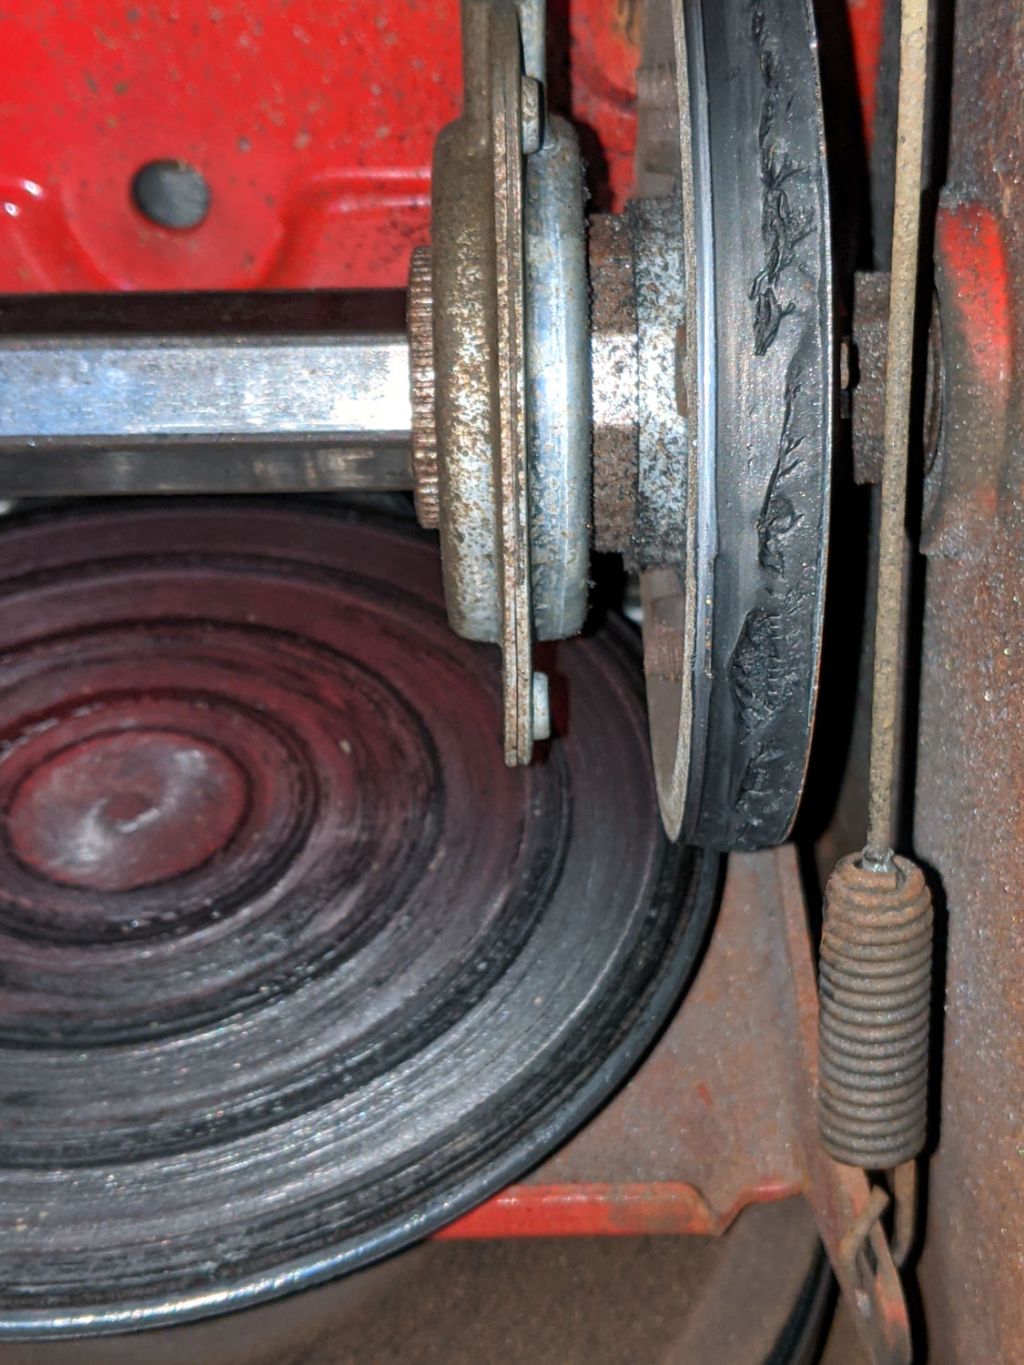
Late in last winter’s snowfall, our MTD snowthrower / snowblower ran low on get-up-and-go mobility, so I resolved to check inside before the next snowfall. What with one thing and another, time passed until, a few days before the first major snowfall of this winter season, I opened the bottom cover and found this mess:
Snowthrower friction wheel – worn in place
Oops.
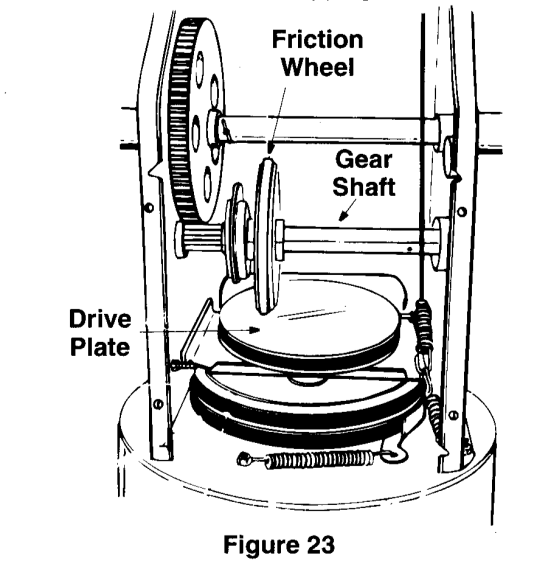
A diagram from the manual identifies the components:
MTD Snowblower – drive train – Fig 23
The 8 HP gas engine spins the drive plate, which transfers some of those horses through the rubber tire on the friction wheel to the gear shaft, which turns the axle attached to the wheels. The shift lever (not shown) moves the friction wheel along the shaft to change the “gear ratio” setting the ground speed, with five positions to the right of the plate center going forward and two on the left going in reverse.
It’s a modern implementation of the classic Lambert friction drive transmission from a century ago. Cheap, effective, nothing wrong with it other than requiring regular inspection and preventive maintenance.
Unfortunately, the rubber tire seems undersized for the task and had completely worn away, leaving its steel rim to chew on the drive plate:
Snowthrower friction wheel – scarred drive plate
Of course, you’re supposed to inspect the situation more regularly than I (and, most likely, anyone) ever have. I vaguely recall replacing the tire once before and, being that type of guy, ordered two to have a spare on the shelf. Anyhow, it was in fine shape the last time I checked to see what shape it was in.
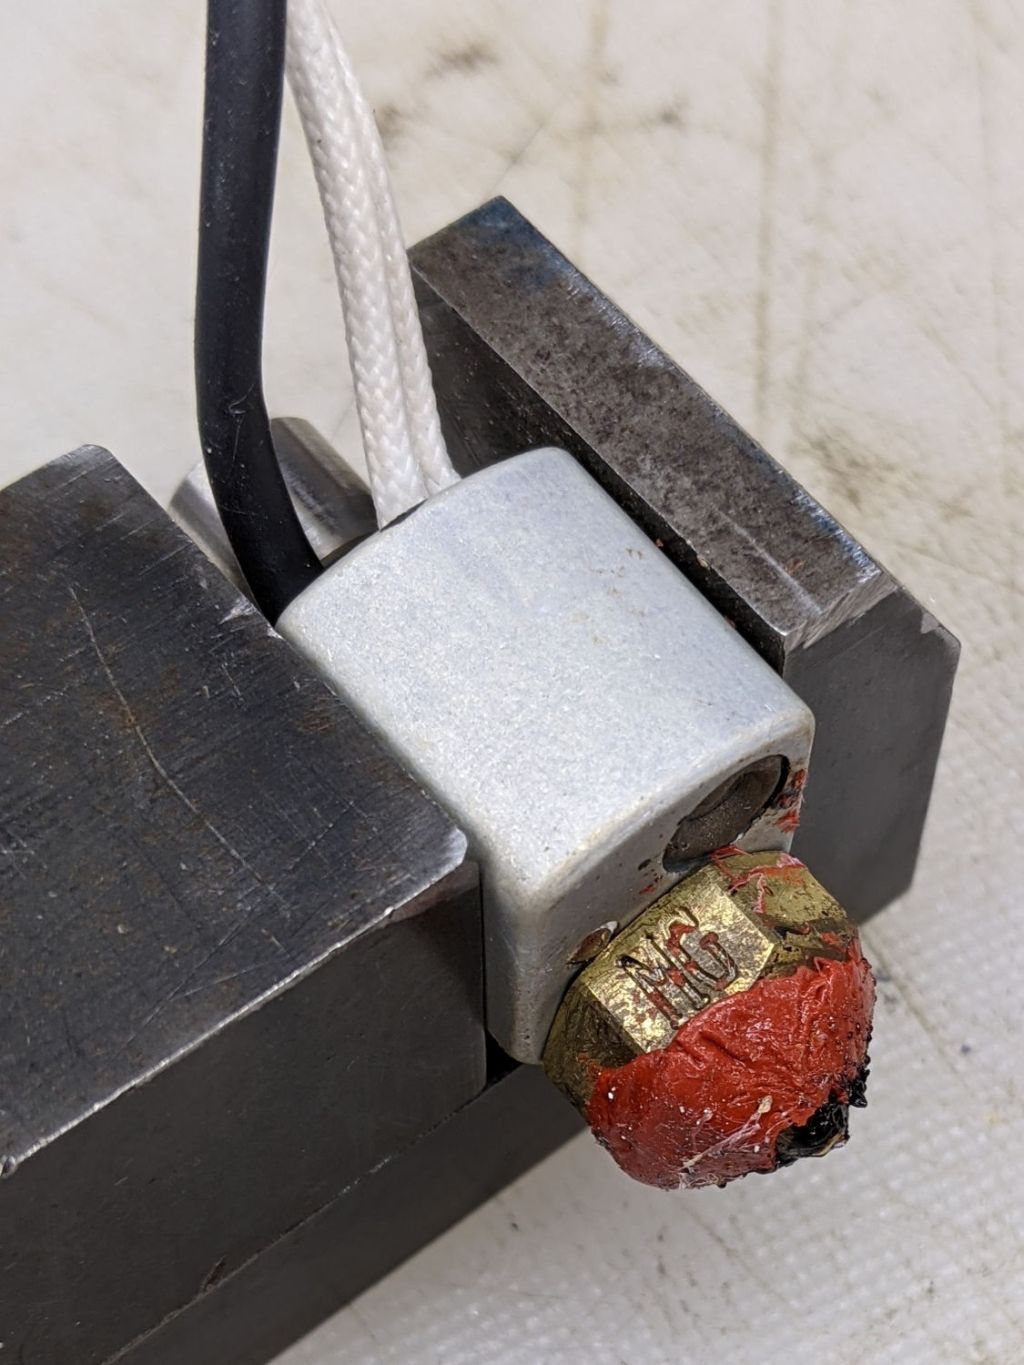
The manual recommends loosening (but not removing) the hex nut on the left side of the gear shaft:
Snowthrower drive gear shaft bearing
Then “lightly tap the hex nut to dislodge the ball bearing”. Well, it’s a nylon lock nut, not a plain hex nut, which means pounding the crimp holding the nylon ring on the nut will destroy it. I whacked the end of the shaft with a plastic hammer to no avail, removed the nut & washer, and gave it a few careful shots with a 2 lb ball peen hammer, also to no avail.
The basic problem comes down to having the bearing mounted in what’s basically a sheet metal wall of no particular substance: banging on the shaft deflects the wall and moves the bearing along with the shaft. As far as I could tell, the shaft was stuck inside the bearing race, so I soaked it in pentrating oil while pondering the next step overnight.
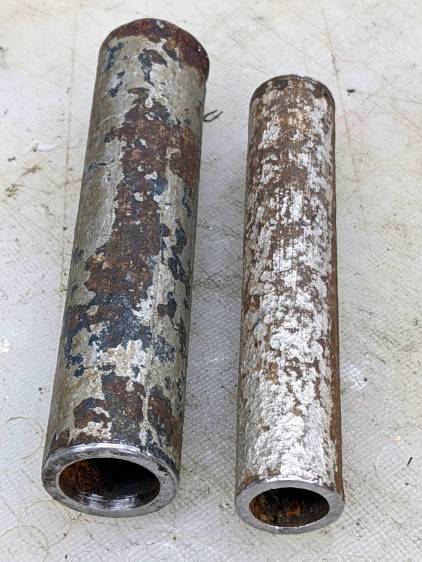
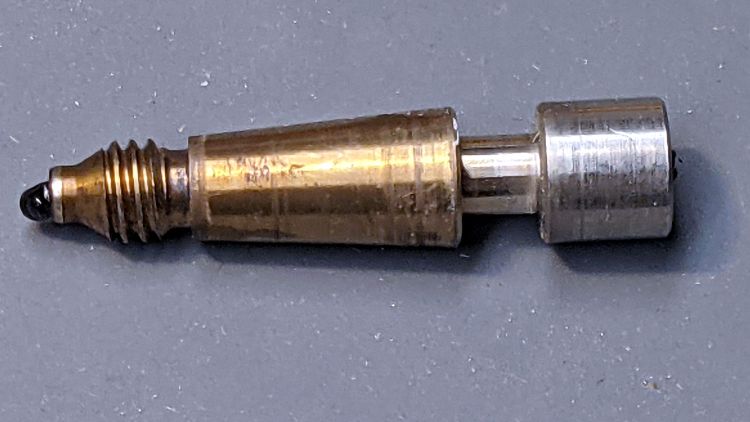
A few more shots with the hammer convinced me that wasn’t going to work and would likely damage the threads, so I made a pair of Special Service Tools:
The smaller one fits around the threaded end of the shaft and inside the inner race to apply the impact directly to the shaft instead of the threads. The larger one fits on the inner race itself, in the expectation I would need to persuade it, but it wasn’t necessary. They both started life as iron pipe, covered in what looks like aluminumized paint for no reason we’ll ever know, and faced in the lathe.
The combination of penetrating oil, a proper SST, and some diligent whacking popped the shaft out of the bearing without damage. The friction wheel assembly then slid off the shaft with no resistance and the shaft and right-side bearing slid easily out of the frame. Once in the shop, gentle filing knocked the rust & burrs off the shaft and let it slide freely into the bearing.
The friction wheel clamps the tire with six bolts, three from each side so MTD can use a single part number for the halves:
Snowthrower friction wheel – screw pattern
It came apart easily, the new tire went on easily, the drive assembly went back together easily, and the blower cleared more than a foot of snow from the driveway:
Mary running snowthrower – 2020-12-17
Nothing can make maneuvering a snowblower easy, alas.
I briefly thought of refacing the drive plate, but I’m pretty sure it comes heartbreakingly close to Tiny Lathe’s limited swing. With two spare tires on the shelf, should the scarred plate chew up the new tire in one season, I’ll make better measurements.
The throttle knob on our MTD snowthrower (a.k.a. snowblower) cracked apart around its metal shaft when I pulled it upward. A temporary fix involving duct tape and cable ties sufficed to start the engine, although the usual intense vibration shook the knob loosesomewhere along the driveway during the next hour.
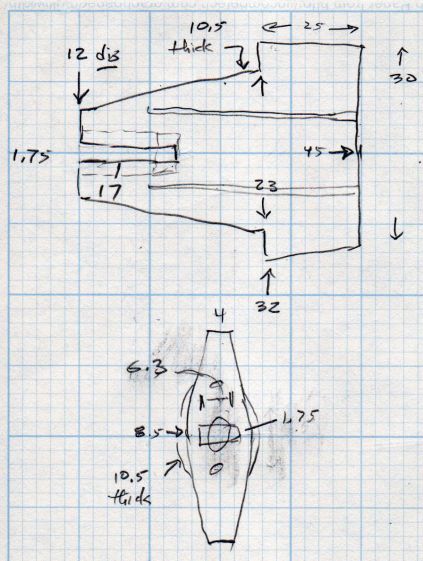
Although I have no photographic evidence, I did make a few quick measurements:
Throttle Knob Dimension Doodles
It fits an MTD model E6A4E, but I suspect nearly all their engines have identical throttle shafts:
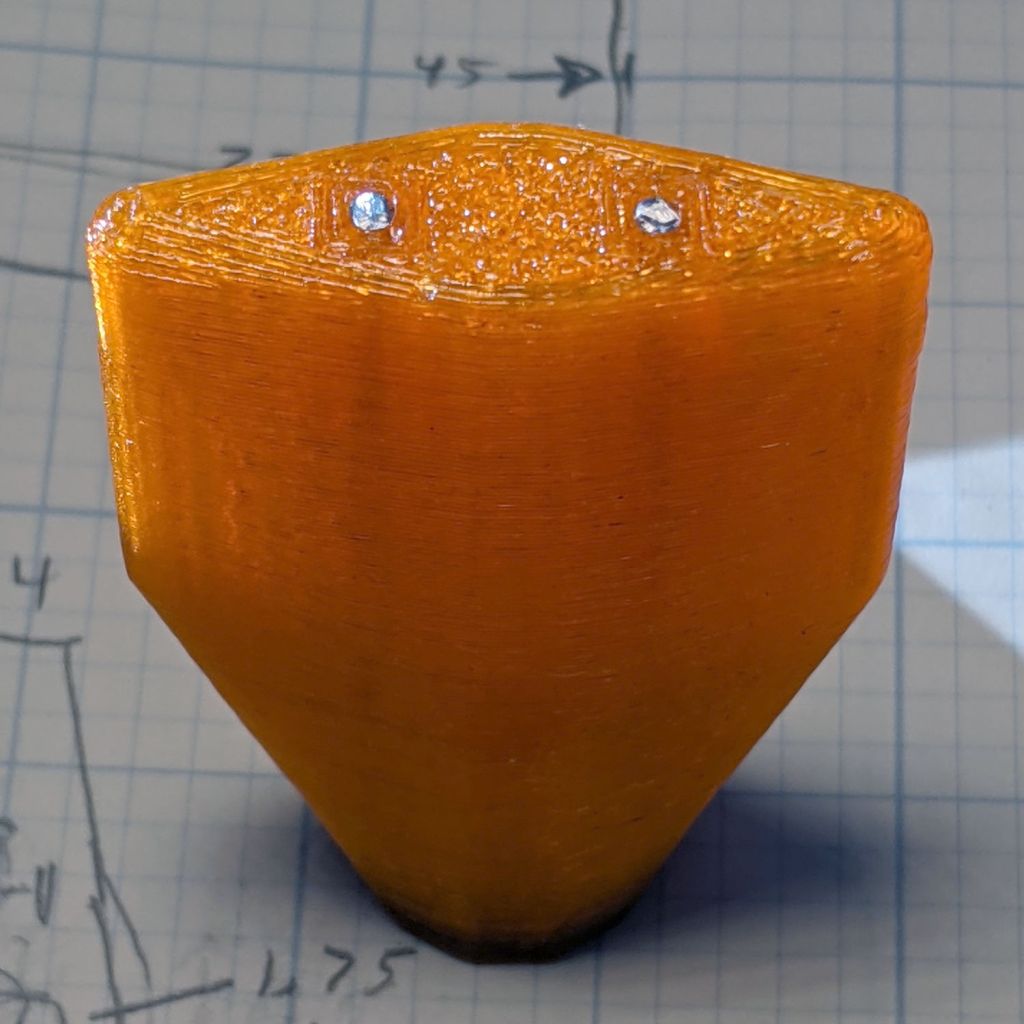
Snowthrower Throttle Knob – stem end – solid model
The only practical way to build the thing has it standing on the shaft end, surrounded by a brim to improve adhesion, so I added (actually, subtracted) a pair of holes for music-wire reinforcements:
Snowthrower throttle knob – reinforcing wires
It definitely has a stylin’ look, next to the original choke control knob:
Snowthrower throttle knob – installed
I omitted the finger grip grooves for obvious reasons.
The slot-and-hole came out slightly smaller than the metal shaft and, rather than wait for epoxy to cure, I deployed a 230 W soldering gun (not a piddly temperature-controlled iron suitable for electronics) on the shaft and melted it into the knob.
More snow may arrive this week and I printed another knob just in case …
This file contains hidden or bidirectional Unicode text that may be interpreted or compiled differently than what appears below. To review, open the file in an editor that reveals hidden Unicode characters.
Learn more about bidirectional Unicode characters
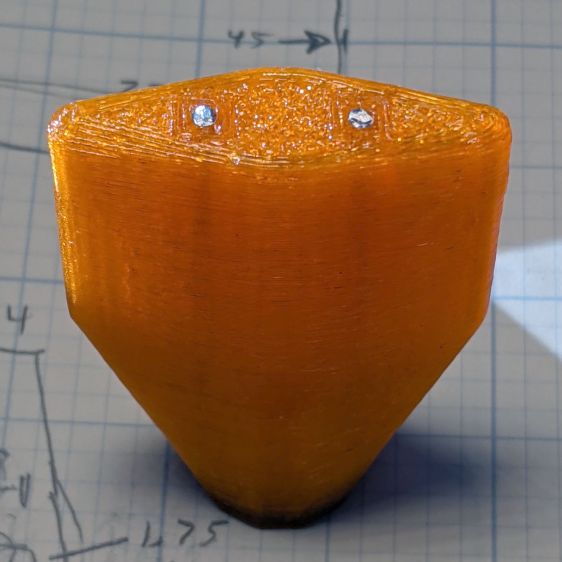
After replacing the nozzle and filament drive on the M2, it’s definitely time to verify that the Z=0 point remains at the platform surface and the whole affair is properly aligned.
Because they’re well separated and only 3 mm tall, I set Slic3r to print them sequentially to eliminate a whole bunch of back-and-forth travel for each layer.
The outer numbers come from the skirt around the whole platform in units of 0.01 mm: 22 → 0.22 mm. The five inner numbers are the eyeballometric average of four measurements across each square.
They came short enough that adding 0.25 mm to their height would improve the outcome. The scribbles in the upper right corner show the initial Z offset was -2.50 mm, which means -2.75 mm should do the trick; remember to save the new value in EEPROM with M500.
Print the same G-Code file with the new offset and measure:
Calibration Boxes – M206 Z-2.75 – 2020-12-11
Can’t get much closer than that!
The skirt gains only 0.1 mm for reasons unknown to me. It’s a good diagnostic tool for keeping an eye on the overall alignment without having to run more calibration squares, though.
Comparing the center squares (bottom layers facing each other in the middle) from the two sets shows the difference:
Test Squares 2.73 3.01 mm – 2020-12-11
The bottom three layers got pretty well squashed with the previous offset. It’s missing about a full layer, although the nozzle wasn’t mashed flat / blocked against the platform. All the layers in the post-adjustment square look identical, as they should.
The wall thickness on the latter squares runs from 0.40 to 0.44 mm, with an eyeballometric average around 0.43, so tweaking the Extrusion Multiplier down by maybe 5% would be in order if I were being fussy.
This being the first time I’ve dismantled the hot end, here’s what lies inside:
Makergear M2 V4 hot end – tapered inner guide
The tighter you make the nozzle, the closer the fit inside the hot end, and the more heat gets transferred to the plastic. The bright ring just to the right of the plastic drool shows where it fits into the brass nozzle.
Peeling the remaining silicone off the nozzle, scraping off the black PETG around the tip, and scraping the gunk out left the inside a bit scuffed:
Makergear 0.35 mm nozzle – interior
The orifice still looks good and is still as close to 0.35 mm as I can measure eyeballometrically:
Makergear 0.35 mm nozzle – exterior
Despite what it looks like, that’s actually a very thin PETG layer.
Having a spare nozzle on the shelf, I decided to install it and leave the old nozzle as a backup. I’ve probably wrecked the snug seal required to keep the plastic out of the hot end.
A fresh coat of silicone, reset the position with the platform at Z=0, and it’s back in action:
Makergear M2 V4 hot end – Z zero set
The PETG remnants show I didn’t get the nozzle quite tight enough on the first attempt, but it’s all good now. The rubbery fiberglass insulator will conceal the mess.
Protip: Always remove the hot end from the printer and clamp it securely before unscrewing the nozzle, because the very thin heat break (over on the right in the second picture) will snap under less torque than you need to break the nozzle free.
You should unscrew the nozzle with the hot end warm enough to soften whatever plastic you’re using, lest it have glued everything inside into a solid lump.