A local hospital contacted Mary’s quilting group to sew up cloth covers to prolong the life of their medical-grade N95 masks. Their recommended pattern, the Fu Face Mask from the FreeSewing group, comes in three sizes:
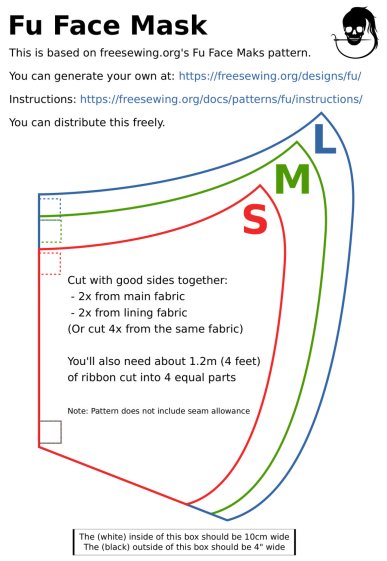
N.B.: Use their original PDF, because a JPG picture probably won’t come out at the right size.
Also N.B.: Used by itself, this is not a medical-grade filter mask.
The patterns do not include the usual 1/4 inch seam allowance around the outside, so I cranked out 3D printed plastic cutting templates.
If you’re not interested in 3D printing, 2D print the PDF file on cardboard, sketch a seam allowance, and cut it out, as quilters have been doing since slightly after home printers happened.
The plan of attack:
- Convert mask outlines into a bitmap image (GIMP)
- Create Bezier curves by tracing outlines (Inkscape)
- Save curves as SVG files
- Convert SVG into solid model (OpenSCAD)
- Add stiffening ribs &c
- Save as STL solid model
- Slice into G-Code file (Slic3r)
- Fire the M2!
So, we begin …
Import the PDF into The GIMP, delete the text & suchlike, convert to monochrome, and save the pattern outlines as a PNG file:
It turns out Inkscape can directly import the PDF, but it valiantly tries to convert all the text and the incidental graphic elements, none of which will be useful in this situation. It’s easier to delete them in The GIMP and make a bank shot off a PNG file.
Update: Scruss’s comment provides a much simpler workflow!
Import the PNG into Inkscape and trace one outline with the Bezier curve tool:

If you squint really carefully, you’ll see Bezier control handles sticking out of the nodes. I laid three nodes along the top arc and four along the right side, but do what’cha like; the Insert key or Shift+I inserts and Delete removes nodes. It’s easier to center a node in the middle of the PNG line with snapping turned off: Shift+drag while mousing or globally with #.
You could unleash the bitmap auto-tracer, but it generates a bazillion uselessly tiny Bezier curves.
When you’re happy, select and copy the path with Ctrl+C, paste it into a shiny new Inkscape document (Ctrl+N) with Ctrl-V, save it with a catchy file name like Fu Mask - Small - nominal.svg, and close that document to return to the document with the PNG outlines and the original path.
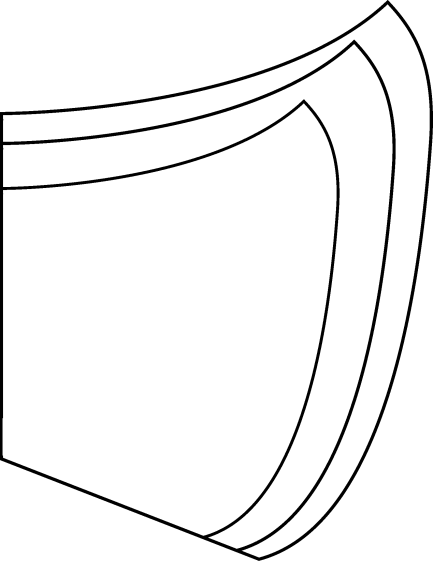
Select the original path again, create a dynamic offset with Ctrl+J, open the XML editor with Ctrl+Shift+X (which automagically selects the proper SVG element), and change the inkscape:radius value from 0 to 6.35 (mm, which everyone should use) to get a 1/4 inch seam allowance:

The path will puff out with curved corners:

Copy into a new document, save as Fu Mask - Small - seam allowance.svg, and close.
Repeat that process for each of the three mask sizes to create three pairs of SVG files: the nominal mask outline and the corresponding seam allowance outline for each size.
The OpenSCAD program imports the SVG files, removes the nominal outline from within the seam allowance to leave the outline, adds stiffening ribs, and stamps an ID letter on both sides of the central button:

Choose one of the three sizes with the OpenSCAD customizer, save the resulting model as an STL file, repeat for the three sizes, and you’re done.
This process can convert any outline paths in SVG files into cutting templates, so, should the Fu Mask not suit your fancy, Use The Source.
For convenience, the STL files are on Thingiverse.
From the comments, a Washington hospital uses a similar pattern: their PDF with assembly instructions.
The OpenSCAD source code as a GitHub Gist:
| // Fu Mask cutting templates | |
| // Ed Nisley – KE4ZNU – 2020-03 | |
| // Mask patterns from: | |
| // https://freesewing.org/blog/facemask-frenzy/ | |
| // More info on my blog: | |
| // https://softsolder.com/2020/03/29/fu-mask-cutting-templates/ | |
| /* [Mask Size] */ | |
| Name = "Small"; // [Small, Medium, Large, Test] | |
| /* [Hidden] */ | |
| Templates = [ // center ID letter and file name | |
| ["S","Small"], | |
| ["M","Medium"], | |
| ["L","Large"], | |
| ["T","Test"], // for whatever you like | |
| ]; | |
| T_ID = 0; // Template indexes | |
| T_NAME = 1; | |
| BarThick = 4.0; // template thickness | |
| HubOD = 20.0; // center button diameter | |
| // These should match slicer values | |
| ThreadThick = 0.25; | |
| ThreadWidth = 0.40; | |
| Protrusion = 0.1; // make clean holes | |
| //— Build it | |
| t = Templates[search([Name],Templates,1,1)[0]]; // find template index | |
| Dir = "./"; | |
| FnOuter = str(Dir,"Fu Facemask – ",t[T_NAME]," – seam allowance.svg"); | |
| FnInner = str(Dir,"Fu Facemask – ",t[T_NAME]," – nominal.svg"); | |
| difference() { | |
| linear_extrude(BarThick,convexity=5) { | |
| intersection() { | |
| import(FnOuter,center=true); | |
| union() { | |
| square([200.0,5.0],center=true); // horizontal bar | |
| square([5.0,200.0],center=true); // vertical bar | |
| } | |
| } | |
| circle(d=HubOD); // central button | |
| difference() { // cutting template! | |
| import(FnOuter,center=true); | |
| import(FnInner,center=true); | |
| } | |
| } | |
| translate([0,0,BarThick – ThreadThick]) // top ID recess | |
| cylinder(d=HubOD – 6*ThreadWidth,h=ThreadThick + Protrusion); | |
| translate([0,0,-Protrusion]) // bottom ID recess | |
| cylinder(d=HubOD – 6*ThreadWidth,h=ThreadThick + Protrusion); | |
| } | |
| translate([0,0,2*BarThick/3]) // top ID | |
| linear_extrude(height=BarThick/3,convexity=2) | |
| text(text=t[T_ID],size=10, | |
| font="Arial:style:Bold",halign="center",valign="center"); | |
| mirror([1,0,0]) // bottom ID | |
| linear_extrude(height=BarThick/3,convexity=2) | |
| text(text=t[T_ID],size=10, | |
| font="Arial:style:Bold",halign="center",valign="center"); |
Verily, there’s nothing like a good new problem to take your mind off all your old problems …

Comments
18 responses to “Fu Mask Cutting Templates”
Do you have a link which explains how these prolong the lives of the N95 masks?
The FreeSewing folks explain it’s a cover for a real mask, which IMO means it’s keeping obvious schmutz off the N95. Something like a prefilter for the filter …
Oh. When people use these instead of N95s, it prolongs the supply of N95s. Doh.
And that, too! [grin]
A report from Weill Cornell in NYC (https://vimeo.com/399733860) suggests the risk of aerosol transmission from casual contacts (not standing in a elevator with a dozen random strangers) is much lower than expected: wearing a non-N95 mask will suffice for civilians, with the major benefit of keeping your grubby hands off your face.
Possible to make a die for stamping out the pattern instead of cutting them out?
Cutting fabric isn’t the bottleneck, because they can slash half a dozen layers of fabric at once by running a rotary cutter around the template, spend the next hour sewing, and repeat as needed. Rotary cutters FTW!
Apparently, if you make these from two-layers of heavy t-shirt material (denim should also be good), they provide adequate protection. Wash or bake (160f for 1/2 hour) every day.
I’ve seen similar reports, although I can’t dig up the references right now. Frankly, I think “adequate” is better than nothing and nearly as good as unobtainable “best” filters.
When my wife passed (not from the virus) I gave away her sewing machine (When am I ever going to need this?). Hah! My scorched earth lifestyle gets me every time.
My first trip into our small city after my not-a-flu cough got manageable, I used a surgical mask to keep anything from going outward…
Our hospital got a pattern and instructions for cotton-only masks. Please be gentle with their bandwidth, it’s a small hospital. [Ed, could you grab a copy and post it? It might help.]
Click to access tater-patch_mask-instructions_03-22-2020.pdf
Done! It’s near the bottom of the post.
Hey, it’s Oregon, but thanks for doing it! What’s a few hundred miles among friends? [grin]
On the Internet, we’re all the same distance away; maybe it’ll be close to somebody who needs one.
Yeah. Julie notes that 1/4″ seam allowance is standard for quilters, but less-experienced sewers might want to push it to 1/2″. My sister-in-law was trying to teach sewing; less difficult to teach kids than adults trying to knock out masks really fast with no experience.
[…] bulk of the subsequent increase comes from the Fu Mask Templates, although I suspect folks aren’t looking for 3D printed […]
[…] Homebrew cloth masks mostly protect you, not me, but they’re still a reasonable way to tamp down the infection rate. […]
I know you’ve got your gimp workflow down and all, but I can’t see how it’s quicker to rasterize and retrace than to:
import the pdf into Inkscape;
Ctrl-A to select all, and keep hitting Shift-Ctrl-G to ungroup until you see the paths broken out that you want to use. This took 2x Shift-Ctrl-Gs in the example PDF, but some files need many more;
Select the path you want to keep;
Shift-! to invert the selection, then hit DEL to delete everything you don’t want.
That’s your path. OpenSCAD ≥2019.05 imports SVG, but older versions don’t. For path offsets for the seam, OpenSCAD’s offset(r=25.4/4) works too.
I’ve not quite got into Inkscape 1.0’s new features (like, “It’s stable, almost!”) but one I’m really looking forward to is the proper Fillet under path effects.
Much better!
I’m mildly surprised the outlines are simple paths, but I’m so biased by the utter crap produced by 3D modeling programs I no longer trust any “objects” found on the InterWebs. Reducing the whole thing to a bone-stock image and rebuilding the path by hand seemed easier.
Thanks for the tip!