The Smell of Molten Projects in the Morning

Ed Nisley's Blog: Shop notes, electronics, firmware, machinery, 3D printing, laser cuttery, and curiosities. Contents: 100% human thinking, 0% AI slop.

Tag: Repairs

If it used to work, it can work again

  • Garage Door Torsion Spring Break

    The really good thing about having torsion springs on the garage door is that when one breaks, not much happens:

    Garage door torsion spring - broken end
    Garage door torsion spring – broken end

    We decided to spray money on the problem and make it go away; the Dutchess Overhead Doors tech was here the morning after I called: quicker than Amazon Prime and he works much faster than I can.

    As nearly as I can tell from the checkbook (remember checkbooks?), an original (to us, anyway) spring broke shortly after we moved in. If so, that spring lasted nearly 17 years; at two open-shut cycles per day, let’s call it 12,000 cycles.

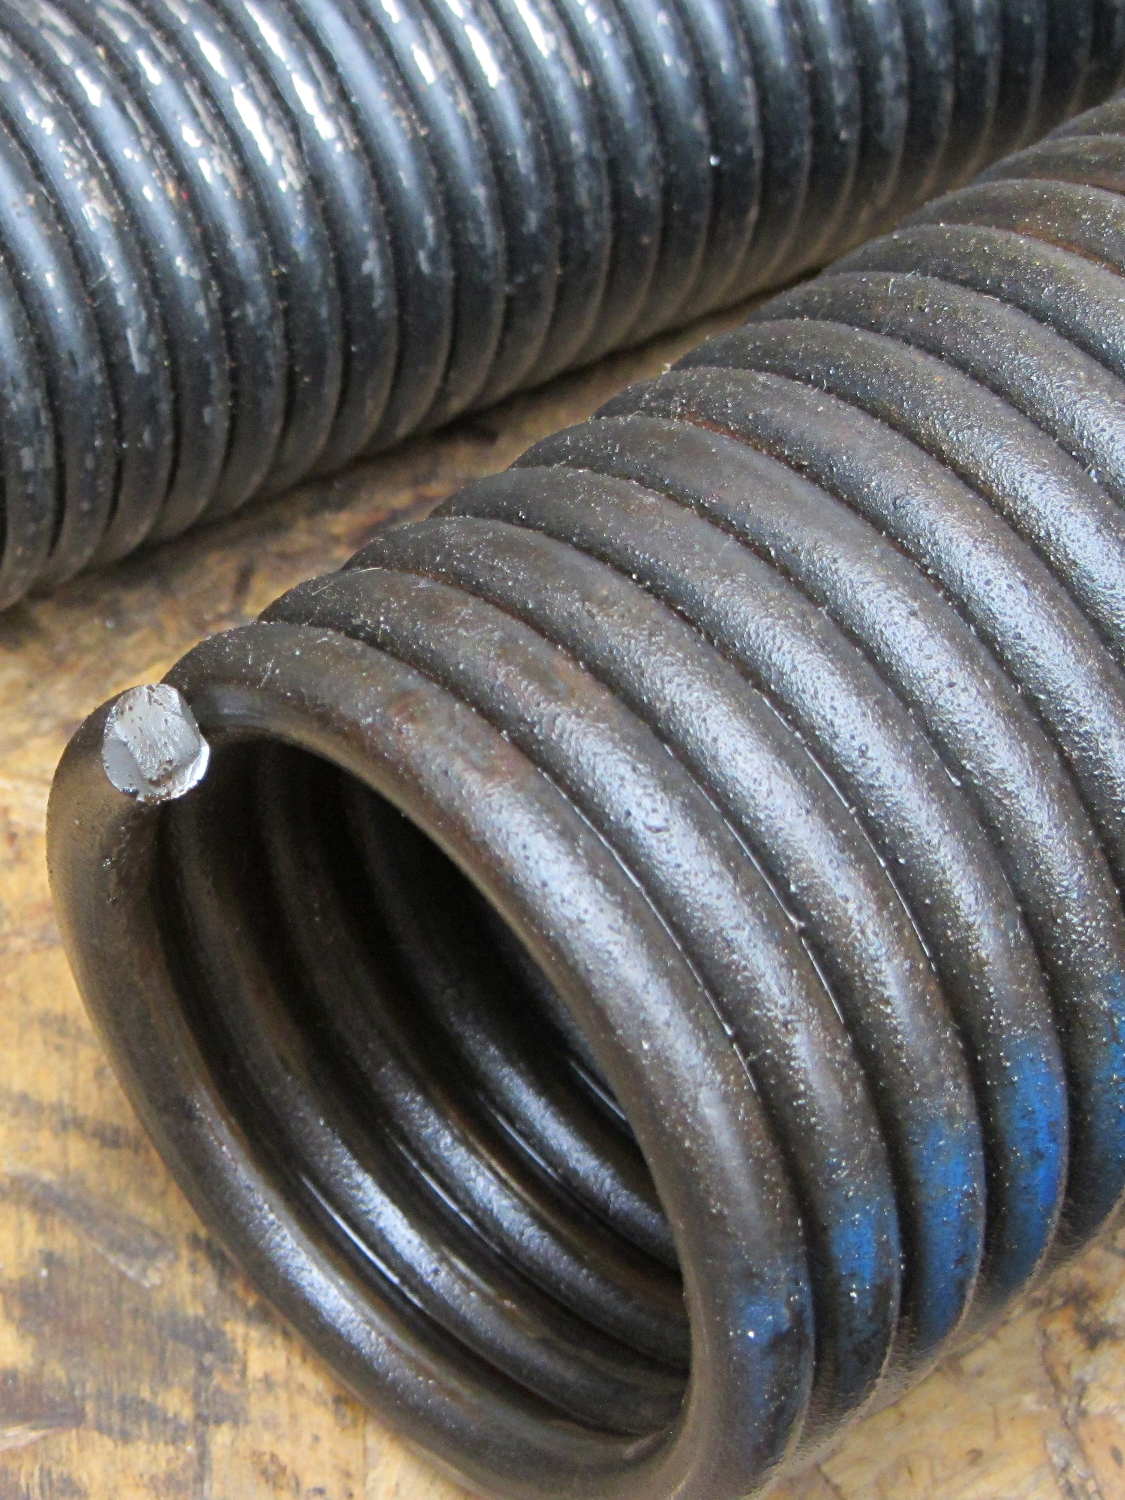
    For the record, the springs are:

    • 29 inches long
    • 1-3/4 inch ID
    • 0.250 wire
    • 7 foot tall door

    He cranked in seven full turns, corresponding to the “one turn per foot of door height” rule, although the door doesn’t quite balance on its own. I’d have done one more quarter-turn to match the chalk above the door (a good example of write it where you use it), plus maybe another for good measure, but I’m reluctant to mess with success:

    dsc08582 - Garage door torsion spring - installed
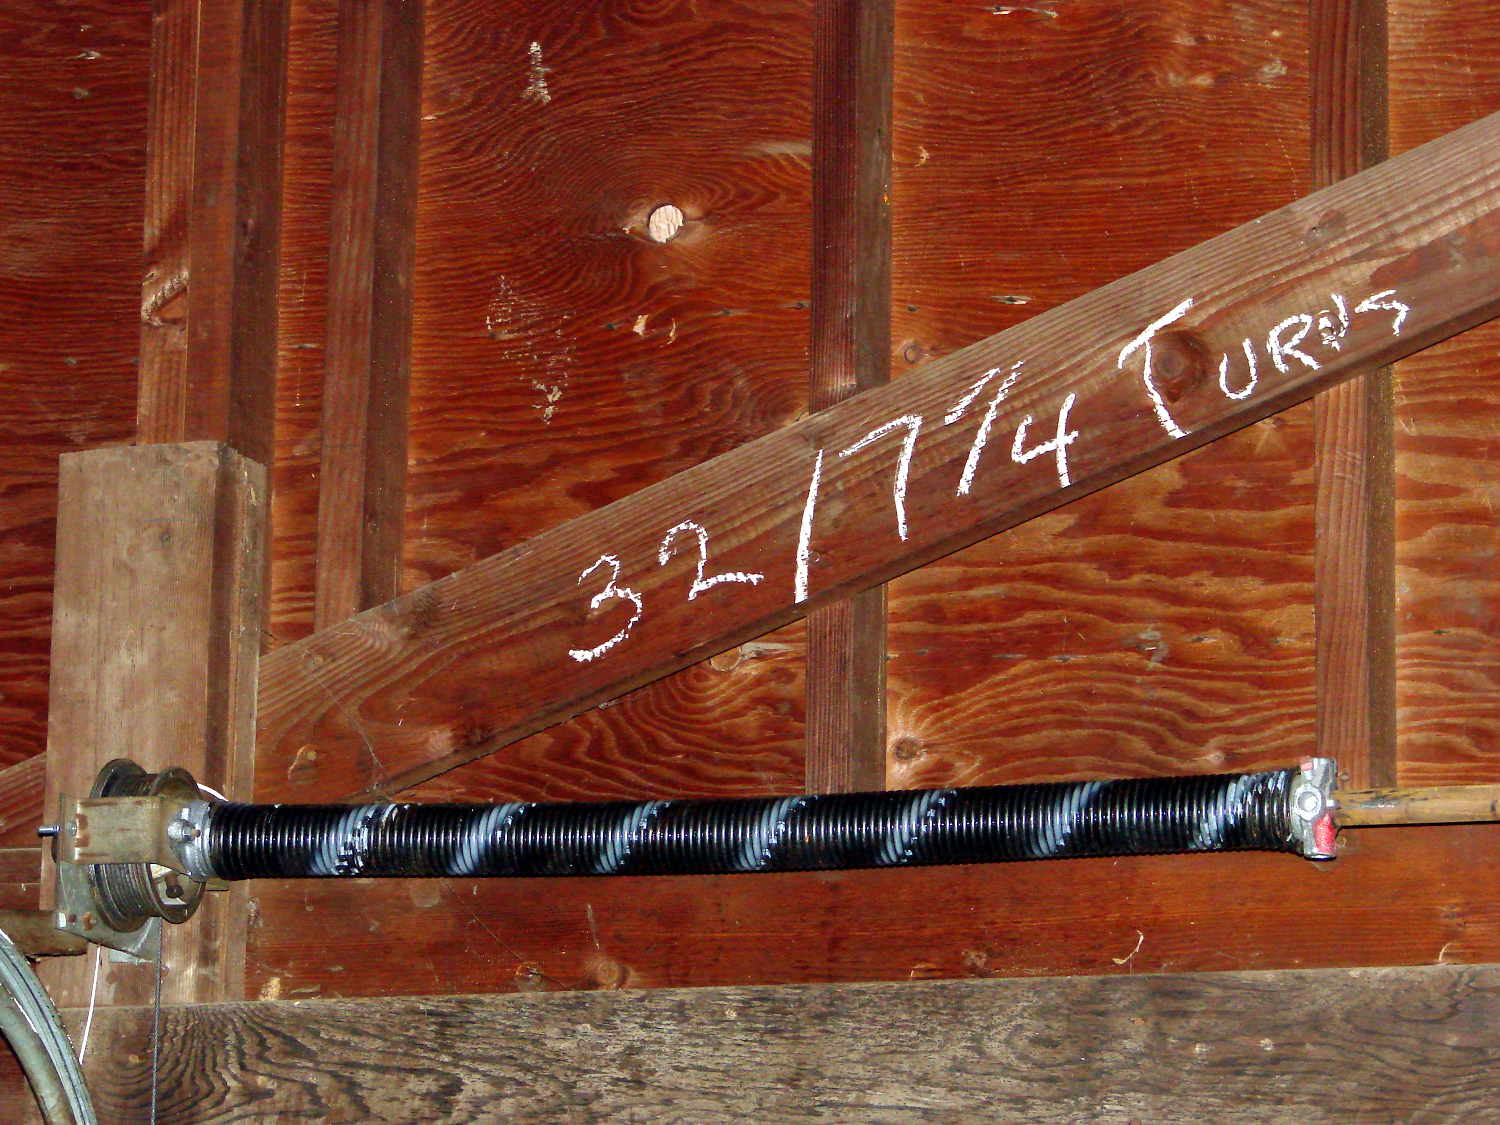
Perhaps the 1955 springs were 32 inches long, but the tech replaced what he found both times. It’s a brute of a door, two generous cars wide, with plywood panels in heavy wood framing, plus a few pounds of filler I applied to the rather crazed surface before painting it some years ago.

    I’m mildly surprised none of the dimensions changed in the last 60 years: the springs, end caps, pulleys, and hardware directly interchanged.

  • Drying Rack Rung Repair

    One of the rungs in the drying rack that keeps my bath towel from crawling away broke:

    Drying Rack - broken rung
    Drying Rack – broken rung

    The rungs have turned-down pegs on the ends that slide through the inner side strut and anchor into the outer strut with a nail through the end. You can see the peg between the struts.

    Removing the nail split the end of the strut, so I slobbered urethane glue into the crack and clamped it together overnight:

    Drying Rack - strut gluing
    Drying Rack – strut gluing

    Rather than removing the strut and doing it right, I gingerly freehanded a 3/8 inch hole into the end with a Forstner bit:

    Drying Rack - drilled reinforced rung
    Drying Rack – drilled reinforced rung

    Yes, that’s off-center, but it’s dead on the scar where the peg broke off. I have no idea how they could turn down a cylinder to get an eccentric peg on the end.

    The black heatstink tubing reinforces the absurdly thin wood shell remaining around the hole. It’s probably not required, given that I’m about to fill the hole with a hardwood peg; nothing exceeds like excess.

    Cut a suitable length from a nearby foam paint brush handle that just happens to be both hardwood and 3/8 inch in diameter, dab urethane glue in the holes (but not in the inner strut!), stuff peg through inner strut, seat in outer strut, stretch things enough to slide peg into rung, separate struts to avoid inadvertently pasting them together:

    Drying Rack - reassembled
    Drying Rack – reassembled

    Took about fifteen minutes over the course of three days while the glue cured.

    Done!

    Those of long memory may recall a similar repair to the previous rack; we do, occasionally, toss things. I did, of course, add some of its dowels to the Long Things Stockpile.

  • Alpha Geek Clock: New Battery

    After the CR123A lithium cell in the Alpha Geek Clock gave out:

    Packaged Alpha-Geek Clock
    Packaged Alpha-Geek Clock

    I duct-taped a pair of D cells onto the case and returned it to the bedroom shelf. According to the date scrawled on the tape, that was five years ago: 26 November 2010.

    Over the last few months, the LED gradually faded from a blink to a steady glow as the battery voltage dropped below 2 V and the WWVB receiver output no longer reached the MOSFET’s threshold.

    We’ll see how long these last:

    Alpha Geek Clock - new batteries
    Alpha Geek Clock – new batteries

    Yeah, I should probably do something involving 3D printing…

  • HP 7475A Plotter: Inmac Ball-Point Pen Tweakage

    The big bag o’ new-old-stock Inmac ball-point plotter pens had five different colors, so I popped a black ceramic tip pen in Slot 0 and ran off Yet Another Superformula Demo Plot:

    HP 7475A - Inmac ball pens - weak blue
    HP 7475A – Inmac ball pens – weak blue

    All the ball pens produce spidery lines, but the blue pen seemed intermittent. Another blue pen from the bag behaved the same way, so I pulled the tip outward and tucked a wrap of fine copper wire underneath. You can see the wire peeking out at about 5 o’clock, with the end at 3-ish:

    HP 7475A - Inmac ball pen - wire spacer
    HP 7475A – Inmac ball pen – wire spacer

    The wire holds the tip slightly further away from the locating flange and, presumably, makes it press slightly harder against the paper:

    HP 7475A - Inmac ball pen - stock vs. extended
    HP 7475A – Inmac ball pen – stock vs. extended

    A bit more pressure helped, but not enough to make it dependable, particularly during startup on the legend characters:

    HP 7475A - Inmac ball pens - extended blue
    HP 7475A – Inmac ball pens – extended blue

    That black line comes from an ordinary fiber-tip pen that looks like a crayon on a paper towel by comparison with the hair-fine ball point lines.

    Delicacy doesn’t count for much in these plots, so I’ll save the ball pens for special occasions. If, that is, I can think of any…

  • Harbor Freight 12 Inch Bar Clamp: Handle Failure

    Harbor Freight’s 12 Inch Ratcheting Bar Clamps come with a clear description:

    The 12 in. ratchet bar clamp/spreader is a light duty tool that’s perfect for delicate woodwork or scale modeling.

    Yeah, right. (*)

    It’s an awkward, clunky, heavy steel bar with chunky plastic fittings, not at all suitable for “delicate woodwork”. In my case, I attempted to clamp a 4×4 block against a bonded pair of of 2×4 studs before drilling a pair of bolt holes, whereupon one of the clamps failed. I deployed a spare clamp (always have a backup) and completed the mission.

    An autopsy showed the problem:

    Harbor Freight Bar Clamp - failed handle pivot
    Harbor Freight Bar Clamp – failed handle pivot

    The orange handle magnifies the applied force by the (more or less) 4:1 lever arm and applies it against two hollow plastic bosses on the side plates. The one just below the handle broke free, which is exactly what you’d expect to happen.

    The through hole looks like it should pass a pivot, but that’s not the case:

    Harbor Freight Bar Clamp - handle detail 1
    Harbor Freight Bar Clamp – handle detail 1

    I drilled out the hole just slightly to fit a snippet of brass tubing:

    Harbor Freight Bar Clamp - brass bushing
    Harbor Freight Bar Clamp – brass bushing

    If the tubing looks slightly off-center, that’s because it is. The two halves of the injection mold weren’t aligned, as you can see along the top edge of the picture, putting the hole off-center. The broken boss took most of the reaction force from the handle: a poor bad design compounded by crappy production QC.

    I filled the empty spaces with epoxy, topped it off with a pair of washers, match-drilled holes in the side plates, and ran a stainless 8-32 screw through the brass tubing:

    Harbor Freight Bar Clamp - reinforced pivot
    Harbor Freight Bar Clamp – reinforced pivot

    The end-on view shows the misaligned handle halves:

    Harbor Freight Bar Clamp - repaired - edge view
    Harbor Freight Bar Clamp – repaired – edge view

    It’s not nearly as stylish, but the handle pivot won’t fail again. I should preemptively repair the other clamps, but …

    “Harbor Freight: The Home of Single-Use Tools” once again performs as expected.

    (*) That’s a rare example of a double positive statement denoting a negative opinion, by the way.

  • HP 7475A Plotter: Pen Performance and a Backup

    By now, I have half a dozen baggies each containing half a dozen plotter pens, plus a demo program that can produce good-looking Superformula plots, so I can do this without any hassle:

    HP 7475A 2541A 68465 - Random pens
    HP 7475A 2541A 68465 – Random pens

    And this:

    HP 7475A 2641V 26599 - Random pens
    HP 7475A 2641V 26599 – Random pens

    I must confess to not being good at withstanding temptation; the second plot comes from another HP 7475A plotter that I won on eBay:

    Stacked HP 7475A Plotters
    Stacked HP 7475A Plotters

    Apparently, nobody else wanted a plotter advertised as “non-working”, leaving me as the sole bidder. The photos showed that it powered up properly, sported a serial (not HPIB) interface, had an (empty) carousel with rubber pen boots (that were, oddly enough, not fossilized), and came with a complete set of manuals. Turns out any one of those items sells for more than the entire package, so I can part it out, flip the pieces, and Profit! if I were so inclined.

    Load the carousel with a handful of restored pens, insert a sheet of paper, hold down the P1 + P2 buttons, flip the power switch, and out comes a perfectly drawn demo plot:

    HP 7475A 2641V 26588 - Firmware Demo Plot
    HP 7475A 2641V 26588 – Firmware Demo Plot

    Compared with the first plot from the first plotter, I’m plotting like it’s 1989!

    Which was the title of my Lightning Talk for the MHV LUG: MHVLUG – HP 7475A Demo – Plot Like Its 1989

    Anyway, now I have a backup…

  • HP 7475A Plotter: Refilled Pen Performance

    During this plot, an Inmac purple pen (in the Pen 5 slot) pretty much ran out of ink:

    HP 7475A - Pen 5 before refill
    HP 7475A – Pen 5 before refill

    It printed the legend perfectly and started the trace solidly enough, proceeding upward from the far right, but after ten circuits around the center it returned dragging a very faint line behind it.

    Ten drops = 0.05 ml of more-or-less reddish purple blended inkjet ink restored its good humor:

    HP 7475A - Pen 5 after refill
    HP 7475A – Pen 5 after refill

    If you get ’em before they fossilize, they’re refillable!