Ed Nisley's Blog: Shop notes, electronics, firmware, machinery, 3D printing, laser cuttery, and curiosities. Contents: 100% human thinking, 0% AI slop.
Category: Software
General-purpose computers doing something specific
In what’s surely a change intended to better meet the needs of their customers, the newspaper changed the crossword layout just a little teeny bit, so my previous script needed a tweak:
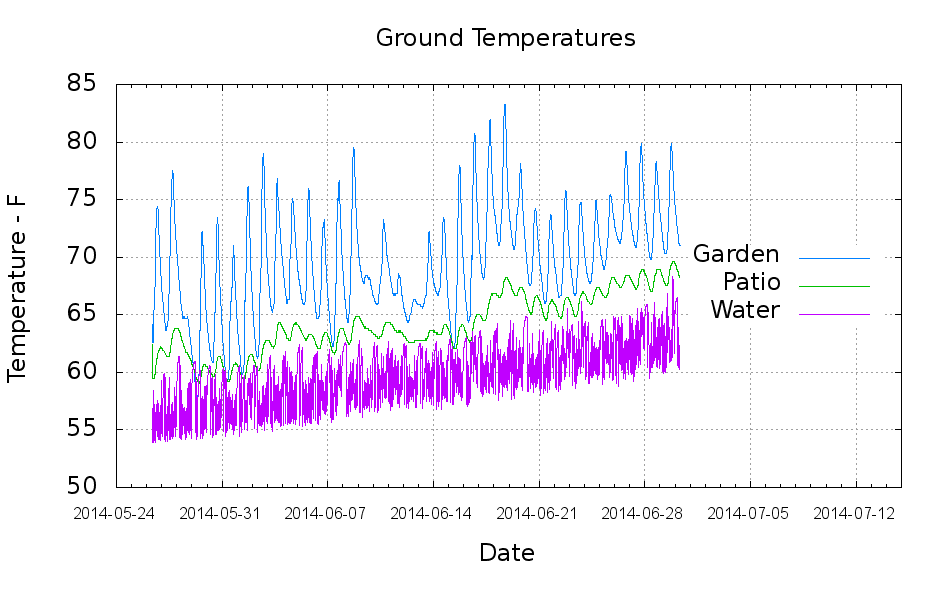
The “Garden” trace comes from a waterproof Hobo datalogger buried a few inches underground, beneath a thick layer of chipped leaf mulch. The “Patio” trace comes from the center of the cramped space below the concrete patio, buried flush with the bare dirt floor. The “Water” trace is the temperature at the incoming water pipe from the town water main, which passes 150 feet under the front yard.
Calculated eyeballometrically, the temperature rose 7 °F in about a month.
The datalogger in the garden came from the “cold cellar” veggie storage buckets, so I don’t have a year-long record. On the other paw, it looks like the patio temperature will be a pretty good proxy for the minimum garden temperature.
I hand-cleaned the Hobo CSV files and fed the results into a Gnuplot script that’s replete with the cruft of ages:
#!/bin/sh
#-- overhead
export GDFONTPATH="/usr/share/fonts/truetype/"
ofile=Temperatures.png
echo Output file: ${ofile}
#-- do it
gnuplot << EOF
#set term x11
set term png font "arialbd.ttf" 18 size 950,600
set output "${ofile}"
set title "Ground Temperatures"
set key noautotitles right center
unset mouse
set bmargin 4
set grid xtics ytics
set timefmt "%m/%d/%Y %H:%M:%S"
set xdata time
set xlabel "Date"
set format x "%Y-%m-%d"
set xrange [:"07/15/2014"]
set xtics font "arial,12"
#set mxtics 2
#set logscale y
#set ytics nomirror autofreq
set ylabel "Temperature - F"
#set format y "%4.0f"
#set yrange [30:90]
#set mytics 2
#set y2label "right side variable"
#set y2tics nomirror autofreq 2
#set format y2 "%3.0f"
#set y2range [0:200]
#set y2tics 32
#set rmargin 9
set datafile separator ","
#set label 1 "Garden"     at "05/31/2014",25 left font "arialbd,10" tc lt 3
#set arrow from 2.100,110 to 2.105,103 lt 1 lw 2 lc 0
plot	\
    "Garden.csv" using 2:3 with lines lt 3 lw 1 title "Garden",\
    "Patio.csv"  using 2:3 with lines lt 2 lw 1 title "Patio",\
    "Water.csv"  using 2:5 with lines lt 4 lw 1 title "Water",\

EOF
Huh. Who’d’a thunk it? That’s just too good to pass up…
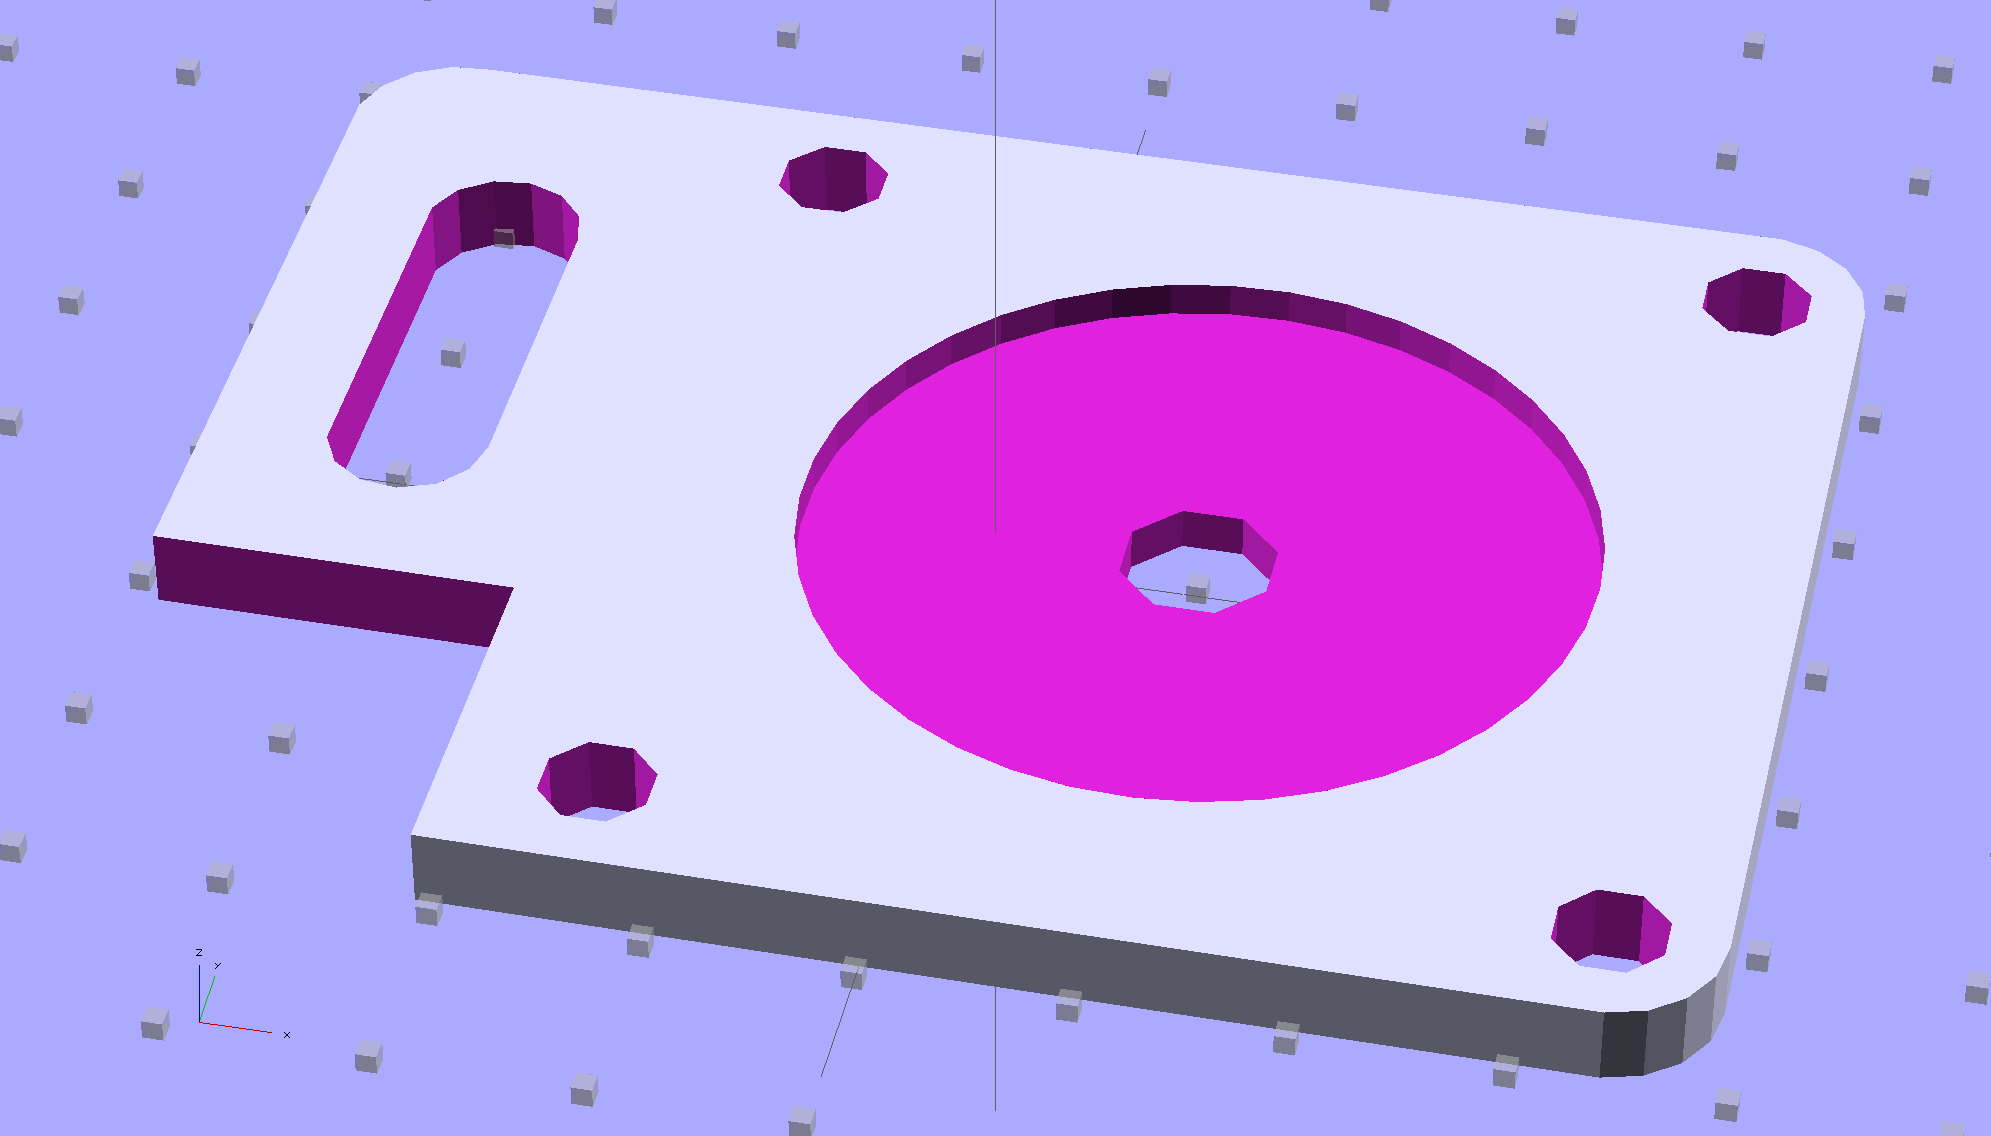
Although you wouldn’t use PLA for the real motor mount, this was easy:
Drive Motor Mount – solid model
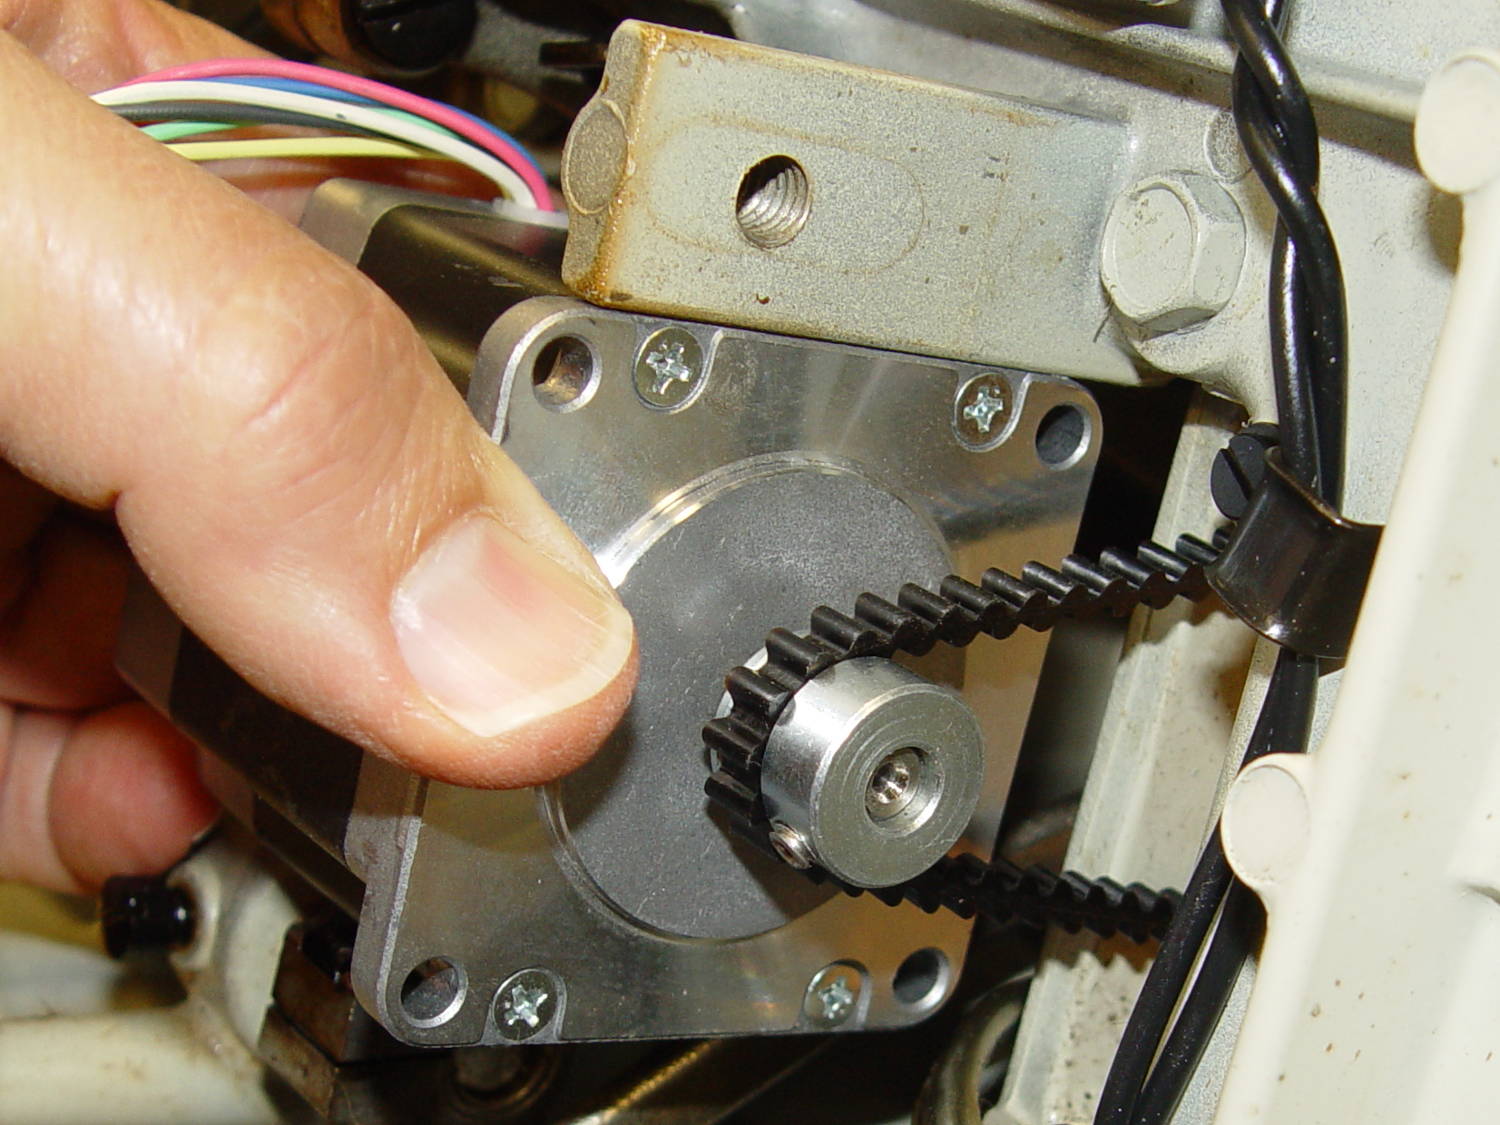
And the whole affair fits pretty much like you’d expect:
Kenmore 158 – NEMA 23 stepper – on adapter
The NEMA 23 motor doesn’t have the same end profile as the AC motor and the adapter plate gets in the way of the pulley, but flipping the pulley end-for-end perfectly aligned the belt.
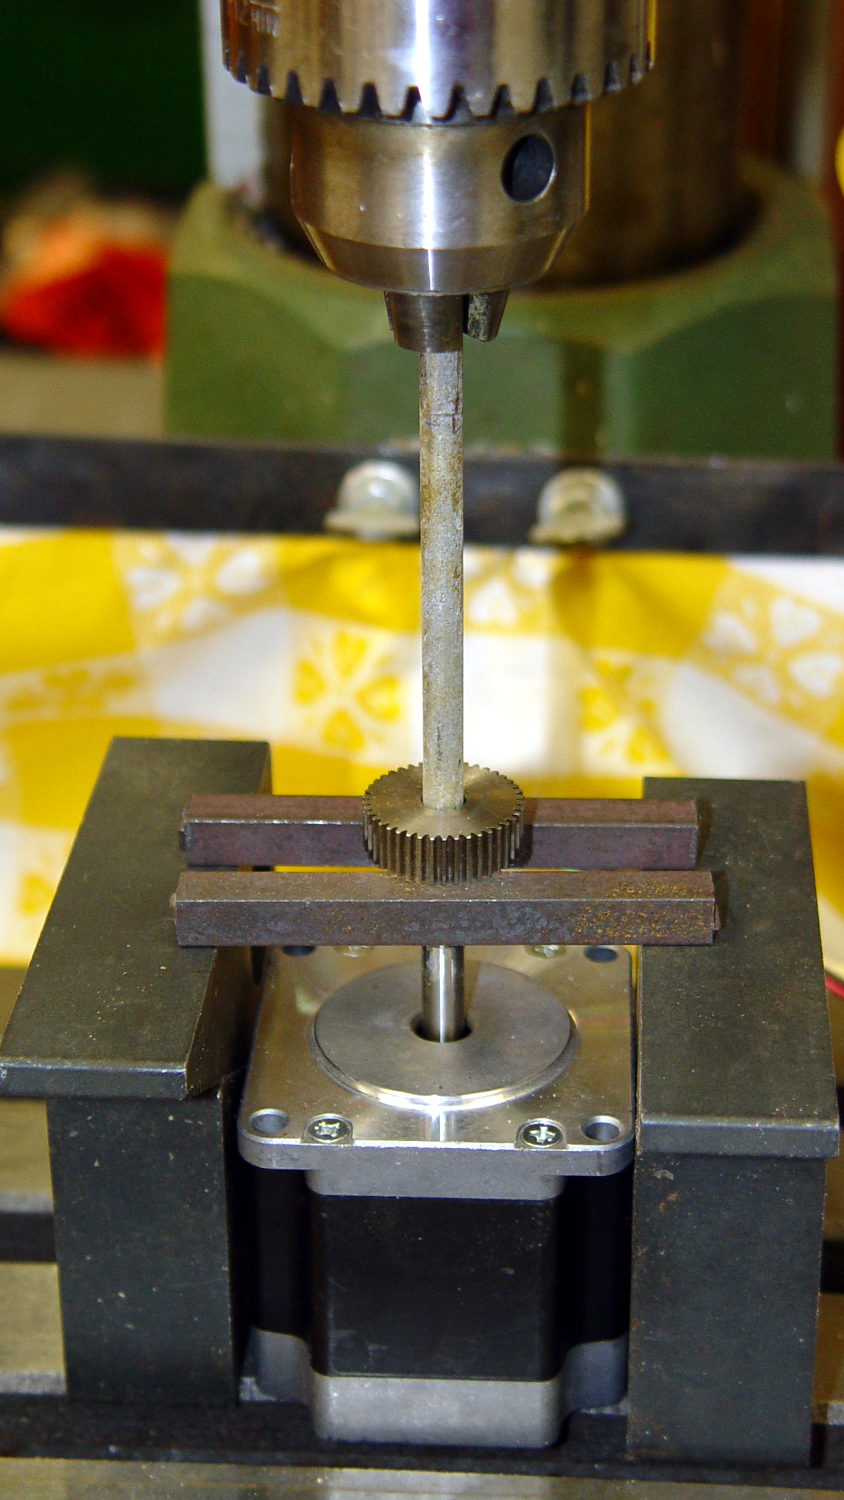
For whatever it’s worth, here’s how I removed the pressed-on gear from the shaft:
NEMA 23 Stepper – removing gear
I’m pretty sure I have a little gear puller somewhere, but it’s not where I expected to find it, which means it could be anywhere.
Much to my astonishment, the shafts on both motors are exactly 1/4″ inch. I filed a flat on the shaft to avoid having the setscrew goober the poor thing.
A stepper isn’t the right hammer for this job, because it can’t possibly reach 8000 rpm, but it’ll be good enough to explore the parameter space and weed out the truly stupid mistakes. A brushless DC motor from halfway around the planet would fit in the same spot.
The OpenSCAD source code:
// NEMA 23 Stepper Mounting Plate
// Ed Nisley - KE4ZNU - June 2014

Layout = "Build";			// Build Show

//- Extrusion parameters must match reality!
//  Print with 4 shells and 3 solid layers

ThreadThick = 0.20;
ThreadWidth = 0.40;

HoleWindage = 0.2;			// extra clearance

Protrusion = 0.1;			// make holes end cleanly

AlignPinOD = 1.70;			// assembly alignment pins: filament dia

inch = 25.4;

function IntegerMultiple(Size,Unit) = Unit * ceil(Size / Unit);

//----------------------
// Dimensions
// Origin at bottom front corner of plate as mounted on machine
//	motor mounted on rear surface, so recess is on that side

PlateThick = 4.0;				// overall plate thickness

SlotOffset = [10.0,13.0,0];		// center nearest origin, motor in X+,Y+ direction
SlotSize = [8.0,25.0];			// diameter of mounting screw , overall end-to-end length

CutoutOffset = [0.0,40.0,0];	// cutout around machine casting
CutoutSize = [18.0,18.0];

MotorBase = 58.0;				// square base plate side
MotorHoleOC = 47.2;				// hole center-to-center spacing
MotorHoleOffset = MotorHoleOC/2;
MotorHoleDia = 5.0;
MotorBaseCornerRadius = (MotorBase - MotorHoleOC)/2;

FlangeWidth = 20.0;				// mounting flange

MotorCenter = [(FlangeWidth + MotorBase/2),(MotorBase/2),0];		// XY of shaft centerline

MotorShaftDia = 7.0;			// allow some clearance

HubDia = 38.5;					// allow some clearance
HubHeight = 1.8;

//----------------------
// Useful routines

module PolyCyl(Dia,Height,ForceSides=0) {			// based on nophead's polyholes

  Sides = (ForceSides != 0) ? ForceSides : (ceil(Dia) + 2);

  FixDia = Dia / cos(180/Sides);

  cylinder(r=(FixDia + HoleWindage)/2,
           h=Height,
           $fn=Sides);
}

module ShowPegGrid(Space = 10.0,Size = 1.0) {

  RangeX = floor(100 / Space);
  RangeY = floor(125 / Space);

	for (x=[-RangeX:RangeX])
	  for (y=[-RangeY:RangeY])
		translate([x*Space,y*Space,Size/2])
		  %cube(Size,center=true);

}

//----------------------
// Build it!

module BasePlate() {

	difference() {
//		cube([(MotorCenter[0] + MotorBase/2),MotorBase,PlateThick],center=false);
		linear_extrude(height = PlateThick) {
			hull() {
				translate([MotorBaseCornerRadius,MotorBaseCornerRadius])
					circle(r=MotorBaseCornerRadius);
				translate([MotorBaseCornerRadius,MotorBase - MotorBaseCornerRadius])
					circle(r=MotorBaseCornerRadius);
				translate([FlangeWidth + MotorBase - MotorBaseCornerRadius,MotorBase - MotorBaseCornerRadius])
					circle(r=MotorBaseCornerRadius);
				translate([FlangeWidth + MotorBase - MotorBaseCornerRadius,MotorBaseCornerRadius])
					circle(r=MotorBaseCornerRadius);
			}
		}

		translate(MotorCenter - [0,0,Protrusion]) {
			rotate(180/8)
				PolyCyl(MotorShaftDia,(PlateThick + 2*Protrusion),8);		// shaft hole
			PolyCyl(HubDia,(HubHeight + Protrusion));						// hub recess
			for (x=[-1,1] , y=[-1,1]) {
				translate([x*MotorHoleOffset,y*MotorHoleOffset,0])
					rotate(180/8)
						PolyCyl(MotorHoleDia,(PlateThick + 2*Protrusion),8);
			}
		}

		translate(SlotOffset - [0,0,Protrusion]) {							// adjustment slot
			linear_extrude(height = (PlateThick + 2*Protrusion))
				hull() {
					circle(d=SlotSize[0]);
					translate([0,(SlotSize[1] - SlotSize[0])])
						circle(d=SlotSize[0]);

				}
		}

		translate(CutoutOffset - [Protrusion,0,Protrusion])
			linear_extrude(height = (PlateThick + 2*Protrusion))
				square(CutoutSize + [Protrusion,Protrusion]);
	}
}

ShowPegGrid();

if (Layout == "Show") {
	BasePlate();
}

if (Layout == "Build") {
	translate([-(SlotOffset[0] + MotorBase/2),MotorBase/2,PlateThick])
		rotate([180,0,0])
			BasePlate();
}
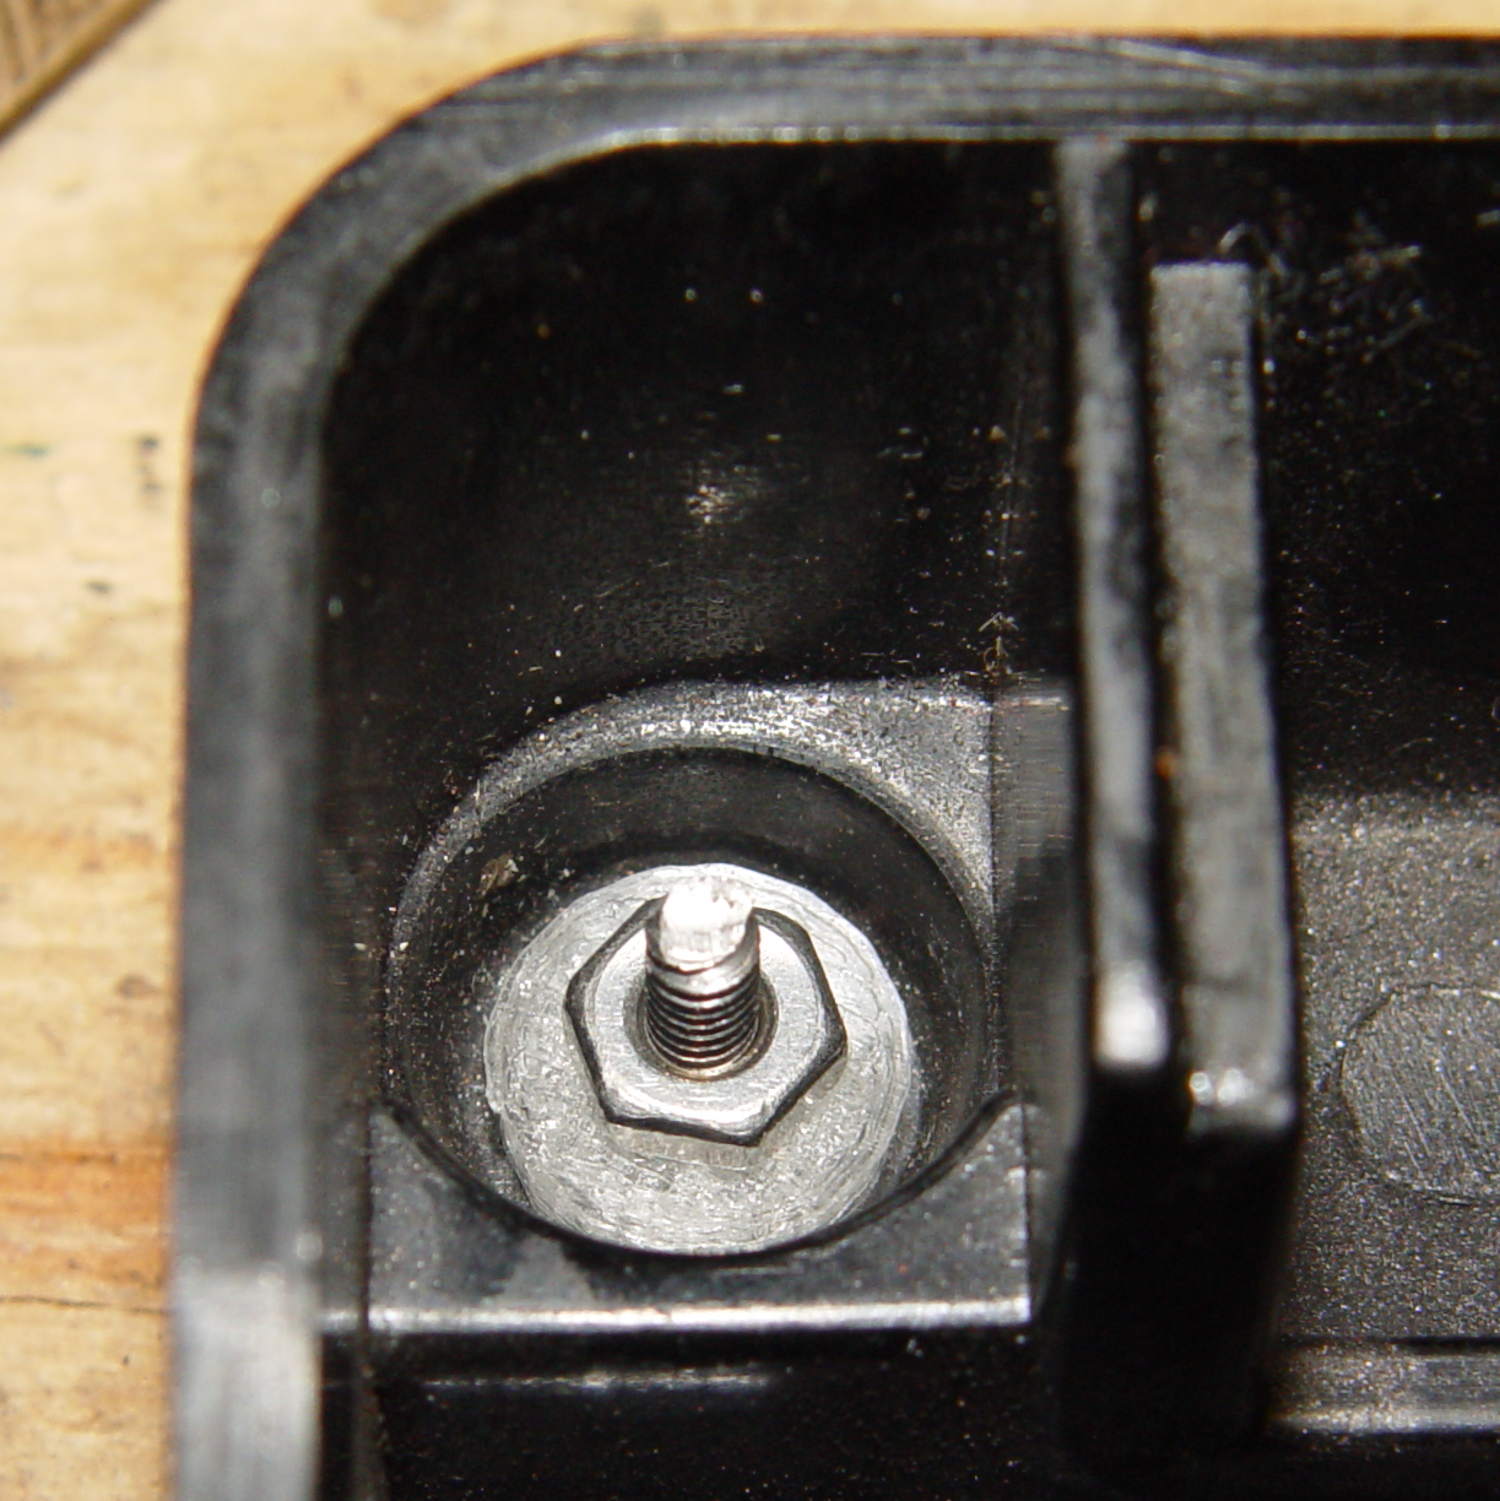
As you’d expect, the soft feet on the bottom of the Kenmore Model 158 sewing machine’s foot pedal control turn into hard buttons after a few decades. The OEM feet have mushroom tops that push through holes in the case and latch in place; of course, none of the rubber feet in my collection match the hole diameter or case thickness.
No problem! Design a bushing that fits the case hole and passes a 4-40 screw:
Speed Control Foot Bushing
Then print up a handful, add screws to fit the rubber feet, and top off with nuts:
Kenmore 158 – pedal foot bushing – detail
Installed, with the screws cropped to a suitable length, they look about like you’d expect:
Kenmore 158 – pedal foot bushing – interior
Turns out that the springs supporting the foot pedal rest in those pockets, so the bushing reduces the spring travel by a few millimeters. The springs aren’t completely compressed with the pedal fully depressed, so it’s all good.
The OpenSCAD source code:
// Kenmore Model 158 Sewing Machine Foot Control Bushings
// Ed Nisley - KE4ZNU - June 2014

//- Extrusion parameters must match reality!
//  Print with 2 shells and 3 solid layers

ThreadThick = 0.20;
ThreadWidth = 0.40;

HoleWindage = 0.2;			// extra clearance

Protrusion = 0.1;			// make holes end cleanly

function IntegerMultiple(Size,Unit) = Unit * ceil(Size / Unit);

//----------------------
// Dimensions

Stem = [2.5,5.7];			// through the case hole
Cap = [3.0,10.0];			// inside the case

LEN = 0;
DIA = 1;

OAL = Stem[LEN] + Cap[LEN];

ScrewDia = 2.8;				// 4-40 generous clearance

//----------------------
// Useful routines

module PolyCyl(Dia,Height,ForceSides=0) {			// based on nophead's polyholes

  Sides = (ForceSides != 0) ? ForceSides : (ceil(Dia) + 2);

  FixDia = Dia / cos(180/Sides);

  cylinder(r=(FixDia + HoleWindage)/2,
           h=Height,
           $fn=Sides);
}

module ShowPegGrid(Space = 10.0,Size = 1.0) {

  RangeX = floor(100 / Space);
  RangeY = floor(125 / Space);

	for (x=[-RangeX:RangeX])
	  for (y=[-RangeY:RangeY])
		translate([x*Space,y*Space,Size/2])
		  %cube(Size,center=true);

}

//----------------------
// Build it!

ShowPegGrid();

difference() {
	union() {
		cylinder(d=Stem[DIA],h=OAL,$fn=16);
		cylinder(d=Cap[DIA],h=Cap[LEN],$fm=16);
	}
	translate([0,0,-Protrusion])
		PolyCyl(ScrewDia,OAL + 2*Protrusion,6);
}
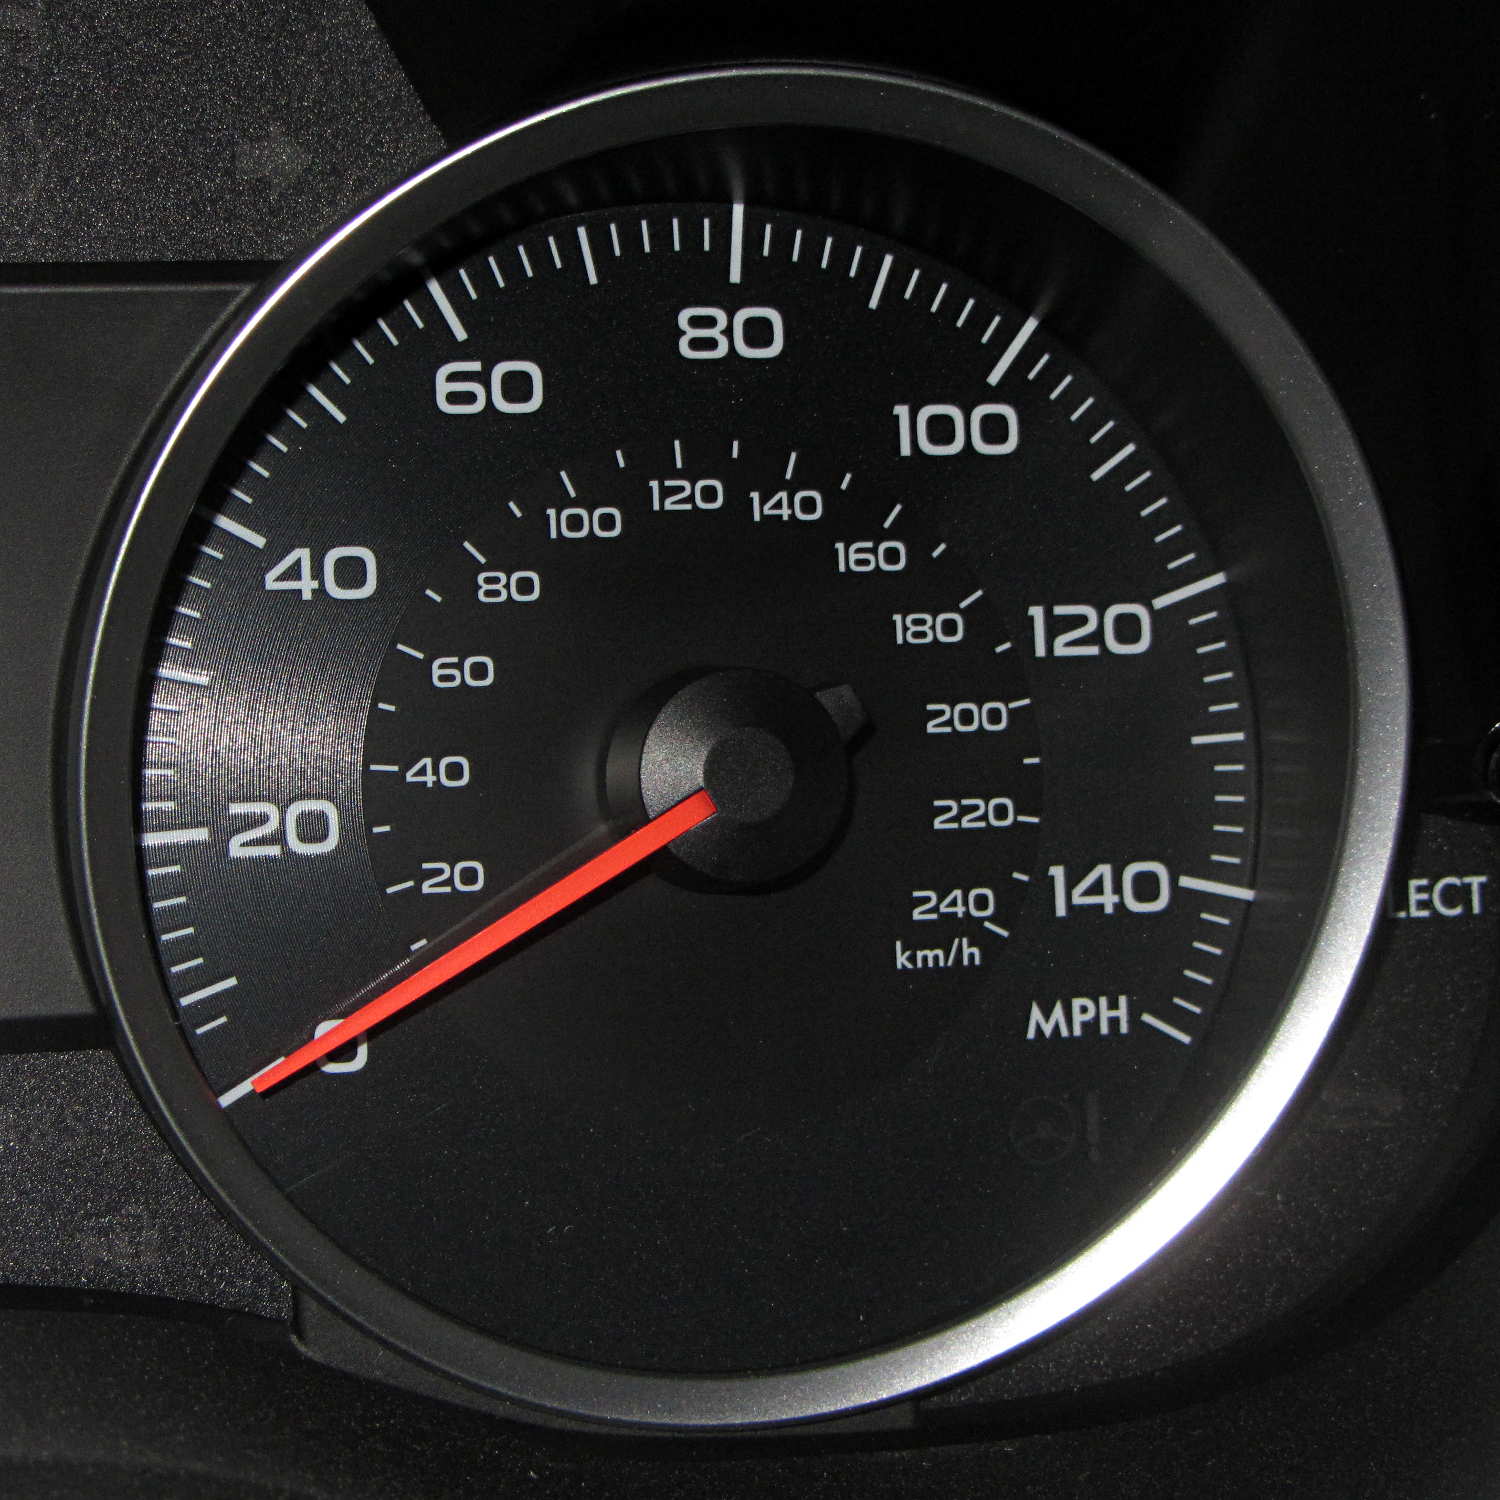
I finally figured out why the Forester feels so slow:
Subaru Forester – speedometer
Here in the Northeast US, the maximum legal speed anywhere is 65 mph, less than half-scale, and typical around-town speeds hit 40 mph, barely 1/4 of full scale.
For all practical purposes, that needle barely moves during our usual trips.
I like analog gauges to represent smoothly varying quantities that you must read at a glance, but a big digital display would actually be more useful than that thing.
A 150 mph speedometer scale makes no sense in what’s basically a shrunken all-wheel-drive SUV, even with minimal off-road capabilities. Yes, perhaps the Forester could hit 150 mph, but why not have the scale top out around, say, 100 mph? Above that, you shouldn’t be paying much attention to the speedo, anyway.
The Sienna’s speedo went to 110 and, to the best of my knowledge, that needle never passed 85 mph, tops. However, ordinary (and legal) driving speeds filled the lower half of the scale, with the highest useful speeds in the next quadrant beyond vertical.
Yes, I know why the speedos sport such absurd numbers. I don’t have to like it.
There’s a servo motor (or some such) driving the needle; calibration has been a simple matter of software for a long, long time.
For whatever it’s worth, the Forester and the Sienna have both tachometers and automatic transmissions, a combination that converts shifting into a spectator sport. The Forester’s continuously variable transmission moves the tach needle in smooth glides, rather than abrupt jumps.
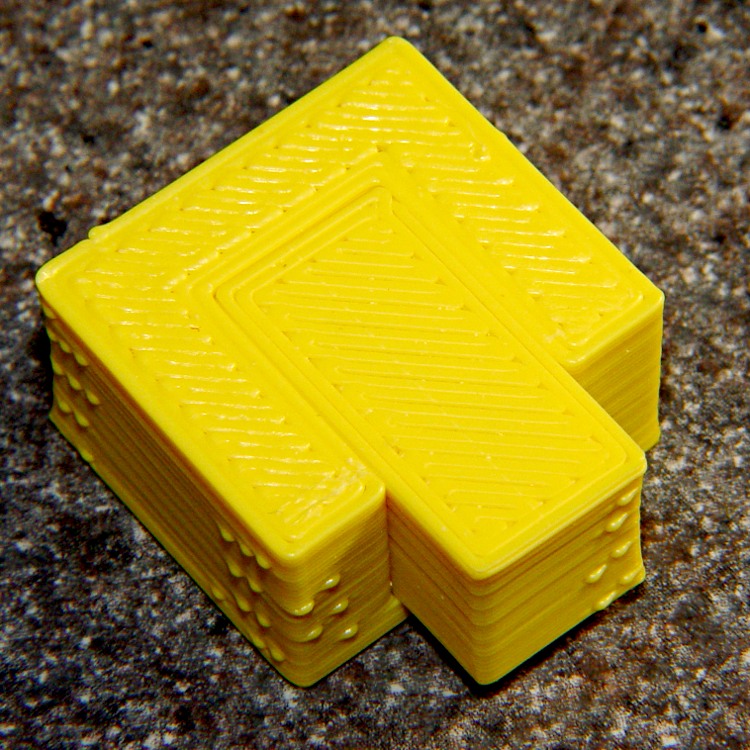
During one of my recent presentations, somebody asked about the accuracy of 3D printed parts, which reminded me of another member of Coasterman’s Essential Calibration Set: the perimeter width/thickness test block. Back in the day, calibrating the extruder meant getting the actual ratio of the thread width to its thickness to match the ideal value you told Skeinforge to use; being a bit off meant that the final dimensions weren’t quite right.
But when I got it right, the Thing-O-Matic printed a test block with considerable success, despite the horrible retraction zittage:
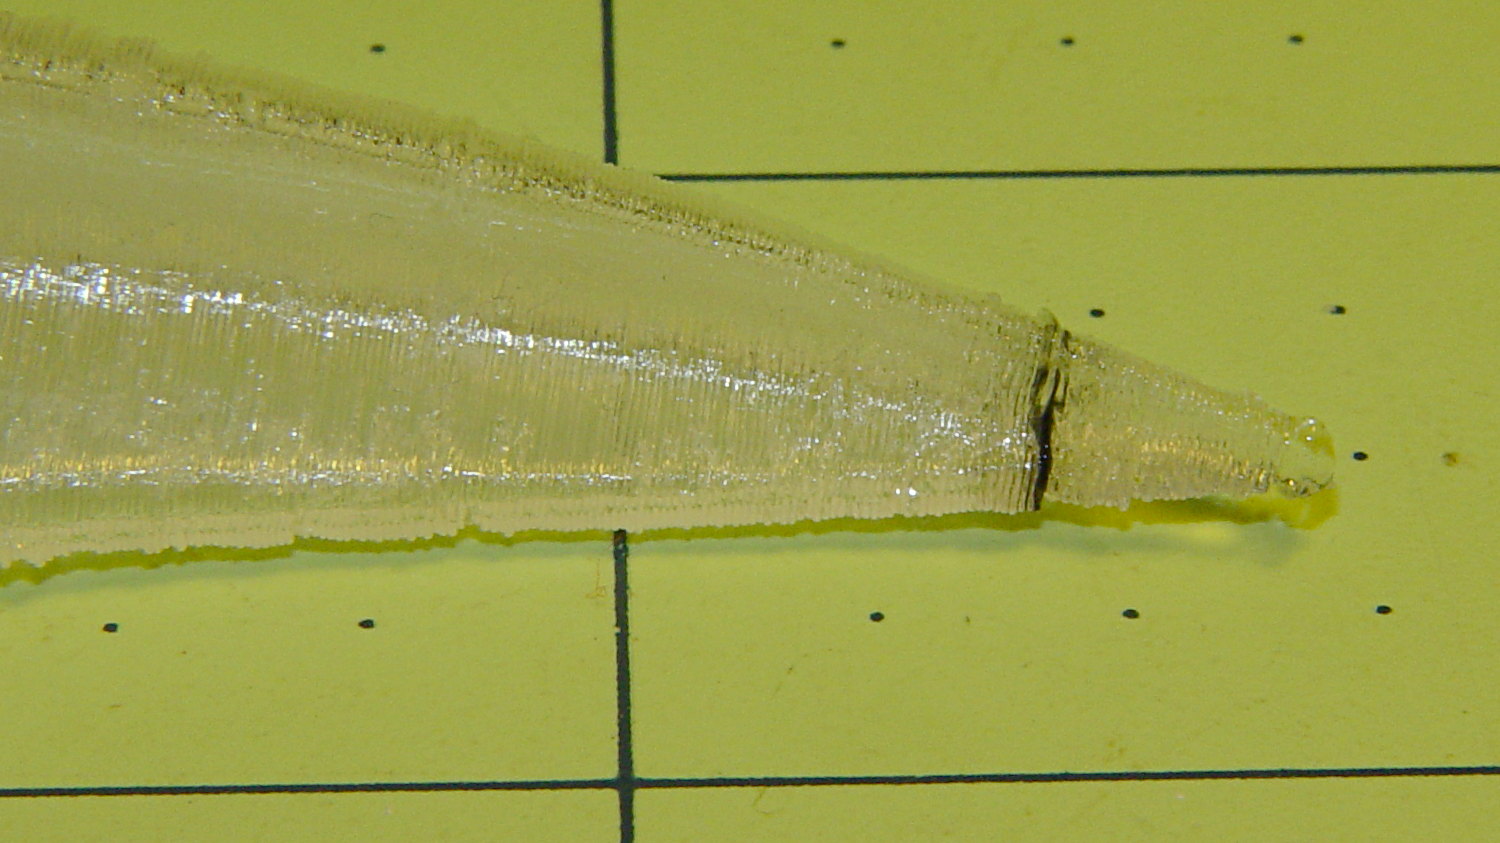
Perimeter Calibration Block – yellow 1.10 rpm 0.33 0.66 mm
Alas, feeding the STL to Slic3r showed that it was grossly non-manifold, and none of the automated repair programs produced good results. Turns out it’s an STL created from a Sketchup model, no surprise there, and the newer slicers seem less tolerant of crappy models.
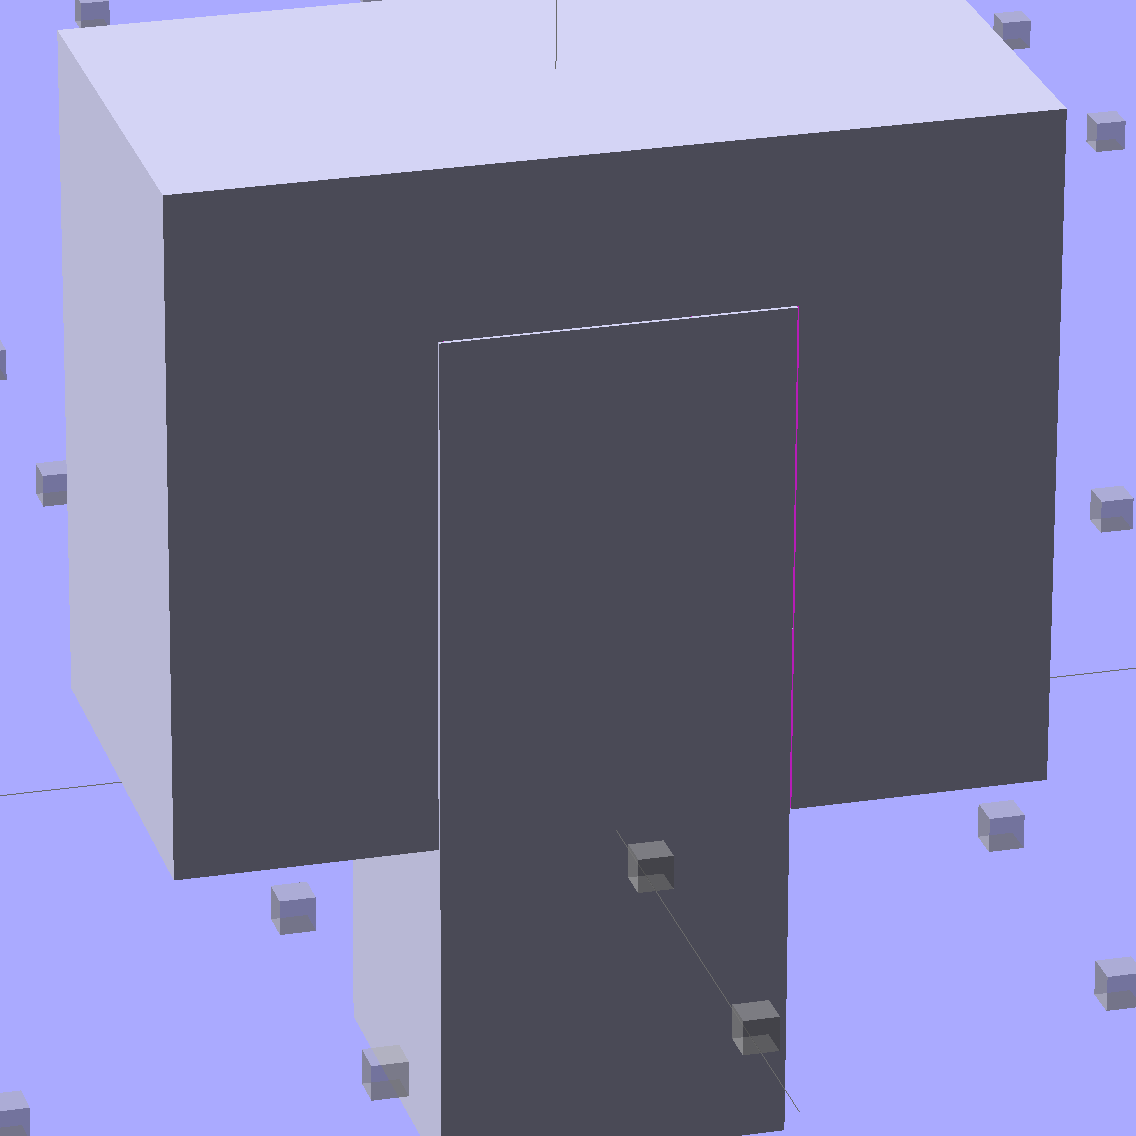
Sooo, here’s a new version built with OpenSCAD:
Fit Test Blocks – build view
You get three blocks-and-plugs at once, arranged in all the useful orientations, so you can test all the fits at the same time. They come off the platform about like you’d expect:
Fit test blocks
I tweaked the code to make the plugs longer than you see there; the short ones were mighty tough to pry out of those slots.
I ran the plugs across a fine file to clean the sides, without removing any base material, and the plugs fit into the slots with a firm push. I’d do exactly the same thing for a CNC milled part from the Sherline, plus breaking the edges & corners.
The plugs doesn’t fit exactly flush in the recesses for the two models on the right side of that first image, because the edges and corners aren’t beveled to match each other. It’s pretty close and, if it had to fit exactly, you could make it work with a few more licks of the file. The left one, printed with the slot on the top surface, fits exactly as flush as the one from the Thing-O-Matic.
Of course, there’s a cheat: the model allows 0.1 mm of internal clearance on all sides of the plug:
Fit Test Block – show view
The outside dimensions of all the blocks and plugs are dead on, within ±0.1 mm of nominal. You’d want to knock off the slight flange at the base and bevel the corners a bit, but unless it must fit inside something else, each object comes off the platform ready to use.
Feel free to dial that clearance up or down to suit your printer’s tolerances.
The OpenSCAD source code:
// Fit test block based on Coasterman's perimeter-wt.stl
//	http://www.thingiverse.com/thing:5573
//	http://www.thingiverse.com/download:17277
// Ed Nisley - KE4ZNU - May 2014

Layout = "Show";

//- Extrusion parameters must match reality!
//  Print with 2 shells and 3 solid layers

ThreadThick = 0.20;
ThreadWidth = 0.40;

Protrusion = 0.1;			// make holes end cleanly

function IntegerMultiple(Size,Unit) = Unit * ceil(Size / Unit);

//----------------------
// Dimensions

Clearance = 0.1;

PlugSize = [10.0,10.0,25.0];
BlockSize = [25.0,13.0,20.0];

PlugOffset = 10.0;

//----------------------
// Useful routines

module ShowPegGrid(Space = 10.0,Size = 1.0) {

  RangeX = floor(100 / Space);
  RangeY = floor(125 / Space);

	for (x=[-RangeX:RangeX])
	  for (y=[-RangeY:RangeY])
		translate([x*Space,y*Space,Size/2])
		  %cube(Size,center=true);

}

module Block() {
	difference() {
		translate([0,0,BlockSize[2]/2])
			cube(BlockSize,center=true);
		translate([0,PlugSize[1] - PlugSize[1]/2 - BlockSize[1]/2,-PlugOffset])
			Plug(Clearance);
	}
}

module Plug(Clear = 0.0) {
	minkowski() {
		translate([0,0,PlugSize[2]/2])
			cube(PlugSize,center=true);
		if (Clear > 0.0)
			cube(Clear,center=true);
	}
}

//----------------------
// Build it

ShowPegGrid();

if (Layout == "Block")
	Block();

if (Layout == "Plug")
	Plug();

if (Layout == "Show") {
	Block();
	translate([0,PlugSize[1] - PlugSize[1]/2 - BlockSize[1]/2,-PlugOffset])
		Plug();
}

if (Layout == "Build") {
	Block();
	translate([0,-15,0])
		Plug();

	translate([-30,0,0]) {
		translate([0,-BlockSize[1]/2,BlockSize[1]/2])
			rotate([-90,0,0])
				Block();
		translate([-PlugSize[2]/2,-15,PlugSize[0]/2])
			rotate([0,90,0])
				Plug();
	}

	translate([30,0,0]) {
		translate([0,0,BlockSize[2]])
			rotate([180,0,180])
				Block();
		translate([-PlugSize[2]/2,-15,PlugSize[1]/2])
			rotate([90,0,90])
				Plug();
	}

}
The Boneheads Raven Skull demo came out reasonably well, albeit in a reduced size, on the Squidwrench Frank-o-Squid:
TOM286 – Raven Skull on platform
So I ran off a full-size version on the M2 for comparison:
Raven Skull – on M2 platform
The extruder apparently contained a gobbet of black PLA, left over from the Pink Panther Woman, that managed to hang on inside until the very tip of the beak:
Raven Skull – beak contamination
Close inspection found two black strands closer to the base of the printed parts:
Raven Skull – black contamination
The rear of the skull joins the front just behind the eye sockets, where the solid bottom layers make a visible contrast with the air behind the perimeter threads elsewhere. Refraction darkens some of the threads, but the two black patches stand out clearly.
If it weren’t natural PLA, those flaws wouldn’t be nearly so noticeable.
Were I doing this stuff for a living, I might dedicate a hot end (or an entire extruder) to each color and be done with it.
All in all, the printed quality is about as good as I could expect from a glorified glue gun.
The extreme slowdown while printing the tip of the beak pushed Pronterface’s remaining time estimate over the edge: