Three firmware constants (seem to) control the acceleration applied to each axis, presented here in their original form:
#define DEFAULT_MAX_ACCELERATION      {9000,9000,30,10000}    // X, Y, Z, E maximum start speed for accelerated moves. E default values are good for skeinforge 40+, for older versions raise them a lot.
#define DEFAULT_ACCELERATION          3000    // X, Y, Z and E max acceleration in mm/s^2 for printing moves
#define DEFAULT_RETRACT_ACCELERATION  3000   // X, Y, Z and E max acceleration in mm/s^2 for r retracts
I do not pretend to understand their interaction and, pursuant to that discussion, some tests and measurements seem to be the only way to find out what’s happening. However, estimating some masses and guesstimating motor performance can put some boundaries on the problem.
Based on weighing a slightly larger stepper motor and the hot end, the complete extruder assembly may weigh (OK, mass) about 600 grams, which I’ll round up to 1 kg to cover bending the filament guide tube and friction. In order to accelerate the extruder carriage at 9000 mm/s^2, the X axis stepper motor force must be:
F = ma = 1 kg * 9 m/s2 = 9 N
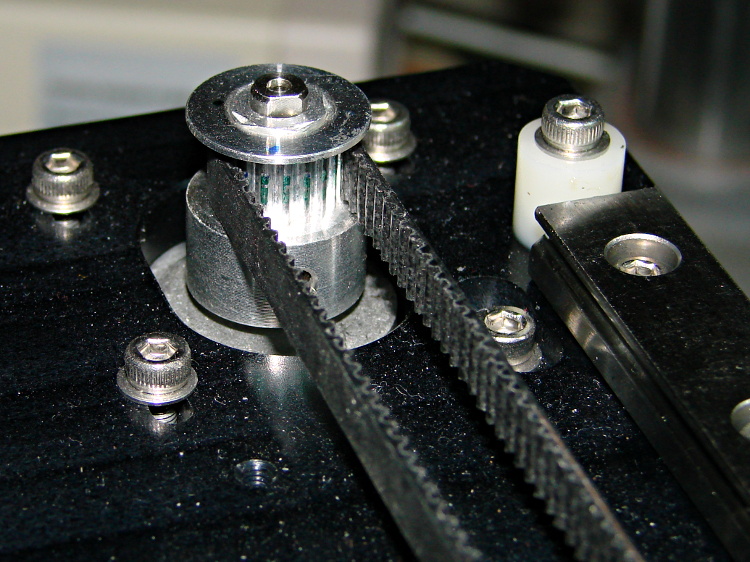
The pulley drives 36 mm of belt per revolution, so the effective diameter = 11.5 mm and the radius = 5.7 mm. That means the motor torque will be:
50 mN·m = 9 N * 5.7 mm
I don’t have specs for the Makergear motors, but similar motors have pull-in torques in the 200 to 300 mN·m range, which is flat out to 1000 (full)step/s and decreases to zilch as the speed approaches 10000 (full)step/s. Because the motors run in 1/16 microstep mode, Marlin’s peak 40000 (micro)step/s rate works out to 2500 (full)step/s, where the motor pull-in torque is maybe half of the maximum.
The motor pull-out torque falls off to nothing around 1000 (full)step/s = 16000 (micro)step/s, which suggests you can’t slow the stages down nearly as fast as you speed them up, at least beyond about 10000 (micro)step/s.
All of that depends on the motor current, of course, and that depends on the amount of heat you’re willing to generate in the motors. I really must build a better dynamometer.
Assuming the Y stage + heater + glass weighs 4 pounds = 2 kg, the numbers are twice as large, but they’re in the same ballpark.
I tried a few values for the Z acceleration and settled on something slightly larger, but that won’t apply to a different motor.
I have no way to estimate the force required to drive the filament, but the gearbox multiplies the motor torque by a factor of 5, so there’s a speed-torque tradeoff lying in wait.
I modified the acceleration constants to bring the overall limits in line with the per-axis values:
#define DEFAULT_MAX_ACCELERATION      {9000,9000,75,10000}
#define DEFAULT_ACCELERATION          10000		// X, Y, Z and E max acceleration in mm/s^2 for printing moves
#define DEFAULT_RETRACT_ACCELERATION  10000		// X, Y, Z and E max acceleration in mm/s^2 for r retracts
Changing the last two values from 3000 to 10000 produced a dramatic increase in acceleration, so those numbers do act as overall limits on the per-axis values in the first line.
Because the motion planner ramps the velocity up at the maximum possible acceleration (reduced, as needed, to accommodate the motor with the lowest acceleration involved in the motion), higher acceleration values allow the motor to reach the desired speed sooner, so shorter motions run faster.
For example, reaching 200 mm/s2 from a standing start requires 6.7 mm at 3000 mm/s2 and 2.2 mm at 9000 mm/s2. Braking to a stop requires the same distance, assuming the pull-out torque allows it. Contemporary motion planners that can match velocities around corners where straight-line segments join will allow higher sustained speeds, so they don’t require slowing to a dead stop.
But, of course, the 3D printer’s overall structure must be rigid enough to restrain the reaction forces caused by high accelerations and the printer must be anchored well enough to not sidle off the table. The M2 can handle a single high-speed move, but chaining multiple moves together shakes the steel chassis rather violently; that happens when you select the Slic3r “Avoid crossing perimeters” option.