The Smell of Molten Projects in the Morning

Ed Nisley's Blog: Shop notes, electronics, firmware, machinery, 3D printing, laser cuttery, and curiosities. Contents: 100% human thinking, 0% AI slop.

Category: Science

If you measure something often enough, it becomes science

  • Monthly Science: Air Temperatures

    This collects the temperature data points from the Hobo data loggers for the last month:
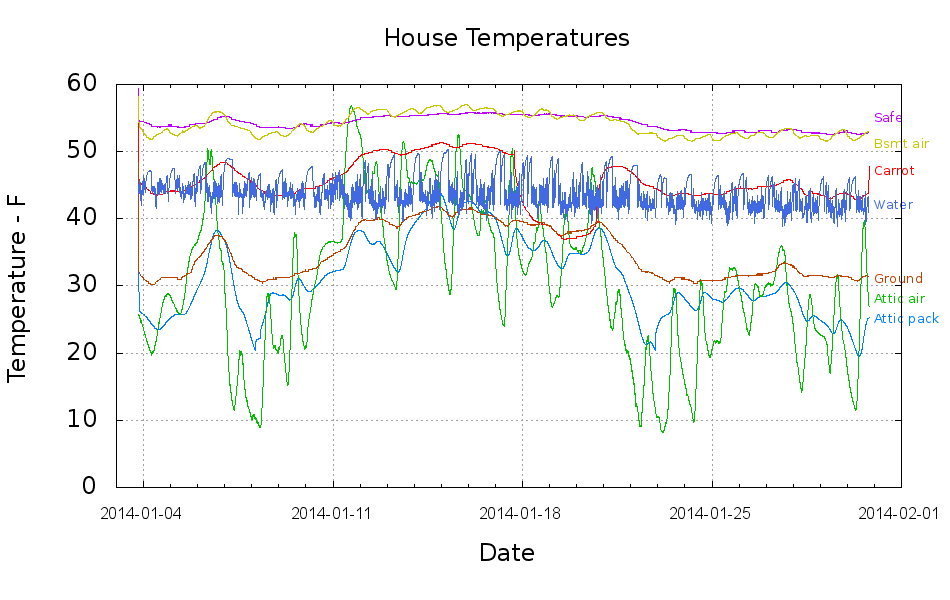
    Temperatures
    Temperatures

    Things to ponder:

    • The carrot buckets sat under the patio at the start of the month and moved indoors twice, marked by the humps. The early part of their curve doesn’t track the patio ground temperature nearly as well as it did during the three days at 18 Jan. We’re not sure why.
    • The water temperature sensor clamps to the copper pipe just inside the wall, so the low points measure outdoor water on its way past. The high points rise toward the basement air temperature (measured a few feet away), but the wall / earth around the pipe holds it below the air.
    • The basement safe looks like a good proxy for the average daily air temperature.
    • The attic insulation I added long ago seems to be working hard & doing swell.

    I cleaned up the data files manually, using those sed pipes, because of inadequate Bash-fu; I can’t figure out how to escape-quote the input file names and make temporary files work inside a Bash for;do;end construct that would rip through all the CSV files in one shot.

    On the other paw, the chart came out pretty well; I can now specify X-axis date ranges with some assurance of getting the right results.

    The Bash / Gnuplot script that made it happen:

    #!/bin/sh
    #-- overhead
    export GDFONTPATH="/usr/share/fonts/truetype/"
    ofile=Temperatures.png
    echo Output file: ${ofile}
    #-- do it
    gnuplot << EOF
    #set term x11
    set term png font "arialbd.ttf" 18 size 950,600
    set output "${ofile}"
    set title "House Temperatures"
    set key noautotitles left bottom
    unset mouse
    set bmargin 4
    set grid xtics ytics
    set timefmt "%m/%d/%Y %H:%M:%S"
    set xdata time
    set xlabel "Date"
    set format x "%Y-%m-%d"
    set xrange ["01/03/2014":]
    set xtics font "arial,12"
    #set mxtics 2
    #set logscale y
    #set ytics nomirror autofreq
    set ylabel "Temperature - F"
    #set format y "%4.0f"
    #set yrange [30:90]
    #set mytics 2
    #set y2label "right side variable"
    #set y2tics nomirror autofreq 2
    #set format y2 "%3.0f"
    #set y2range [0:200]
    #set y2tics 32
    #set rmargin 9
    set datafile separator ","
    set label 1 "Attic pack" at "01/31/2014",25 left font "arialbd,10" tc lt 3
    set label 2 "Attic air"  at "01/31/2014",28 left font "arialbd,10" tc lt 2
    set label 3 "Safe"       at "01/31/2014",55 left font "arialbd,10" tc lt 4
    set label 4 "Carrot"     at "01/31/2014",47 left font "arialbd,10" tc lt 1
    set label 5 "Ground"     at "01/31/2014",31 left font "arialbd,10" tc lt 6
    set label 6 "Bsmt air"   at "01/31/2014",51 left font "arialbd,10" tc lt 7
    set label 7 "Water"      at "01/31/2014",42 left font "arialbd,10" tc lt 8
    #set arrow from 2.100,110 to 2.105,103 lt 1 lw 2 lc 0
    plot	\
        "Attic.csv"  using 2:3 with lines lt 3 lw 1,\
        "Attic.csv"  using 2:4 with lines lt 2 lw 1,\
        "Safe.csv"   using 2:3 with lines lt 4 lw 1,\
        "Carrot.csv" using 2:3 with lines lt 1 lw 1,\
        "Patio.csv"  using 2:3 with lines lt 6 lw 1,\
        "Water.csv"  using 2:3 with lines lt 7 lw 1,\
        "Water.csv"  using 2:5 with lines lt 8 lw 1
    
    EOF
    
  • 2000 Toyota Sienna: Replacing the Bank 1 Sensor 2 Oxygen Sensor

    Shortly after replacing the battery, the dreaded Malfunction Indicator Lamp popped on with a P0420 error code that, according to the Nice Man at Autozone, translates into “low catalytic converter efficiency”. A bit of diagnostic sleuthing reported that the most likely cause was an exhaust leak, followed by an out-of-calibration downstream oxygen sensor, followed by a bad converter. Internet lore has it that replacing the cat cracker is a dealer-only event (here in New York State, with a van sporting the California emissions package) that costs upwards of $2 k, which seems excessive for a 14-year-old van.

    Actually, the most probable cause was replacing the battery: the brief power outage wipes out the stored performance data for the emissions control machinery. Because we make only short trips and it’s been bitterly cold, the algorithms may conclude the converter’s dead when it’s just a matter of measuring the variables under suboptimal conditions.

    With all that in mind, after a peek under the van ruled out the exhaust leak, I decided to replace the oxygen sensor. All this happened during a week when the outdoor temperature hovered around 10 °F = -12 °C, but the forecast called for an atypical January day with a high of 55 °F = 13 °C; I might not get a second chance before the annual inspection came due in February.

    The sensor is relatively cheap (about $70 at the local Autozone) and, entirely unlike Bank 1 Sensor 1, readily accessible on the tailpipe downstream of the cat cracker:

    Sienna Bank 1 Sensor 2 - in place
    Sienna Bank 1 Sensor 2 – in place

    The OEM sensor cable runs in a sheath held to the chassis with a plastic clamp:

    Sienna Bank 1 Sensor 2 - cable clamp
    Sienna Bank 1 Sensor 2 – cable clamp

    Jamming a small screwdriver into the clamp released the tongue and the sheath. The sheath vanishes into the van’s interior through a squishy rubber boot, with a crimped metal band joining the two:

    Sienna Bank 1 Sensor 2 - floor boot
    Sienna Bank 1 Sensor 2 – floor boot

    Internet lore would have you believe you can replace the sensor without removing the front passenger seat, but it’s much easier if you remove the four bolts, disconnect the seat sensor, and lay the seat on its back:

    Sienna Bank 1 Sensor 2 - interior connector
    Sienna Bank 1 Sensor 2 – interior connector

    More fiddly-diddly with the screwdriver under the van wrecked the band enough to separate sheath from boot, at which point deploying the BFW with the magic oxygen sensor socket showed that the anti-seize compound on the sensor’s thread worked as intended: after one oomph the sensor turned out by hand.

    Then you just punch the boot through the floor and bring it all inside to splice new sensor onto OEM connector. Standardization is a wonderful thing; the sensor cable may use any one of eight color codes. The Toyota OEM sensor was a “Type B” that matches up with the Bosch replacement sensor thusly:

    • Heater = two black leads ↔ two white leads
    • Signal = blue lead ↔ black lead
    • Ground = white lead ↔ gray lead

    Although the splice block has water-resistant seals, I figured putting it inside the van couldn’t possibly be a Bad Idea, so there it is, nestled snugly into the recess in the floor:

    Sienna Bank 1 Sensor 2 - splice block
    Sienna Bank 1 Sensor 2 – splice block

    Picked up a nice new Autel AL519 OBD Code Scanner from the usual Amazon vendor, reset the trouble code, drove to-and-from Squidwrench (across the river, just barely far enough to reset the performance data), and so far it’s All Good. The motivation for getting my very own scanner, rather than returning to Autozone, is that the AL519 can do real-time graphing and data capture from various sensors, so I can perform Science! should the spirit move me.

    The AL519 has a USB connection that appears as a USB serial device but, alas, the relentlessly Windows-centric host program won’t run under Wine.

  • Plastic Stress in Polarized Light

    Here’s what the (cracked) faceplate of the FC1002 Frequency Meter looks like, through polarizing filters that reveal the internal stress.

    A circular polarizer screwed on the lens:

    FC1002 Frequency Counter - faceplate - circular polarizer
    FC1002 Frequency Counter – faceplate – circular polarizer

    A sheet of linear polarizing film held in front of the lens:

    FC1002 Frequency Counter - faceplate - linear polarizer
    FC1002 Frequency Counter – faceplate – linear polarizer

    For reference, none of the other instrument faceplates on the bench show anything other than uniform gray, with one exception that points directly to the plastic injection point.

    I’d say this plate cracked due to unrelieved internal stresses and not anything I did or didn’t do.

  • Canon vs. Wasabi NB-6LH Batteries

    Our Larval Engineer reported that her camera, which is my old Casio pocket camera, has begun fading away, so we’re getting her a shiny new camera of her very own. Being a doting father, I picked up a pair of Wasabi NB-6L batteries (and a charger, it not costing much more for the package) so she’s never without electrons, and did the usual rundown test on all three batteries:

    Canon NB-6L - 2014 OEM vs Wasabi
    Canon NB-6L – 2014 OEM vs Wasabi

    Fairly obviously, the Wasabi batteries aren’t first tier products, but they’re definitely better than that bottom-dollar crap from eBay.

  • Monthly Image: Ice Crystals

    The recent bout of single-digit (Fahrenheit!) temperatures produced ice crystals on some of our leakier windows:

    Window Ice Feathers
    Window Ice Feathers
    Window Ice Spines
    Window Ice Spines
    Window Ice Feathers
    Window Ice Feathers
    Window Ice Feathers
    Window Ice Feathers

    The windows came with the house, date back to 1955, do have storm windows, and we’ll grant the next owners the joy and delight of replacing them…

  • Water Cooled Stepper Motors: Flow Calculation

    A discussion on the Makergear Google Group about a heated enclosure prompted me to run the numbers for cooling stepper motors with water, rather than fans and finned heatsinks.

    The general idea comes from my measurements of the air-cooled heatsink stuck to a stepper’s end cap. The metal-to-metal conductivity works surprisingly well and reduces the case temperature to slightly over ambient with decent airflow through the heatsink; epoxying a cold plate to the end cap should work just as well. A NEMA 17 stepper case is 42.3 mm square, so a standard 40 mm square CPU cooling plate will fit almost exactly.

    The question then becomes: how much water flow do you need to keep the motors cool?

    Some numbers:

    • Water’s heat capacity is 4.2 J/g·K
    • 1 J = 1 W·s, 1 W = 1 J/s
    • NEMA 17 motors dissipate about 5 W (13 W if you’re abusing them)
    • We’ll cool all four motors in parallel, for a total of 20 W
    • Allow a 5 K = 5 °C temperature rise in each cold plate

    Rub them all together:

    (20 J/s) / (5 K * (4.2 J/g·K)) = 0.95 g/s

    For water, 1 g = 1 cc, so the total flow is 1 cc/s = 3600 cc/h = 3.6 liter/h, which, here in the US, works out to a scant 1 gallon/hour. It’s tough getting a pump that small and cheap flowmeters run around 0.5 liter/m…

    If you don’t want a pump. put an aquarium up on a (sturdy) shelf and drain it through the cold plates. A cubic foot of water, all eight gallons and sixty-some-odd pounds of it, will last 8 hours, which should be enough for most printing projects.

    If you want reliability, drain the coolers into a sump with a float switch (high = on), put another float switch (high = off) on the aquarium, and have the pump top up the aquarium. If the pump fails, your steppers stay cool for the next 8 hours. Heating the water about 5 °C during 8 hours won’t require active cooling.

    Now, managing the hoses leading to the X axis stepper may be challenging, but a cable drag chain would control the rest of the wiring, too.

  • Northern Cardinal: Window Strike

    For all the usual reasons, I didn’t hang the mesh netting over the bedroom window when I put up the bird feeder on the far corner of the patio:

    Male cardinal - window strike death
    Male cardinal – window strike death

    That window is far enough away that birds get up to full speed and low enough that they can see through the windows on the far side of the bedroom to the bushes and trees north of the house.

    The mesh is up now and I feel like crap.