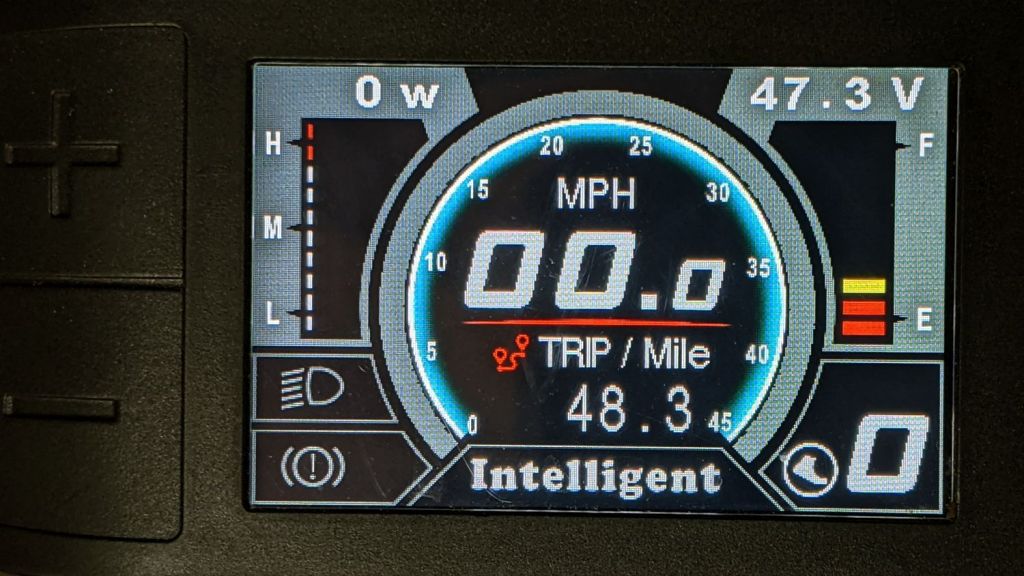
The Smell of Molten Projects in the Morning

Ed Nisley's Blog: Shop notes, electronics, firmware, machinery, 3D printing, laser cuttery, and curiosities. Contents: 100% human thinking, 0% AI slop.

Category: Recumbent Bicycling

Cruisin’ the streets

  • Amber 1 Watt LED: MP1584 Hackery

    Amber 1 Watt LED: MP1584 Hackery

    The PCB wrapping a buck regulator around an MP1584 chip uses a tiny trimpot to set the output voltage:

    MP1584 buck regulator PCB
    MP1584 buck regulator PCB

    The 01D resistors use the EIA-96 identifier series and are 100 kΩ.

    Based on simpleminded testing, a 1 W amber LED drops about 2.5 V at 430 mA. A 1 Ω ballast resistor drops another half volt and burns a quarter of a watt, sufficient to cover some LED forward drop variation.

    The trimpot is entirely too twitchy, so I replaced it with an SMD resistor:

    Amber 1W LED - fixed voltage SMD
    Amber 1W LED – fixed voltage SMD

    The trimpot read 26.5 kΩ after I extracted it, but I surely nudged it a smidgen in the process.

    For the record (first column is SMD topmark, second is measured resistance):

    • 3012 = 29.9 kΩ (!!) → 3.67 V into a 100 Ω resistor
    • 2492 = 24.9 kΩ → 3.19 V : 2.63 V @ 550 mA = 1.45 W
    • 2362 = 22.6 kΩ → 2.97 V : 2.52 V @ 450 mA = 1.13 W
    • 223 = 22.0 kΩ → 2.91 V : 2.484 V @ 425 mA = 1.06 W

    With 6.3 V @ 210 mA = 1.3 W from the bench regulator, the resistor now burns 180 mW at 425 mA and the LED burns 82% of the input power.

    Letting it cook overnight settled out with the LED at 2.47 V and 440 mA = 1.09 W, with 6.3 V at 220 mA = 1.4 W from the bench supply. The LED dissipates 78% of the input power and the resistor burns 190 mW = 14%, so the regulator uses 120 mW = 8%.

    I can come close to the final output voltage by plugging the new resistor value and the 8.2 kΩ resistor (on the PCB) into the MP1584 datasheet equations, but figuring the resistor to get a specific output voltage seems largely empirical.

  • Amber 1 Watt LED: First Light

    Amber 1 Watt LED: First Light

    After the rather disappointing results of the truck side marker LED light, this seems more promising:

    Amber 1W LED - test heatsink
    Amber 1W LED – test heatsink

    The 1 watt amber LED is soldered to an aluminum heat spreader stuck to a scrap heatsink with thermally conductive tape. The PCB is a buck converter build around an MP1584 regulator. The lens on the left claims a 5° beam angle, which seems aspirational at best.

    Not counting the heatsink, you’re looking at less than three bucks of parts; living in the future is great.

    Fitting the lens over the LED produces a shatteringly bright beam, at least in the Basement Laboratory:

    Amber 1W LED - lens test
    Amber 1W LED – lens test

    The lens has a conical cavity surrounding the LED lens to capture the light and redirect it to the beam forming reflector. It’s done with total internal reflection, there are no coatings, and it’s a wonder to behold: one-shot molded aspheric optics at work.

    Not seating the lens firmly against the LED produces a dark spot in the middle of the beam. I soldered the leads directly to the LED and cut out the sides of the black lens holder, as soldering them to the convenient side pads would prevent the lens from seating properly.

    The LED drops about 2.5 V at 430 mA (1.08 W). The bench supply delivered 6.3 V at 190 mA (1.2 W) to simulate the headlight output of the Bafang motor controller.

    The headlight output is good for 6-ish V and 3 W = 500-ish mA, so burning half the power in a simple dropping resistor or linear current regulator is a Bad Idea™. You can get constant current LED drivers, but apparently not with 6 V input and 1 W output, so stepping the voltage down makes more sense. You’d want at least a little ballast resistor in there to soak up small forward drop changes with temperature variations.

    The regulator can handle up to 28 V input and the tiny trimpot must cover nearly that range of output voltages, so the 2.5 V output jams it near the minimum end of its rotation (which is, of course, backwards). This calls for a fixed resistor to eliminate the effects of vibration on a trimpot at 10% of its range.

  • Fiskars Bypass Pruner Rehabilitation

    Fiskars Bypass Pruner Rehabilitation

    Mary found a rusted Fiskars bypass pruner in the trash pile near her Vassar Farms plot and brought it home for proper disposal. The nuts and screws responded to an overnight penetrating oil treatment and it came apart easily:

    Fiskars bypass pruner - as found
    Fiskars bypass pruner – as found

    The movable jaw may have once sported a PTFE coating, but it’s likely just a different steel alloy.

    After scrubbing the pieces with an abrasive pad, a little diamond filing, and (at the insistence of the Squidwrench chorus) some Dremel wire-wheel action, it looks almost new:

    Fiskars bypass pruner - restored
    Fiskars bypass pruner – restored

    The blades sport a few nicks from their previous life, but work well enough.

  • Power Outage Explained

    Power Outage Explained

    Spotted in the corner gas station’s wrecked car lookaside buffer:

    Rt 376 midnight crash - vehicle
    Rt 376 midnight crash – vehicle

    The white paint seemed familiar:

    Rt 376 midnight crash - 2021-07-20 - C
    Rt 376 midnight crash – 2021-07-20 – C

    Word has it the 16 year old son was driving, with his father in the passenger seat, and managed to lose control without any of the usual causative factors. Everyone lived to tell the tale, which is a tribute to the contemporary auto tech we all take for granted.

    Contrary to what we thought, they crashed around 8 pm and Central Hudson cut the power around midnight to repair the lines.

    Looks they’ll need another truck; that ain’t gonna buff right out.

  • Amber Side Marker Light Hackery

    Amber Side Marker Light Hackery

    Start with the amber side marker light sporting a cataract and distorted beam:

    Side Marker - beam test - E
    Side Marker – beam test – E

    Part off the lens:

    Side Marker E - cutting case
    Side Marker E – cutting case

    The cut is just in front of the PCB and went slowly to avoid clobbering the SMD resistors very near the edge.

    The cataract turned out to be crud adhered to the LED lens:

    Side Marker E - LED cataract
    Side Marker E – LED cataract

    Brutal surgery removed the LED and installed a replacement:

    Side Marker E - replacement LED
    Side Marker E – replacement LED

    The PCB had two 150 Ω SMD resistors for use with 12-ish V automotive batteries. While I had the hood up, I removed one and shorted across its pads to make the LED work with the 6 V switched headlight supply from the Bafang motor.

    In round numbers, 6 V minus 2.2 V forward drop divided by 150 Ω is about 25 mA. The original LED ran at 35-ish mA, but it’s close enough.

    Glue the lens back in place:

    Side Marker E - clamping case
    Side Marker E – clamping case

    The bubbly stuff is solid epoxy from the original assembly, which is why removing the PCB is not an option.

    The new LED is no more off-center than any of the others:

    Side Marker E - new LED - front
    Side Marker E – new LED – front

    It does, however, sit much closer to the lens, due to the ring of plastic I cut away to get inside. As a result, the beam is mostly a single centered lobe with only hints of the five side lobes; there isn’t much waste light from the side of the LED into those facets.

    Replace the one I originally put in the new fairing mount:

    Side Marker E rebuilt - installed
    Side Marker E rebuilt – installed

    However, it’s still not much more than a glowworm in the daytime, so we need more firepower …

  • Another Power Outage

    Another Power Outage

    We woke just after midnight to a completely dark and silent house, I padded around shutting of half a dozen UPS units under various desks and benches, and we eventually got back to sleep:

    Rt 376 midnight crash - 2021-07-20 - status
    Rt 376 midnight crash – 2021-07-20 – status

    According to our clocks, power actually returned about four hours later.

    Our grocery ride the next morning went past the crash site:

    Rt 376 midnight crash - 2021-07-20 - A
    Rt 376 midnight crash – 2021-07-20 – A

    Tracks in the grass leading up to the smashed mailbox on our right suggest the driver didn’t quite make the very slight curve leading to the straight section.

    It was garbage collection day and the debris field covered the entire front lawn:

    Rt 376 midnight crash - 2021-07-20 - B
    Rt 376 midnight crash – 2021-07-20 – B

    Both poles have rectangular reflectors, but the one on the smashed pole (on the left) shows the pole is maybe four feet shorter than it used to be.

    We have no idea how a can of white paint got involved in the proceedings:

    Rt 376 midnight crash - 2021-07-20 - C
    Rt 376 midnight crash – 2021-07-20 – C

    [Update: Now we know where the paint came from.]

    Quite some years ago, an errant driver demolished the front corner of that house and, more recently, the whole building burned out, so there may be a jinx on the site.

    Other than that, we had an uneventful ride …

  • Bafang Charger Cord Anchor

    Bafang Charger Cord Anchor

    The Bafang battery charger uses an AC line cord “binocular” connector with what must be the weakest spring contacts ever made, which finally annoyed me enough to fix:

    Bafang charger - AC line cord anchor
    Bafang charger – AC line cord anchor

    Also, the case now sports four thick fuzzy felt feet to keep it from sliding around quite so easily.

    Another customer-does-the-last-ten-percent product …