The Smell of Molten Projects in the Morning

Ed Nisley's Blog: Shop notes, electronics, firmware, machinery, 3D printing, laser cuttery, and curiosities. Contents: 100% human thinking, 0% AI slop.

Category: Recumbent Bicycling

Cruisin’ the streets

  • Tour Easy Rear Running Light: LED Heatsink

    Tour Easy Rear Running Light: LED Heatsink

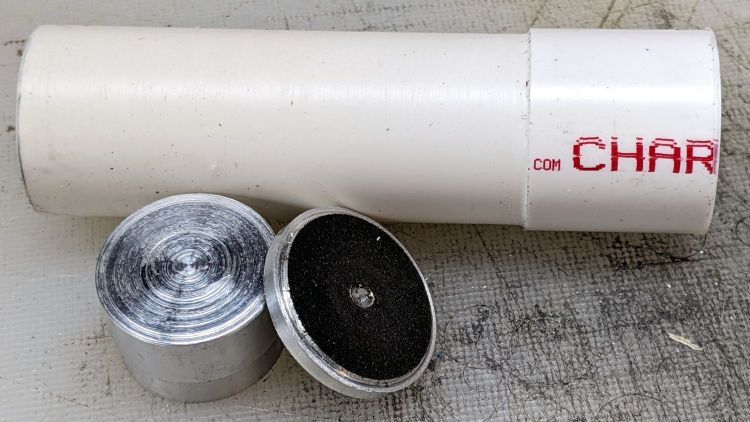
    Because the rear running light will have a higher duty cycle than the front light, I made the (admittedly too small) heatsink slightly longer, with a deeper recess to protect the lens from cargo on the rear rack:

    Tour Easy Rear Running Light - boring LED recess
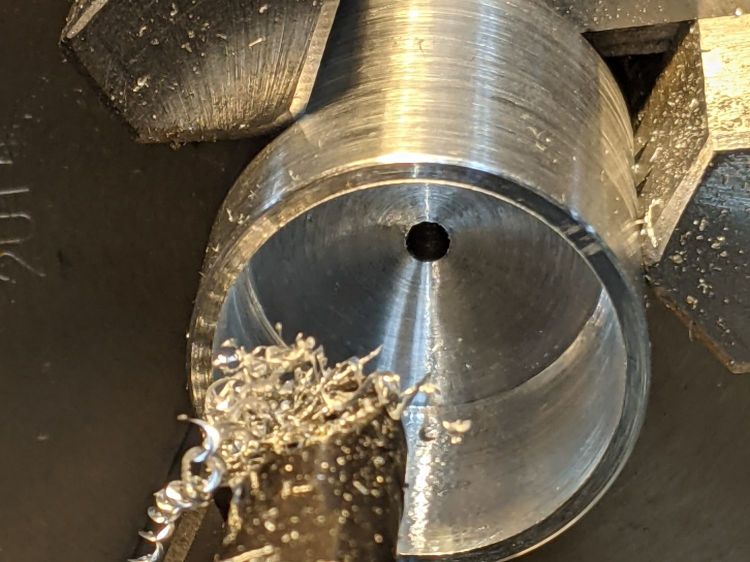
    Tour Easy Rear Running Light – boring LED recess

    Boring that nice flat bottom is tedious; I must lay in a stock of aluminum tubing to simplify the process.

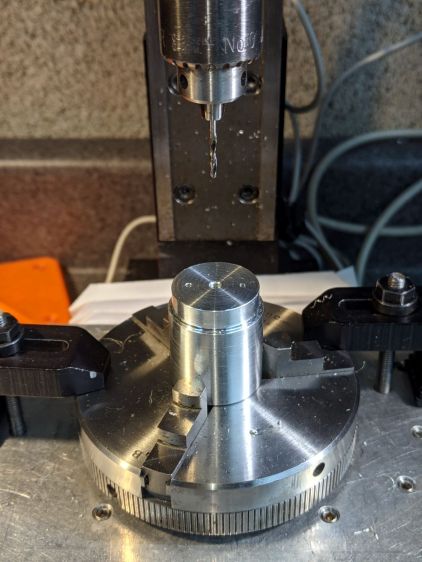
    Drilling the holes went smoothly:

    Tour Easy Rear Running Light - drilling LED heatsink
    Tour Easy Rear Running Light – drilling LED heatsink

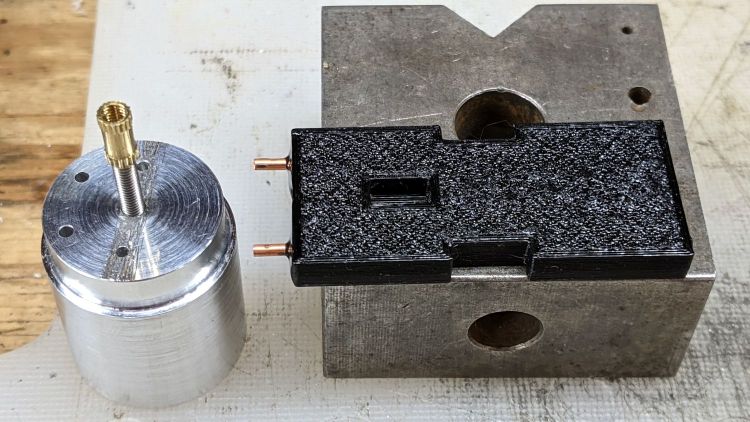
    Those two holes fit a pair of pins aligning the circuit plate, with a screw and brass insert holding it to the heatsink. Scuffing a strip across the aluminum might give the urethane adhesive (you can see uncured globs on the pins) a better grip:

    Tour Easy Rear Running Light - circuit plate attachment
    Tour Easy Rear Running Light – circuit plate attachment

    The screw / insert /pins are glued into the plate to permanently bond it to the heatsink. The screw occupies only half of the insert, with the longer screw from the end cap pulling the whole affair together.

    The two holes on the left pass both LED leads to one side of the circuit plate, where they connect to the current regulator and its sense resistor.

  • Rear Running Light: Too-aggressive Turning

    Rear Running Light: Too-aggressive Turning

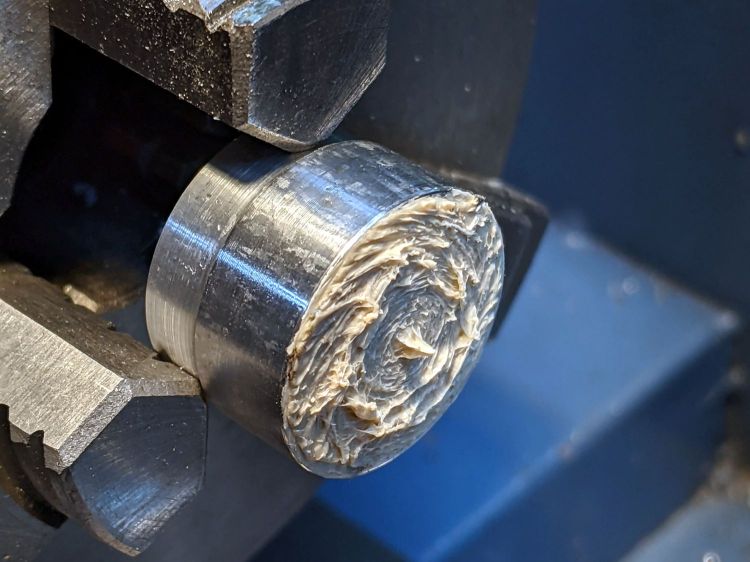
    The same lathe fixture and double-sided duct tape trick I used for the amber running light’s end cap should have worked for this one, but only after I re-learned the lesson about taking sissy cuts:

    Tour Easy Rear Running Light - end cap fixture - swirled adhesive
    Tour Easy Rear Running Light – end cap fixture – swirled adhesive

    Yet another snippet of tape and sissy cuts produced a better result:

    Tour Easy Rear Running Light - end cap
    Tour Easy Rear Running Light – end cap

    Protip: when you affix an aluminum disk bandsawed from a scrap of nonstick griddle to a lathe fixture, the adhesive will grip the disk in only one orientation.

  • Rear Running Light: Tour Easy Seat Clamp

    Rear Running Light: Tour Easy Seat Clamp

    With the amber front running light blinking away, it’s time to replace the decade-old Planet Bike Superflash behind the seat:

    Superflash on Tour Easy
    Superflash on Tour Easy

    The new mount descends directly from the clamps holding the fairing strut on the handlebars and various hose clamps:

    Rear Running Light Seat Clamp - solid model
    Rear Running Light Seat Clamp – solid model

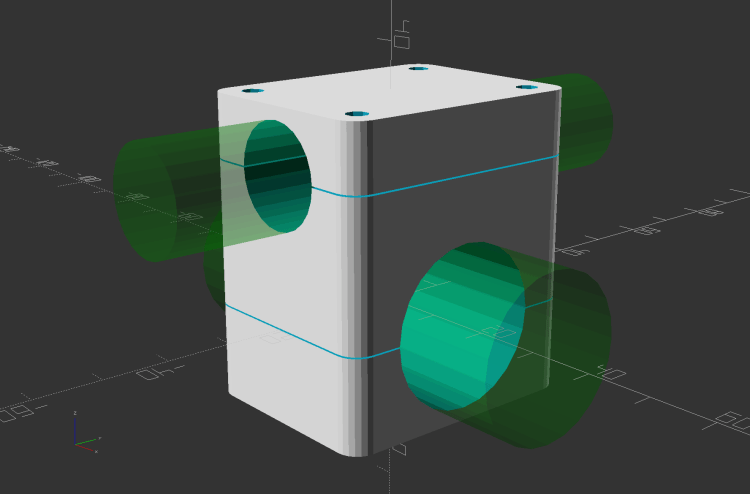
    The central block has two quartets of brass inserts epoxied inside:

    Rear Running Light Seat Clamp - sectioned - solid model
    Rear Running Light Seat Clamp – sectioned – solid model

    That means I can install the light, then mount the whole affair on the bike, without holding everything together while fiddling with overly long screws.

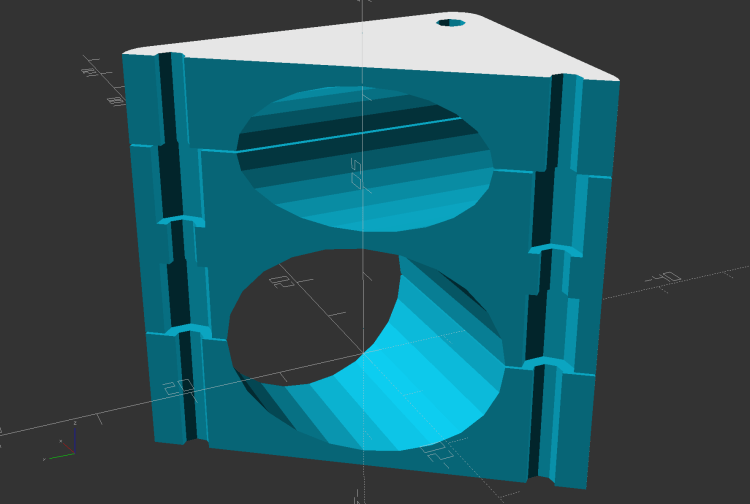
    A trial fit with the not-yet-cut-to-length 25.3 (-ish) PVC pipe body tube:

    Rear Running Light - Tour Easy seat clamp trial fit
    Rear Running Light – Tour Easy seat clamp trial fit

    The aluminum plates have the standard used-car finish: nice polish over deep scratches.

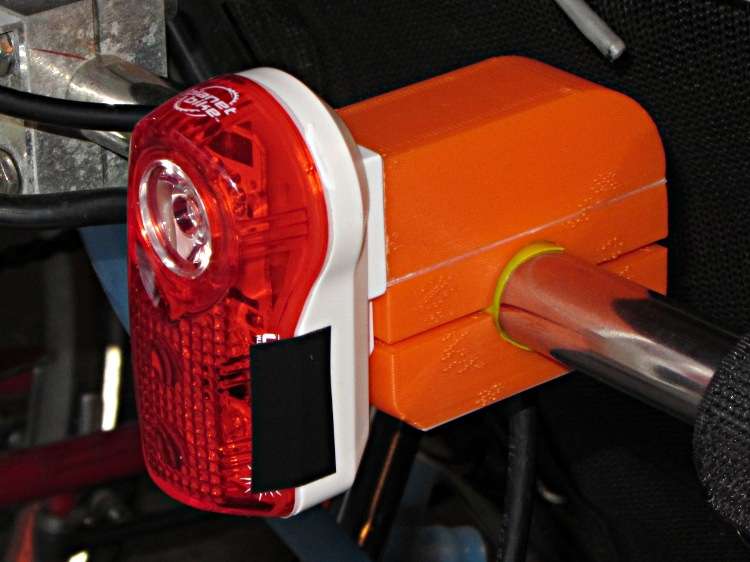
    Although I’ve been thinking of mounting the light below the seat rail, as shown, it can also sit above the rail.

    Mary hauls seedlings and suchlike to the garden in a plastic drawer bungied to the rack, with the SuperFlash serving as an anchor point; this light may need fine tuning for that purpose.

    The OpenSCAD source code as a GitHub Gist:

    // Rear running light clamp for Tour Easy seat strut
    // Ed Nisley – KE4ZNU – 2021-09
    Layout = "Show"; // [Show,Build,Block]
    Section = true;
    /* [Hidden] */
    ThreadThick = 0.25;
    ThreadWidth = 0.40;
    HoleWindage = 0.2;
    Protrusion = 0.1; // make holes end cleanly
    function IntegerMultiple(Size,Unit) = Unit * ceil(Size / Unit);
    ID = 0;
    OD = 1;
    LENGTH = 2;
    inch = 25.4;
    //———————-
    // Dimensions
    // Light case along X axis, seat strut along Y, Z=0 at strut centerline
    LightOD = 25.4 + HoleWindage;
    StrutOD = 5/8 * inch + HoleWindage;
    PlateThick = 1/16 * inch;
    WallThick = 2.0;
    Kerf = ThreadThick;
    Screw = [3.0,6.8,4.0]; // M3 OD=washer, length=nut + washers
    Insert = [3.0,5.4,8.0 + 1.0]; // splined brass insert
    RoundRadius = IntegerMultiple(Screw[OD]/2,0.5); // corner rounding
    ScrewOC = [IntegerMultiple(StrutOD + 2*WallThick + Screw[ID],1.0),
    IntegerMultiple(LightOD + 2*WallThick + Screw[ID],1.0)];
    echo(str("Screw OC: ",ScrewOC));
    BlockSize = [ScrewOC.x + Insert[OD] + 2*WallThick,
    ScrewOC.y + Insert[OD] + 2*WallThick,
    LightOD + StrutOD + 3*WallThick];
    echo(str("Block: ",BlockSize));
    BaseOffset = -(WallThick + LightOD/2); // block bottom to centerline
    StrutOffset = LightOD/2 + WallThick + StrutOD/2; // light centerline to strut centerline
    echo(str("Strut screw min: ",IntegerMultiple(PlateThick + WallThick + StrutOD/2 + Insert[LENGTH]/2,1.0)));
    echo(str("Light screw min: ",IntegerMultiple(PlateThick + WallThick + LightOD/2 + Insert[LENGTH]/2,1.0)));
    NumSides = 2*3*4;
    //———————-
    // Useful routines
    module PolyCyl(Dia,Height,ForceSides=0) { // based on nophead's polyholes
    Sides = (ForceSides != 0) ? ForceSides : (ceil(Dia) + 2);
    FixDia = Dia / cos(180/Sides);
    cylinder(r=(FixDia + HoleWindage)/2,
    h=Height,
    $fn=Sides);
    }
    // Block with light along X axis
    module Block() {
    difference() {
    hull()
    for (i=[-1,1], j=[-1,1])
    translate([i*(BlockSize.x/2 – RoundRadius),j*(BlockSize.y/2 – RoundRadius),BaseOffset])
    cylinder(r=RoundRadius,h=BlockSize.z,$fn=NumSides);
    for (i=[-1,1], j=[-1,1])
    translate([i*ScrewOC.x/2,j*ScrewOC.y/2,BaseOffset – Protrusion])
    rotate(180/8)
    PolyCyl(Screw[ID],BlockSize.z + 2*Protrusion,8);
    for (i=[-1,1], j=[-1,1])
    translate([i*ScrewOC.x/2,j*ScrewOC.y/2,0]) {
    translate([0,0,-Protrusion])
    rotate(180/8)
    PolyCyl(Insert[OD],Insert[LENGTH] + 1*Protrusion,8);
    translate([0,0,(StrutOffset – Insert[LENGTH] – Kerf/2 + Protrusion)])
    rotate(180/8)
    PolyCyl(Insert[OD],Insert[LENGTH] + 1*Protrusion,8);
    }
    translate([-BlockSize.x,0,0])
    rotate([0,90,0])
    cylinder(d=LightOD,h=2*BlockSize.x,$fn=NumSides);
    translate([0,BlockSize.y,StrutOffset])
    rotate([90,0,0])
    cylinder(d=StrutOD,h=2*BlockSize.y,$fn=NumSides);
    translate([0,0,StrutOffset])
    cube([2*BlockSize.x,2*BlockSize.y,Kerf],center=true);
    cube([2*BlockSize.x,2*BlockSize.y,Kerf],center=true);
    }
    }
    //- Build it
    if (Layout == "Block")
    if (Section)
    difference() {
    Block();
    rotate(atan(ScrewOC.y/ScrewOC.x))
    translate([0,BlockSize.y,0])
    cube(2*BlockSize,center=true);
    }
    else
    Block();
    if (Layout == "Show") {
    Block();
    color("Green",0.25)
    translate([-BlockSize.x,0,0])
    rotate([0,90,0])
    cylinder(d=LightOD,h=2*BlockSize.x,$fn=NumSides);
    color("Green",0.25)
    translate([0,BlockSize.y,StrutOffset])
    rotate([90,0,0])
    cylinder(d=StrutOD,h=2*BlockSize.y,$fn=NumSides);
    }
    if (Layout == "Build") {
    translate([-1.2*BlockSize.x,0,-BaseOffset])
    difference() {
    Block();
    translate([0,0,BlockSize.z])
    cube(2*BlockSize,center=true);
    }
    translate([1.2*BlockSize.x,0,StrutOD/2 + WallThick])
    difference() {
    rotate([180,0,0])
    translate([0,0,-StrutOffset])
    Block();
    translate([0,0,BlockSize.z])
    cube(2*BlockSize,center=true);
    }
    translate([0,0,StrutOffset – Kerf/2])
    rotate([180,0,0])
    intersection() {
    Block();
    translate([0,0,StrutOffset/2])
    cube([2*BlockSize.x,2*BlockSize.y,StrutOffset],center=true);
    }
    }

  • Rail Trail: Fallen Tree Clearing

    Rail Trail: Fallen Tree Clearing

    We rolled up to a pair of walkers who had just watched a long-dead tree fall across the Dutchess Rail Trail ahead of them:

    Rail Trail - fallen tree - 2021-09-15
    Rail Trail – fallen tree – 2021-09-15

    Which is why I now carry a fold-out pruning saw in my tool kit:

    Rail Trail - fallen tree - cleared - 2021-09-15
    Rail Trail – fallen tree – cleared – 2021-09-15

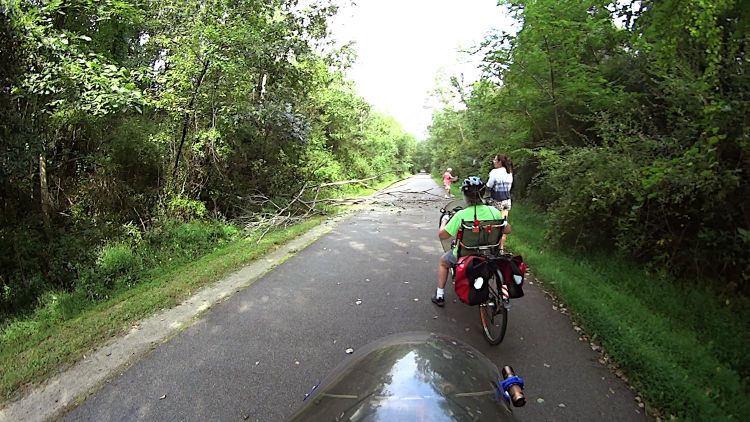
    The mowing crew we encountered half a mile ahead had a chainsaw and cleared the remainder.

    Stay alert out there!

    Although I don’t have a picture, there was a freshly dead bat lying underneath the main trunk. I think it rode the tree down, only to get slapped hard against the gravel beside the trail. I’m sure bats power up faster than I do, but not quite fast enough.

  • Tenergy 18650 Lithium Cells: Four Years of Running Lights

    Tenergy 18650 Lithium Cells: Four Years of Running Lights

    With the amber daytime running light connected to the Bafang’s headlight output and the Anker flashlight on the other side of the fairing getting fewer power-on hours, it’s a good time to see how those four Tenergy lithium 18650 cells are doing:

    Tenergy 18650 Protected - 2021-09-09
    Tenergy 18650 Protected – 2021-09-09

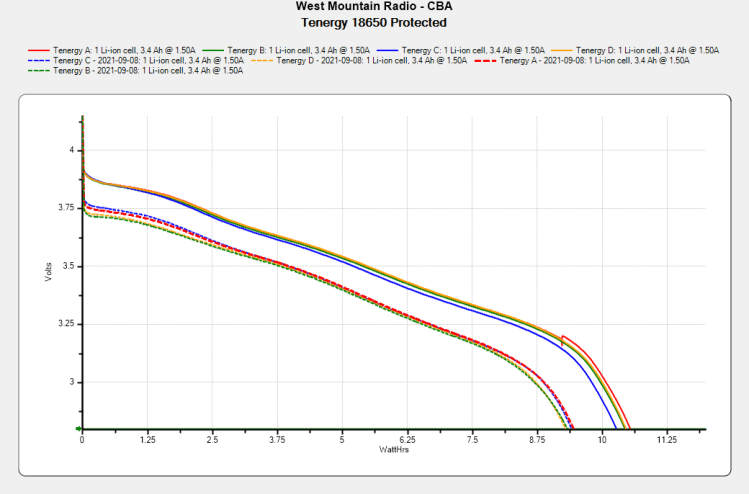
    The overall capacity is down by 10%, with the voltage depressed by 120 mV over most of the curve.

    Although I don’t keep daily records, the back of the envelope reveals 150 to 200 hour-long rides per year during the last four years, so call it 700 charging cycles:

    Anker LC40 Flashlight - Anodizing fade
    Anker LC40 Flashlight – Anodizing fade

    High brightness draws 1.5 A and low is 50% duty cycle, so a typical ride requires 750 mA·h = 2.5 W·h. Each cell lives for three or four rides with the LED set to low brightness and the numbers work out close enough.

  • Sharing the Road on Raymond Avenue: Zero Clearance

    Sharing the Road on Raymond Avenue: Zero Clearance

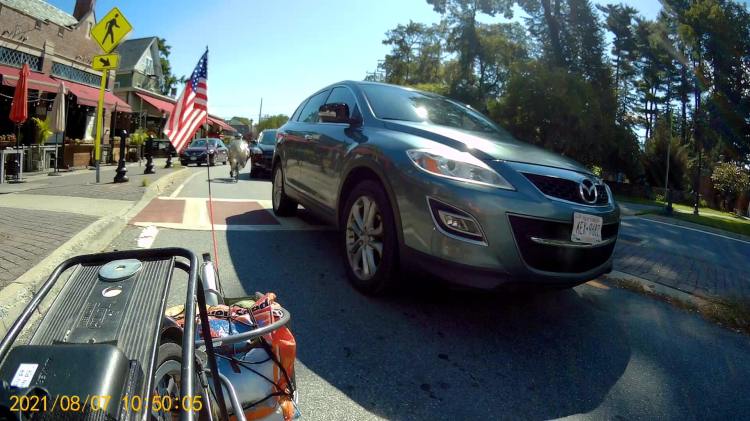
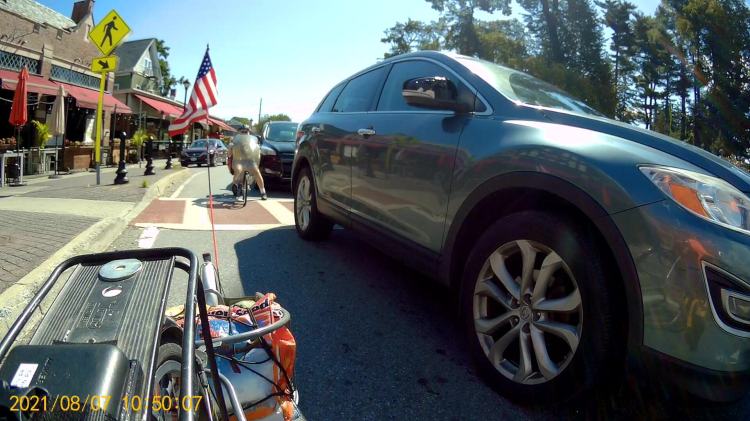
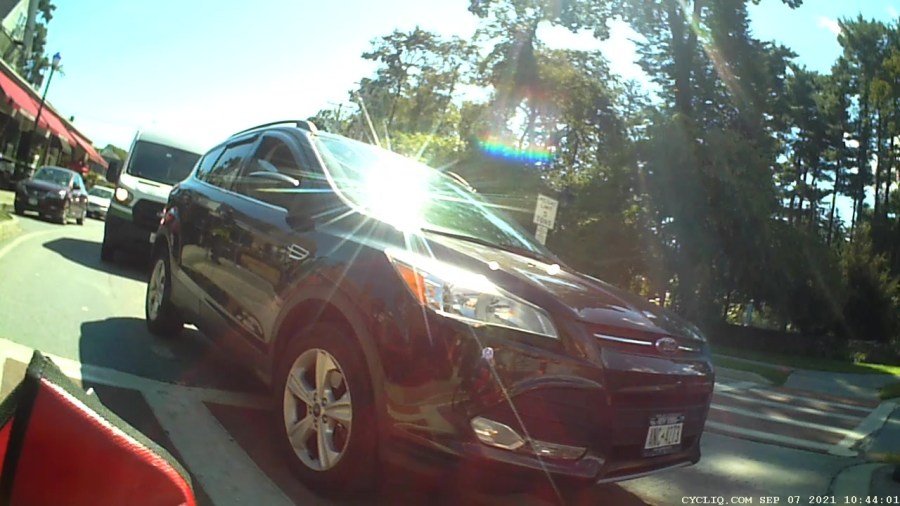
    We’re bicycling on Collegeview Avenue, approaching the eastern traffic circle (of three) along Raymond Avenue. I’m in the lead, hauling a trailer with the week’s groceries:

    Zero Clearance - Ed Front - 2021-09-07 - 0497
    Zero Clearance – Ed Front – 2021-09-07 – 0497

    The four digit frame numbers tick along at 60 fps for my helmet camera and 30 fps for the rear cameras.

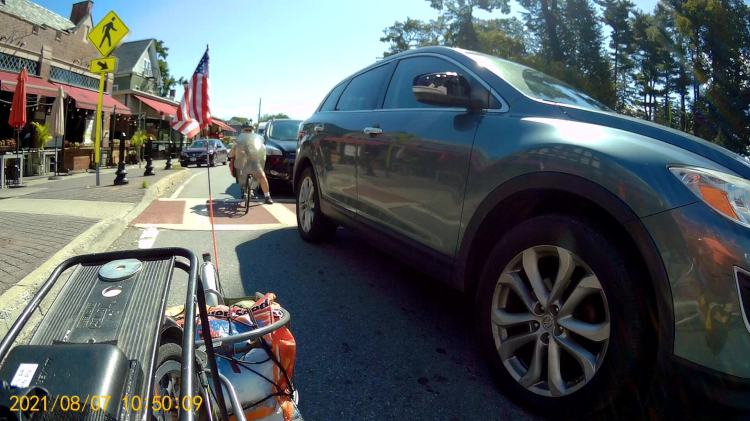
    Note the “splitter” (a.k.a. “pedestrian refuge”) on the left, intended to separate Collegeview’s incoming and outgoing traffic. It formerly had one non-reflective black bollard on each side of the ladder crosswalk, but errant drivers destroyed so many bollards along Raymond that they’re now WONTFIX remnants. The flush concrete disk in the lower left of this picture will become relevant in a few seconds of real time:

    Zero Clearance - Ed Front - 2021-09-07 - 0593
    Zero Clearance – Ed Front – 2021-09-07 – 0593

    Collegeview has the same deteriorating pavement as found along Raymond Avenue, so we must maneuver beside the potholes:

    Zero Clearance - Mary - 2021-09-07 - 0797
    Zero Clearance – Mary – 2021-09-07 – 0797

    The potholes make maintaining a safe-ish distance from the parked cars somewhat difficult:

    Zero Clearance - Ed Rear - 2021-09-07 - 1140
    Zero Clearance – Ed Rear – 2021-09-07 – 1140

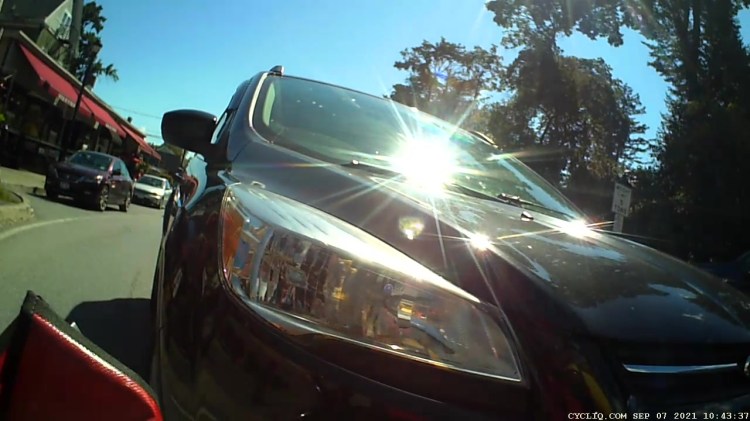
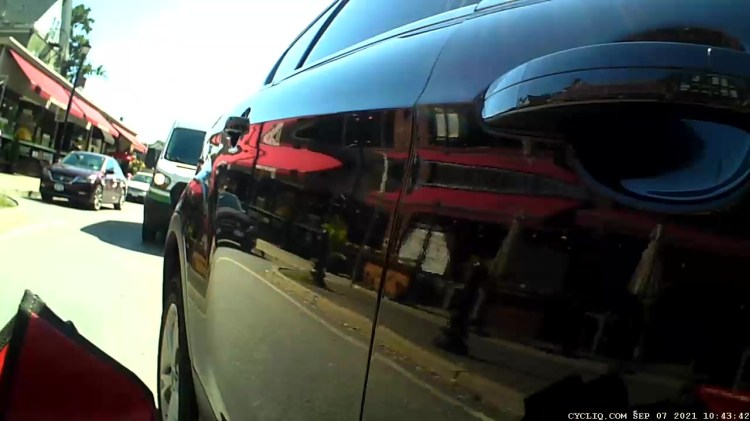
    All of us are slowing to stop at the traffic circle, with Mary behind the car that will eventually stop beside me:

    Zero Clearance - Ed Rear - 2021-09-07 - 1522
    Zero Clearance – Ed Rear – 2021-09-07 – 1522

    Mary could see the car behind her in her helmet mirror, but she’s slowing to stall speed with no time for sightseeing and no room for maneuvering. The view from the camera on the seat frame behind her left shoulder:

    Zero Clearance - Mary - 2021-09-07 - 0957
    Zero Clearance – Mary – 2021-09-07 – 0957

    Two seconds later:

    Zero Clearance - Mary - 2021-09-07 - 1078
    Zero Clearance – Mary – 2021-09-07 – 1078

    One second:

    Zero Clearance - Mary - 2021-09-07 - 1110
    Zero Clearance – Mary – 2021-09-07 – 1110

    Two more seconds:

    Zero Clearance - Mary - 2021-09-07 - 1182
    Zero Clearance – Mary – 2021-09-07 – 1182

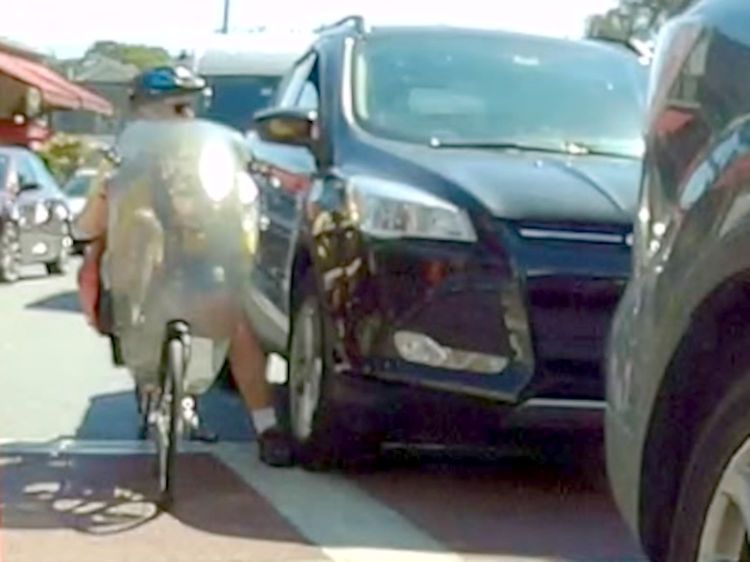
    Mary has stopped, as shown by the parked car’s unchanging position in the frame over on the left in the next images. The driver, however, continues creeping slowly forward; there can be no doubt she sees Mary at this distance.

    After three more seconds:

    Zero Clearance - Mary - 2021-09-07 - 1270
    Zero Clearance – Mary – 2021-09-07 – 1270

    One second later, the front wheel is exactly at Mary’s left foot:

    Zero Clearance - Mary - 2021-09-07 - 1308
    Zero Clearance – Mary – 2021-09-07 – 1308

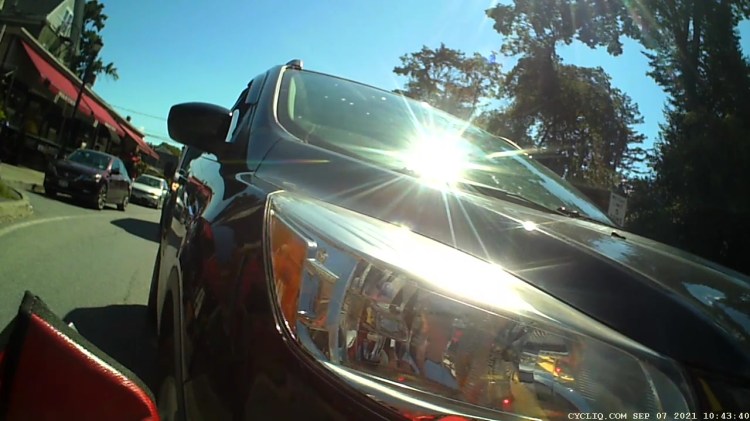
    The same events, viewed from the camera on my bike, start less than one second from the 1522 image above. I’m stopped, while the driver next to me continues to roll forward.

    Mary is extending her left leg in preparation for a complete stop, at about the same time as the 1078 image:

    Zero Clearance - Ed Rear - 2021-09-07 - 1542
    Zero Clearance – Ed Rear – 2021-09-07 – 1542

    Three seconds later her toe touches the pavement, while both she and the driver continue moving forward very slowly:

    Zero Clearance - Ed Rear - 2021-09-07 - 1634
    Zero Clearance – Ed Rear – 2021-09-07 – 1634

    Five seconds later, she is stopped with her foot firmly planted:

    Zero Clearance - Ed Rear - 2021-09-07 - 1773
    Zero Clearance – Ed Rear – 2021-09-07 – 1773

    And the driver continues moving:

    Zero Clearance - Mary - 2021-09-07 - 1333
    Zero Clearance – Mary – 2021-09-07 – 1333

    Another five seconds and the sidewall bulge of the car’s radial tire is pressing her foot to the pavement:

    Zero Clearance - Ed Rear - 2021-09-07 - 1934
    Zero Clearance – Ed Rear – 2021-09-07 – 1934

    A closer look:

    Zero Clearance - Ed Rear - 2021-09-07 - 1946 detail
    Zero Clearance – Ed Rear – 2021-09-07 – 1946 detail

    She yanks her foot away:

    Zero Clearance - Ed Rear - 2021-09-07 - 1953
    Zero Clearance – Ed Rear – 2021-09-07 – 1953

    While the driver continues to creep forward:

    Zero Clearance - Mary - 2021-09-07 - 1397
    Zero Clearance – Mary – 2021-09-07 – 1397

    Sometimes, it’s the only way to get some attention:

    Zero Clearance - Ed Rear - 2021-09-07 - 2026
    Zero Clearance – Ed Rear – 2021-09-07 – 2026

    Mary is now off-balance, leaning on the car door, explaining what just happened:

    Zero Clearance - Ed Rear - 2021-09-07 - 2152
    Zero Clearance – Ed Rear – 2021-09-07 – 2152

    Mary regains her balance as the driver backs cautiously away:

    Zero Clearance - Mary - 2021-09-07 - 1546
    Zero Clearance – Mary – 2021-09-07 – 1546

    Were the bollard still atop that sad concrete foundation, the driver might not have driven up on the splitter to get around Mary, if only to avoid scuffing a fender:

    Zero Clearance - Ed Rear - 2021-09-07 - 2479
    Zero Clearance – Ed Rear – 2021-09-07 – 2479

    Compare this clearance with what you saw earlier in the 0957 image:

    Zero Clearance - Mary - 2021-09-07 - 1627
    Zero Clearance – Mary – 2021-09-07 – 1627

    Mary can’t get far enough away, but this must suffice:

    Zero Clearance - Ed Rear - 2021-09-07 - 2761
    Zero Clearance – Ed Rear – 2021-09-07 – 2761

    Now the driver can pass her again with more clearance:

    Zero Clearance - Mary - 2021-09-07 - 1891
    Zero Clearance – Mary – 2021-09-07 – 1891

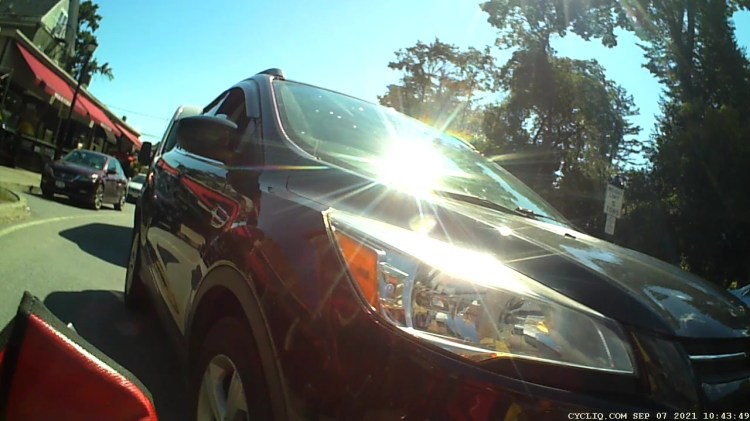
    I pointed to the car, then to the circle, and shouted “GO!” because neither of us wanted to be in front of that particular driver:

    Zero Clearance - Ed Front - 2021-09-07 - 2540
    Zero Clearance – Ed Front – 2021-09-07 – 2540

    We’ll surely meet her again, ideally with more clearance.

    Henceforth, we will take the middle of the lane into splitters, as cyclists should do on a “shared” roadway. I was assured by the DOT engineer who designed Raymond Avenue that it’s all “standards compliant”, so this is what NYS DOT regards as “making their highway systems safe and functional for all users”.

    Having amateur radio HTs on the bikes lets us talk with each other in real time, which is a definite asset when stuff like this happens.

    Not to mention having cameras here, there, and everywhere.

    Elapsed time from the first to the last picture: 33 s.

    For the record: blue Ford (although the ersatz fender vents seem reminiscent of an old Buick), license ANC-4273.

  • Tour Easy: Bafang BBS02 Lower Power

    Tour Easy: Bafang BBS02 Lower Power

    It turns out Mary rarely used assist level 6 and had no use for levels 7 and 8 of my derated BBS02 configuration:

    LC=15
    ALC0=0
    ALC1=5
    ALC2=7
    ALC3=16
    ALC4=25
    ALC5=37
    ALC6=51
    ALC7=67
    ALC8=85
    ALC9=100
    

    Level 9 must be 100% of the maximum motor current so the throttle can apply full power to get out of the way in a hurry.

    The new and even more derated configuration allows small-step assist level selection for our usual riding, at the cost of an unused huge step to level 9 for the throttle:

    [Basic]
    LBP=42
    LC=18
    ALC0=0
    ALC1=4
    ALC2=6
    ALC3=9
    ALC4=15
    ALC5=20
    ALC6=25
    ALC7=30
    ALC8=40
    ALC9=100
    ALBP0=0
    ALBP1=100
    ALBP2=100
    ALBP3=100
    ALBP4=100
    ALBP5=100
    ALBP6=100
    ALBP7=100
    ALBP8=100
    ALBP9=100
    WD=12
    SMM=0
    SMS=1
    [Pedal Assist]
    PT=3
    DA=0
    SL=0
    SSM=4
    WM=0
    SC=20
    SDN=4
    TS=15
    CD=8
    SD=5
    KC=100
    [Throttle Handle]
    SV=11
    EV=42
    MODE=1
    DA=10
    SL=0
    SC=5
    

    The LC=18 line limits the maximum motor current to 18 A, rather than the rated 24 A, which may improve controller MOSFET longevity; reliable evidence is hard to come by. Controller failures seem to happen more often to riders who value jackrabbit acceleration on harsh terrain, so it may make little difference for road cyclists.

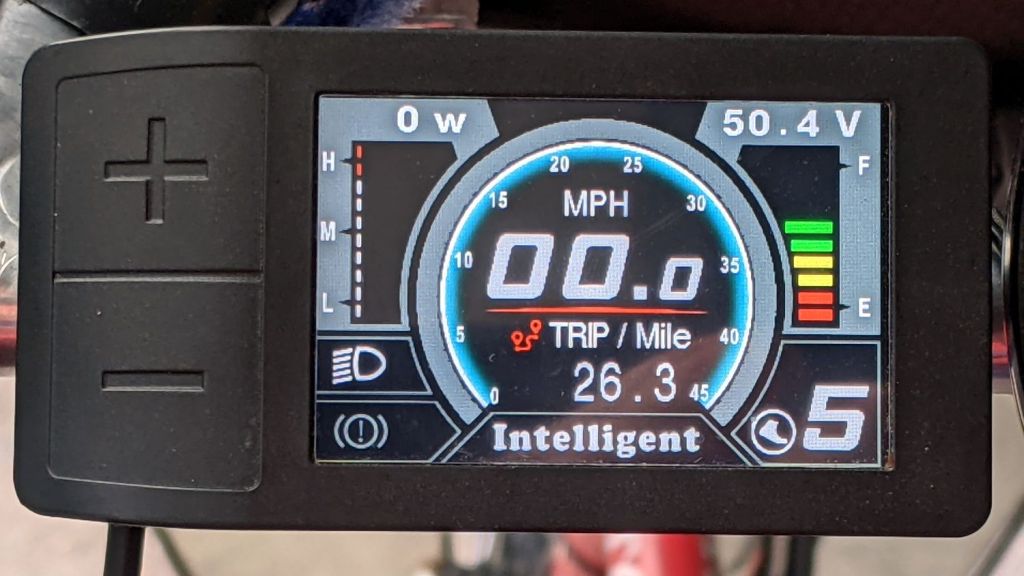
    So level 5 now selects 75% × 20% = 15% of the motor’s nominal 750 W:

    Tour Easy Bafang - display 26 mi
    Tour Easy Bafang – display 26 mi

    Call it 115 W: we’re both getting plenty of exercise!