The Smell of Molten Projects in the Morning

Ed Nisley's Blog: Shop notes, electronics, firmware, machinery, 3D printing, laser cuttery, and curiosities. Contents: 100% human thinking, 0% AI slop.

Author: Ed

  • Blog Summary: 2022

    A blog about GRBL configuration and water heat anode rod wrenches, perhaps with a few pictures, would have killer SEO:

    Home page / Archives21053
    CNC 3018-Pro: GRBL Configuration5341
    Why You Need a 6-Point Socket to Remove a Water Heater Anode Rod5197
    G-Code and M-Code Grand Master List3250
    Toyota Sienna: ABS Trouble Codes2385
    American Standard Elite Kitchen Faucet Disassembly2297
    Homage Tektronix Circuit Computer1898
    Subaru Forester Fuse Boxes1607
    Bed Bugs: Thermal Kill1581
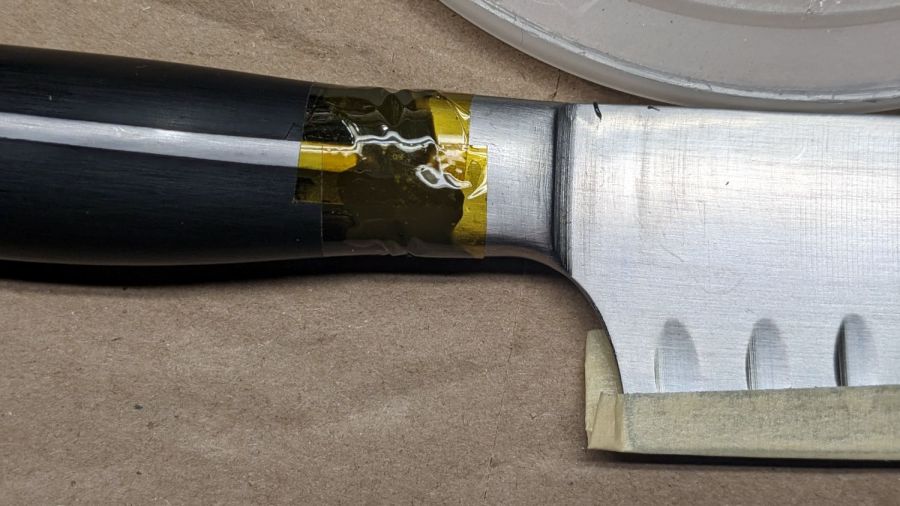
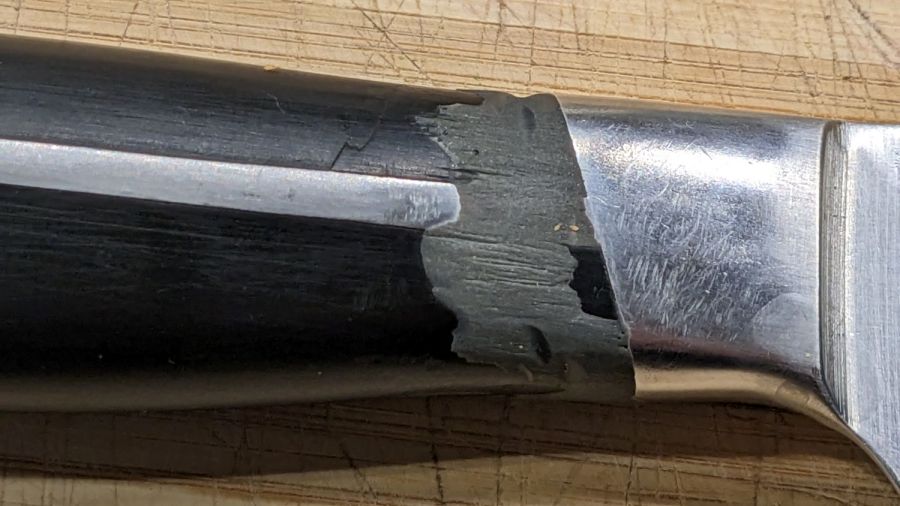
    Broom Handle Screw Thread: Replacement Plug1512
    Kensington Expert Mouse Trackball: Scroll Ring Troubles943
    Whirlpool Water Heater “Lifetime” Warranty: The Good and the Bad922
    Digital Tattoo Power Supply: Polarity Doesn’t Matter868
    Auto-V.I.N Gauge Scam829
    Review Phreesia Authorization827
    Baofeng UV-5R Squelch Settings806
    Raspberry Pi: Forcing VNC Display Resolution777
    Kenmore 158.17032 Handwheel Clutch Disassembly758
    2000 Toyota Sienna: Replacing the Bank 1 Sensor 2 Oxygen Sensor751
    Bafang USB Programming Adapter747
    Removing a Water Heater Anode Rod724
    CNC 3018-Pro: DRV8825 Hack for 1:8 Microstep Mode710
    Low Budget Bench Power Supply691
    Kensington Expert Mouse Scroll Ring Fix648
    Juki JC-001 Foot Control: Resolving Uncommanded Thread Cutting646
    Browning Hi-Power Magazine Dimensions633
    Displaying Variables in Gnuplot622
    Replacing Phil Wood Hub Bearings619
    Makerbot-style Endstop Power Adapter for Protoneer Arduino CNC Shield593
    Schwab / Symantec VIP Access vs. Yubikey581
    Shimano SPD Pedals: Creaking Resolved573
    Raspberry Pi Interrupts vs. Rotary Encoder566
    Kohl’s Guest WiFi Terms & Conditions: The Short Version558
    GRBL Error 33: Arc Coordinates vs. Decimal Places516
    Abusing a Leather Punch for Manhattan-Style Circuit Construction515
    OMTech 60 W Laser: Adjustable Honeycomb Stops511
    LTSpice Diode Models Sorted By Forward Voltage511
    Why You Shouldn’t Use Heat Pumps in the Northeast US509
    HP-48GX Calculator Disassembly: Case Rivets508
    Homage Tektronix Circuit Computer: Laser-Engraved Hairline Tests504
    Homebrew Magnetizer-Demagnetizer488
    Quick-and-easy IR-passing / Visible-blocking Optical Filter475
    Old Kenmore Sewing Machine Foot Control Repair467
    Reversible Belt Buckle: Post Restaking464
    Toyota Sienna: Rear ABS / Speed Sensor Failure461
    Mini-Lathe Tailstock: Alignment455
    Philips Sonicare Essence 5000: Battery Replacement445
    Mysterious Noise in Toyota Sienna Minivan: Fixed!440
    Demolition Card GTA 5-10-9434
    Icecast and Ezstream Configuration424
    OMTech 60 W Laser: Controlling the Air Assist Pump418
    Multimeter Range Switch Contacts: Whoops!417
    Chili Powder Beetles410
    Mini-Lathe Metric Threading: 21 Tooth Gear407
    Water Bottle Spring Cap Repair404
    Baofeng UV-5: Squelch Tail Elimination399

    So much for all the techie stuff.

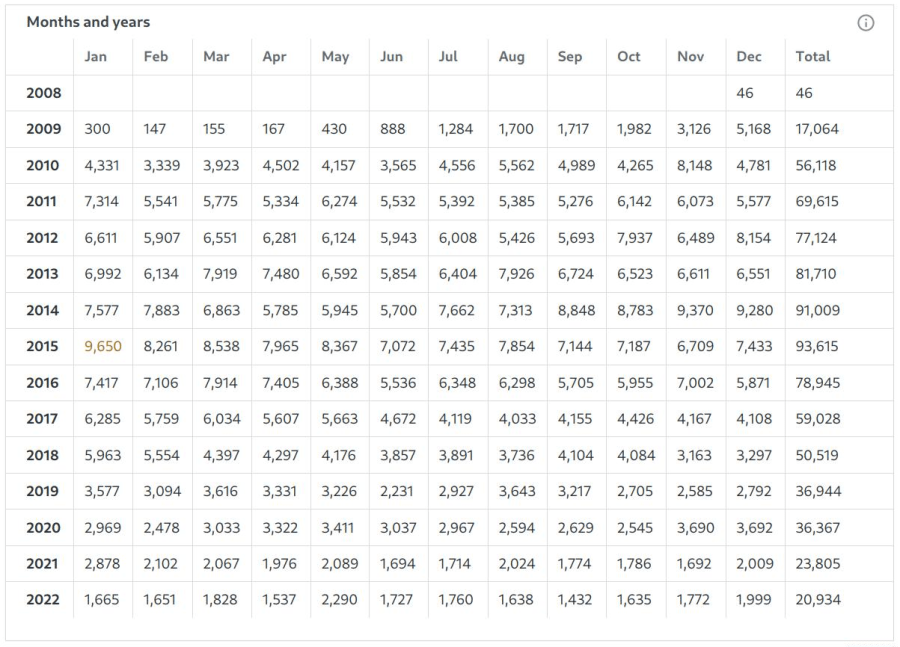
    Overall readership continues to decline, which would matter a whole lot more were I drumming up business engagement:

    Page Views - monthly 2008-2022
    Page Views – monthly 2008-2022

    My shop notes occasionally come in handy for other folks, so it’s not a dead loss …

  • Kitchen Knife Handle: Epoxy Patch

    Kitchen Knife Handle: Epoxy Patch

    The black plastic-like substance molded around the tang of our daily driver kitchen knife crumbled away near the blade and eventually reached the point my thumb couldn’t stand it any more. Given the good results of the JB Weld coating on the cheese slicer (which is still going strong after four years), I chipped away the loose fragments on all sides, wire-brushed the crater with alcohol, and filled it with epoxy:

    Kitchen knife handle - tape reforming
    Kitchen knife handle – tape reforming

    The Kapton tape bridges the solid part of the handle with the metal just behind the blade, holding the epoxy in more-or-less the right shape while it cured overnight. The other side looks much the same, which is why I couldn’t just let it sit out.

    A few minutes with a file and wire wheel knocked back the high spots and left it looking much better than before, if a bit scuffed:

    Kitchen knife handle - restored
    Kitchen knife handle – restored

    The tang inside the molded shell is kinda-sorta cruciform, with an exposed rib along both sides. I think the plastic shrank around the tang in that gap between the ribs and the blade, where its lack of flexibility caused the cracks.

    Neither a beautiful restoration nor a permanent fix, but it ought to last for a while. Similar cracks at the hilt end of the handle suggest more repairs lie in its future.

  • Seasonal Snowflake Coasters

    Seasonal Snowflake Coasters

    The rattlecan chipboard coasters having passed their Best Used By dates, I figured a more durable seasonal version was in order:

    Snowflake Coasters - overview
    Snowflake Coasters – overview

    I laid out the design with the intent of cutting an acrylic snowflake with a bit of compensation to fit snugly into a plywood background:

    Snowflake Coaster - LB layout
    Snowflake Coaster – LB layout

    At the last moment I realized I could just cut two of the patterns on the left, swap the snowflakes, and get two coasters with very little scrap:

    Snowflake Coasters - detail
    Snowflake Coasters – detail

    Mary thinks the gap between the snowflake and the background looks OK. I’m not convinced, but studying the results suggests applying enough kerf compensation to close the largest gaps would results in the rest of the flake not fitting into its socket. Plus, of course, you’d have more scrap.

    Embiggening the small dagger-shaped pieces around the center would be an improvement. Perhaps cutting those as a separate operation after arranging them in a corner would work.

    Protip: Align the grain in those daggers with the rest of the plywood, because It Will Be Very Obvious if you don’t.

    Applying a nice wood stain / finish to the plywood, perhaps before cutting it out, would certainly improve the result.

    Invisible on the bottom: self-adhesive cork disks eliminating the need to glue the pieces to something else. I had thought of a blank plywood or MDF disk, but came to my senses just in time.

    The original SVG fell with a blizzard from one of the many SVG snowflake generators out there. Because LightBurn uses only the stroke centerlines of SVG images and ignores the stroke width, it required some tweakage before becoming a coaster.

    After saving an SVG flake from the blizzard, fire up Inkscape:

    • Import the SVG file
    • Center it in whatever page you’re using
    • Ungroup the flake from the frame (if it has one)
    • Delete the frame to leave only the flake
    • Select the flake
    • Invoke Path → Stroke to Path
    • Save as an SVG image under a new file name

    Then fire up LightBurn:

    • Import the tweaked SVG file
    • Assign a layer with line (rather than fill) parameters
    • Ungroup to separate the flake’s strokes
    • Weld the strokes together to remove the overlaps
    • Wrap a coaster outline around it
    • Resize the flake as needed
    • Set layer parameters as needed
    • Duplicate the flake
    • Embiggen as needed
    • Unleash the laser!

    The LightBurn SVG layout as a GitHub Gist:

    Loading
    Sorry, something went wrong. Reload?
    Sorry, we cannot display this file.
    Sorry, this file is invalid so it cannot be displayed.

  • Seasonal Holly Coasters

    Seasonal Holly Coasters

    Starting with a random SVG holly image from the InterTubes:

    Holly Coaster - assortment
    Holly Coaster – assortment

    The rattlecan chipboard versions came out pretty well, because I’ve already explored much of the error space. The two-tone berries and leaves received Sharpie contrast touchup. They’re all in constant use on the kitchen table!

    The wood veneer version over on the right looks surprisingly good (in person, anyway) for being a complete faceplant. The narrow sections suffered severe burning and fell apart where the grain runs perpendicular to the cut. The highlight spots for the berries fell through the honeycomb table and vanished in the chaff. Sanding the whole mess flat scuffed off most of the smudges, although I couldn’t bring myself to slather it with polyurethane.

    The bright holly on the left is mirror-back acrylic pressed into a 3 mm deep (!) recess engraved in more scrap paneling:

    Holly Coaster - mirror
    Holly Coaster – mirror

    I hand-painted the colors by scribbling Sharpie onto areas where the mirror backing was engraved away. A sheet of aluminized Mylar below the acrylic reflects some light back through the colors to make them slightly brighter.

    As I recently learned, applying alcohol to laser-cut acrylic produces almost instantaneous stress-cracking, which accounts for the decorative crackle finish around the perimeter:

    Holly Coaster - mirror flaws
    Holly Coaster – mirror flaws

    The surface flaw beyond the berry over on the right apparently came from an acrylic fume explosion in the honeycomb below it, strong enough to torch the protective plastic film. Given that I was starting with a scrap mirror fragment, I didn’t perch it up on spikes, which is pretty much required to prevent such events.

    The wood coasters have mmmmm excellent upside potential, but it’s obvious I have not yet mastered my craft.

    The LightBurn SVG layout as a GitHub Gist:

    Loading
    Sorry, something went wrong. Reload?
    Sorry, we cannot display this file.
    Sorry, this file is invalid so it cannot be displayed.

  • Splined Neck Cozy Pattern

    Splined Neck Cozy Pattern

    Mary made a neck cozy based on a Craftsy description using a pattern I’d extracted from the low-res photo and rescaled to the proper size. The perimeter came out grittier than I like, but the laser had no trouble chopping it from a sheet of paper, and she cut smoothly around the lumps:

    Neck Cozy mask - right
    Neck Cozy mask – right

    It looks better on her, but you get the general idea:

    Neck Cozy - rev 1 finished
    Neck Cozy – rev 1 finished

    After some experience, however, she wanted to lengthen the top and bottom seams to improve the way it draped, which meant I had to modify the extracted pattern. The original pattern in the Craftsy photo was hand-drawn (which is perfectly fine) and the two halves were of two different sizes; we decided to work with the left half and produce a symmetric result.

    Rather than fiddle with the bitmap, I drew a rectangle around the outside of the left pattern mask, converted it to a path, moved the nodes to key locations, then fiddled with the control points to lay the splines along the perimeter:

    Neck Cozy pattern - LB splines
    Neck Cozy pattern – LB splines

    Removing the bitmap makes the splines much more obvious and shows the much smoother perimeter:

    Neck Cozy pattern - LB extended splines
    Neck Cozy pattern – LB extended splines

    Adding a few nodes to change the splined shape is much simpler than fiddling with the bitmap, particularly when tweaking their position as directed by someone who knows how the fabric will eventually take shape.

    Add fiducial marks and a label, duplicate the shape, mirror it to get the other half, and fire the laser:

    Neck Cozy pattern - as cut right
    Neck Cozy pattern – as cut right

    Fabric cutting isn’t in my wheelhouse, but I made the offer …

    The LightBurn layout as a GitHub Gist:

    Loading
    Sorry, something went wrong. Reload?
    Sorry, we cannot display this file.
    Sorry, this file is invalid so it cannot be displayed.

  • Dogbone Pillow Pattern

    Dogbone Pillow Pattern

    Mary is putting together a dogbone headrest pillow for a friend who will be spending a lot of time in a chair. It’ll be similar to this one from a while ago:

    Dog Bone Pillow
    Dog Bone Pillow

    She used Bonnie Browning’s pattern and I offered to laser-cut it as practice for other projects I have in mind.

    It eventually worked out well enough:

    Dog Bone Pillow - cut pattern
    Dog Bone Pillow – cut pattern

    Fold a piece of fabric in half, align the pattern’s bottom edge with the fold, cut around the perimeter, make two more, and sew ’em together.

    My first mistake was attempting to assemble the two halves of the pattern from the PDF document into a bitmap image using The GIMP:

    D0G-BONE pattern - rejoined
    D0G-BONE pattern – rejoined

    That is both tedious and unnecessary, as I found out while trying to align the pieces.

    The end goal is a simple and symmetric vector path defining the outline, including a line across the bottom, suitable for laser cutting. Rather than assembling an image, tracing it into a bunch of vectors, then cleaning up the mess, just lay a smooth spline vector path around half of it and invoke symmetry, much as happened with the Lip Balm Holder.

    So import the slightly misaligned bitmap into LightBurn, draw a rectangle over just the left half, convert the rectangle to a path, then add a few nodes anchoring the splines to key points of the image:

    Dog Bone Pillow - LB half pattern first splines
    Dog Bone Pillow – LB half pattern first splines

    Although it’s not visible, the top and bottom spline nodes defining the vertical line down the middle are not quite vertically aligned, even though I dragged them to the middle of the pattern. Unsurprisingly, the bitmap image is not exactly aligned with the axes, even though the conversion from PDF to bitmap is entirely digital; the original design may be off by an itsy that would never matter for its intended application.

    Tweak the splines / control points, add a few more nodes, and in short order the vector path runs pretty nearly along the middle of the bitmap image:

    Dog Bone Pillow - LB half pattern overlay
    Dog Bone Pillow – LB half pattern overlay

    Rather than trying to draw the second half just like the first half, duplicate the path and mirror the copy left-to-right to get the right half of the pattern. Grab the lower-left corner of the copy and snap it to the lower-right corner of the original, whereupon you will find the two points at the top of those lines don’t quite line up.

    This is a grossly zoomed look at the top center, with the two red angles showing the two halves not quite meeting in the middle:

    Dog Bone Pillow - LB top center spline mismatch
    Dog Bone Pillow – LB top center spline mismatch

    Now the magic happens.

    In quick succession:

    • Select the right-side path
    • Invoke Arrange → Two-point Rotate / Scale
    • Zoom way in on the bottom center
    • Click on the center point to define the Rotate center
    • Zoom way in on the top center
    • Click-n-drag the right corner to snap it onto the left corner
    • Done!

    What just happened is that the right half now directly adjoins the left half, with the upper and lower center points overlapping.

    Invoke the node editor and delete the center lines from both halves, leaving just the (overlaid) top and bottom nodes. Select both paths, then invoke Edit → Auto-join selected shapes to merge the two halves into one:

    Dog Bone Pillow - LB splines
    Dog Bone Pillow – LB splines

    I missed the clip line in the middle of the top, but that’s why the first version is always a prototype.

    This was easy, but it’s good to stay in practice …

  • More Laser-Cut Shop Wipes

    More Laser-Cut Shop Wipes

    A filled box of worn-out clothing produced more shop wipes:

    Laser-cut Shop Wipes - assortment
    Laser-cut Shop Wipes – assortment

    The last few pieces were a bit finicky, but provided good on-the-fly practice with linear arrays:

    Shop Wipe - LightBurn setup
    Shop Wipe – LightBurn setup

    This trick never grows old:

    Laser-cut Shop Wipes - as-cut
    Laser-cut Shop Wipes – as-cut

    I washed those neat stacks (in their very own load!), which didn’t turn out well:

    Laser-cut Shop Wipes - washed
    Laser-cut Shop Wipes – washed

    They’ll get used no matter what they look like!