Ed Nisley's Blog: Shop notes, electronics, firmware, machinery, 3D printing, laser cuttery, and curiosities. Contents: 100% human thinking, 0% AI slop.
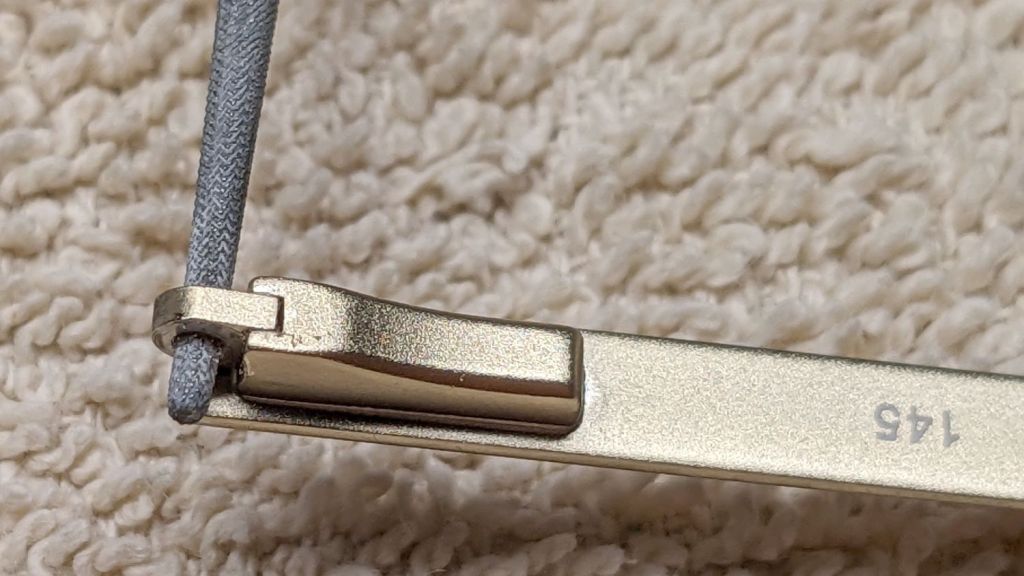
A screws in one of Mary’s eyeglasses unscrewed itself, but, miraculously, we found it and I retired to the shop.
Because the glasses have spring temples, the screw would not align no matter what force I applied to it:
Eyeglass spring temple – screw misalignment
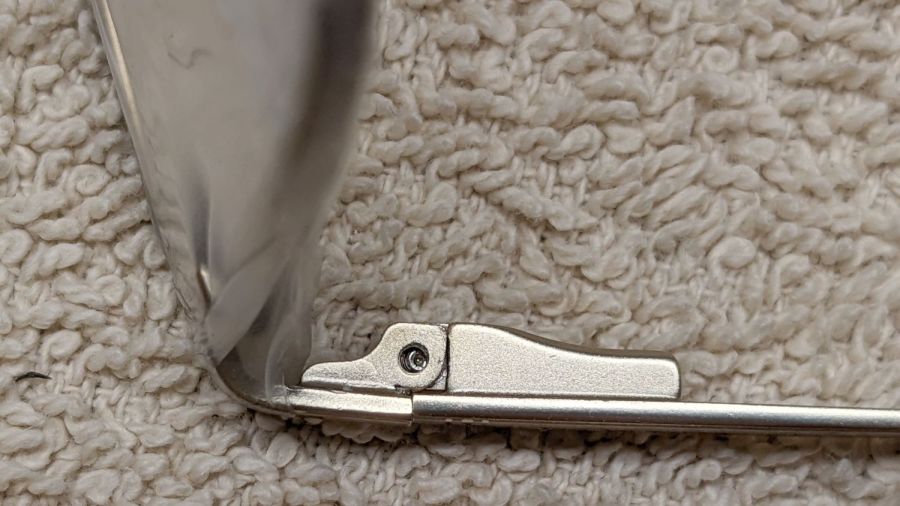
So I just embiggened the hole until the available force did the trick:
Eyeglass spring temple – hole filing
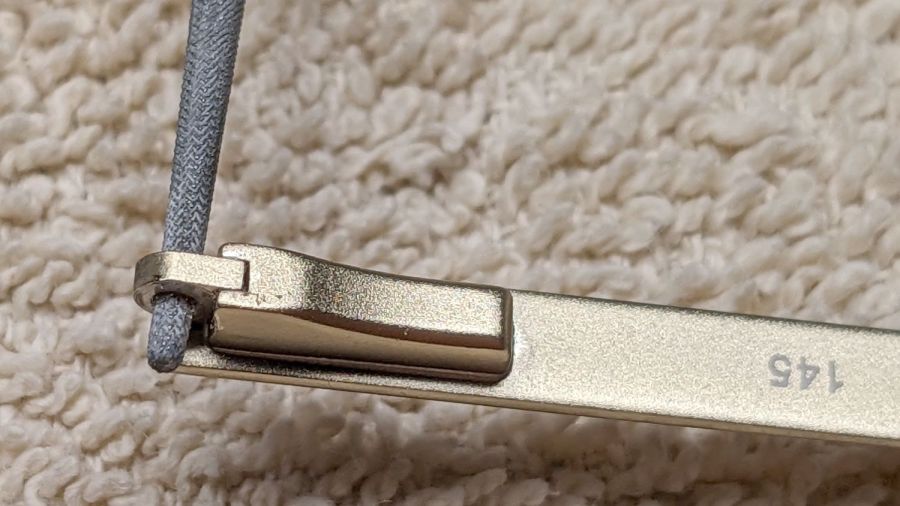
Dots of Loctite worked into the threads should prevent that from happening again, but I’ve learned to never say never.
In retrospect, the temple pivots have an exposed slot that I think would allow jamming a block in place after pulling the spring-loaded pivot outward. Temple springs are impossibly stiff and I have previously failed to budge them in glasses without the slots, so I don’t know how well that might work.
Verily: If brute force isn’t working for you, then you’re not using enough of it.
During the course of diagnosing and fixing the latest oven igniter failure, an unrelated series of events produced a flood under the kitchen sink and across the floor. After cleaning up the mess and determining the floor under the cabinet was merely damp, rather than wet, I drilled a hole suitable for another PC cooling fan from the Box o’ MostlyFans, installed the fan to pull air upward, and let it run for a couple of days while watching the humidity drop.
Fortunately, I had a hole saw exactly the right size for an 80 mm case fan:
Kitchen sink – fan cover plate
I will lay big money on a bet saying your kitchen cabinets don’t have Real Wood like that, nor are the interiors painted bold Chinese Red. This place really is a time capsule from 1955.
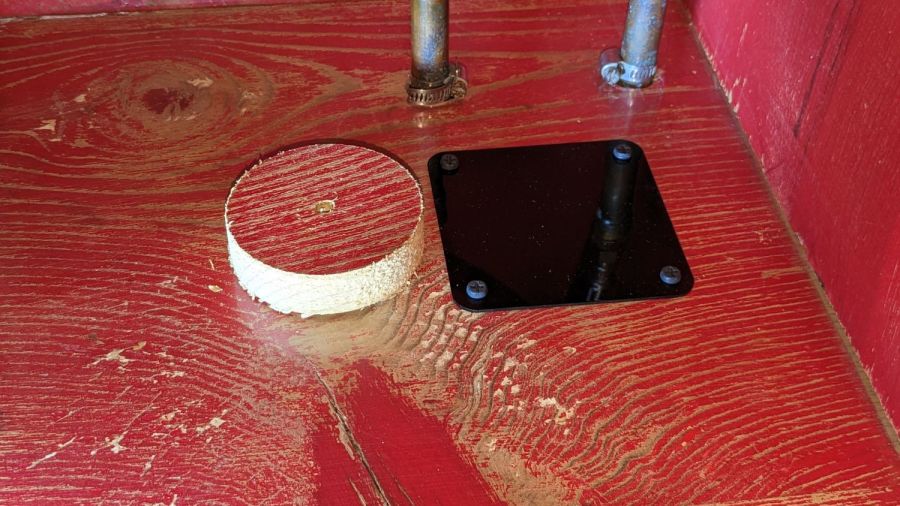
While the drying happened, I made a hole cover from 1.5 mm black acrylic and, there being no style points involved, rounded up a quartet of black-oxide self-drilling sheet metal screws to hold it in place.
Although it’s not obvious, there’s a layer of transparent plastic “shelf paper” in there. It covers the fan hole under the cover, so any future spills will have approximately the same difficulty reaching the floor as this one did.
The LightBurn layout produces both the fan cover and a template to mark the four screw holes around the fan opening:
Kitchen Sink Fan – LB layout
The blue tool layer lines serve as a guide for the rest of the cover layout; the matching orange square on the right marks the fan outline on the drill template as a quick size check.
No need for an SVG version, because now that you have the general idea, it’s easy to recreate it for your own fan.
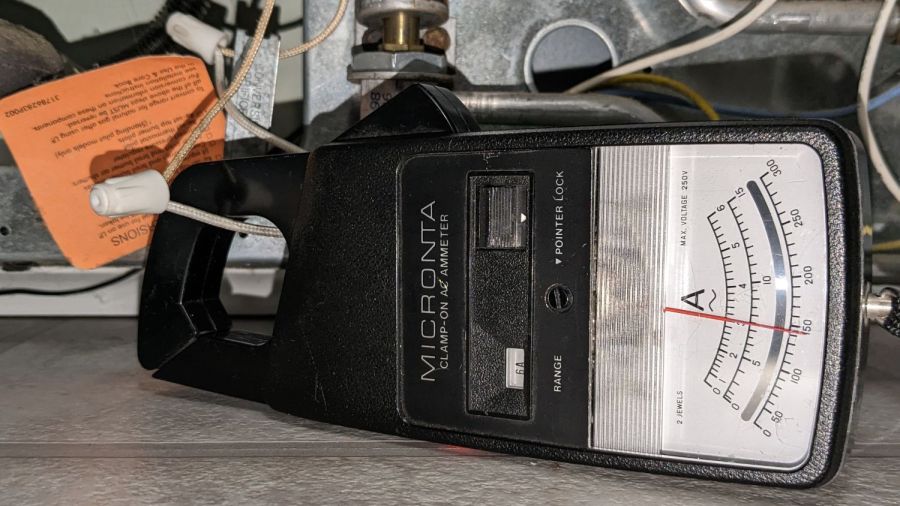
Apparently igniters last about eight years, regardless of provenance, because the igniter just failed, with the usual symptoms of low current draw (about 2 A), failed ignition, and a faint smell of propane (well, mercaptan) before the safety valve kicked in:
Oven igniter – location
The new igniter, another low-buck Amazon offering, came with half a green plastic connector block that mated neatly with the existing half under the oven. Unfortunately, the new wires had female pins crimped on their ends, rather than the male pins required by the existing connector and the ceramic wire nuts I’d used to join the previous igniter to the OEM connector were non-removable.
So I trimmed the old wires to a usable length and applied the new ceramic wire nuts to the stubs:
Oven igniter – connector rewiring
Also as before, the new igniter measures 3 A, definitely below the low end of the valve’s 3.3 to 3.6 A range:
Oven igniter – current test
If this one lasts eight years, I won’t be the guy replacing it …
The rather battered library card on the bottom has been rattling around on Mary’s keyring since late in the last millennium:
Library card tags – front
I made the one on the top as a replacement, because Mary wanted one, but the library no longer issues keyring cards these days.
The front surface was laid out in The GIMP, inkjet-printed on good paper, cold laminated, laser-cut with LightBurn’s Print-and-Cut process, then affixed to the acrylic tag with really good double-sided tape:
Adriance Card – LightBurn PnC layout
I cut and applied the tape after cutting the tag, but the next time around I’ll apply the tape to the stock and cut both together to improve the edge alignment.
The smaller text uses dot mode and the bars & number are engraved:
Library card tag – detail
In retrospect, it’s painfully obvious the engraving passes should run parallel to the bars, rather than perpendicular to them.
The barcode uses Codabar encoding generated with a Codabar font. I scaled the graphic block slightly larger than the original in the hope of making it more readable.
I determined the start and stop characters by trial and error; for this card, they’re A and B. Which could, perhaps, stand for Arlington Branch, but might equally well be coincidence.
It worked perfectly on the first scan at the library counter and apparently went entirely unnoticed. I trust duplicating a library card does not constitute a federal offense.
For what should be obvious reasons, however, I’m not posting the LightBurn layout.
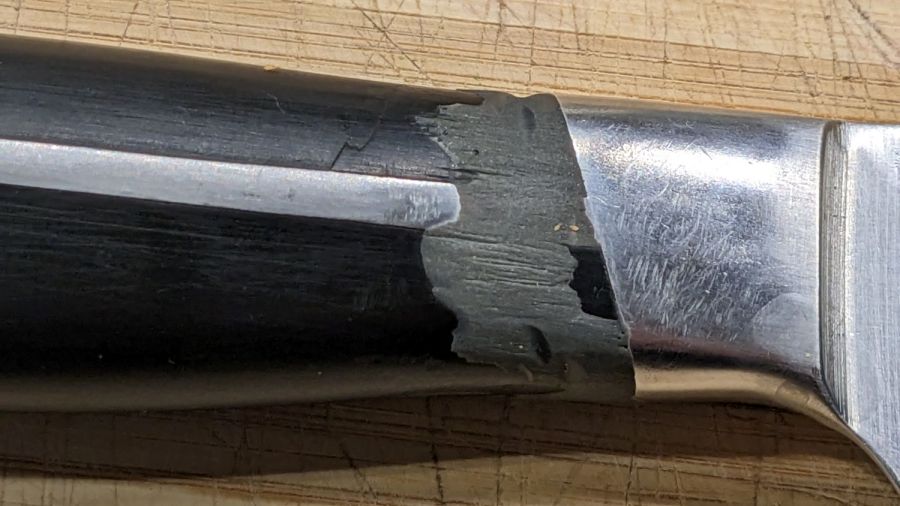
The black plastic-like substance molded around the tang of our daily driver kitchen knife crumbled away near the blade and eventually reached the point my thumb couldn’t stand it any more. Given the good results of the JB Weld coating on the cheese slicer (which is still going strong after four years), I chipped away the loose fragments on all sides, wire-brushed the crater with alcohol, and filled it with epoxy:
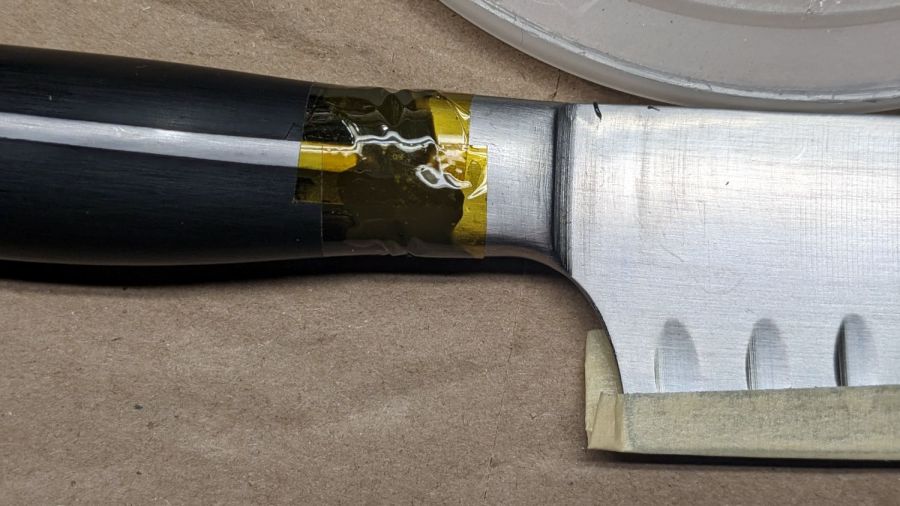
Kitchen knife handle – tape reforming
The Kapton tape bridges the solid part of the handle with the metal just behind the blade, holding the epoxy in more-or-less the right shape while it cured overnight. The other side looks much the same, which is why I couldn’t just let it sit out.
A few minutes with a file and wire wheel knocked back the high spots and left it looking much better than before, if a bit scuffed:
Kitchen knife handle – restored
The tang inside the molded shell is kinda-sorta cruciform, with an exposed rib along both sides. I think the plastic shrank around the tang in that gap between the ribs and the blade, where its lack of flexibility caused the cracks.
Neither a beautiful restoration nor a permanent fix, but it ought to last for a while. Similar cracks at the hilt end of the handle suggest more repairs lie in its future.
Last week Mary reported the toilet in the front bathroom had the sound of running water, which is unfortunately the sort of noise I can no longer hear. I replaced the flush (a.k.a. “flapper”) valve, because it’s always the flush valve, cleaned the valve seat, washed my hands vigorously, cauterized both stumps, and declared victory.
This week she reported it was once again leaking.
A bit of poking around showed the tank was now full to the top of the overflow pipe and the refill tube was piddling down the pipe: obviously, something was wrong with the fill valve, because the flush valve was sealed tight.
Having been through this rodeo a few times, I fetched a replacement valve disk from the Box o’ Toilet Stuff, installed it, and was about to declare victory when I noticed the refill tube was still piddling.
Pop the top off the fill valve and peer inside:
Toilet Fill Valve – aligned
Did you see it? I didn’t, either, when I replaced the valve disk.
More fiddling produced this view:
Toilet Fill Valve – cracked
The valve seat is attached to a plastic stem going down the length of the fill tube, but it’s free to rotate on both ends. I have no idea what applied enough torque or how it could break all those ribs, but there they were(n’t).
Fetch a complete valve kit from the aforementioned Box, drain the tank, install All. The. Parts., verify that the valve now shuts off properly, declare victory, etc, etc.
Whereupon I could switch caps and begin making the weekly pizza.
It’s easy to find the two front screws holding the top in place, although you’ll need either a bendy or offset screwdriver to remove them:
Sears Progressive Vacuum – front case screws
Pull up hard on the cord retraction plunger to remove it, revealing the two rear screws:
Sears Progressive Vacuum – rear case screws
Extract the wires and motor control PCB from their niches:
Sears Progressive Vacuum – motor assembly overview
Prying the latch in the middle of the rear panel (over on the right) releases the motor assembly, which you can then wiggle-n-jiggle upward and out:
Sears Progressive Vacuum – extracting motor assembly
Disconnect the wires, peel off various foam bits, and extract the motor from its carapace. Measure the blower diameter and cut a suitable plywood clamp for the bench vise:
Sears Progressive Vacuum – custom motor clamp
I loves me some good laser cutter action, even when the plywood crate the laser came in doesn’t have much to recommend it:
Sears Progressive Vacuum – failed plywood clamp
I vaguely recall reading the purple tinge comes from the bromine vapor used to dis-insect the wood during manufacturing, before shipping it halfway around the planet.
One area of the commutator looks like it’s in bad shape:
Sears Progressive Vacuum – as-found commutator
Clean the commutator bars in the desperate hope it’s just random crud, even though that seems unlikely, then connect a widowmaker cord to the motor terminals:
Sears Progressive Vacuum – widowmaker line cord
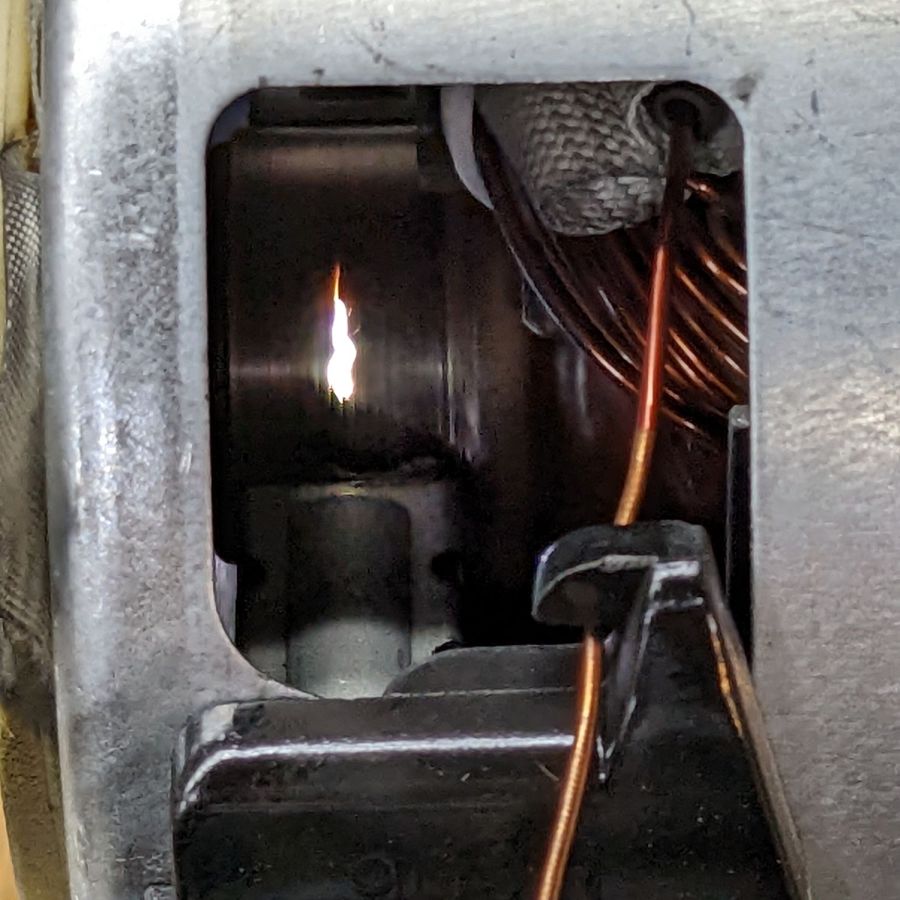
Use a Variac to spin the motor at a (relatively) low speed while watching the brushes and commutator:
Sears Progressive Vacuum – commutator sparking
Now, that is not a nominal outcome.
The cleaned commutator again shows signs of distress:
Sears Progressive Vacuum – scarred commutator
Indeed, measuring the resistance across the line cord terminals shows a shorted winding: 0.0 Ω with the brushes aligned on the bars just antispinward of the scars.
So the motor is definitely, irretrievably dead.
Extracting the brushes shows the arcs have eroded their spinward edges:
Sears Progressive Vacuum – eroded motor brushes
The dark smudge on the windings seems due to internal problems, rather than just the arcs, because the wiring crossing between the commutator and the smudge remains clean:
Sears Progressive Vacuum – charred motor windings
One can buy a used motor assembly on eBay for about $40, with no assurance it doesn’t also have a shorted winding.