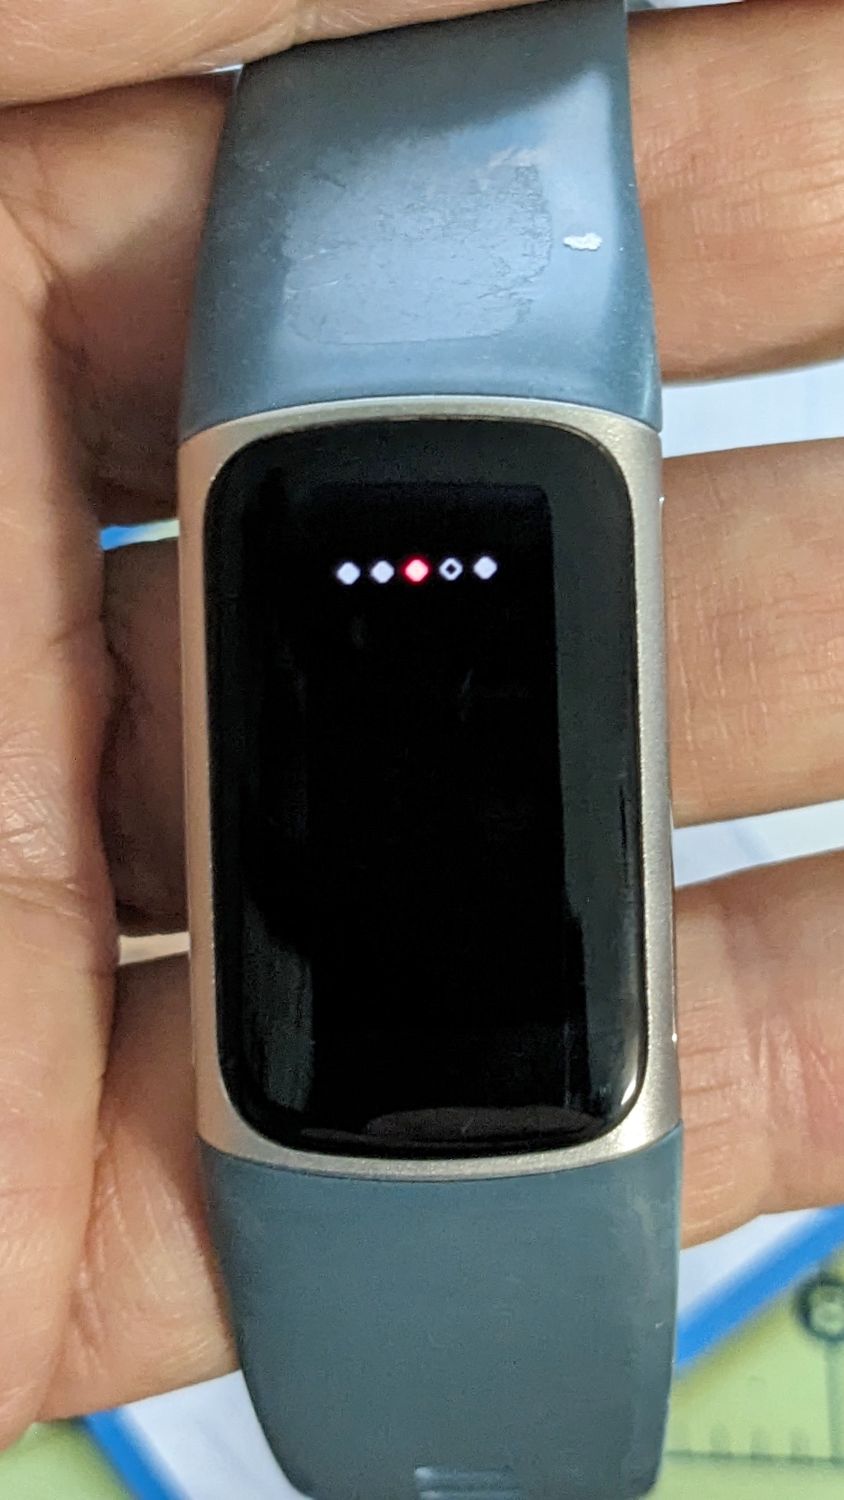
The Smell of Molten Projects in the Morning

Ed Nisley's Blog: Shop notes, electronics, firmware, machinery, 3D printing, laser cuttery, and curiosities. Contents: 100% human thinking, 0% AI slop.

Tag: Repairs

If it used to work, it can work again

  • Miroco Floor Lamp Base Details

    Miroco Floor Lamp Base Details

    The pole of our much-repaired Miroco floor lamp screws into a weighted base:

    Miroco floor lamp base - assembled
    Miroco floor lamp base – assembled

    Because the lamp has a big nut apparently holding the pole socket to the base, I figured a dab of threadlock on the pole or the base would solve the problem: lock the pole to the socket, then remove the nut to disassemble when needed. That turned out to be a Bad Idea™.

    The socket is a plastic part separate from the base cover plate:

    Miroco floor lamp base - socket
    Miroco floor lamp base – socket

    A pair of keys prevent the socket from rotating in the hole:

    Miroco floor lamp base - socket in place
    Miroco floor lamp base – socket in place

    Four threaded bosses (two visible there) hold the rim of the cover to the weight, with the socket doing the hard work.

    A fender washer atop the weight distributes stress from the pole:

    Miroco floor lamp base - weight top washer
    Miroco floor lamp base – weight top washer

    Another fender washer on the bottom of the weight lets the nut jam against steel, rather than soft plastic:

    Miroco floor lamp base - weight bottom washer
    Miroco floor lamp base – weight bottom washer

    FWIW, the nut is either a perfect 15/16 inch or, more likely, a sloppy 24 mm.

    In any event, permanently locking the pole to that socket will also lock the pole to the base, with no way to dismantle the lamp when I must once again repair it.

    Perhaps a wrap of PTFE tape on the threads will stiffen it enough?

    Certain better looking than black duct tape …

  • Dirt Devil Stick Vacuum: Floor Brush Salvage

    Dirt Devil Stick Vacuum: Floor Brush Salvage

    The knuckle joint on the Dirt Devil stick vacuum failed, so it followed us home instead of leaping into the trash:

    Dirt Devil - broken swivel joint
    Dirt Devil – broken swivel joint

    Although the fitting seems to be made of ABS, it’s now missing major chunks of plastic in the high-stress areas, so rebuilding it seems not worth the effort.

    Because we don’t have any carpets and this one will never leave the basement, I extracted the carpet beater brush and its motor, only to find Yet Another Example of poor assembly practices:

    Dirt Devil - stray strands
    Dirt Devil – stray strands

    It’s a 12 V (-ish, I didn’t measure whatever comes out of the vacuum head) DC motor and those errant strands aren’t quite long enough to meet in the middle. The yellow rectangle is a thermal fuse that would be shorted out if the strands were a bit longer.

    The broken joint lets the head swivel from side to side, but the elevation joint is still good. If I don’t expect too much, the thing might still suffice for extracting dust from under the benches:

    Dirt Devil - taped joint
    Dirt Devil – taped joint

    Worst case, I can swap in a classic floor brush using one of the adapters I made a while ago:

    Dirt Devil adapters - assembled
    Dirt Devil adapters – assembled

    That was easy, if only because I skipped the hard part …

  • Zenni Optical Glasses: Nosepad Misalignment

    Zenni Optical Glasses: Nosepad Misalignment

    Mary’s new glasses arrived from halfway around the planet with excruciatingly misaligned nosepads:

    Zenni Optical glasses - misangled nosepads
    Zenni Optical glasses – misangled nosepads

    Despite past experience, Zenni generally does better than this.

    Fortunately, a few minutes with the same metal-forming pliers as before settled them in place.

    Ya gotta have tools!

  • Subaru Forest High Beam Bulbs: Thermal Damage

    Subaru Forest High Beam Bulbs: Thermal Damage

    Although these passed the annual New York State safety inspection, I thought they needed replacing:

    HB3 9005 Bulbs - bulged glass
    HB3 9005 Bulbs – bulged glass

    A closer look:

    HB3 9005 Bulbs - bulged glass - detail
    HB3 9005 Bulbs – bulged glass – detail

    The bulge was upward, of course.

    The Forester’s manual says they’re HB3 bulbs, but the rest of the world knows them as 9005 bulbs. At full power they draw 60 W = 5 A each, although we rarely drive at night and then rarely have the opportunity for much high-beam use. I assume the blackening comes from nine years of running at half-ish power as the Forester’s daytime running lights.

    The low beam headlights seem to be in fine shape.

    These two went into the tray under the floor of the rear cargo area, because the crappy bulb you have is better than the one that just burned out on the road.

  • Laser Cutter Z-Axis: Hitch in the Git-Along

    Laser Cutter Z-Axis: Hitch in the Git-Along

    My OMTech 60 W laser cutter has a stepper motor Z axis drive that has worked flawlessly since it arrived. However, it recently developed a periodic klonk during autofocusing and manual jogging, loud enough to shake the platform and rattle the cabinet’s bottom plate.

    A few minutes of poking around revealed the klonk happened on each turn of the Z axis leadscrews, which quickly led to finding the cause:

    Craft Stick - swarf in belt drive
    Craft Stick – swarf in belt drive

    It’s a rectangular wood chip, perfectly sized to jam into the Z axis motor pulley driving the belt: a belt tooth lifts up on the chip as the pulley turns, then klonks as it slips off the other side. The motor pulley and all four leadscrew pinons have the same number of teeth, so they’re all at the same point in their rotation when the belt slams down onto the pulley.

    Where might such a thing come from? Well, I recently finished a batch of plant markers and hadn’t yet cleaned out the “chip tray” which is also just the bottom plate of the cabinet:

    Craft Stick - swarf
    Craft Stick – swarf

    I briefly considered building a guard for the motor pulley, but the belt most likely carried it from elsewhere. The leadscrews have an ample coating of grease that was also smeared elsewhere on the cabinet, making the belt sticky enough to catch such things.

    The chip tray is once again pretty clean and the platform behaves normally again.

    That was easy …

  • Subaru Forester Gas Tank Capacity, Experimental Measurement Thereof

    Subaru Forester Gas Tank Capacity, Experimental Measurement Thereof

    According to the manual, which I have hitherto had no reason to doubt, our non-turbo 2015 Subaru Forester has a 15.9 gallon fuel tank:

    Subaru Forester - Fuel Capacity Chart
    Subaru Forester – Fuel Capacity Chart

    One screen shown on the dashboard’s Multi-Function Display gives the current mileage and estimated range:

    Forester - MPG Range
    Forester – MPG Range

    Dividing those two numbers gives you 13.97 gallons, the current fuel level. As you’d expect, should the average miles per gallon change, the range will change accordingly.

    The trip odometer says we have driven 72.8 miles since I filled the tank. Dividing that by the average mpg gives 2.3 gallons, so the tank could possibly hold 16.2 gallons, which, given all the averages involved, is reasonably close to the 15.9 gallons shown in the manual.

    Being that type of guy, I have a spreadsheet tallying each fillup since the car was new:

    • 8.1 gal average
    • 7.5 gal median
    • 13.9 gal maximum

    Long ago, my father taught me to fill the tank when the needle got halfway down and I’ve been doing so ever since. As a result, we have only rarely seen the Low Fuel Warning Light:

    Subaru Forester - Low Fuel Warning Light info
    Subaru Forester – Low Fuel Warning Light info

    A concatenation of unavoidable events put us southbound on I-87 when that light went on. Given the estimated range of 70-ish miles, I planned to refuel at the New Baltimore Service Area, about a dozen miles ahead.

    The engine shut down and all the dashboard warning lights lit up with the Service Area Ahead sign in view:

    Out of Gas - Service Area Ahead
    Out of Gas – Service Area Ahead

    All the “facilities” are blank because they’re rebuilding the whole place, with the gas station remaining open.

    So I slapped the shifter into neutral and we drifted slowly along the shoulder, under the bridge visible ahead, and eventually came to a halt at the beginning of the exit lane.

    There was only one thing to do:

    Out of Gas - Walking On
    Out of Gas – Walking On

    Some storytelling later:

    Out of Gas - Walking Back
    Out of Gas – Walking Back

    Just because I could:

    Refueling - GPS Track
    Refueling – GPS Track

    For what are, I trust, understandable reasons, I started the tracker after I began hiking and forgot to turn it off before driving away.

    After figuring out the devilishly complex spring-loaded anti-spill spout on the gas can, we drove 1500 feet to the Service Area:

    Out of Gas - Service Station
    Out of Gas – Service Station

    As usual, I filled the tank until the nozzle automatically shut off, for a total of 13.554 gallons in two transactions:

    Pump Receipts
    Pump Receipts

    Now, it is possible the Forester fuel system has another 2.3 gallons tucked away somewhere, but if that reserve doesn’t make the wheels go around, it’s not doing me the least bit of good.

    The fact that I’ve occasionally added just short of 14 gallons suggests the estimated remaining capacity depends strongly on the average mileage up to that point and I have come very very close to running out of gas on several occasions.

    As far as I can tell, the usable fuel capacity is a scant 14 gallons and the Low Fuel Light goes on with, at most, a dozen more miles in the tank.

    This is the second time in more than half a century of driving I’ve run out of gas.

    My father was right and I shall henceforth mend my wayward behavior.

  • SJCAM M50 Trail Camera: Dead Remote

    SJCAM M50 Trail Camera: Dead Remote

    The remote control included with the SJCAM M50 trail camera did absolutely nothing. Not only did it not turn on the camera’s WiFi, the two indicator LEDs between the buttons didn’t blink:

    SJCAM M50 remote - front view
    SJCAM M50 remote – front view

    With not much to lose, I removed those four screws and popped the back cover:

    SJCAM M50 remote - interior
    SJCAM M50 remote – interior

    Yup, the OEM no-name CR2032 lithium cell was dead flat discharged. A new one perked it right up, with blinky LEDs and all.

    Now I can check the camera for interesting pix without hauling it into the house:

    The Early Raccoon
    The Early Raccoon

    Plenty of critters making the rounds out there …