Ed Nisley's Blog: Shop notes, electronics, firmware, machinery, 3D printing, laser cuttery, and curiosities. Contents: 100% human thinking, 0% AI slop.
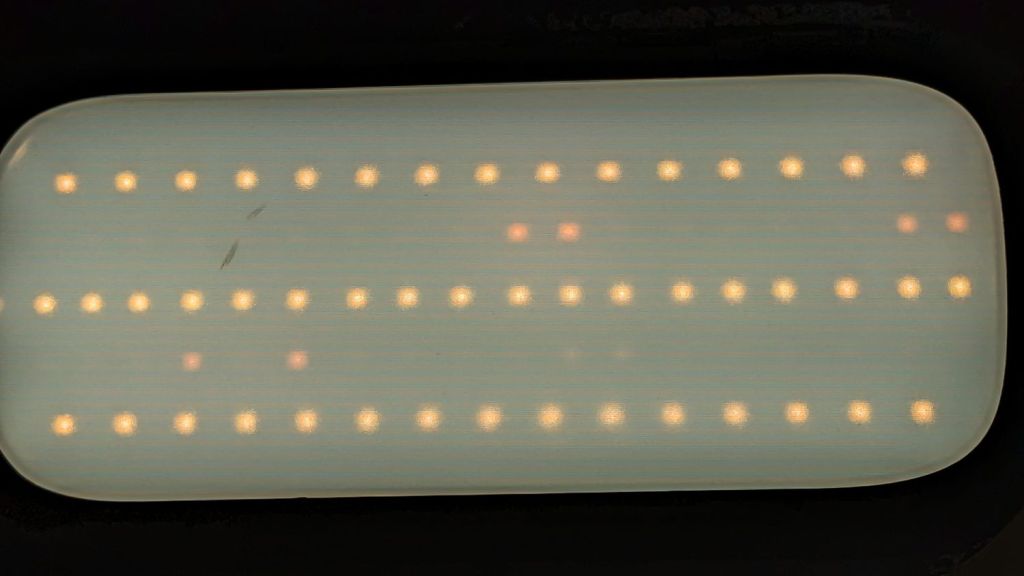
Confirming the diagnosis, the cool white LEDs worked fine with the light turned on:
Miroco floor lamp – all-LED mode fail
With nine spare SI2306 transistors in hand from the last time in this rodeo and minus the sticky adhesive foam covering the PCB, replacing the other driver transistor was no big deal, whereupon the lamp once again worked the way it should:
Miroco floor lamp – restored warm LEDs
While I was in there, I spotted a dent in the input filter cap:
Miroco floor lamp – OEM capacitor
Most likely I squished a wire between the cap and the U-shaped steel strut joining the two halves of the pole. I relocated the replacement cap off the circuit board into an open space with a bit more room:
Miroco floor lamp – recapped
The fragile wires running to the lamp head got their own sheet of silicone tape (not shown here) to isolate them from the U-strut:
Miroco floor lamp – LED wiring
Tuck all the wires back inside, snap the housing together, and it should be good for another uhh half year or two.
It’s hard to be sure about such things, but I now have eight spare transistors …
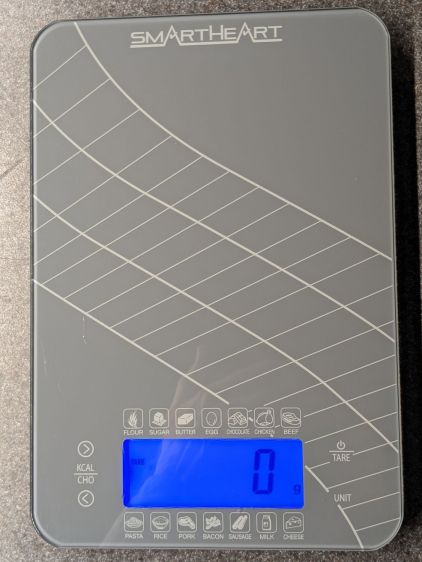
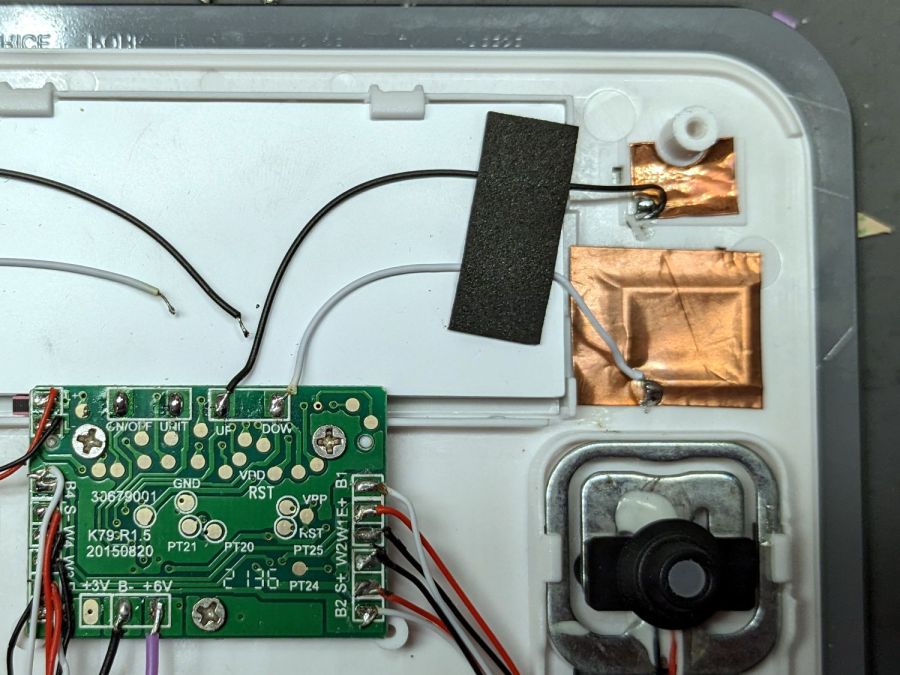
The four control “buttons” on the SmartHeart kitchen scale are copper-foil tabs that sense the presence of your finger though about 5 mm of white plastic and glass:
SmartHeart 19-106 Kitchen Scale – top view
The main failure mode seemed to come from the microcontroller locking up and refusing to recognize any of the buttons, most annoyingly the On/Tare button, while continuing to measure whatever weight was on the scale with whatever zero point it chose. Recovery involved waiting until the thing timed out and shut itself off.
The two buttons on the left select Kilocalories for any of the various foods arrayed around the display. Depending on how it jammed during startup, it might display the Kilocalorie value for, say, sugar, while ignoring all button presses. As the manual does not mention any way to return to weights after activating the Kilocalorie function, other than turning it off, it’s not clear recognizing the other buttons would be much help.
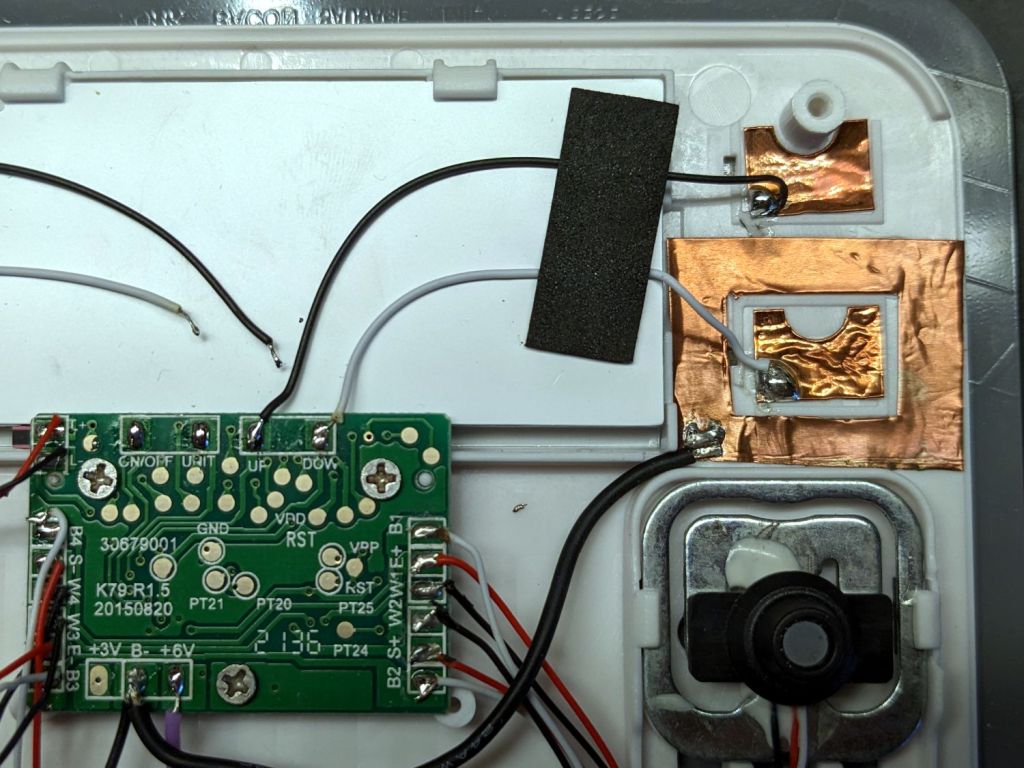
Because we have no use for those functions, I unsoldered the wires to those sensor pads and it no longer jams in that mode:
SmartHeart 19-106 Kitchen Scale – PCB detail
The alert reader will note the PCB legend says I have unsoldered the ON/OFF and UNIT wires. If one believes the silkscreen, the PCB dates back to 2015, so it now carries a reprogrammed microcontroller with functions that no longer match the silkscreen.
The overall soldering quality resembles mine on a bad day.
With those out of the way, the scale still jammed and refused to recognize the remaining two buttons. I wondered if it was somehow sensing ghost fingers over both sensors and waiting for one to vanish, so I added a shield ring around the power tab:
SmartHeart 19-106 Kitchen Scale – shielded sensor
That reduced the sensitivity of both sensors to the point where they pretty much didn’t work, without reducing the number of jams.
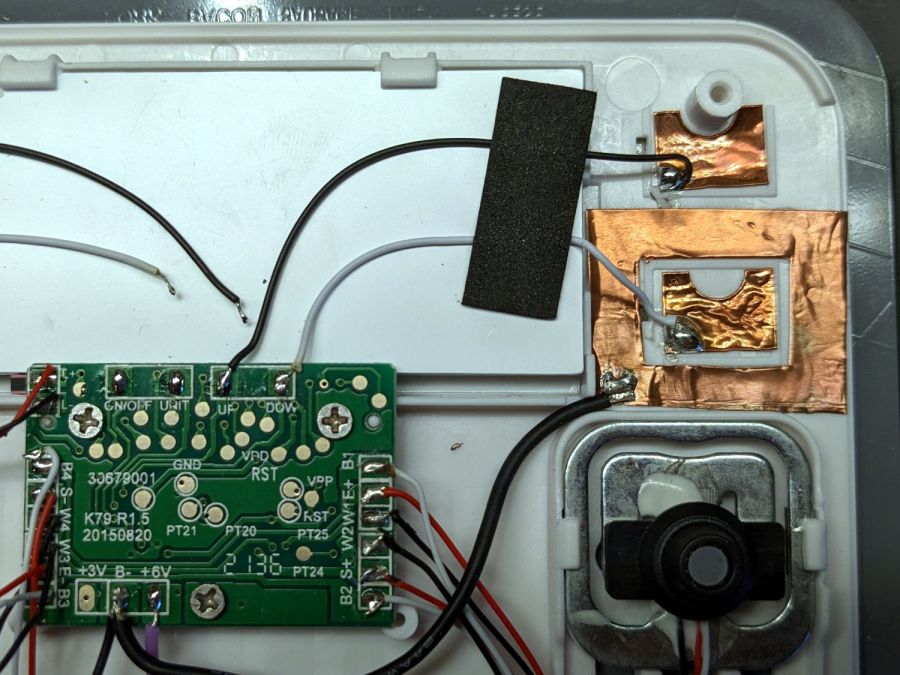
So I tried increasing the sensitivity of the power tab by replacing it with a larger copper foil sheet:
SmartHeart 19-106 Kitchen Scale – larger sensor
That definitely got its attention, as it will now respond to a finger hovering half an inch over the glass, as well as a finger on the bottom of the case: it can now turn on and jam while I pick it up.
More tinkering is in order, but it’s at least less awful in its current state than it was originally, so I can fix a few other things of higher priority.
The health plan I use pays $100 toward the year’s over-the-counter healthcare stuff, although with a caveat: you can only buy the stuff from a specific website. As you might expect, what’s available consists of no-name generic products with absurdly high sticker prices and, just to rub it in, the hundred bucks gets paid in quarterly use-it-or-lose it installments.
Seeing as how it was free, I got a kitchen scale:
SmartHeart 19-106 Kitchen Scale – top view
It has two catastrophically bad design features:
Terrible battery life
Overly sensitive controls
It runs from a pair of series-connected CR2032 non-rechargeable lithium coin cells. Which would be fine, except that the blue LED backlight stays on for 30 seconds after each button touch and draws about 10 mA.
The battery lifetime is best measured in days.
The four control “buttons” on either side of the backlit LCD are touchless sensors using copper foil stickers:
SmartHeart 19-106 Kitchen Scale – NP-BX1 retrofit
The alert reader will spot those the empty CR2032 coin cell contacts over on the left and a pair of NP-BX1 batteries in the middle.
I figured there was no need to keep feeding it coin cells while I played with it, so I conjured a holder from the vasty digital deep. Normally, that would be an OpenSCAD solid model suited for 3D printing, but in this case the lithium cells exactly filled the space between the PCB and the bottom of the case, so it became a 2D design neatly suited for laser cuttery.
Kitchen scale – NP-BX1 holder – LB layout
I planned to stick the orange cutout (in 1.5 mm acrylic) as a stabilizer around the pogo pins making contact with the cell terminals from the red cutout (in 3 mm acrylic), but just melting the pins into the acrylic seemed sufficient for the purpose. Strips of adhesive sheet saved from the margins of previous projects affix the holder (not the cells!) to the scale’s upper glass layer.
As far as I can tell, the scale is perfectly happy running on 7.4 V, rather than 6.0 V. The PCB has two terminals marked +3V and +6V, so it probably depends on which LEDs they use for backlights:
SmartHeart 19-106 Kitchen Scale – PCB detail
The alert reader will notice a peculiarity concerning the sensor pad connections along the top edge.
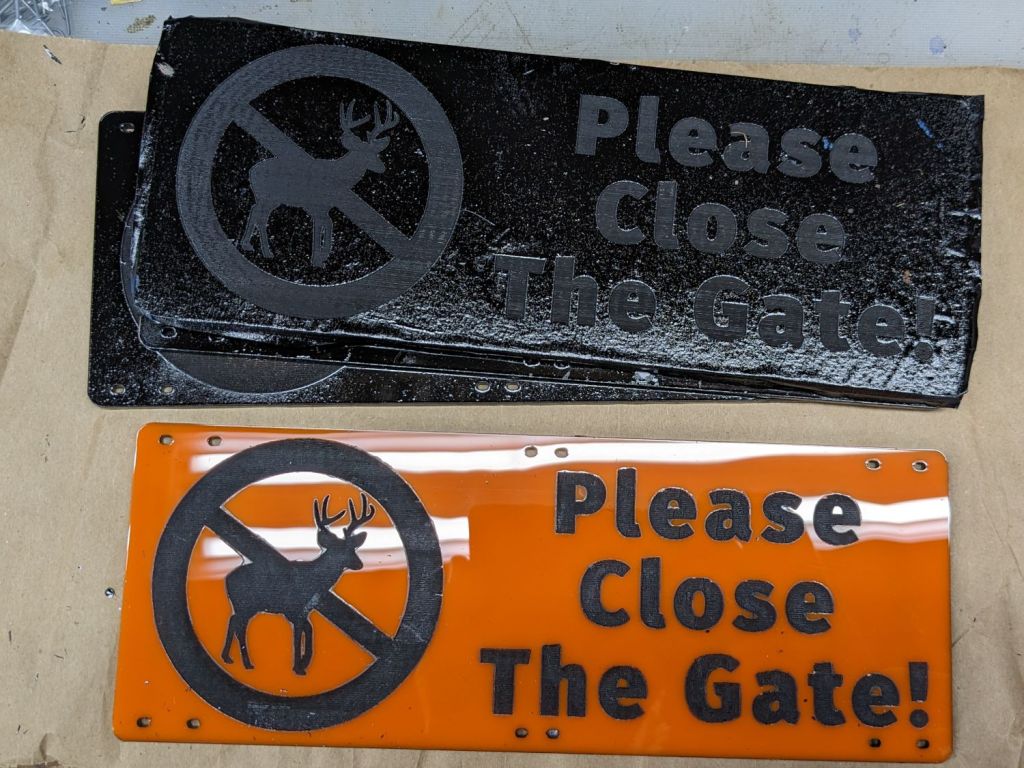
That’s eight months of weathering on MDF covered with indoor urethane sealant and it’s not as awful as I expected: the MDF didn’t actually disintegrate, it just collected some mold / mildew / crud.
A closer look:
Please Close The Gate – weathered MDF – detail
The black paint survived surprisingly well.
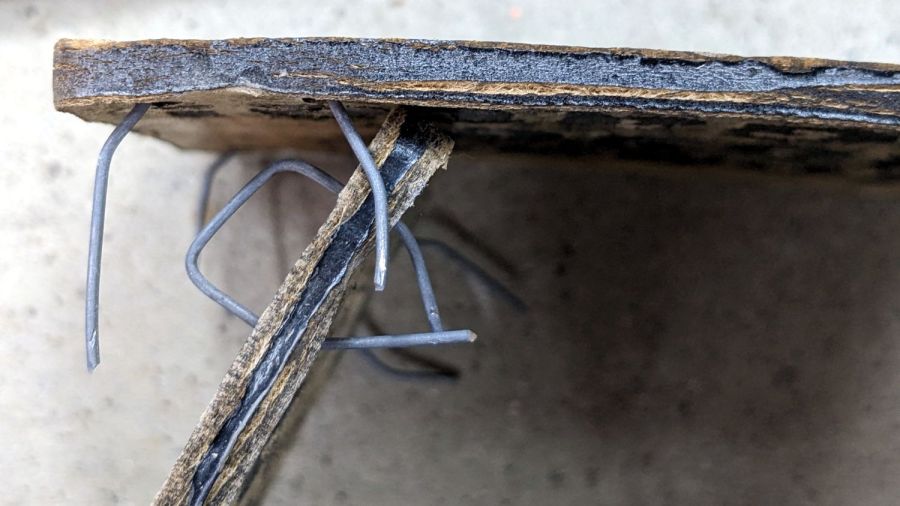
I hadn’t paid much any attention to the edges, so they got covered with random amounts of black paint and urethane. It seems that’s where the disintegration starts:
Please Close The Gate – weathered MDF – side view
MDF definitely isn’t the right material for an outdoor sign and I knew that going in, but it’s cheap and readily available, which makes up for a lot.
For comparison, they looked nice right after installation:
A warm day let me shoot the engraved signs for the Vassar Community Garden gates with rattlecan black:
Please Close The Gate – masking tape peeled
The full sheet of orange acrylic arrived with plastic protective film on both sides, which I planned to use for paint masking. Alas, one side also had a wrinkle running its length that ended up on two signs, so I replaced that film with blue masking tape.
As fate would have it, the first side of the first sign I peeled had masking tape and produced what you see above.
Things went bad in a hurry. The paint had no adhesion whatsoever to the plastic film and fell off in flakes as I peeled the film away:
Please Close The Gate – plastic peeled
I assumed the flakes would just fall off the signs, perhaps with a little persuasion, so I peeled and weeded all the signs before cleaning them up.
Although the paint was fully dry, when the molecularly smooth surface of each paint flake touched the molecularly smooth surface of the newly exposed acrylic, the two instantly and permanently fused together.
There were a lot of flakes:
Please Close The Gate – plastic peeled – detail
Removal techniques that did not work:
Vacuuming with a brush
Gentle rubbing with a soft cloth
Firm rubbing after spraying with acrylic cleaner
Scraping with a plastic razor blade
So I deployed a P220 grit sanding block and wrecked the glossy surface of both sides of all six signs. I briefly considered trying to recover the finish by sanding them all up through about 2000 grit, then came to my senses: my sanding arm is weak.
Careful examination of the last picture shows several places around edges of the circle where the plastic film melted into a blob that blocked the paint, rather than vaporizing. I used enough power to engrave only about 0.3 mm deep (because they’re engraved on both sides), but the transition wasn’t fast enough for a clean edge.
They don’t look as nice as I’d like, but they’re good enough for the purpose:
Please Close The Gate – installed
The acrylic sheet is more see-through than I expected, at least when backlit by bright sunlight.
Please Close The Gate – seethrough
Next: we discover what happens to UV-stabilized orange acrylic and black outdoor paint over the course of a year in garden sunshine.
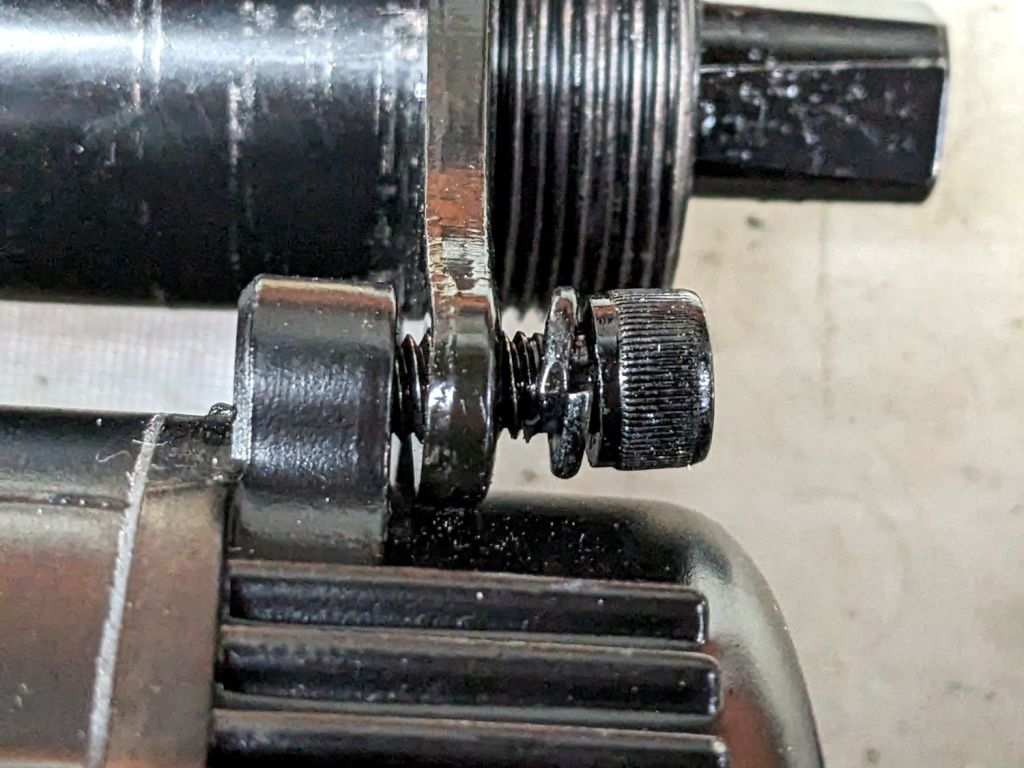
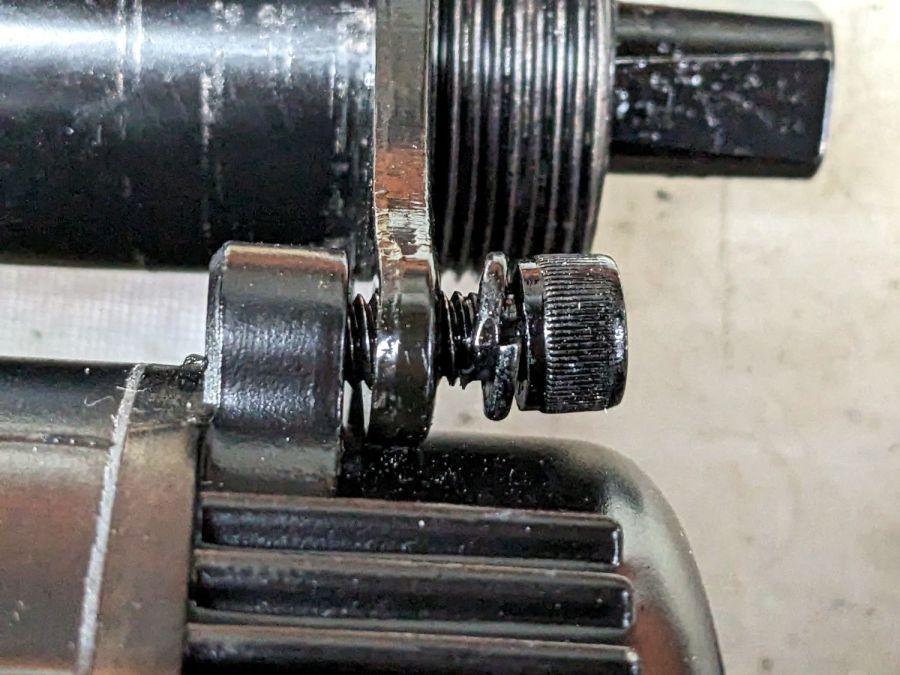
The time has come to add a Bafang mid-drive motor to my Tour Easy recumbent, much like the one Mary has been using for the last two years. When I got to the point of installing the motor in the bottom bracket shell, this happened:
Bafang Triangle Plate – jammed screw
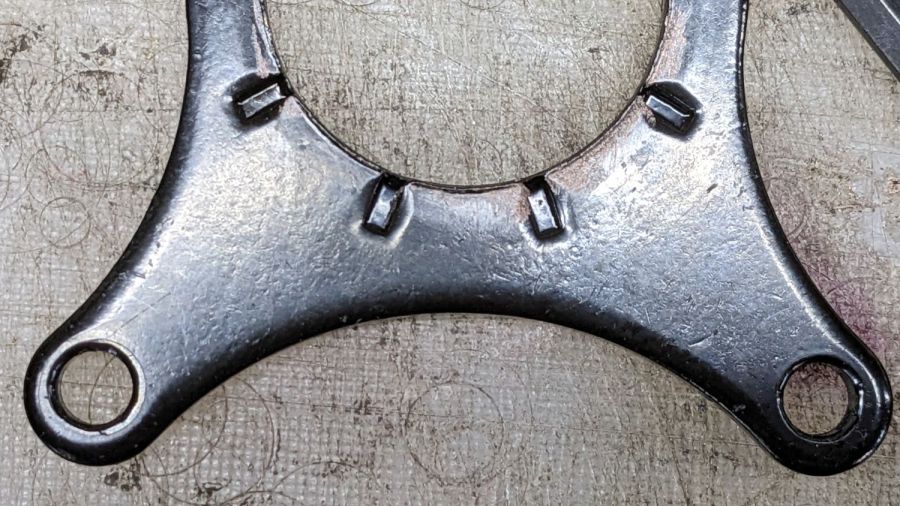
It turns out the triangle plate has slightly misplaced bolt holes:
Bafang Triangle Plate – misplaced bolt holes
If you look very carefully, you’ll see the holes sit just slightly above the midline of those ears. The additional fractional millimeter below the holes touches the motor end bell and prevents them from lining up with the tapped holes.
Normally, you’d just hit the plate with a file and be done with it, but it’s ferociously hardened steel: a file bounces right off.
I deployed a Dremel sanding drum above the ShopVac’s snout to catch the abrasive dust, eroded just enough steel to line up the holes, and everything now fits the way it should.