The Smell of Molten Projects in the Morning

Ed Nisley's Blog: Shop notes, electronics, firmware, machinery, 3D printing, laser cuttery, and curiosities. Contents: 100% human thinking, 0% AI slop.

Tag: Repairs

If it used to work, it can work again

  • Hobo Datalogger vs. Hacked AA Alkaline Battery

    The AA battery pack grafted onto the back of the Hobo datalogger recording groundwater temperature showed a 50% level during its most recent dump, so I swapped in a pair of new AA cells.

    The pack hack dates back to 2009-09 and the Duracell Ultra cells have a “best used by” date of March 2013. Call it 5.5 years of service and, figuring an average current of 10 μA, that’s a total of 480 mA·h.

    The datasheet shows many graphs at much higher currents, but a capacity of 3500 mA·h to 0.80 V at 5 mA seems pretty close. Given that they produce 2.87 V with no load, they’re still in decent shape.

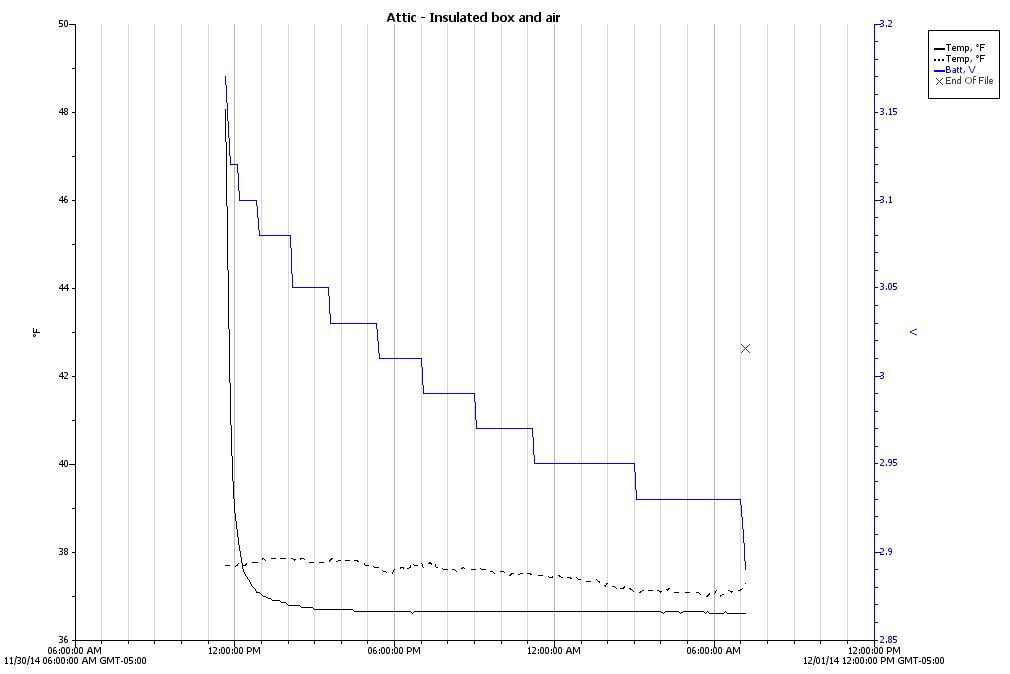
    However, the logger’s opinion of their voltage is what counts. To estimate that number, I checked the reports from the attic: the death planet for lithium cells.

    Starting with an old Energizer failing after a few hours in December:

    Attic - Insulated Box - Early battery failure
    Attic – Insulated Box – Early battery failure

    Two new Maxell CR2032 lithium cells also had trouble, with the first reporting a low voltage in January:

    Attic - Insulated Box - Maxell battery failure
    Attic – Insulated Box – Maxell battery failure

    The second in February:

    Attic - Insulated Box - Maxell battery low - 2015-02-25
    Attic – Insulated Box – Maxell battery low – 2015-02-25

    I think the Maxell cells failed from low temperature, but dead cell is dead.

    That happens just above 2.85 V, so the attic datalogger now carries an AA alkaline battery pack.


  • Thunderbird: Disabling an ISP Email Account

    For reasons that probably make sense to them, Optimum Online (the ISP part of Cablevision) uses totally insecure password-in-the-clear user authentication to the POP3 and SMTP servers. That’s marginally OK for access through their own cable network, but, should you access those servers through a different ISP, you’ve just exposed some sensitive bits to the Internet at large.

    Disabling an account in Evolution requires removing one checkmark:

    Edit → Preferences → Mail Accounts tab → uncheck the account → done!

    Doing the same in Thunderbird, however, requires arcane knowledge and deft surgery, documented in the usual obscure forum post containing most of the information required to pull it off:

    Edit → Preferences → Advanced tab → Config Editor button

    Search for server.server and find the .name entry corresponding to the ISP account. Note the digit identifying the server, which in my case was 1: server1.

    Search for server1 and find the number of the mail.account.* entry with that string in the value field. In my case, that was account1.

    Search for accountmanager to find the mail.accountmanager.accounts entry and remove the account you found from the Value string.

    Done!

    Make a note of all that information, because you must un-futz the accountmanager string to re-enable the account. Of course, if you add or remove any accounts before that, all bets are off.

    There, now, wasn’t that fun?

  • MTD Snowblower Muffler Bolts

    One of the bolts from the replacement muffler on the MTD snowblower worked its way out of the engine block and vanished along the driveway, perhaps to be found when the snow vanishes in a few months. The muffler’s still in place, but the engine exhaust comes straight out of the port into that compartment and, because I’m running the engine a bit rich to make up for oxygenated gasoline, a beautiful blue flame jets about two inches from the bolt hole.

    Being that sort of guy, I installed one of the original bolts that I’d tossed into the bin with its relatives and continued the mission.

    For future reference:

    • MTD Snowthrower E6A4E
    • Tecumseh engine HMSK80
    • Tecumseh muffler 35056
    • Tecumseh bolt 651002

    The bolt has, of course, delightfully custom specs: 5/16-18 x 4-3/16.

    My bolt stash tops out at 4 inches, so that not-quite-1/4 inch extra length means you gotta buy an OEM bolt.

    They’re $1.20 from Jack’s Small Engines, with five bucks of shipping, or you can find a kit with two bolts and the lock bracket for $12 on Amazon.

    No pix, because it’s 14 °F outside and barely more than that in the garage.

  • Dell Inspiron E1405 vs. Ubuntu 14.04LTS vs. Broadcom Drivers

    So the ancient Dell E1405 laptop on the Electronics Bench, connected to this-and-that, woke up without network connections. As in, right after booting, the link and activity lights jammed on solid, the usual eth0 device wasn’t there, WiFi was defunct, and nothing made any difference.

    After a bit of searching, the best summary of what to do appears on the Ubuntu forums. The gist of the story, so I need not search quite so much the next time, goes like this:

    The laptop uses the Broadcom BCM4401 Ethernet and BCM4311 WiFi chips, which require the non-free Broadcom firmware found in the linux-nonfree-firmware package. There’s a proprietary alternative in bcmwl-kernel-source that apparently works well for most Broadcom chips, but not this particular set.

    Guess which driver installed itself as part of the previous update?

    The key steps:

    sudo apt-get purge bcmwl-kernel-source
    egrep 'blacklist (b43|ssb)' /etc/modprobe.d/*
    ... then manually kill any files that appear ...
    

    Apparently that problem has been tripping people for at least the last four years. That this is the 14.04 Long Term Support version evidently has little to do with anything at all.

    While I was at it, I deleted all the nVidia packages that somehow installed themselves without my noticing; the laptop has Intel 945 integrated graphics hardware.

    I vaguely recall what I intended to do before this happened…

  • IBM L191p Monitor Stand Disassembly

    Our Larval Engineer expressed a need for some monitors, so I dispatched a pair of IBM L191p panels from the heap. Despite reusing a gargantuan box from the Dell U2713HM monitor, I had to disassemble the struts from their swiveling base to fit everything inside.

    The intact base has no obvious affordance to remove the covers:

    L191p Monitor Stand - struts intact
    L191p Monitor Stand – struts intact

    After taking the bottom apart, I discovered that you just poke a screwdriver under each cover and it slides upward and off:

    L191p Monitor Stand - struts cover removal
    L191p Monitor Stand – struts cover removal

    Duh & similar remarks.

    The two covers are not interchangeable:

    L191p Monitor Stand - struts cover handedness detail
    L191p Monitor Stand – struts cover handedness detail

    Removing two pairs of screws from each strut releases them from the base:

    L191p Monitor Stand - struts disassembled
    L191p Monitor Stand – struts disassembled

    The projecting horns on the outboard side of those struts are exactly as delicate as you think.

    I put a piece of thick cardboard sheathed in closed-cell foam between the LCD screens that separated their bezels (minus cutouts for the buttons), then taped them together face-to-face. Add foam peanuts, drop in the monitors, nestle struts beside monitors, add rigid foam blocks all around and between, put flat bases atop monitors with a foam slab protecting those strut brackets, over-stuff the box with more peanuts, forcibly tape the thing closed, and it survived the trip in good order.

    A pair of 1280×1024 monitors isn’t worth insuring these days, though.

  • Dell 2005FPW Monitor Disassembly & Recapping

    The Dell 2005FPW monitor that I’d been using in portrait mode suffered the common failure of rebooting itself, which suggested failing capacitors. Despite my reservations, I dropped eleven bucks on a repair kit containing exactly the right caps (from sunny California via eBay), hauled the carcass to a couple of Squidwrench sessions, replaced the offending caps, and it’s all good again.

    No pix of the recapping, but a few notes that may prove useful next time.

    The standard advice from the usual Internet Sages recommends prying the bezel apart along the nearly invisible outside joint. I did that, then found the user manuals and the Fine Repair Manual and discovered that you jam your fingernails under the inside of the bezel against the LCD screen, pry upward, rotate / bend the bezel around its outer edge, and it Just Pops Off. I doubt it’s that easy, but …

    You should start from the top of the bezel, because the PCB behind the buttons & LEDs along the bottom doesn’t have a whole lot of slack in its cable. This shows the PCB and disconnected cable:

    Dell 2005FPW monitor - button PCB cable
    Dell 2005FPW monitor – button PCB cable

    Just pull the small brown latch away from the cable and the cable will slide out. That would be significantly easier if the socket were on the backside of the PCB, but you must pop the PCB out of its own latches before you get access to the socket latch. Rotate the bezel carefully around the PCB and maybe it’ll survive.

    The pushbutton that releases the stand’s not-quite-a-VESA-mount bracket remains in place when you remove the rear cover, held in place by a wedge:

    Dell 2005FPW monitor - mount release button detail
    Dell 2005FPW monitor – mount release button detail

    It is, however, the only thing sticking that far out of the back surface and, if you leave it alone, it will eventually release itself from captivity, whereupon its spring will fire it across the room. You have been warned.

    Reassembly is in reverse order, although I didn’t snap the button-and-LED PCB firmly into place. Fixing that will require dismounting the bezel again, which I’m so not doing for a 1 mm gap along the bottom edge.

  • Kenmore 158: Bobbin Winder Repair

    For reasons which are, trust me on this, not relevant here, we now have a third Kenmore 158 sewing machine: a freebie that sat under a roof leak in an unused room some years ago and wasn’t cleaned before being stored. Even though not much water got inside the covers, the bobbin winder shaft froze solid.

    Two black screws hold it to the cover and provide a slight adjustment of the tire-to-handwheel distance:

    Bobbin Winder - old tire
    Bobbin Winder – old tire

    Prior to this adventure, I soaked the shaft in penetrating oil for a week or two, but to no avail.

    I didn’t take any before-the-repair photos, but it looked like this afterward, with the new tire installed…

    From the top right (looking over the handwheel):

    Bobbin Winder - assembled - top right
    Bobbin Winder – assembled – top right

    Notice the small rectangular hole just below the larger section of the shaft in the protruding part of the pot metal housing. That’s supposed to be an oil hole, but it’s also a fine water inlet.

    From the top left:

    Bobbin Winder - assembled - top left
    Bobbin Winder – assembled – top left

    The two obvious screws remove the obvious parts, but beware the compression spring:

    Bobbin Winder - fill sense lever
    Bobbin Winder – fill sense lever

    And the torsion spring:

    Bobbin Winder - drive latch
    Bobbin Winder – drive latch

    Some experimentation with a strap wrench rotated the wheel on the (still firmly frozen) shaft, which suggested the joint was a press fit without a setscrew, splines, or adhesive.

    Grabbing the shaft lightly in a machinist’s vise, resting it atop the bench vise, and giving it a few shots with a drift punch drove it downward through the housing:

    Bobbin Winder - driving out spindle
    Bobbin Winder – driving out spindle

    More gentle beating produced this heartrending scene:

    Bobbin Winder - corroded shaft
    Bobbin Winder – corroded shaft

    Water just isn’t any good at all for unlubricated steel in a pot-metal bushing…

    Anyhow, the shaft & housing cleaned up well, although they look a tad grody, and everything went back together in the reverse order.

    I added a drop of light oil through the lube port, chucked the shaft in the drill press, spun it for a minute at low speed to wear off a slight binding, and it’s all good again.