The 2016-11A and 2016-11B cells produced the overlapping red and green curves, with the gritty section due to crappy battery pack connections:

The lower curve comes from an old unprotected cell harvested from a defunct media player and retrieved from the to-be-recycled pile.
I picked 1 A as a reasonable value for their intended use in flashlights and maybe a helmet camera. Unlike some other cells in the recent past, these deliver 3.0 A·h, reasonably close to their rated 3.4 A·h capacity at a (presumably) lower current.
Replotting the voltage vs. energy delivered doesn’t show any surprises:
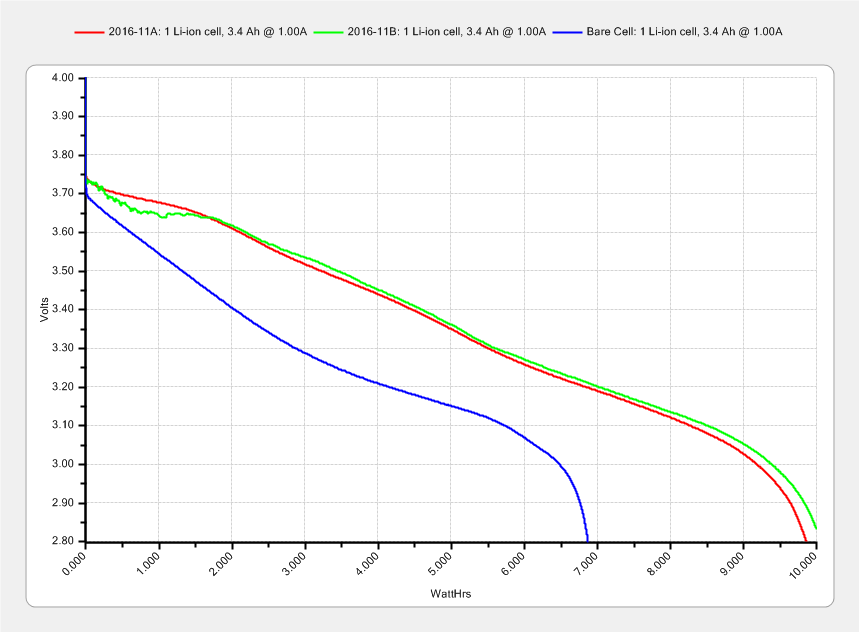
The voltage declines more-or-less linearly, without the relatively flat discharge curve for smaller cells, which explains why the J5 V2 flashlight becomes seriously dim after a few hours. On the upside, that allows a reasonably accurate state-of-charge display.
Assuming the Sony HDR-AS30V camera burns 0.1 W·h/min while recording (which is a fancy way of saying it dissipates 6 W), then it should run for (10 W·h)/(0.1W·h/min) = 100 min from one of these cells fitted as an outrigger. The best of the NP-BX1 cells for the camera delivers something like 90 minutes from a measured capacity of 4 A·h at 500 mA; I don’t know what to make of those numbers. Perhaps the camera runs the NP-BX1 cells below the 2.8 V cutoff I’ve been assuming?