Ed Nisley's Blog: Shop notes, electronics, firmware, machinery, 3D printing, laser cuttery, and curiosities. Contents: 100% human thinking, 0% AI slop.
Category: Science
If you measure something often enough, it becomes science
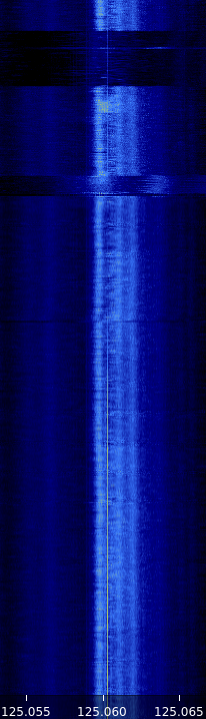
Seven hours of mid-January RF, tight-zoomed in both frequency and amplitude, from 0350 to 1050 local:
WWVB waterfall – N3 – 2017-01-24 1050 – composite
The yellow line of the WWVB carrier comes out 2 ppm high, which means the local oscillator chain is 2 ppm low. We know the WWVB transmitter frequency is exactly 60.000 kHz, translated up by 125 MHz to the N3’s tuning range; you can, ahem, set your clock by it.
The blue band marks the loop antenna + preamp passaband, which isn’t quite centered around 60.000 kHz. Tweaking the mica compression caps just a bit tighter should remedy that situation.
Given that input, a very very tight bandpass filter should isolate the WWVB carrier and then it’s all a matter of fine tuning…
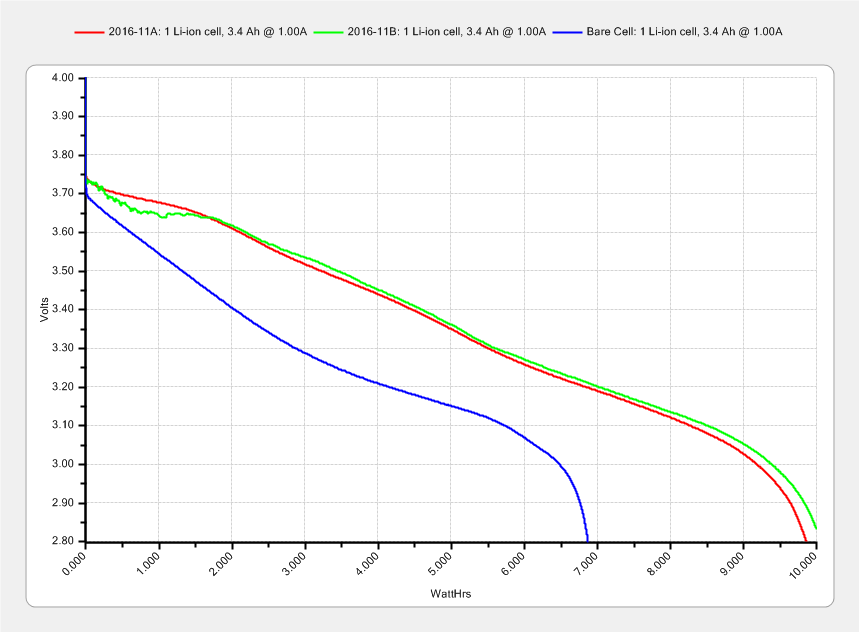
The lower curve comes from an old unprotected cell harvested from a defunct media player and retrieved from the to-be-recycled pile.
I picked 1 A as a reasonable value for their intended use in flashlights and maybe a helmet camera. Unlike some other cells in the recent past, these deliver 3.0 A·h, reasonably close to their rated 3.4 A·h capacity at a (presumably) lower current.
Replotting the voltage vs. energy delivered doesn’t show any surprises:
The voltage declines more-or-less linearly, without the relatively flat discharge curve for smaller cells, which explains why the J5 V2 flashlight becomes seriously dim after a few hours. On the upside, that allows a reasonably accurate state-of-charge display.
Assuming the Sony HDR-AS30V camera burns 0.1 W·h/min while recording (which is a fancy way of saying it dissipates 6 W), then it should run for (10 W·h)/(0.1W·h/min) = 100 min from one of these cells fitted as an outrigger. The best of the NP-BX1 cells for the camera delivers something like 90 minutes from a measured capacity of 4 A·h at 500 mA; I don’t know what to make of those numbers. Perhaps the camera runs the NP-BX1 cells below the 2.8 V cutoff I’ve been assuming?
That works out to a bit under 1000 page views/day of purely organic traffic.
As always, way more people than I’d expect come here with plumbing problems. On the upside, much of the bedbug saga has fallen off the trailing edge of the wedge; life is good!
The Hobo datalogger buried in the dirt under the patio kvetched about a low battery, which produced this surprising result:
Maxell CR2032 cell – early failure
Cells from the same lot have been doing just fine in the other dataloggers, so I hope this is a one-off weak cell and not the harbinger of another run of dead cells.
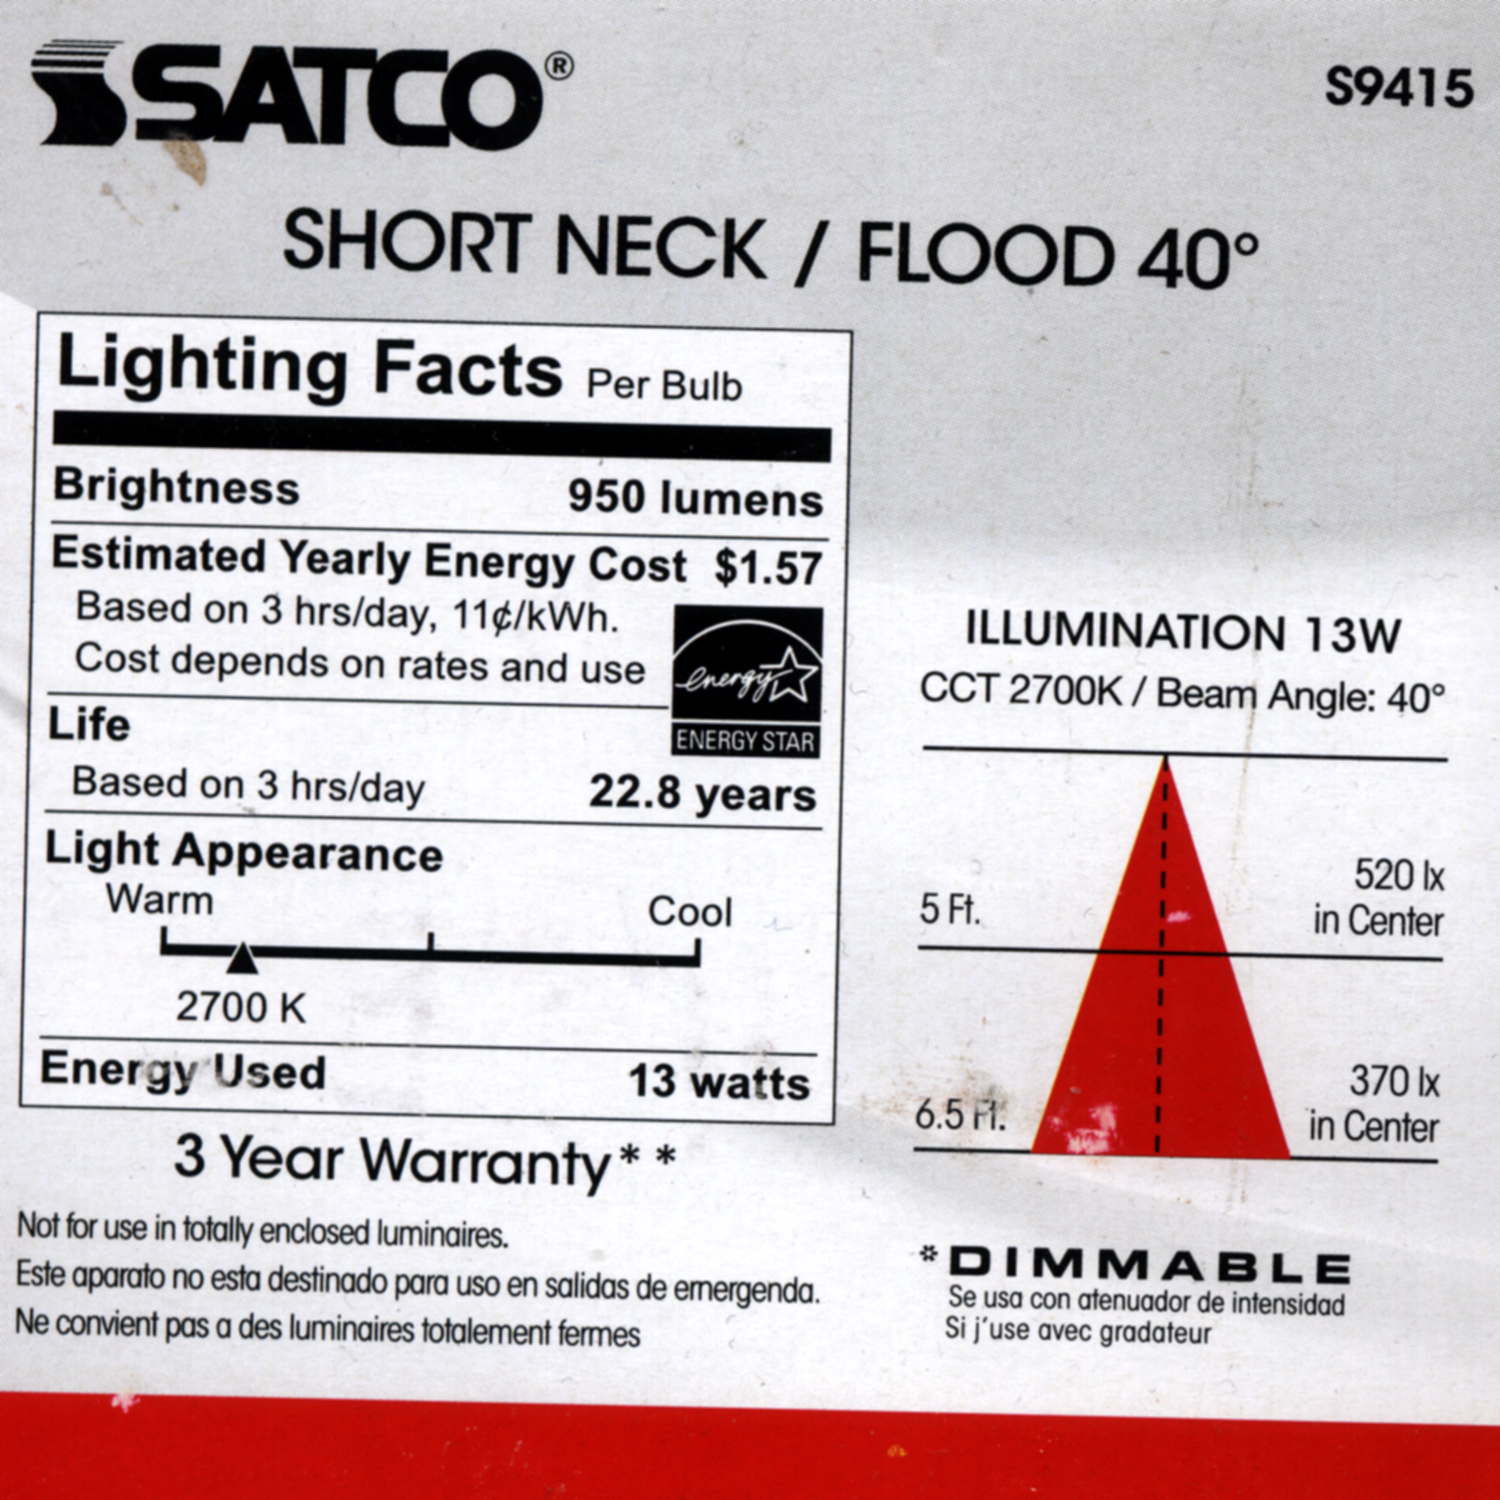
I replaced a dead 75 W halogen PAR30 bulb over the kitchen sink with a Satco S9415 LED bulb that was, at the time, advertised as “75 W equivalent”:
Satco S9415 PAR30 LED Bulb – specs
It’s noticeably less bright than the surviving halogen bulb, which is what you’d expect when 950 lm goes head-to-head with 1100+ lm (based on casual searching), but with a similar color temperature and beam pattern, so it’s Good Enough. I should have bought two and converted the halogens into glass sculptures.
The difference between the 22.8 year Life and the 3 Year Warranty always seems amusing. The warranty requires returning the bulb, so that’s about useless …
This relentlessly organized doodle happened while reading some tech docs on the Comfy Couch:
Sakura Pen Width Examples
The first two lines obviously belong in their own group, but, hey, it’s a doodle.
The two Uni-Ball Kuru Toga pencils, in 0.5 and 0.7 mm, have diamond-impregnated lead that’s supposed to be much more break-resistant than usual. I fear that they’ll land point-downward and wreck the rotating sleeve surrounding the lead, so I’ve managed zero drops so far. Even I hesitated at the 0.3 mm version.
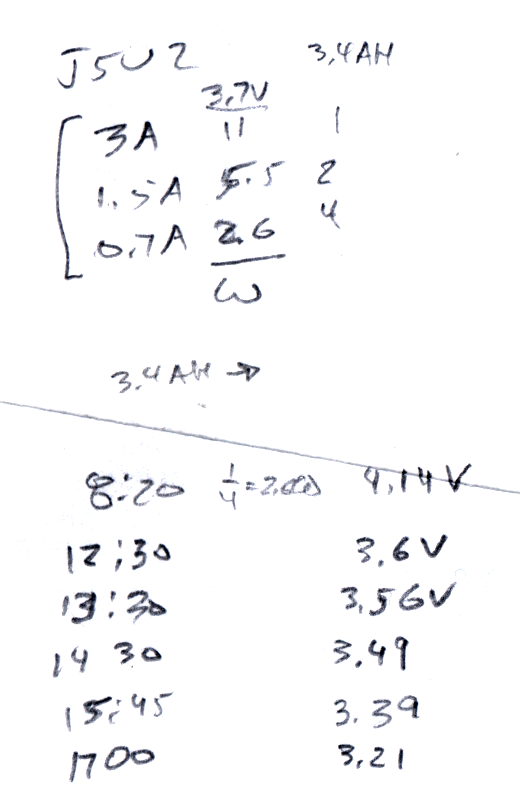
Just for fun, I measured the J5 V2 flashlight’s current, by the simple expedient of unscrewing the cap and bridging the battery-to-case-threads gap with a multimeter:
J5 V2 Flashlight – negative cell terminal
The results:
High: 3 A
Medium: 1.5 A
Low: 0.7 A
As nearly as I can tell, they’re connecting the 18650 cell directly across the LED for High and PWM-ing it down to 50% and 25%. The PWM frequency is low enough to be visible during eye saccades and flashlight motions.
The flashlight knows how to do all five modes without its tail cap, so the controller + FET must live behind the LED. I can’t tell if the switch in the tail cap is just a dumb pushbutton (with, it seems, a surprising & ill-controlled resistance) or doing something clever with resistive levels (because the resistance varies with each push); at some point this thing will fail in an amusing manner and I’ll take it apart to find out.
The High setting dissipates 11 W (!) that pushes the flashlight well beyond uncomfortably warm within five minutes, so that’s not a useful long-term setting. The little alien egg beside the LED melted into a puddle during those five minutes; at least it won’t be moving anywhere else.
Setting it to Low = 25% PWM duty cycle = 0.7 A (average, sorta-kinda), a freshly charged 18650 cell lasts for about five hours down to 3.6 V, which is pretty close to the cell’s 3.4 A·h rating (kinda-sorta, ignoring the decreasing cell voltage, etc). That suggests Medium would last maybe two hours, tops, and there’s not enough heatsinking to discover how long High would last.
After 8.5 hours the cell was down to 3.2 V and the LED was, as you’d expect, rather dim. You could click to High for more light, of course, trading off runtime for brightness.
The square LED emitter array produces a square light pattern that’s not aligned with the flats on the body, so if you happened to be thinking of clamping a holder onto those flats, be prepared for some custom rotation to align the pattern with the outside world. That obviously doesn’t matter in a hand-held flashlight, but a bike headlight might look weird.
The zoom slider goes from a focused square (at full extension) to a well-filled round disk (at minimum length) with a diameter about five times the square’s side. I think the smooth zoom motion comes from grease-on-O-ring viscosity rather than precision machining.