The Smell of Molten Projects in the Morning

Ed Nisley's Blog: Shop notes, electronics, firmware, machinery, 3D printing, laser cuttery, and curiosities. Contents: 100% human thinking, 0% AI slop.

Category: PC Tweakage

Remembering which tweaks worked

  • Manjaro Linux vs. Dell Latitude E7250 Bluetooth

    Manjaro Linux vs. Dell Latitude E7250 Bluetooth

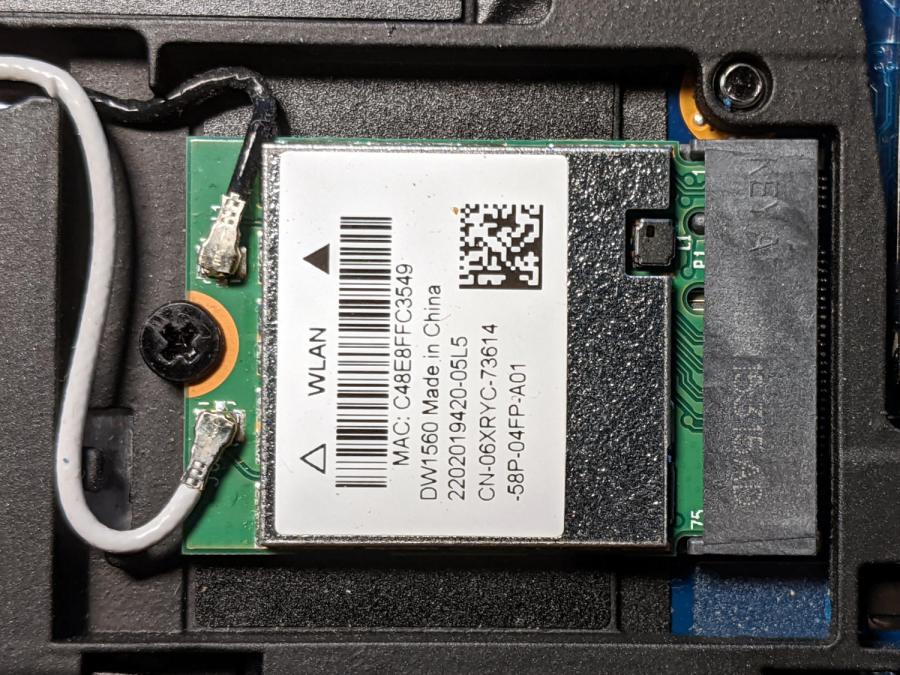
    Although the Dell Latitude E7250 allegedly had Bluetooth capability and the Blueman applet tried connecting to my Bluetooth headsets, the connection aways failed and nothing worked. There’s a WLAN module stuck in an M.2 socket inside the laptop providing both WiFi and Bluetooth:

    Dell E7250 - DW1560 card in place
    Dell E7250 – DW1560 card in place

    A bit of searching suggested the driver wasn’t loading properly, which became obvious after I knew where to look:

    dmesg | grep -i blue
    … snippage …
    [    5.678610] Bluetooth: hci0: BCM20702A1 (001.002.014) build 1572
    [    5.678851] bluetooth hci0: Direct firmware load for brcm/BCM20702A1-0a5c-216f.hcd failed with error -2
    [    5.678853] Bluetooth: hci0: BCM: Patch brcm/BCM20702A1-0a5c-216f.hcd not found
    [   10.854607] Bluetooth: RFCOMM TTY layer initialized
    [   10.854613] Bluetooth: RFCOMM socket layer initialized
    [   10.854619] Bluetooth: RFCOMM ver 1.11

    Without having the proper firmware / patch loaded, the module won’t work, even though the TTY / socket layers know it’s present, which explains why Blueman did everything except actually connect to the headsets.

    More searching suggested you must extract the firmware HEX file from the Windows driver. Feeding the Service Tag into the Dell support site, then feeding “Bluetooth” and “Windows 8.1, 64-bit” (preinstalled on the laptop) into the Drivers & Downloads tab gets you the relevant EXE file: Dell Wireless 1550/1560 Wi-Fi and Bluetooth Driver. It turns out to be a self-extracting ZIP file (in Windows, anyway), so unzip it all by yourself:

    unzip Network_Driver_5DFVH_WN32_6.30.223.262_A03.EXE

    This produces a blizzard of HEX files in the newly created Drivers/production/Windows8.1-x64 directory. Each firmware HEX file is keyed to the USB Product Code identifying the unique USB gadget, found with lsusb:

    lsusb
    … snippage …
    Bus 002 Device 003: ID 0a5c:216f Broadcom Corp. BCM20702A0 Bluetooth
    … snippage …

    The DW1560 apparently has a USB RAM interface, with the specific HEX file identified in the CopyList stanza of the INF file corresponding to that USB Product Code:

    grep -i -A 5  ramusb216f.copylist Drivers/production/Windows8.1-x64/bcbtums-win8x64-brcm.inf
    [RAMUSB216F.CopyList]
    bcbtums.sys
    btwampfl.sys
    BCM20702A1_001.002.014.1443.1572.hex
    … snippage …

    However, the Linux firmware loader needs a different file format with a different name, mashed together from the HEX file, USB Vendor, and USB Product codes:

    hex2hcd -o BCM20702A1-0a5c-216f.hcd BCM20702A1_001.002.014.1443.1572.hex

    The converted firmware file goes where the loader expected to find it:

    sudo cp BCM20702A1-0a5c-216f.hcd /lib/firmware/brcm/

    Whereupon next reboot sorted things out:

    dmesg | grep -i blue
    [    6.024838] Bluetooth: Core ver 2.22
    [    6.024868] Bluetooth: HCI device and connection manager initialized
    [    6.024872] Bluetooth: HCI socket layer initialized
    [    6.024874] Bluetooth: L2CAP socket layer initialized
    [    6.024881] Bluetooth: SCO socket layer initialized
    [    6.100796] Bluetooth: BNEP (Ethernet Emulation) ver 1.3
    [    6.100800] Bluetooth: BNEP filters: protocol multicast
    [    6.100804] Bluetooth: BNEP socket layer initialized
    [    6.157114] Bluetooth: hci0: BCM: chip id 63
    [    6.158125] Bluetooth: hci0: BCM: features 0x07
    [    6.176119] Bluetooth: hci0: BCM20702A
    [    6.177114] Bluetooth: hci0: BCM20702A1 (001.002.014) build 0000
    [    7.031228] Bluetooth: hci0: BCM20702A1 (001.002.014) build 1572
    [    7.047177] Bluetooth: hci0: DW1560 Bluetooth 4.0 LE
    [   13.141854] Bluetooth: RFCOMM TTY layer initialized
    [   13.141865] Bluetooth: RFCOMM socket layer initialized
    [   13.141872] Bluetooth: RFCOMM ver 1.11

    The firmware may be in one of the myriad Bluetooth packages not installed by default, so perhaps identifying & installing the proper package would sidestep the hocus-pocus.

    Maybe next time?

    Now I can wear my Bose Hearphones in Zoom sessions with the E7250, because my Pixel 3a phone heats up almost to the gets-bendy level while thrashing its battery to death.

  • USB Media Card Reader: Contrast Improvement

    USB Media Card Reader: Contrast Improvement

    Consumer electronics designers seem to favor low- or no-contrast markings, with this USB reader falling on the vanishing end of the spectrum:

    USB card reader - low-contrast slots
    USB card reader – low-contrast slots

    I poke the MicroSD card from the AS30V helmet camera into the smaller slot on the top surface, but, contrary to what’s revealed by the camera’s flash, the slot is a black-on-black target.

    Well, I finally fixed that:

    USB card reader - high-contrast slots
    USB card reader – high-contrast slots

    Although white tape surely would have sufficed, the roll of fluorescent red came to hand and that’s what it’ll be. The CompactFlash and Memory Stick slots on the front don’t see much traffic and have better access.

    I slapped tape on case, trimmed the slots with a razor knife, and declared victory.

    Much better!

  • PiHole with DNS-over-HTTP: Revised

    More than a year later, the PiHole continues to work fine, but the process for installing the Cloudflare DoH machinery has evolved.

    (And, yes, it’s supposed to be DNS-over-HTTPS. So it goes.)

    To forestall link rot, the key points:

    cd /tmp ;  wget https://bin.equinox.io/c/VdrWdbjqyF/cloudflared-stable-linux-arm.tgz
    tar -xvzf cloudflared-stable-linux-arm.tgz 
    sudo cp cloudflared /usr/local/bin
    sudo chmod +x /usr/local/bin/cloudflared
    sudo cloudflared -v
    sudo useradd -s /usr/sbin/nologin -r -M cloudflared
    sudo nano /etc/default/cloudflared
    ----
    CLOUDFLARED_OPTS=--port 5053 --upstream https://1.1.1.1/dns-query --upstream https://1.0.0.1/dns-query 
    ----
    sudo chown cloudflared:cloudflared /etc/default/cloudflared
    sudo chown cloudflared:cloudflared /usr/local/bin/cloudflared
    sudo nano /etc/systemd/system/cloudflared.service
    ----
    [Unit]
    Description=cloudflared DNS over HTTPS proxy
    After=syslog.target network-online.target
    
    [Service]
    Type=simple
    User=cloudflared
    EnvironmentFile=/etc/default/cloudflared
    ExecStart=/usr/local/bin/cloudflared proxy-dns $CLOUDFLARED_OPTS
    Restart=on-failure
    RestartSec=10
    KillMode=process
    
    [Install]
    WantedBy=multi-user.target
    ----
    sudo systemctl enable cloudflared
    sudo systemctl start cloudflared
    sudo systemctl status cloudflared

    Then aim PiHole’s DNS at 127.0.0.1#5053. It used to be on port #54, for whatever that’s worth.

    Verify it at https://1.1.1.1/help, which should tell you DoH is in full effect.

    To update the daemon, which I probably won’t remember:

    wget https://bin.equinox.io/c/VdrWdbjqyF/cloudflared-stable-linux-arm.tgz
    tar -xvzf cloudflared-stable-linux-arm.tgz
    sudo systemctl stop cloudflared
    sudo cp ./cloudflared /usr/local/bin
    sudo chmod +x /usr/local/bin/cloudflared
    sudo systemctl start cloudflared
    cloudflared -v
    sudo systemctl status cloudflared

    And then It Just Works … again!

  • Clearing The Noto Font Clutter

    The Noto (“No Tofu”) font family includes nearly All. The. Languages., which is certainly a noble goal, but I’m just not ever going to need fonts like these:

    ./NotoSerifTelugu-Regular.ttf
    ./NotoSansBengali-Bold.ttf
    ./NotoSansGurmukhiUI-Bold.ttf
    ./NotoSansGurmukhi-Bold.ttf
    ./NotoSerifTamil-Regular.ttf
    ./NotoSansOriyaUI-Bold.ttf
    ./NotoSerifSinhala-Regular.ttf
    ./NotoSerifSinhala-Bold.ttf
    ./NotoSerifMalayalam-Bold.ttf
    ./NotoSansTelugu-Bold.ttf
    ./NotoSansAvestan-Regular.ttf
    … and so forth and so on …

    A bit of searching & listing identified the few I might ever use, so armor those against the coming catastrophe:

    cd /usr/share/fonts/truetype/noto/
    sudo chmod a-w NotoMono-Regular.ttf
    sudo chmod a-w NotoSans-Bold*
    sudo chmod a-w NotoSansDisplay-*
    sudo chmod a-w NotoSans-Italic.ttf
    sudo chmod a-w NotoSansGothic-Regular.ttf
    sudo chmod a-w NotoSansMono-*
    sudo chmod a-w NotoSans-Regular.ttf 
    sudo chmod a-w NotoSansSymbols-*
    sudo chmod a-w NotoSerif-Bold*
    sudo chmod a-w NotoSerifDisplay-*
    sudo chmod a-w NotoSerif-Italic.ttf 
    sudo chmod a-w NotoSerif-Regular.ttf

    There seems no regex-ish way of picking those out; next time, I’ll recycle the list as a script.

    With armor in place, remove the rest:

    find . -perm -u=w -type f -exec sudo rm '{}' \;

    Rebuild the font caches:

    sudo fc-cache -v -f

    Maybe do such things near the end of the day, when you’re going to shut down anyway, because you’ll want to restart any programs using fonts in any nontrivial way.

    Making the desired fonts read-only may confuse the next update involving the Noto fonts, but this setup (Xubuntu 18.04 LTS) is getting old and maybe something else will happen when I get around to installing a whole new release.

  • Kensington Expert Mouse Scroll Ring Fix

    Apparently the newest Kensington Expert “Mouse” trackballs have a hack re-orienting the scroll ring quadrature detector. The picture from my original writeup shows the previous situation:

    Scroll ring IR emitter-detector quadrature pair
    Scroll ring IR emitter-detector quadrature pair

    The quadrature detector, the black block on the left, is oriented with its lens (and, thus, the actual detectors) pointed away from the IR emitter. I thought it might be an assembly screwup, but it’s actually worse: the PCB layout is wrong.

    A note from Tristan in NZ explains the situation:

    So I have a later model than yours. It has a 2nd PCB chunk between where the legs normally would be. Just a floating piece with two holes for the legs, holding the legs from the board […] to the main board.It is also pointing the correct way (with the lens towards the three leg emitter).

    Kensington scroll wheel revision2
    Kensington scroll wheel revision2

    The new quad detector has only three pins and no convex lens, but the active area now faces the emitter across the gap.

    Because the interposer PCB occupies the space previously devoted to the emitter & detector leads, Kensington apparently soldered the new parts directly to the top surface without any clearance:

    It’s like they failed to put through-vias to the rear or didn’t route them to the bottom another way, hence the solder is under the component

    Tristan managed to wreck the detector while attempting to re-solder the intermittent joints, a situation I’m painfully familiar with. He replaced it with a quad detector harvested from a mid-90s optical mouse and it’s back in operation.

    So I think the correct “fix” for the old-style PCBs (without the new interposer) is to unsolder the detector, rotate it so the lens faces the emitter, then somehow rewire the pins to the original pads. This won’t be easy and definitely won’t be pretty, but as long as it’s pointed in the right general direction it should work:

    mine works off axis quite a bit

    Should either of my Expert Mouse trackballs fail, now I know what to do

    Many thanks to Tristan for reporting his findings!

    Update: A note from Alan brings more data to the discussion

  • Schwab / Symantec VIP Access vs. Yubikey

    A Yubikey 5 NFC turns out to be perfectly compatible with any website using Symantec’s (no longer available) hardware key and VIP Access (definitely a misnomer) app to generate TOTP access codes, because the sites use bog-standard TOTP. The only difficulty comes from Symantec’s proprietary protocol creating the token linking an ID with a secret value to generate the TOTP codes, which is how they monetize an open standard.

    Fortunately, Cyrozap reverse-engineered the Symantec protocol, dlenski mechanized it with a Python script, and it works perfectly:

    python3 -m venv symkey-env
    source symkey-env/bin/activate
    pip3 install https://github.com/dlenski/python-vipaccess/archive/HEAD.zip
    vipaccess provision -t SYMC
    deactivate

    That spits out a file containing the ID and secret, from which you create a QR code for the Yubikey Authenticator app:

    qrencode -t UTF8 'otpauth://totp/VIP%20Access:SYMCidnumbers?secret=longsecretgibberish&issuer=Symantec&algorithm=SHA1&digits=6'

    Fire up the app, wave the Yubikey behind the phone, scan the QR code, wave the Yubikey again to store it, sign in to the Schwab site, turn on 2FA, enter the ID & current TOTP value from the Yubikey Authenticator, and It Just Works™.

    Of course, you can kiss Schwab’s tech support goodbye, because you’re on your own. If you ever lose the Yubikey, make sure you know the answers to your allegedly secret questions.

    Equally of course, you’re downloading and running random shit from the Intertubes, but …

    Now, if only all my financial institutions would get with the program.

  • Huion H610Pro (V2) Tablet vs. xsetwacom

    For unknown reasons, likely having to do with ordinary system updates, both the Huion H610Pro (V2) tablet’s device name and the display output’s name have changed. This came to light when I discovered the tablet’s stylus was no longer constrained to the landscape display, which worked fine when I set it up barely a month ago.

    Running the setup command manually:

    xsetwacom --verbose set "HUION Huion Tablet Pen stylus" MapToOutput "DP-1"
    ... Display is '(null)'.
    ... 'set' requested for 'HUION Huion Tablet Pen stylus'.
     <<< snippage >>>
    ... Checking device 'HUION Huion Tablet stylus' (11).
    ... Checking device 'HUION Huion Tablet eraser' (19).
    Cannot find device 'HUION Huion Tablet Pen stylus'.

    Apparently, the device formerly known as HUION Huion Tablet Pen stylus is now called HUION Huion Tablet stylus.

    Fine, I can live with that. Try again:

    xsetwacom --verbose set "HUION Huion Tablet stylus" MapToOutput "DP-1"
    ... Display is '(null)'.
    ... 'set' requested for 'HUION Huion Tablet stylus'.
     <<< snippage >>>
    ... Checking device 'HUION Huion Tablet stylus' (11).
    ... Checking device 'HUION Huion Tablet eraser' (19).
    ... Device 'HUION Huion Tablet stylus' (11) found.
    ... Found output 'VGA-1' (disconnnected)
    ... Found output 'DP-1' (disconnnected)
    ... Found output 'HDMI-1' (disconnnected)
    ... Found output 'DP-2' (connected)
    ... CRTC (2560x0) 1440x2560
    ... Found output 'HDMI-2' (disconnnected)
    ... Found output 'DP-1-8' (connected)
    ... CRTC (0x0) 2560x1440
    ... Found output 'DP-1-1' (disconnnected)
    Unable to find output 'DP-1'. Output may not be connected.

    Apparently, the video output formerly known as DP-1 has fissioned into DP-1-1 and DP-1-8, with only the latter connected. Weirdly, nothing happened to DP-2.

    Once more, into the bleach:

    xsetwacom --verbose set "HUION Huion Tablet stylus" MapToOutput "DP-1-8"
    ... Display is '(null)'.
    ... 'set' requested for 'HUION Huion Tablet stylus'.
     <<< snippage >>>
    ... Checking device 'HUION Huion Tablet stylus' (11).
    ... Checking device 'HUION Huion Tablet eraser' (19).
    ... Device 'HUION Huion Tablet stylus' (11) found.
    ... Found output 'VGA-1' (disconnnected)
    ... Found output 'DP-1' (disconnnected)
    ... Found output 'HDMI-1' (disconnnected)
    ... Found output 'DP-2' (connected)
    ... CRTC (2560x0) 1440x2560
    ... Found output 'HDMI-2' (disconnnected)
    ... Found output 'DP-1-8' (connected)
    ... CRTC (0x0) 2560x1440
    ... Setting CRTC DP-1-8
    ... Remapping to output area 2560x1440 @ 0,0.
    ... Transformation matrix:
    ... 	[ 0.640000 0.000000 0.000000 ]
    ... 	[ 0.000000 0.562500 0.000000 ]
    ... 	[ 0.000000 0.000000 1.000000 ]

    Well, that worked.

    Actually, I had to constrain the stylus to DP-2, then jam it back on DP-1-8, to spread the tablet’s horizontal extent over the entire monitor. Updating the startup script started the tablet properly the next morning.

    The new device name certainly makes more sense and, perhaps, the X output connection now recognizes the landscape monitor’s ability to pass its DisplayPort video stream along to a second monitor.