|
# HAL config file automatically generated by Eagle-CAD ULP: |
|
# [/mnt/bulkdata/Project Files/eagle/ulp/hal-write-2.5.ulp] |
|
# (C) Martin Schoeneck.de 2008 |
|
# Charalampos Alexopoulos 2011 |
|
# Mods Ed Nisley KE4ZNU 2010 2013 |
|
# Path [/mnt/bulkdata/Project Files/eagle/projects/LinuxCNC for M2/] |
|
# ProjectName [LinuxCNC Sherline Configuration] |
|
# File name [/mnt/bulkdata/Project Files/eagle/projects/LinuxCNC for M2/LinuxCNC Sherline Configuration.hal] |
|
# Created [11:17:21 17-Feb-2013] |
|
|
|
|
|
|
|
#################################################### |
|
# Load realtime and userspace modules |
|
loadrt trivkins |
|
loadrt [EMCMOT]EMCMOT key=[EMCMOT]SHMEM_KEY num_joints=[TRAJ]AXES base_period_nsec=[EMCMOT]BASE_PERIOD servo_period_nsec=[EMCMOT]SERVO_PERIOD traj_period_nsec=[EMCMOT]SERVO_PERIOD |
|
# not needed in 2.7 |
|
# loadrt probe_parport |
|
loadrt hal_parport cfg="[PARPORT]ADDRESS out" |
|
loadrt stepgen step_type=0,0,0,0 |
|
loadrt pwmgen output_type=0 |
|
loadusr -W hal_manualtoolchange |
|
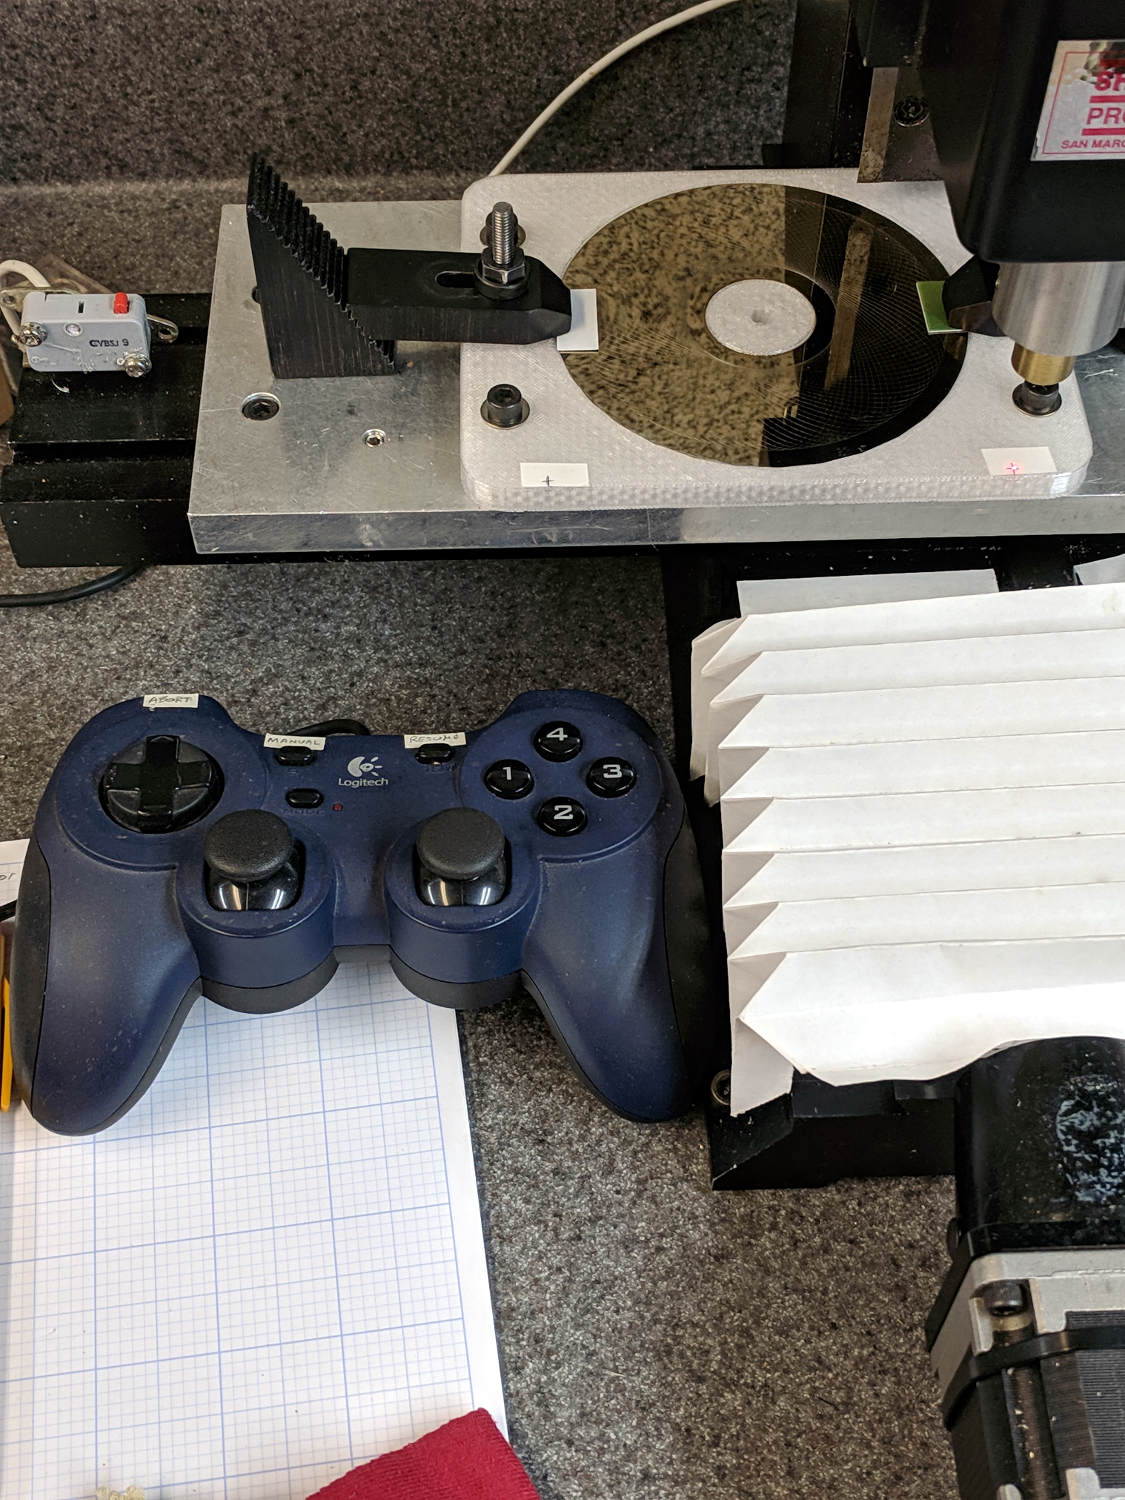
loadusr -W hal_input -KA Dual |
|
loadrt logic count=1 personality=0x104 |
|
loadrt constant count=13 |
|
loadrt and2 count=17 |
|
loadrt conv_float_s32 count=1 |
|
loadrt flipflop count=4 |
|
loadrt mux2 count=5 |
|
loadrt mux4 count=1 |
|
loadrt not count=8 |
|
loadrt or2 count=14 |
|
loadrt scale count=7 |
|
loadrt timedelay count=1 |
|
loadrt toggle count=1 |
|
|
|
|
|
#################################################### |
|
# Hook functions into threads |
|
addf stepgen.make-pulses base-thread |
|
addf pwmgen.make-pulses base-thread |
|
addf parport.0.read base-thread |
|
addf parport.0.write base-thread |
|
addf parport.0.reset base-thread |
|
addf logic.0 base-thread |
|
addf motion-command-handler servo-thread |
|
addf motion-controller servo-thread |
|
addf stepgen.update-freq servo-thread |
|
addf stepgen.capture-position servo-thread |
|
addf pwmgen.update servo-thread |
|
addf constant.0 servo-thread |
|
addf constant.1 servo-thread |
|
addf constant.2 servo-thread |
|
addf constant.3 servo-thread |
|
addf constant.4 servo-thread |
|
addf constant.5 servo-thread |
|
addf constant.6 servo-thread |
|
addf constant.7 servo-thread |
|
addf constant.8 servo-thread |
|
addf constant.9 servo-thread |
|
addf constant.10 servo-thread |
|
addf constant.11 servo-thread |
|
addf constant.12 servo-thread |
|
addf and2.0 servo-thread |
|
addf and2.1 servo-thread |
|
addf and2.2 servo-thread |
|
addf and2.3 servo-thread |
|
addf and2.4 servo-thread |
|
addf and2.5 servo-thread |
|
addf and2.6 servo-thread |
|
addf and2.7 servo-thread |
|
addf and2.8 servo-thread |
|
addf and2.9 servo-thread |
|
addf and2.10 servo-thread |
|
addf and2.11 servo-thread |
|
addf and2.12 servo-thread |
|
addf and2.13 servo-thread |
|
addf and2.14 servo-thread |
|
addf and2.15 servo-thread |
|
addf and2.16 servo-thread |
|
addf conv-float-s32.0 servo-thread |
|
addf toggle.0 servo-thread |
|
addf flipflop.0 servo-thread |
|
addf flipflop.1 servo-thread |
|
addf flipflop.2 servo-thread |
|
addf flipflop.3 servo-thread |
|
addf timedelay.0 servo-thread |
|
addf or2.0 servo-thread |
|
addf or2.1 servo-thread |
|
addf or2.2 servo-thread |
|
addf or2.3 servo-thread |
|
addf or2.4 servo-thread |
|
addf or2.5 servo-thread |
|
addf or2.6 servo-thread |
|
addf or2.7 servo-thread |
|
addf or2.8 servo-thread |
|
addf or2.9 servo-thread |
|
addf or2.10 servo-thread |
|
addf or2.11 servo-thread |
|
addf or2.12 servo-thread |
|
addf or2.13 servo-thread |
|
addf not.0 servo-thread |
|
addf not.1 servo-thread |
|
addf not.2 servo-thread |
|
addf not.3 servo-thread |
|
addf not.4 servo-thread |
|
addf not.5 servo-thread |
|
addf not.6 servo-thread |
|
addf not.7 servo-thread |
|
addf scale.0 servo-thread |
|
addf scale.1 servo-thread |
|
addf scale.2 servo-thread |
|
addf scale.3 servo-thread |
|
addf scale.4 servo-thread |
|
addf scale.5 servo-thread |
|
addf scale.6 servo-thread |
|
addf mux2.0 servo-thread |
|
addf mux4.0 servo-thread |
|
addf mux2.1 servo-thread |
|
addf mux2.2 servo-thread |
|
addf mux2.3 servo-thread |
|
addf mux2.4 servo-thread |
|
|
|
|
|
#################################################### |
|
# Set parameters |
|
setp parport.0.reset-time [PARPORT]RESET_TIME |
|
setp stepgen.0.maxaccel [AXIS_0]STEPGEN_MAXACCEL |
|
setp stepgen.0.maxvel [AXIS_0]MAX_VELOCITY |
|
setp stepgen.0.dirhold [PARPORT]DIRHOLD |
|
setp stepgen.0.dirsetup [PARPORT]DIRSETUP |
|
setp stepgen.0.steplen [PARPORT]STEPLEN |
|
setp stepgen.0.stepspace [PARPORT]STEPSPACE |
|
setp stepgen.0.position-scale [AXIS_0]SCALE |
|
setp parport.0.pin-03-out-reset FALSE |
|
setp parport.0.pin-05-out-reset FALSE |
|
setp parport.0.pin-07-out-reset FALSE |
|
setp parport.0.pin-09-out-reset FALSE |
|
setp parport.0.pin-17-out-reset FALSE |
|
setp stepgen.1.maxaccel [AXIS_1]STEPGEN_MAXACCEL |
|
setp stepgen.1.maxvel [AXIS_1]MAX_VELOCITY |
|
setp stepgen.1.dirhold [PARPORT]DIRHOLD |
|
setp stepgen.1.dirsetup [PARPORT]DIRSETUP |
|
setp stepgen.1.steplen [PARPORT]STEPLEN |
|
setp stepgen.1.stepspace [PARPORT]STEPSPACE |
|
setp stepgen.1.position-scale [AXIS_1]SCALE |
|
setp stepgen.2.maxaccel [AXIS_2]STEPGEN_MAXACCEL |
|
setp stepgen.2.maxvel [AXIS_2]MAX_VELOCITY |
|
setp stepgen.2.dirhold [PARPORT]DIRHOLD |
|
setp stepgen.2.dirsetup [PARPORT]DIRSETUP |
|
setp stepgen.2.steplen [PARPORT]STEPLEN |
|
setp stepgen.2.stepspace [PARPORT]STEPSPACE |
|
setp stepgen.2.position-scale [AXIS_2]SCALE |
|
setp stepgen.3.maxaccel [AXIS_3]STEPGEN_MAXACCEL |
|
setp stepgen.3.maxvel [AXIS_3]MAX_VELOCITY |
|
setp stepgen.3.dirhold [PARPORT]DIRHOLD |
|
setp stepgen.3.dirsetup [PARPORT]DIRSETUP |
|
setp stepgen.3.steplen [PARPORT]STEPLEN |
|
setp stepgen.3.stepspace [PARPORT]STEPSPACE |
|
setp stepgen.3.position-scale [AXIS_3]SCALE |
|
setp parport.0.pin-04-out-invert TRUE |
|
setp parport.0.pin-06-out-invert TRUE |
|
|
|
|
|
#################################################### |
|
# Set constants |
|
setp constant.0.value 0.1 |
|
setp constant.1.value 20 |
|
setp constant.2.value [TRAJ]MAX_LINEAR_VELOCITY |
|
setp constant.3.value [TRAJ]MAX_ANGULAR_VELOCITY |
|
setp constant.4.value 60 |
|
setp constant.5.value 0.50 |
|
setp constant.6.value 1.00 |
|
setp constant.7.value 0.10 |
|
setp constant.8.value 0.10 |
|
setp constant.9.value 0.0 |
|
setp constant.10.value -1.0 |
|
setp constant.11.value 0.020 |
|
setp constant.12.value 0.000 |
|
|
|
|
|
#################################################### |
|
# Connect Modules with nets |
|
net a-amp-enable logic.0.in-03 axis.3.amp-enable-out stepgen.3.enable |
|
net a-analog halui.jog.3.analog mux2.4.out |
|
net a-button-minus or2.0.in0 input.0.btn-joystick and2.7.in0 |
|
net a-button-plus or2.0.in1 input.0.btn-thumb2 and2.8.in0 |
|
net a-buttons-active or2.0.out or2.1.in0 or2.11.in1 |
|
net a-direction parport.0.pin-08-out stepgen.3.dir |
|
net a-disable not.7.out and2.13.in1 |
|
net a-enable or2.11.in0 flipflop.3.out not.7.in mux2.4.sel |
|
net a-jog input.0.abs-z-position mux2.4.in1 |
|
net a-knob-active or2.9.out not.2.in and2.15.in1 |
|
net a-knob-inactive not.2.out and2.14.in1 |
|
net a-select and2.16.in0 and2.15.out |
|
net a-set flipflop.3.set and2.16.out |
|
net a-step parport.0.pin-09-out stepgen.3.step |
|
net all-amps-enabled logic.0.and parport.0.pin-17-out |
|
net angular_motion or2.11.out mux2.0.sel |
|
net any-buttons-active mux4.0.sel0 or2.12.out |
|
net axis-disabled-value constant.9.out mux2.1.in0 mux2.2.in0 mux2.3.in0 mux2.4.in0 |
|
net az-buttons-active or2.1.out or2.12.in1 or2.13.in0 |
|
net az-reset flipflop.2.reset and2.14.out flipflop.3.reset |
|
net button-crawl scale.4.out mux4.0.in3 |
|
net button-fast scale.2.out mux4.0.in1 scale.4.in |
|
net estop-a and2.0.in0 input.0.btn-top2 |
|
net estop-b and2.0.in1 input.0.btn-base |
|
net estop-out parport.0.pin-01-out iocontrol.0.emc-enable-in iocontrol.0.user-enable-out |
|
net homeswitches parport.0.pin-10-in-not axis.0.home-sw-in axis.1.home-sw-in axis.2.home-sw-in axis.3.home-sw-in |
|
net jog-crawl toggle.0.out mux4.0.sel1 |
|
net jog-speed halui.jog-speed mux4.0.out |
|
net knob-crawl mux4.0.in2 scale.3.out |
|
net knob-fast mux4.0.in0 scale.1.out scale.3.in |
|
net manual-mode halui.mode.manual input.0.btn-base3 |
|
net n_9 axis.0.motor-pos-cmd stepgen.0.position-cmd |
|
net n_11 axis.0.motor-pos-fb stepgen.0.position-fb |
|
net n_13 and2.0.out halui.estop.activate |
|
net n_14 or2.3.in0 input.0.btn-base5 |
|
net n_15 or2.3.in1 input.0.btn-base6 |
|
net n_16 toggle.0.in or2.3.out |
|
net n_17 conv-float-s32.0.out input.0.abs-x-flat input.0.abs-y-flat input.0.abs-z-flat input.0.abs-rz-flat |
|
net n_18 constant.1.out conv-float-s32.0.in |
|
net n_19 constant.4.out scale.0.gain |
|
net n_20 constant.5.out scale.1.gain |
|
net n_21 constant.6.out scale.2.gain |
|
net n_22 constant.7.out scale.3.gain |
|
net n_23 scale.4.gain constant.8.out |
|
net n_24 constant.0.out halui.jog-deadband |
|
net n_25 constant.2.out mux2.0.in0 |
|
net n_26 mux2.0.in1 constant.3.out |
|
net n_34 axis.1.motor-pos-cmd stepgen.1.position-cmd |
|
net n_36 axis.1.motor-pos-fb stepgen.1.position-fb |
|
net n_42 or2.7.in0 input.0.abs-x-is-pos |
|
net n_43 or2.7.in1 input.0.abs-x-is-neg |
|
net n_44 or2.8.in0 input.0.abs-y-is-pos |
|
net n_45 or2.8.in1 input.0.abs-y-is-neg |
|
net n_46 or2.9.in0 input.0.abs-z-is-pos |
|
net n_47 or2.9.in1 input.0.abs-z-is-neg |
|
net n_48 or2.10.in0 input.0.abs-rz-is-pos |
|
net n_49 or2.10.in1 input.0.abs-rz-is-neg |
|
net n_51 constant.10.out scale.5.gain scale.6.gain |
|
net n_54 constant.11.out timedelay.0.on-delay |
|
net n_55 constant.12.out timedelay.0.off-delay |
|
net n_56 timedelay.0.out and2.1.in1 and2.2.in1 and2.4.in1 and2.3.in1 and2.5.in1 and2.6.in1 and2.8.in1 and2.7.in1 |
|
net n_57 and2.1.out halui.jog.0.minus |
|
net n_58 and2.2.out halui.jog.0.plus |
|
net n_59 and2.3.out halui.jog.1.minus |
|
net n_60 halui.jog.1.plus and2.4.out |
|
net n_61 and2.5.out halui.jog.2.minus |
|
net n_62 and2.6.out halui.jog.2.plus |
|
net n_63 and2.7.out halui.jog.3.minus |
|
net n_64 and2.8.out halui.jog.3.plus |
|
net n_67 axis.2.motor-pos-cmd stepgen.2.position-cmd |
|
net n_69 axis.2.motor-pos-fb stepgen.2.position-fb |
|
net n_77 axis.3.motor-pos-cmd stepgen.3.position-cmd |
|
net n_79 axis.3.motor-pos-fb stepgen.3.position-fb |
|
net probe-in parport.0.pin-15-in-not motion.probe-input |
|
net program-resume halui.program.resume input.0.btn-base4 |
|
net reset-estop input.0.btn-base2 halui.estop.reset |
|
net tool-change iocontrol.0.tool-change hal_manualtoolchange.change |
|
net tool-changed hal_manualtoolchange.changed iocontrol.0.tool-changed |
|
net tool-number iocontrol.0.tool-prep-number hal_manualtoolchange.number |
|
net tool-prepare-loopback iocontrol.0.tool-prepare iocontrol.0.tool-prepared |
|
net vel-per-minute scale.0.out scale.1.in scale.2.in |
|
net vel-per-second mux2.0.out scale.0.in |
|
net x-amp-enable logic.0.in-00 axis.0.amp-enable-out stepgen.0.enable |
|
net x-analog mux2.1.out halui.jog.0.analog |
|
net x-buttons-active or2.5.in0 or2.4.out |
|
net x-direction parport.0.pin-02-out stepgen.0.dir |
|
net x-disable not.4.out and2.12.in1 |
|
net x-enable not.4.in flipflop.0.out mux2.1.sel |
|
net x-hat-minus or2.4.in1 input.0.abs-hat0x-is-neg and2.1.in0 |
|
net x-hat-plus or2.4.in0 input.0.abs-hat0x-is-pos and2.2.in0 |
|
net x-jog input.0.abs-x-position mux2.1.in1 |
|
net x-knob-active or2.7.out not.0.in and2.9.in0 |
|
net x-knob-inactive not.0.out and2.10.in0 and2.11.in0 |
|
net x-set and2.9.out flipflop.0.set |
|
net x-step parport.0.pin-03-out stepgen.0.step |
|
net xy-buttons-active or2.5.out or2.12.in0 or2.13.in1 |
|
net xy-reset flipflop.0.reset and2.10.out flipflop.1.reset |
|
net xyza-buttons-active or2.13.out timedelay.0.in |
|
net y-amp-enable logic.0.in-01 axis.1.amp-enable-out stepgen.1.enable |
|
net y-analog halui.jog.1.analog mux2.2.out |
|
net y-buttons-active or2.6.out or2.5.in1 |
|
net y-direction parport.0.pin-04-out stepgen.1.dir |
|
net y-disable not.5.out and2.9.in1 |
|
net y-enable flipflop.1.out not.5.in mux2.2.sel |
|
net y-hat-minus or2.6.in1 input.0.abs-hat0y-is-neg and2.4.in0 |
|
net y-hat-plus or2.6.in0 input.0.abs-hat0y-is-pos and2.3.in0 |
|
net y-jog input.0.abs-y-position scale.5.in |
|
net y-jog-reversed mux2.2.in1 scale.5.out |
|
net y-knob-active not.1.in or2.8.out and2.11.in1 |
|
net y-knob-inactive not.1.out and2.10.in1 |
|
net y-select and2.12.in0 and2.11.out |
|
net y-set flipflop.1.set and2.12.out |
|
net y-step parport.0.pin-05-out stepgen.1.step |
|
net z-amp-enable logic.0.in-02 axis.2.amp-enable-out stepgen.2.enable |
|
net z-analog mux2.3.out halui.jog.2.analog |
|
net z-button-minus or2.2.in0 input.0.btn-thumb and2.5.in0 |
|
net z-button-plus or2.2.in1 input.0.btn-top and2.6.in0 |
|
net z-buttons-active or2.2.out or2.1.in1 |
|
net z-direction parport.0.pin-06-out stepgen.2.dir |
|
net z-disable not.6.out and2.16.in1 |
|
net z-enable not.6.in flipflop.2.out mux2.3.sel |
|
net z-jog input.0.abs-rz-position scale.6.in |
|
net z-jog-reversed scale.6.out mux2.3.in1 |
|
net z-knob-active not.3.in or2.10.out and2.13.in0 |
|
net z-knob-inactive not.3.out and2.15.in0 and2.14.in0 |
|
net z-set and2.13.out flipflop.2.set |
|
net z-step parport.0.pin-07-out stepgen.2.step |