The Smell of Molten Projects in the Morning

Ed Nisley's Blog: Shop notes, electronics, firmware, machinery, 3D printing, laser cuttery, and curiosities. Contents: 100% human thinking, 0% AI slop.

Author: Ed

  • Crystal Modeling: Parasitic Capacitor Values

    A Circuit Cellar reader asked for a better explanation of the parasitic capacitors inside a quartz crystal can than I provided in my April 2017 Circuit Cellar column. Here’s the schematic, with values for a 32 kHz tuning fork resonator and the original caption:

    Quartz resonator circuit model
    Figure 1 – The mechanical properties of quartz resonators determine the values of the “motional” electrical components in the bottom branch of its circuit model. These values correspond to a 32.768 kHz quartz tuning fork resonator: the 10.4 kH inductor is not a misprint!

    I wrote this about the caps:

    The value of C0 in the model’s middle branch corresponds to the capacitance between the electrodes plated onto the quartz. The 3.57954 MHz crystal in the title photo, with two silver electrodes deposited on a flat insulating disk, closely resembles an ordinary capacitor. You can measure a crystal’s C0 using a capacitance meter.
    However, each of those electrodes also has a capacitance to the resonator’s metal case. The top branch of the model shows two capacitors in series, with Cpar representing half the total parasitic capacitance measured between both leads and the case. Grounding the case, represented by the conductor between the capacitors, by soldering it to the ground plane of an RF circuit eliminates any signal transfer through those capacitors. They will appear as shunt capacitors between the pins and ground; in critical applications, you must add their capacitance to the external load capacitors.

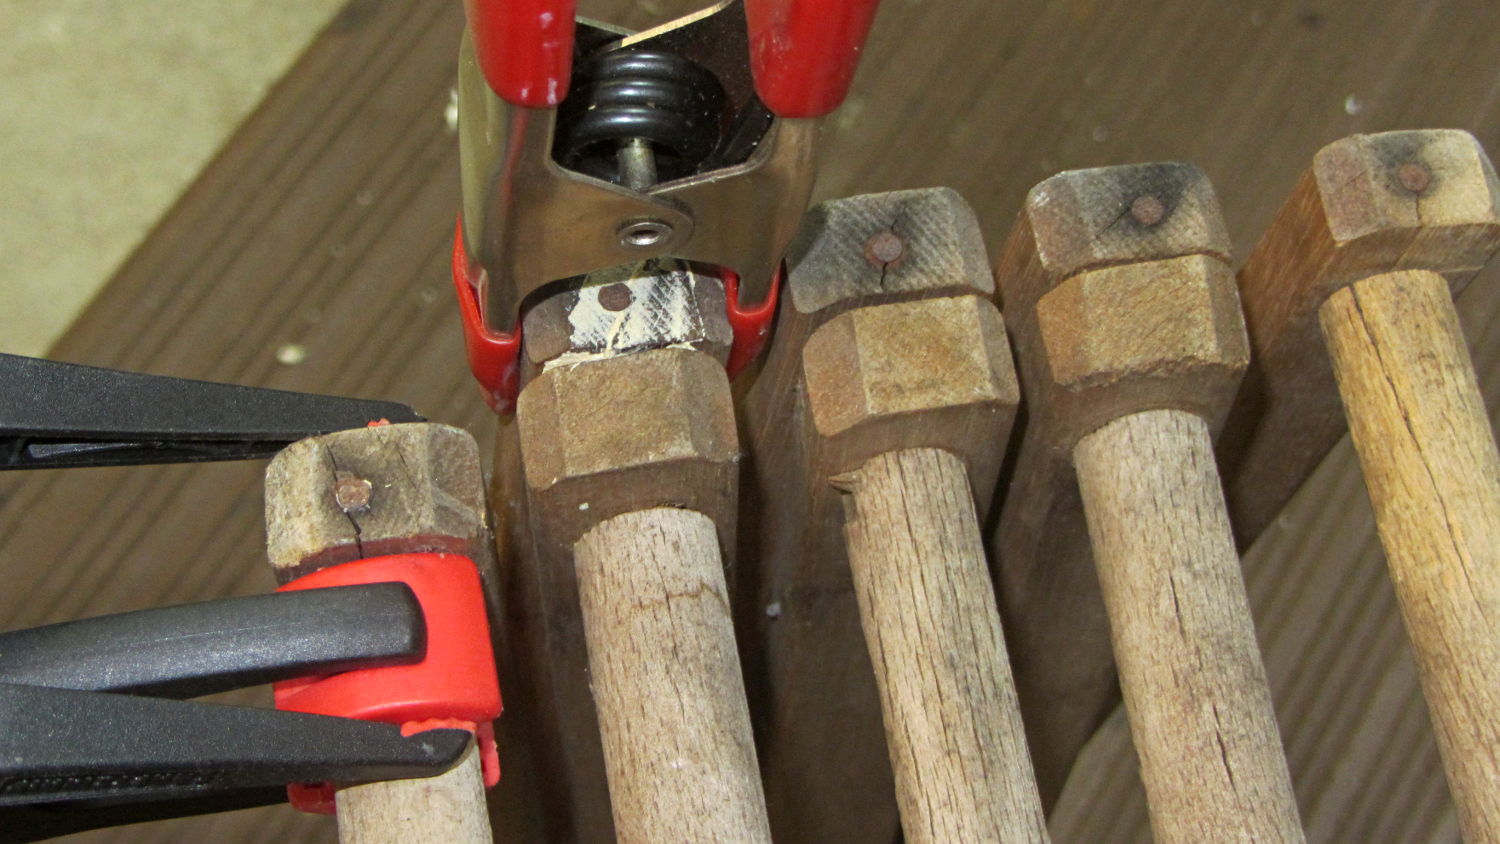
    And this about the measurement technique, using a fixture on my AADE LC meter:

    With the resonator case captured under the clip on the far right and both its leads held by the clip to the upper left, the meter measures Cpar, the lead-to-case parasitic capacitance. The meter will display twice the value of each parasitic capacitor, at least to a good approximation, because they are in parallel. The five resonators averaged 0.45 pF, with each lead having about 0.25 pF of capacitance to the case. Obviously, measuring half a picofarad requires careful zeroing and a stable fixture: a not-quite-tight banana jack nut caused baffling errors during my first few measurements.
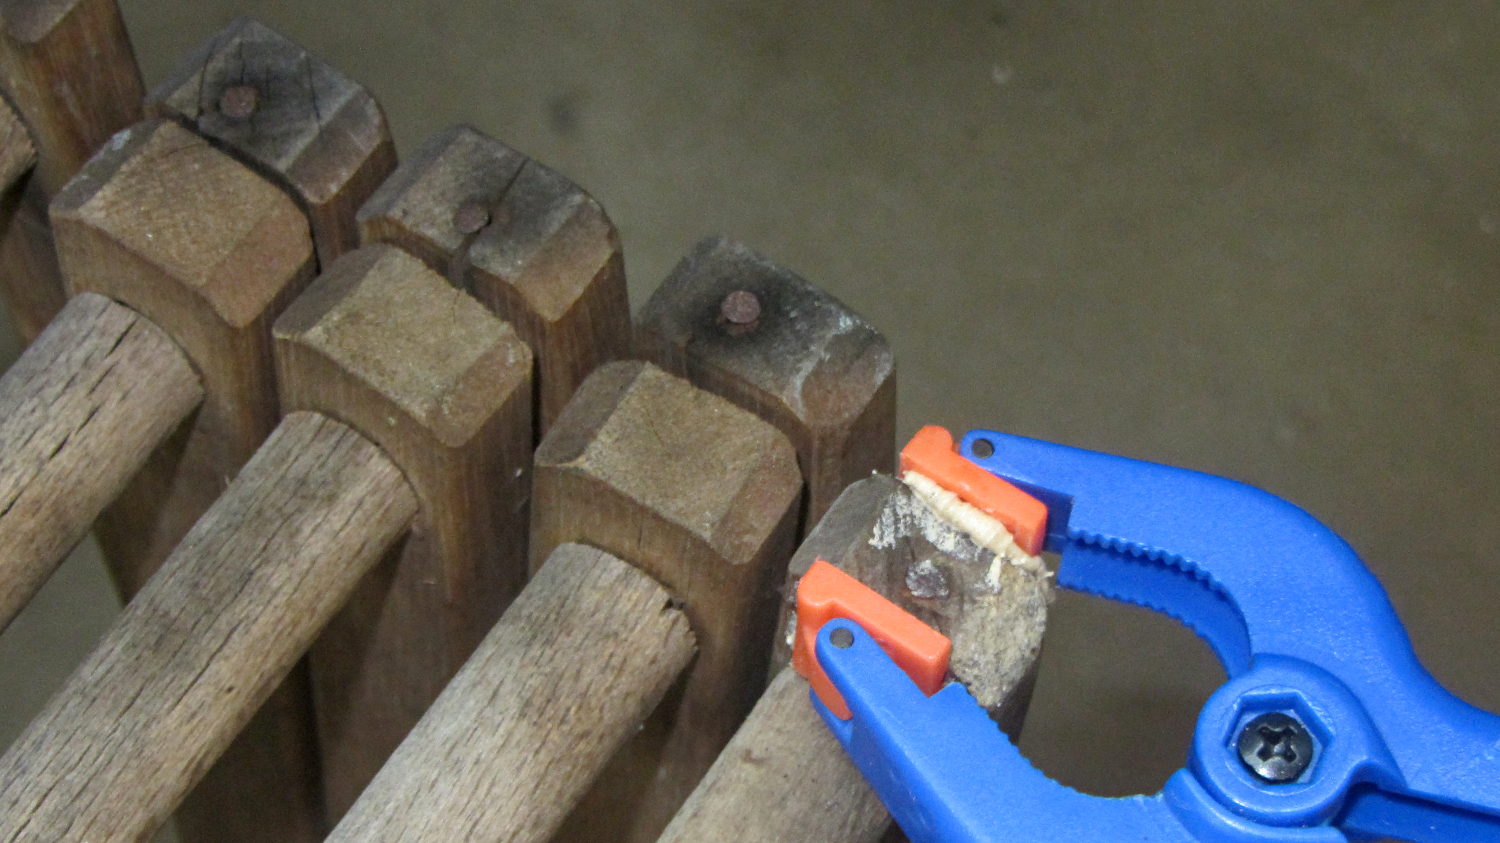
    With the resonator repositioned as shown in Photo 2, with one lead under each clip, the meter measures C0, the lead-to-lead capacitance. After careful zeroing, the resonators averaged 0.85 pF.
    Although the parasitic lead-to-case capacitors are in parallel with C0, their equivalent capacitance is only Cpar/4 = 0.1 pF. That’s close enough to the measurement error for C0, so I ignored it by rounding C0 upward.

    He quite correctly pointed out:

    With both leads connected together on one side, then that essentially constitutes a single electrical element inside the case. And with the case being a single element, this configuration in the test fixture seems like a single capacitor with one lead being the case and the other lead being the pins, with a vacuum dielectric.

    I would think the meter would display the total capacitance rather than twice the value … It makes sense to me to later say Cpar/2 when the leads are not connected together.

    Here’s my second pass at the problem:

    … the two-capacitor model comes from the common-case condition, where each lead displays a (nominally equal) parasitic capacitance to the case, because the crystal mounting is reasonably symmetric inside the can. It’s easiest to measure the total capacitance with the leads shorted together, because it’s in the low pF range, then divide by two to get the value of each lead-to-case cap.

    […]

    For “real” RF circuits with larger (HC-49 -ish) crystals in parallel-resonance mode, you ground the case and subtract the parasitic capacitance at each lead from the external load capacitors. That’s the usual situation for microprocessor clock oscillators: the crystal sits across the clock amplifier pins, with two more-or-less equal caps from the pins to ground. You should subtract the internal parasitic caps from the clock’s specified load caps, but in practice the values are so small and the cap tolerance so large that it mostly doesn’t matter.

    […]

    Un-grounding the case puts those two parasitic caps in series, just as with two discrete caps, so the lead-to-lead capacitance is (or should be!) half of each: 1/4 of the both-leads-to-case value.

    Re-reading yet again says I glossed over the effect of having C0 in parallel with the Cpar/2 caps, but methinks dragging those complications into the model benefits only the theoreticians among us (or those working very close to the edge of the possible).

    To make it worse, I also botched the QEX reference, which should be Jan/Feb 2016, not 2017. Verily, having a column go read-only makes the errors jump right off the page. [sigh]

    At least I can point to this and amend as needed.

  • Amazon EK3211 Scale: Re-Footing

    Our long-suffering kitchen scale lost a pair of feet, most likely because those two feet do most of the skidding as we slide it onto a shelf below a cabinet. The scale has (well, had) six silicone rubber feet:

    Amazon EK3211 Scale - OEM foot
    Amazon EK3211 Scale – OEM foot

    The vagaries of color photography turned a neutral-gray silicone disk into that weird blue.

    A pair of ¼ inch disks punched from non-skid textured rubber tape fit perfectly into the recesses:

    Amazon EK3211 Scale - tread foot
    Amazon EK3211 Scale – tread foot

    Now, we’ll see how tread adhesive withstands the same abuse.

  • Drying Rack Re-Repair

    Despite having sworn a mighty oath to the contrary, I found myself doing this again:

    Clothes Rack - end clamp
    Clothes Rack – end clamp

    A strut on the other end of the dowel split across its face:

    Clothes Rack - split clamp
    Clothes Rack – split clamp

    The white stuff is wood-filled epoxy, normally used to repair rotted wood, left over from another project. I’ll claim this tests its mechanical strength against peeling forces.

    Easily determined by inspection: a sensible person would toss the rack, but …

  • AD9850 Module: Oscillator Thermal Time Constant

    With an LM75 atop the 125 MHz oscillator and the whole thing wrapped in foam:

    LM75A Temperature Sensor - installed
    LM75A Temperature Sensor – installed

    Let it cool overnight in the Basement Laboratory, fire it up, record the temperature every 30 seconds, and get the slightly chunky blue curve:

    125 MHz Oscillator - Heating Time Constant
    125 MHz Oscillator – Heating Time Constant

    Because we know this is one of those exponential-approach problems, the equation looks like:

    Temp(t) = Tfinal + (Tinit - Tfinal) × e-t/τ

    We can find the time constant by either going through the hassle of an RMS curve fit or just winging it by assuming:

    • The initial temperature, which is 22.5 °C = close to 22.7 °C ambient
    • The final temperature (call it 42 °C)
    • Any good data point will suffice

    The point at 480 s is a nice, round 40 °C, so plug ’em in:

    40.0 = 42.0 + (22.7 - 42.0) × e-480/τ

    Turning the crank produces τ = 212 s, which looks about right.

    Trying it again with the 36.125 °C point at 240 s pops out 200.0 °C.

    Time for a third opinion!

    Because we live in the future, the ever-so-smooth red curve comes from unleashing LibreOffice Calc’s Goal Seek to find a time constant that minimizes the RMS Error. After a moment, it suggests 199.4 s, which I’ll accept as definitive.

    The spreadsheet looks like this:

    T_init 22.5
    T_final 42.0
    Tau 199.4
    Time s Temp °C Exp App Error²
    0 22.250 22.500 0.063
    30 25.500 25.224 0.076
    60 28.000 27.567 0.187
    90 30.125 29.583 0.294
    120 31.750 31.317 0.187
    150 33.250 32.810 0.194
    180 34.375 34.093 0.079
    210 35.375 35.198 0.031
    240 36.125 36.148 0.001
    270 36.813 36.965 0.023
    300 37.500 37.668 0.028
    330 38.125 38.273 0.022
    360 38.500 38.794 0.086
    390 39.000 39.242 0.058
    420 39.500 39.627 0.016
    450 39.750 39.959 0.043
    480 40.000 40.244 0.059
    510 40.250 40.489 0.057
    540 40.500 40.700 0.040
    570 40.750 40.882 0.017
    600 41.000 41.038 0.001
    RMS Error 0.273

    The Exp App column is the exponential equation, assuming the three variables at the top, the Error² column is the squared error between the measurement and the equation, and the RMS Error cell contains the square root of the average of those squared errors.

    The Goal Seeker couldn’t push RMS Error to zero and gave up with Tau = 199.4. That’s sensitive to the initial and final temperatures, but close enough to my back of the envelope to remind me not to screw around with extensive calculations when “two minutes” will suffice.

    Basically, after five time constants = 1000 s = 15 minutes, the oscillator is stable enough to not worry about.

  • AD9850 DDS Module: 125 MHz Oscillator vs. Temperature, Quadratic Edition

    I let the DDS cool down overnight, turned it on, and recorded the frequency offset as a function of temperature as it heated up again:

    125 MHz Osc Freq Offset vs Temp - Quadratic - 29 - 43 C
    125 MHz Osc Freq Offset vs Temp – Quadratic – 29 – 43 C

    The reduced spacing between the points as the temperature increases shows how fast the oscillator heats up. I zero-beat the 10 MHz output, scribbled the temperature, noted the offset, and iterated as fast as I could. The clump of data over on the right end comes from the previous session with essentially stable temperatures.

    I only had to throw out two data points to get such a beautiful fit; the gaps should be obvious.

    The fit seems fine from room (well, basement) ambient up to hotter than you’d really like to treat the DDS, so using the quadratic equation should allow on-the-fly temperature compensation. Assuming, of course, the equation matches some version of reality close to the one prevailing in the Basement Laboratory, which remains to be seen.

    In truth, it probably doesn’t, because the temperature was changing so rapidly the observations all run a bit behind reality. You’d want a temperature-controlled environment around the PCB to let the oscillator stabilize after each increment, then take the measurements. I am so not going to go there.

    The original data:

    125 MHz Osc Freq Offset vs Temp - 29 - 43 C - data
    125 MHz Osc Freq Offset vs Temp – 29 – 43 C – data
  • AD9850 DDS Module: 125 MHz Oscillator vs. Temperature, Linear Edition

    A day of jockeying the AD9850 DDS oscillator shows an interesting relation between the frequency offset and the oscillator temperature:

    DDS Oscillator Frequency Offset vs. Temperature - complete
    DDS Oscillator Frequency Offset vs. Temperature – complete

    Now, as it turns out, the one lonely little dot off the line happened just after I lit the board up after a tweak, so the oscillator temperature hadn’t stabilized. Tossing it out produces a much nicer fit:

    DDS Oscillator Frequency Offset vs. Temperature
    DDS Oscillator Frequency Offset vs. Temperature

    Looks like I made it up, doesn’t it?

    The first-order coefficient shows the frequency varies by -36 Hz/°C. The actual oscillator frequency decreases with increasing temperature, which means the compensating offset must become more negative to make the oscillator frequency variable match reality. In previous iterations, I’ve gotten this wrong.

    For example, at 42.5 °C the oscillator runs at:

    125.000000 MHz - 412 Hz = 124.999588 MHz

    Dividing that into 232 = 34.35985169 count/Hz, which is the coefficient converting a desired frequency into the DDS delta phase register value. Then, to get 10.000000 MHz at the DDS output, you multiply:
    10×106 × 34.35985169 = 343.598517×10⁶

    Stuff that into the DDS and away it goes.

    Warmed half a degree to 43.0 °C, the oscillator runs at:

    125.000000 MHz - 430 Hz = 124.999570 MHz

    That’s 18 Hz lower, so the coefficient becomes 34.35985667, and the corresponding delta phase for a 10 MHz output is 343.598567×10⁶.

    Obviously, you need Pretty Good Precision in your arithmetic to get those answers.

    After insulating the DDS module to reduce the effect of passing breezes, I thought the oscillator temperature would track the ambient temperature fairly closely, because of the more-or-less constant power dissipation inside the foam blanket. Which turned out to be the case:

    DDS Oscillator Temperature vs. Ambient
    DDS Oscillator Temperature vs. Ambient

    The little dingle-dangle shows startup conditions, where the oscillator warms up at a constant room temperature. The outlier dot sits 0.125 °C to the right of the lowest pair of points, being really conspicuous, which was another hint it didn’t belong with the rest of the contestants.

    So, given the ambient temperature, the oscillator temperature will stabilize at 0.97 × ambient + 20.24, which is close enough to a nice, even 20 °C hotter.

    The insulation blanket reduces short-term variations due to breezes, which, given the -36 Hz/°C = 0.29 ppm temperature coefficient, makes good sense; you can watch the DDS output frequency blow in the breeze. It does, however, increase the oscillator temperature enough to drop the frequency by 720 Hz, so you probably shouldn’t use the DDS oscillator without compensating for at least its zero-th order offset at whatever temperature you expect.

    Of course, that’s over a teeny-tiny temperature range, where nearly anything would be linear.

    The original data:

    DDS Oscillator offset vs temperature - 2017-06-24
    DDS Oscillator offset vs temperature – 2017-06-24
  • Canon LiDE 120 Scanner vs. SANE

    I just replaced a cheap old Canon LiDE 30 flatbed scanner with a cheap new LiDE 120, only to get flat-black scans. The machinery worked (yes, I released the travel lock), everything seemed fine, the images were the proper size, but they were dead black.

    Of course, the scanner worked OK on the Token Windows Box, but wow what crappy software they include.

    Turns out the LiDE 120 requires the latest-and-greatest version 1.0.27 of the various SANE programs & libraries. Mercifully, getting those didn’t require compiling from source, just setting up the maintainer’s PPA of the most recent stable release:

    sudo add-apt-repository ppa:rolfbensch/sane-release
    sudo apt-get update
    sudo apt-get upgrade
    

    Which introduced circular dependencies with the distro-installed version 1.0.25 files, which I solved by ripping the entire SANE Thing out by the root(s) and reinstalling it to (re)synchronize All The Things:

    sudo apt-get remove libsane:i386 sane sane-utils xsane libsane-common ia32-libs libsane
    sudo apt-get install libsane:i386 sane sane-utils xsane libsane-common ia32-libs libsane
    

    And then It Just Worked:

    C-Note - detail
    C-Note – detail

    Of course, you must keep this WARNING in mind:

    Canon LiDE 120 - Legal Issues Warning
    Canon LiDE 120 – Legal Issues Warning

    Franklin didn’t know about scanners or color laser printers when he observed:

    Those who would give up essential Liberty, to purchase a little temporary Safety, deserve neither Liberty nor Safety

    Of course, there’s more to the story, but one should:

    Never let the truth get in the way of a good story.