The Smell of Molten Projects in the Morning

Ed Nisley's Blog: Shop notes, electronics, firmware, machinery, 3D printing, laser cuttery, and curiosities. Contents: 100% human thinking, 0% AI slop.

Author: Ed

  • Congratulations!!

    This just in (clicky for more dots, but not clearer dots):

    Spam image - xxx
    Spam image – xxx

    Yes, the attachment was named xxx.jpg, presumably so I wouldn’t suspect it of containing anything untoward.

    The name-dropping definitely adds verisimilitude: not just Microsoft (or Micro Soft) Windows and Google, but Yahoo, too. Be still, my heart!

    It’s unclear how I would contact their “fiduciary agent in LIMA PERU” by dialing a 909 area code in California or sending an email to, um, eaaj@europe.com, but, hey, why not? Perhaps another version of me in a parallel universe used the Peruvian Internet?

    This must be one of those scams where, if you’re bright enough to notice the problems, they won’t need to waste any time on you.

    You’re welcome to my identification numbers. When you get the check, slip me maybe 100 large, preferably under the table, and we’ll call it square.

    Sheesh

  • MPCNC: Drag Knife Holder Spring Constant vs. Stiction

    Sliding a drag knife body in a PETG holder, even after boring the plastic to fit, shows plenty of stiction along 2 mm of travel:

    MPCNC - Drag Knife Holder - spring constant
    MPCNC – Drag Knife Holder – spring constant

    Punching the Z axis downward in 0.5 or 1.0 mm steps produced the lower line at 210 g/mm. Dividing by three springs, each one has a 70 g/mm spring constant, which may come in handy later.

    The wavy upper line shows the stiction as the Z axis drops in 0.1 mm steps. The line is eyeballometrically fit to be parallel to the “good” line, but it’s obvious you can’t depend on the Z axis value to put a repeatable force on the knife.

    I cranked about a turn onto the three screws to preload the springs and ensure the disk with the knife body settles onto the bottom of the holder:

    MPCNC - DW660 adapter drag knife holder - spring loaded
    MPCNC – DW660 adapter drag knife holder – spring loaded

    The screws are M4×0.7, so one turn should apply about 140 g of preload force to the pen holder. Re-taking a few data points with a 0.5 mm step and more attention to an accurate zero position puts the intercept at 200 g, so the screws may have been slightly tighter than I expected. Close enough, anyway.

    The stiction is exquisitely sensitive to the tightness of the two DW660 mount clamp screws (on the black ring), so the orange plastic disk isn’t a rigid body. No surprise there, either.

    Loosening the bored slip fit would allow more lateral motion at the tip. Perhaps top-and-bottom Delrin bushings (in a taller mount) would improve the situation? A full-on linear bearing seems excessive, even to me, particularly because I don’t want to bore out a 16 mm shaft for the blade holder.

    It’s certainly Good Enough™ as-is for the purpose, as I can set the cut depth to, say, 0.5 mm to apply around 250-ish g of downforce or 1.0 mm for 350-ish g. The key point is having enough Z axis compliance to soak up small  table height variations without needing to scan and apply compensation.

  • Cheap Scale Calibration Check

    Before doing another spring constant test with the old Harbor Freight scale, I found deployed my cheap calibration weight sets to verify it displayed the right numbers:

    US-Magnum Scale - calibration check
    US-Magnum Scale – calibration check

    It’s spot on for all weights above 1 g, although I must tap the pan to settle on the reading from above for it get the last 0.1 g right.

    Below 1 g, it’s the wrong hammer for the job; I expected no better from it.

  • MPCNC: Drag Knife Holder

    My attempt to use a HP 7475A plotter as a vinyl cutter failed due to its 19 g pen load limit:

    HP 7475A knife stabilizer - big nut weight
    HP 7475A knife stabilizer – big nut weight

    The MPCNC, however, can apply plenty of downforce, so I tinkered up a quick-and-dirty adapter to put the drag knife “pen” body into the MPCNC’s standard DW660 router holder:

    MPCNC - DW660 adapter drag knife holder - fixed position
    MPCNC – DW660 adapter drag knife holder – fixed position

    That’s using the DW660 adapter upside-down to get the business end of the knife closer to the platform. The solid model descends from the linear-bearing Sakura pen holder by ruthless pruning.

    It didn’t work well at all, because you really need a spring for some vertical compliance and control over the downforce pressure.

    Back to the Comfy Chair:

    Drag Knife Holder - DW660 Mount - solid model
    Drag Knife Holder – DW660 Mount – solid model

    A trio of the lightest springs from a 200 piece assortment (in the front left compartment) pushes the upper plate downward against the drag knife’s flange:

    MPCNC - DW660 adapter drag knife holder - spring loaded
    MPCNC – DW660 adapter drag knife holder – spring loaded

    There’s a bit more going on than may be obvious at first glance.

    The screws slide in brass tubing press-fit into the upper plate, because otherwise their threads hang up on the usual 3D printed layers inside the (drilled-out) holes. Smaller free-floating brass tubing snippets inside the springs keep them away from the screw threads; the gap between the top of the tubing and the screw head limits the vertical compliance to 3 mm. The screws thread into brass inserts epoxied into the bottom disk, with a dab of low-strength Loctite for stay-put adjustment.

    I bored the orange PETG disk to a nice slip fit around the knife body:

    DW660 drag knife holder - boring body
    DW660 drag knife holder – boring body

    The upper plate also required fitting:

    DW660 drag knife holder - boring plate
    DW660 drag knife holder – boring plate

    A few iterations produced reasonably smooth motion over a few millimeters, but it’s definitely not a low-friction / low-stiction drag knife holder. It ought to be good for some proof-of-concept vinyl cutting, though.

    The OpenSCAD source code as a GitHub Gist:

    // Drag Knife Holder for DW660 Mount
    // Ed Nisley KE4ZNU – 2018-09-26
    Layout = "Show"; // Build, Show, Puck, Mount, Plate
    /* [Extrusion] */
    ThreadThick = 0.25; // [0.20, 0.25]
    ThreadWidth = 0.40; // [0.40]
    /* [Hidden] */
    Protrusion = 0.1; // [0.01, 0.1]
    HoleWindage = 0.2;
    inch = 25.4;
    function IntegerMultiple(Size,Unit) = Unit * ceil(Size / Unit);
    ID = 0;
    OD = 1;
    LENGTH = 2;
    //- Adjust hole diameter to make the size come out right
    module PolyCyl(Dia,Height,ForceSides=0) { // based on nophead's polyholes
    Sides = (ForceSides != 0) ? ForceSides : (ceil(Dia) + 2);
    FixDia = Dia / cos(180/Sides);
    cylinder(r=(FixDia + HoleWindage)/2,h=Height,$fn=Sides);
    }
    //- Dimensions
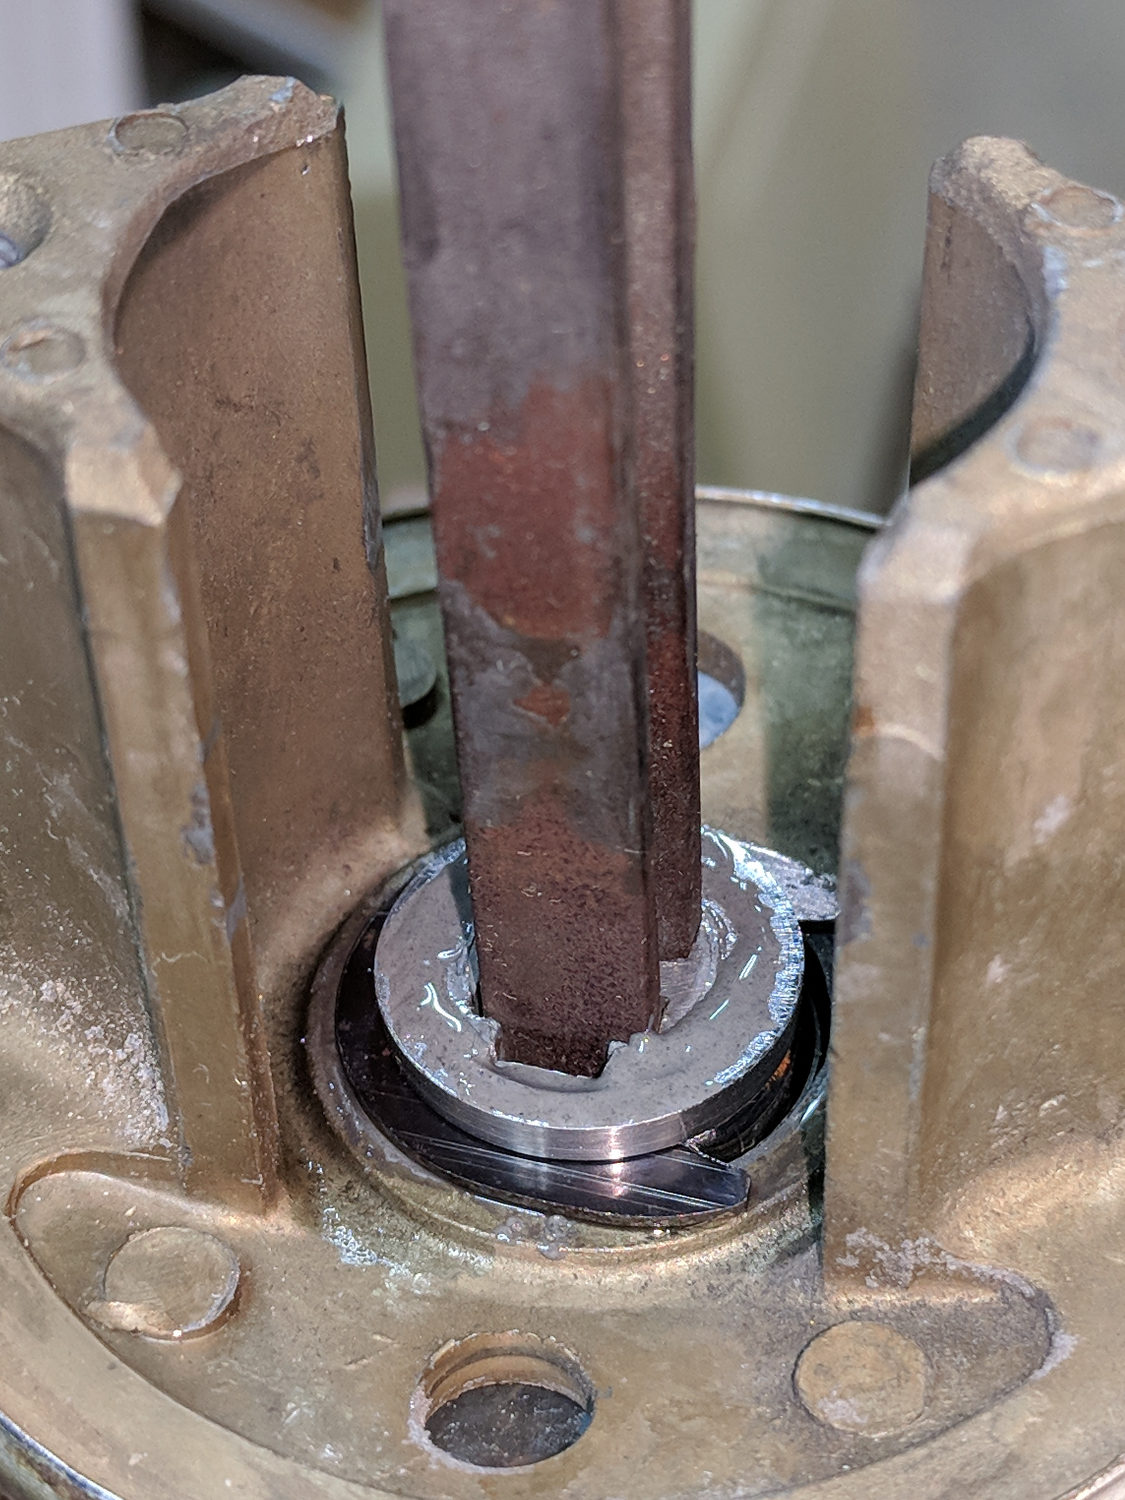
    KnifeBody = [12.0,16.0,2.0]; // body flange — resembles HP plotter pen
    WallThick = 3.0; // minimum thickness / width
    Screw = [4.0,8.5,8.0]; // holding it all together, OD = washer
    Insert = [4.0,6.0,10.0]; // brass insert
    Plate = [KnifeBody[ID],KnifeBody[OD] + 3*Screw[OD],4.0]; // spring reaction plate
    PlateGuide = [4.0,4.8,Plate[LENGTH]]; // … guide tubes
    NumScrews = 3;
    ScrewBCD = 2*(KnifeBody[OD]/2 + Screw[OD]/2 + 0.5);
    NumSides = 9*4; // cylinder facets (multiple of 3 for lathe trimming)
    // Basic shape of DW660 snout fitting into the holder
    // Lip goes upward to lock into MPCNC mount
    Snout = [44.6,50.0,9.6]; // LENGTH = ID height
    Lip = 4.0; // height of lip at end of snout
    PuckOAL = Snout[LENGTH] + Lip; // total height
    Key = [Snout[ID],25.7,PuckOAL]; // rectangular key
    module DW660Puck() {
    translate([0,0,PuckOAL])
    rotate([180,0,0]) {
    cylinder(d=Snout[OD],h=Lip/2,$fn=NumSides);
    translate([0,0,Lip/2])
    cylinder(d1=Snout[OD],d2=Snout[ID],h=Lip/2,$fn=NumSides);
    cylinder(d=Snout[ID],h=PuckOAL,$fn=NumSides);
    intersection() {
    translate([0,0,0*Lip + Key.z/2])
    cube(Key,center=true);
    cylinder(d=Snout[OD],h=Lip + Key.z,$fn=NumSides);
    }
    }
    }
    module MountBase() {
    difference() {
    DW660Puck();
    translate([0,0,-Protrusion]) // knife holder body
    PolyCyl(KnifeBody[ID],2*PuckOAL,NumSides);
    translate([0,0,PuckOAL – KnifeBody[LENGTH]/2]) // … half of flange, loose fit
    PolyCyl(KnifeBody[OD] + 2*HoleWindage,KnifeBody[LENGTH],NumSides);
    for (i=[0:NumScrews – 1]) // clamp screws
    rotate(i*360/NumScrews)
    translate([ScrewBCD/2,0,-Protrusion])
    rotate(180/8)
    PolyCyl(Insert[OD],2*PuckOAL,8);
    }
    }
    module SpringPlate() {
    difference() {
    cylinder(d=Plate[OD],h=Plate[LENGTH],$fn=NumSides);
    translate([0,0,-Protrusion]) // knife holder body
    PolyCyl(KnifeBody[ID],2*PuckOAL,NumSides);
    translate([0,0,Plate[LENGTH] – KnifeBody[LENGTH]/2]) // … half of flange, snug fit
    PolyCyl(KnifeBody[OD],KnifeBody[LENGTH],NumSides);
    for (i=[0:NumScrews – 1]) // clamp screws
    rotate(i*360/NumScrews)
    translate([ScrewBCD/2,0,-Protrusion])
    rotate(180/8)
    PolyCyl(PlateGuide[OD],2*PuckOAL,8);
    }
    }
    //—–
    // Build it
    if (Layout == "Puck")
    DW660Puck();
    if (Layout == "Plate")
    SpringPlate();
    if (Layout == "Mount")
    MountBase();
    if (Layout == "Show") {
    MountBase();
    translate([0,0,2*PuckOAL])
    rotate([180,0,0])
    SpringPlate();
    }
    if (Layout == "Build") {
    translate([0,Snout[OD]/2,0])
    MountBase();
    translate([0,-Snout[OD]/2,0])
    SpringPlate();
    }


  • Powered Prototype Board: Laying-on of Hands Repair

    One of my very first projects, after setting up my very first home shop in our very first home, was building an overly elaborate prototype board with five (!) linear power supplies:

    Proto Board - overview
    Proto Board – overview

    The components come from the mid-70s and the shop happened around 1980, so it’s been ticking along for nigh onto four decades. Of late, the supply voltages became erratic and I eventually popped the top:

    Proto Board - innards
    Proto Board – innards

    Yeah, linear pass transistor regulators driven from bulk cap storage, hand-hewn bridge rectifiers, and multi-tap transformers. Everything mounts on screws tapped into the 1/8 inch aluminum chassis, with power transistors on a huge finned heatsink attached to the rear panel. The thing weighs 11.6 pounds = 5.3 kg.

    Not a trace of firmware to be found. Heck, surface-mount components hadn’t yet come into common use.

    The circuitry lives on a crudely etched phenolic board:

    Proto Board - etched circuit board
    Proto Board – etched circuit board

    There may be a schematic somewhere in my collection, but it hasn’t surfaced in a long time. I’m mildly surprised I didn’t tuck it inside the case, which may have been a life lesson yet to be learned.

    Based on my recent experience with the Tek AM503, I wiggled the two metal-can regulators and the ceramic (!) regulator, gingerly plugged in the line cord, flipped the switch, and all the supply voltages once again work perfectly.

    Whew!


  • Doorknob Repair

    The outer doorknob on the kitchen pantry became very loose and sloppy, with the screw holding the inner knob on the shaft remaining snug. Obviously, something else was wrong inside the door.

    A spring clip should retain the outer knob in the escutcheon:

    Doorknob - worn retaining flange - detail
    Doorknob – worn retaining flange – detail

    The flange holding the clip has worn away, letting the clip fall loose. A side view shows the problem:

    Doorknob shaft - worn retaining flange
    Doorknob shaft – worn retaining flange

    Yes, the knob’s chrome plating is in sorry shape after six decades of wear. I’d rather keep using a solid knob, instead of force-fitting some contemporary half-assed / cost-reduced junk into the door.

    Reference: beausage. I say it “beau-sage”, the beauty that comes from usage.

    The shaft consists of three triangular rods, with the setscrew on the inner knob pressing against the smaller rod to lock all three of them in place and eliminate all rattle & play:

    Doorknob shaft - detail
    Doorknob shaft – detail

    A tapered pin (!) locks the three shaft rods into the outer knob:

    Doorknob shaft - tapered pin
    Doorknob shaft – tapered pin

    Some doodling, most of which turned out to be irrelevant, captured the essential dimensions and suggested how to replace the flange:

    Doorknob - dimension doodles
    Doorknob – dimension doodles

    The stock is 11/16 inch O-1 oil-hardening rod, forever to remain unhardened:

    Doorknob - retainer ring boring
    Doorknob – retainer ring boring

    I drilled a few holes to get up to 1/2 inch, the largest drill bit I have and just barely clearing the the boring bar.

    With the hole bored out to fit the end of the knob, cut it off:

    Doorknob - retainer ring cutoff
    Doorknob – retainer ring cutoff

    Trial-fit the ring on the knob with the spring clip:

    Doorknob - retainer trial fit
    Doorknob – retainer trial fit

    Reinstall the shaft, tap in the retaining pin, then epoxy the ring in place with the knob supported from below to eliminate having to fiddle with the spring clip:

    Doorknob - retainer ring epoxy
    Doorknob – retainer ring epoxy

    Add a few dots of oil here & there, reinstall the parts in reverse order, and the knob works perfectly again. Still looks heavily used, of course, but that’s OK.

    They definitely don’t make ’em like that any more …


  • Driving While Inattentive

    When you come upon a scene like this, you know someone’s having a Bad Day:

    Rt 376 Collision Scene - approach - 2018-09-21
    Rt 376 Collision Scene – approach – 2018-09-21

    I rode slowly past a line of stopped cars, became a pedestrian, walked through the lawns on the left, then turned back into a bicyclist.

    It appeared to be a three-car collision, with two vehicles aligned almost perfectly nose-to-nose in the northbound lane:

    Rt 376 Collision Scene - overview - 2018-09-21
    Rt 376 Collision Scene – overview – 2018-09-21

    The red 2015-ish Forester apparently snagged a rear wheel on the far side of another contestant:

    Rt 376 Collision Scene - Forester - 2018-09-21
    Rt 376 Collision Scene – Forester – 2018-09-21

    Talk about heart-stopping: Mary had driven off to a meeting some hours before. Even though the wrecked Forester differed in enough details to make me absolutely certain it wasn’t ours , Mary got a firmer-than-usual hug when she got home.

    A picture not shown: two expressionless officers supervising a guy having great difficulty walking the fog line.

    I’ll never know the rest of the story, but the overall outline seems clear.

    Other than that, it was a fine day for a ride