The Smell of Molten Projects in the Morning

Ed Nisley's Blog: Shop notes, electronics, firmware, machinery, 3D printing, laser cuttery, and curiosities. Contents: 100% human thinking, 0% AI slop.

Author: Ed

  • Kensington Expert Mouse Scroll Ring Fix

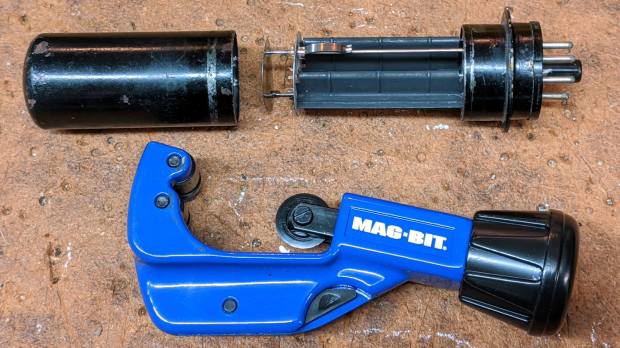
    Apparently the newest Kensington Expert “Mouse” trackballs have a hack re-orienting the scroll ring quadrature detector. The picture from my original writeup shows the previous situation:

    Scroll ring IR emitter-detector quadrature pair
    Scroll ring IR emitter-detector quadrature pair

    The quadrature detector, the black block on the left, is oriented with its lens (and, thus, the actual detectors) pointed away from the IR emitter. I thought it might be an assembly screwup, but it’s actually worse: the PCB layout is wrong.

    A note from Tristan in NZ explains the situation:

    So I have a later model than yours. It has a 2nd PCB chunk between where the legs normally would be. Just a floating piece with two holes for the legs, holding the legs from the board […] to the main board.It is also pointing the correct way (with the lens towards the three leg emitter).

    Kensington scroll wheel revision2
    Kensington scroll wheel revision2

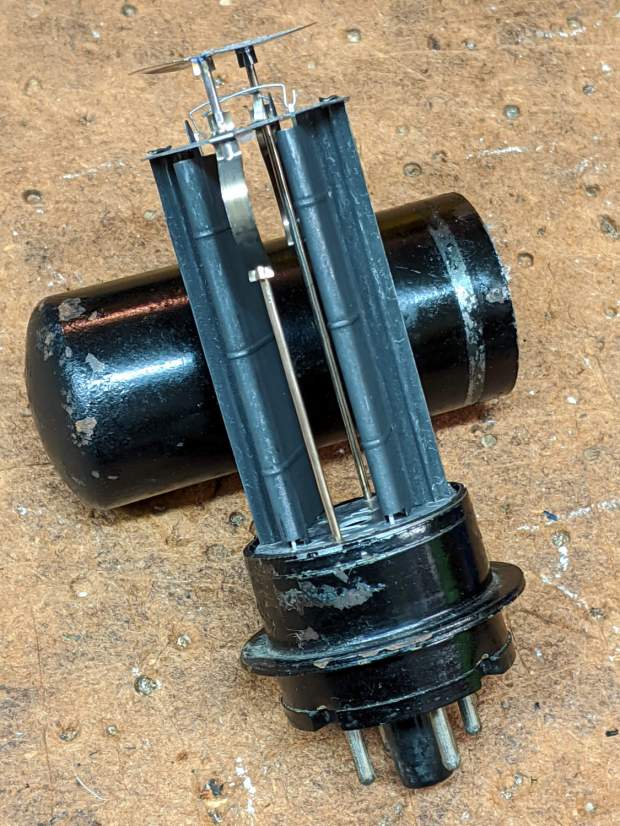
    The new quad detector has only three pins and no convex lens, but the active area now faces the emitter across the gap.

    Because the interposer PCB occupies the space previously devoted to the emitter & detector leads, Kensington apparently soldered the new parts directly to the top surface without any clearance:

    It’s like they failed to put through-vias to the rear or didn’t route them to the bottom another way, hence the solder is under the component

    Tristan managed to wreck the detector while attempting to re-solder the intermittent joints, a situation I’m painfully familiar with. He replaced it with a quad detector harvested from a mid-90s optical mouse and it’s back in operation.

    So I think the correct “fix” for the old-style PCBs (without the new interposer) is to unsolder the detector, rotate it so the lens faces the emitter, then somehow rewire the pins to the original pads. This won’t be easy and definitely won’t be pretty, but as long as it’s pointed in the right general direction it should work:

    mine works off axis quite a bit

    Should either of my Expert Mouse trackballs fail, now I know what to do

    Many thanks to Tristan for reporting his findings!

    Update: A note from Alan brings more data to the discussion

  • Hiatus

    Between the ACM presentation, an upcoming Digital Machinist column, and homeowner stuff “not relevant here”, I’ll be posting intermittently for a week or so.

    Logo - Isolated 0D3
    Logo – Isolated 0D3

    Algorithmic Artifacts will be getting more attention!

  • Metal-case 5T4 Vacuum Tube Opened

    I’ve always wondered what’s inside a metal-case vacuum tube:

    Dual rectifier tube 5T4 - metal case opened
    Dual rectifier tube 5T4 – metal case opened

    The cutter last saw action on the EMT used in the MPCNC, so it’s intended for use on steel tubes. I thought about parting the case off in the lathe, but a tubing cutter sufficed for a first attempt, even if it couldn’t cut quite as close to the flange as I wanted.

    A 5T4 tube is a full-wave rectifier with two sections:

    Dual rectifier tube 5T4 - upright
    Dual rectifier tube 5T4 – upright

    Unsurprisingly, the guts resemble those of glass-envelope rectifier tubes in my collection, like this 5U4GB:

    5U4GB Full-wave vacuum rectifier - cyan red phase
    5U4GB Full-wave vacuum rectifier – cyan red phase

    The metal case would be far more rugged than a glass bottle and, perhaps, the flange locked the tube into its socket against vibration.

    The filaments surely weren’t thoriated, so it’s all good …

  • Video-rated MicroSD Card Status Report

    Having just returned from the fourth ride of the season, it’s worthwhile to note how the MicroSD cards in the cameras are doing.

    The Sony HDR-AS30V helmet camera has been running a 64 GB Sandisk high-endurance video-rated card since late August 2017:

    Sandisk - 64 GB MicroSDXC cards
    Sandisk – 64 GB MicroSDXC cards

    In those 29 calendar months (maybe 20 riding months) I’ve ridden 4500-ish miles at perhaps 12 mph, so call it 375 hr = 22.5 k min. The camera fills a 4 GB file every 22.75 min, so it’s recorded 1000 files = 4 TB, which is 62× its capacity. This is better than the defunct Sandisk Extreme Pro card (3 TB & 50×) and much much better than the Sony cards (1 TB & 15×), although I have caught the camera in RCVR mode maybe twice, which means the card or camera occasionally coughs and reformats itself.

    The Cycliq Fly6 rear camera uses a Sandisk 32 GB card that’s been running flawlessly since late 2017:

    MicroSD 32 GB - Samsung EVO and SanDisk High Endurance
    MicroSD 32 GB – Samsung EVO and SanDisk High Endurance

    The new 16850 lithium cell continues to work fine, too.

    The SJCam M20 rear camera also uses a Sandisk 32 GB high-endurance card and has worked fine since early 2018. An external battery eliminated all the hassle of its feeble internal batteries, although the one that’s been in there has faded to the point of just barely keeping the clock ticking over during winter weeks without rides:

    SJCAM M20 Mount - Tour Easy side view
    SJCAM M20 Mount – Tour Easy side view

    All in all, paying the premium for video-rated MicroSD cards has been worthwhile!

  • Homage Tek CC: Subscripts & Superscripts

    The GCMC typeset() function converts UTF-8 text into a vector list, with Hershey vector fonts sufficing for most CNC projects. The fonts date back to the late 1960s and lack niceties such as superscripts, so the Homage Tektronix Circuit Computer scale legends have a simpler powers-of-ten notation:

    Tek CC - Pilot V5 - plain paper - red blue
    Tek CC – Pilot V5 – plain paper – red blue

    Techies understand upward-pointing carets, but … ick.

    After thinking it over, poking around in the GCMC source code, and sketching alternatives, I ruled out:

    • Adding superscript glyphs to the font tables
    • Writing a text parser with various formatting commands
    • Doing anything smart

    Because I don’t need very many superscripts, a trivial approach seemed feasible. Start by defining the size & position of the superscript characters:

    SuperScale = 0.75;                                       // superscript text size ratio
    SuperOffset = [0mm,0.75 * LegendTextSize.y];            //  ... baseline offset
    

    Half-size characters came out barely readable with 0.5 mm Pilot pens:

    Tek CC - Superscript test - 0.5x
    Tek CC – Superscript test – 0.5x

    They’re legible and might be OK with a diamond drag point.

    They work better at 3/4 scale:

    Tek CC - Superscript test - 0.75x
    Tek CC – Superscript test – 0.75x

    Because superscripts only occur at the end of the scale legends, a truly nasty hack suffices:

    function ArcLegendSuper(Text,Super,Radius,Angle,Orient) {
    
      local tp = scale(typeset(Text,TextFont),LegendTextSize);
    
      tp += scale(typeset(Super,TextFont),LegendTextSize * SuperScale) + SuperOffset + [tp[-1].x,0mm];
    
      local tpa = ArcText(tp,[0mm,0mm],Radius,Angle,TEXT_CENTERED,Orient);
    
      feedrate(TextSpeed);
      engrave(tpa,TravelZ,EngraveZ);
    }
    

    The SuperScale constant shrinks the superscript vectorlist, SuperOffset shifts it upward, and adding [tp[-1].x,0mm] glues it to the end of the normal-size vectorlist.

    Yup, that nasty.

    Creating the legends goes about like you’d expect:

      ArcLegendSuper("pF - picofarad  x10","-12",r,a,INWARD);
    

    Presenting “numeric” superscripts as text keeps the option open for putting non-numeric stuff up there, which seemed easier than guaranteeing YAGNI.

    A similar hack works for subscripts:

    Tek CC - Subscript test - 0.75x
    Tek CC – Subscript test – 0.75x

    With even more brutal code:

      Sub_C = scale(typeset("C",TextFont),LegendTextSize * SubScale) + SubOffset;
    
    <<< snippage >>>
    
        tp = scale(typeset("←----- τ",TextFont),LegendTextSize);
        tp += Sub_C + [tp[-1].x,0mm];
        tp += scale(typeset(" Scale -----→",TextFont),LegendTextSize) + [tp[-1].x,0mm];
    

    The hackage satisfied the Pareto Principle, so I’ll declare victory and move on.

  • Filament Spool Sidewall

    A new spool of retina-burn orange PETG snagged when the takeup guide let the filament fall off the inboard side and the extruder tightened the loops around the spool holder. I carefully unwound the loops without removing the spool to ensure I didn’t introduce a crossover, scraped the bird’s next off the platform, and restarted the print.

    After undoing the second snag, I added a crude spool sidewall:

    Makergear M2 - filament spool sidewall
    Makergear M2 – filament spool sidewall

    It’s decidedly unlovely, but I was in a hurry to get a PCB holder printed and ready for use. Worked perfectly!

    I’ve rarely had a problem with any other spools and I don’t know what’s new-and-different with this one.

  • High-Impact Driving

    We spotted this near our usual parking spot during a recent grocery trip:

    Adams crash - stone wall
    Adams crash – stone wall

    The bush was pretty well uprooted, suggesting the vehicle stopped atop the bush after demolishing the wall.

    Wondering how it got there, I looked across the parking lot:

    Adams crash - reverse view
    Adams crash – reverse view

    Yes, that’s a dead lamp post. The impact dislodged its concrete base by about four inches:

    Adams crash - lamp pole detail
    Adams crash – lamp pole detail

    The greenery came from another eviscerated bush:

    Adams crash - bush debris
    Adams crash – bush debris

    I expected to see tire gouges in the grass, but … nope.

    The bush got a haircut, although the right half seems undamaged:

    Adams crash - bush detail
    Adams crash – bush detail

    The boulder won its disagreement with the vehicle, although there’s surprisingly little shattered plastic and other debris along the trail:

    Adams crash - boulder detail
    Adams crash – boulder detail

    The impact dislodged the boulder, which came to rest about four feet from its origin:

    Adams crash - overview
    Adams crash – overview

    The damage lies along a straight line from the middle of the Adams entrance intersection to the wall impact:

    Adams crash - trajectory
    Adams crash – trajectory

    There are no obvious skid marks, undercarriage scrapes, or gouges in the grass anywhere along the trajectory, suggesting the vehicle remained mostly airborne and ballistic during the whole event, and even the three (!) curbs involved have no marks.

    The nice lady at the Adams Customer Service counter didn’t know what happened and, as usual, the Poughkeepsie Journal (newspaper) has nothing to say.

    I did not check for a high-clearance pickup truck with tall tires and severe front-end damage in the body shop across the street, although one seems a likely suspect. Whatever the vehicle may have been, it was definitely traveling at the usual (tautological) “high rate of speed” …