The Smell of Molten Projects in the Morning

Ed Nisley's Blog: Shop notes, electronics, firmware, machinery, 3D printing, laser cuttery, and curiosities. Contents: 100% human thinking, 0% AI slop.

Author: Ed

  • Glass Tiles: Proof of Concept

    Glass Tiles: Proof of Concept

    Extract some victims from a square foot of glass tiles:

    Glass Tiles - as sold
    Glass Tiles – as sold

    Wire an old WS2812 breakout board (the new ones are much larger) to an Arduino Nano running the Nissan Fog Lamp firmware:

    Glass Tile - backlight blue - setup
    Glass Tile – backlight blue – setup

    Aaaand it looks like this might actually work:

    Glass Tile - backlight blue
    Glass Tile – backlight blue

    The WS2812 “beam” illuminates the 25 mm square tile without too much vignetting at about 15 mm.

    The bottom tile is white-ish, the top is gray-ish, and they look different enough to justify using only one color in each array:

    Glass Tile - backlight neutral
    Glass Tile – backlight neutral

    Now, for some solid modeling …

  • American Standard Kitchen Faucet: Yet Another Replacement

    American Standard Kitchen Faucet: Yet Another Replacement

    These cartridges seem to wear out after two years, at most:

    American Standard faucet cartridge
    American Standard faucet cartridge

    The handle becomes difficult to move, both left-to-right and up-and-down, with lubrication of the (obviously metal-on-plastic) shaft being unavailing.

    Having devoted considerable time & attention to keeping this thing alive, there really aren’t any user-serviceable parts inside:

    American Standard Ceramic Faucet Valve Cores - old vs new
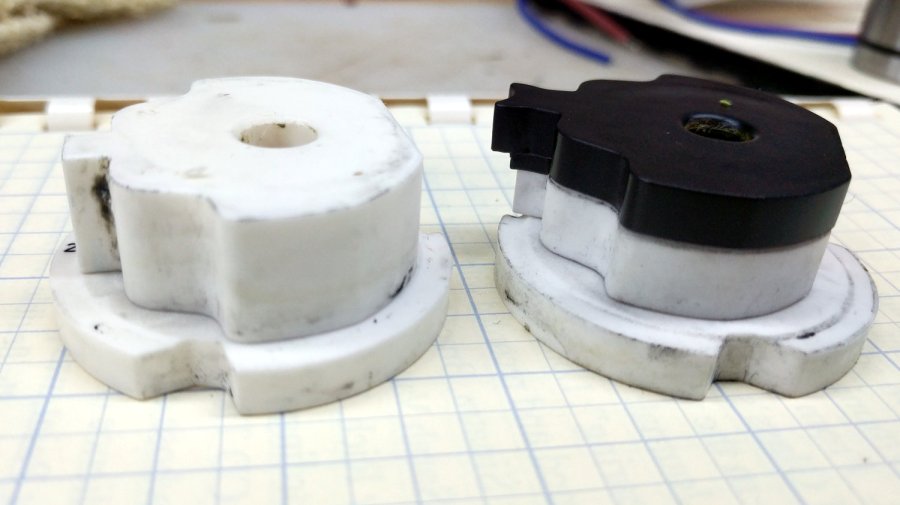
    American Standard Ceramic Faucet Valve Cores – old vs new

    I think the sliding fit between the two ceramic blocks laps itself into a more perfect joint, to the extent it’s wrung together and can’t be moved. Even after filtering, our town-supplied water apperently has enough micro-fine grit for the purpose.

    So I have another valve core for the collection …

    On the upside, the improved spout bearing rings continue to work fine, although it’s only been five months.

  • COVID-19: The New Face of Bicycling

    COVID-19: The New Face of Bicycling

    Eastbound on the Walkway Over the Hudson, which asks everyone to mask up:

    The New Face of Bicycling - Ed masked - 2020-05-21
    The New Face of Bicycling – Ed masked – 2020-05-21

    Homebrew cloth masks mostly protect you, not me, but they’re still a reasonable way to tamp down the infection rate.

    You’d (well, I’d) like to know the population infection rate, but we don’t have enough random testing to justify a number. Current testing remains biased toward those most likely to be infected, so the 15% cumulative rate (total positive / total tested) is certainly a gross overestimate and the 4% daily rate (new positive today / tested today) is still biased upward..

    We figure the real population rate is well under 4%, which means we don’t encounter many infected folks out there.

    But even 4% means staying isolated is the only way to prevent another wave of infection and another 23,000 deaths (in NY). The Mid-Hudson region has yet to meet all the state criteria for “restarting”, although Dutchess County has recently become ready, so we’ll be continuing all our usual at-home activities.

    A number of state are now “opening up” without worrying about the details. Because exponential growth starts very slowly and the dying begins three weeks after the infections, the CNN charts (near the bottom of the page) will be revealing; we’ll witness several large-scale epidemiology experiments in real time over the next few months.

    We have enough data to know anybody in and beyond our age bracket has plenty to worry about.

    I think if any single action other than a virus killed 100,000 US citizens in three months, there wouldn’t be nearly as much discussion about the correct response. On the other paw, COVID-19 still runs a little under the rate for heart disease, so it seems we can get used to dying, even in bulk, when we do it long enough.

  • Floor Lamp: Rattle-Can Black

    Floor Lamp: Rattle-Can Black

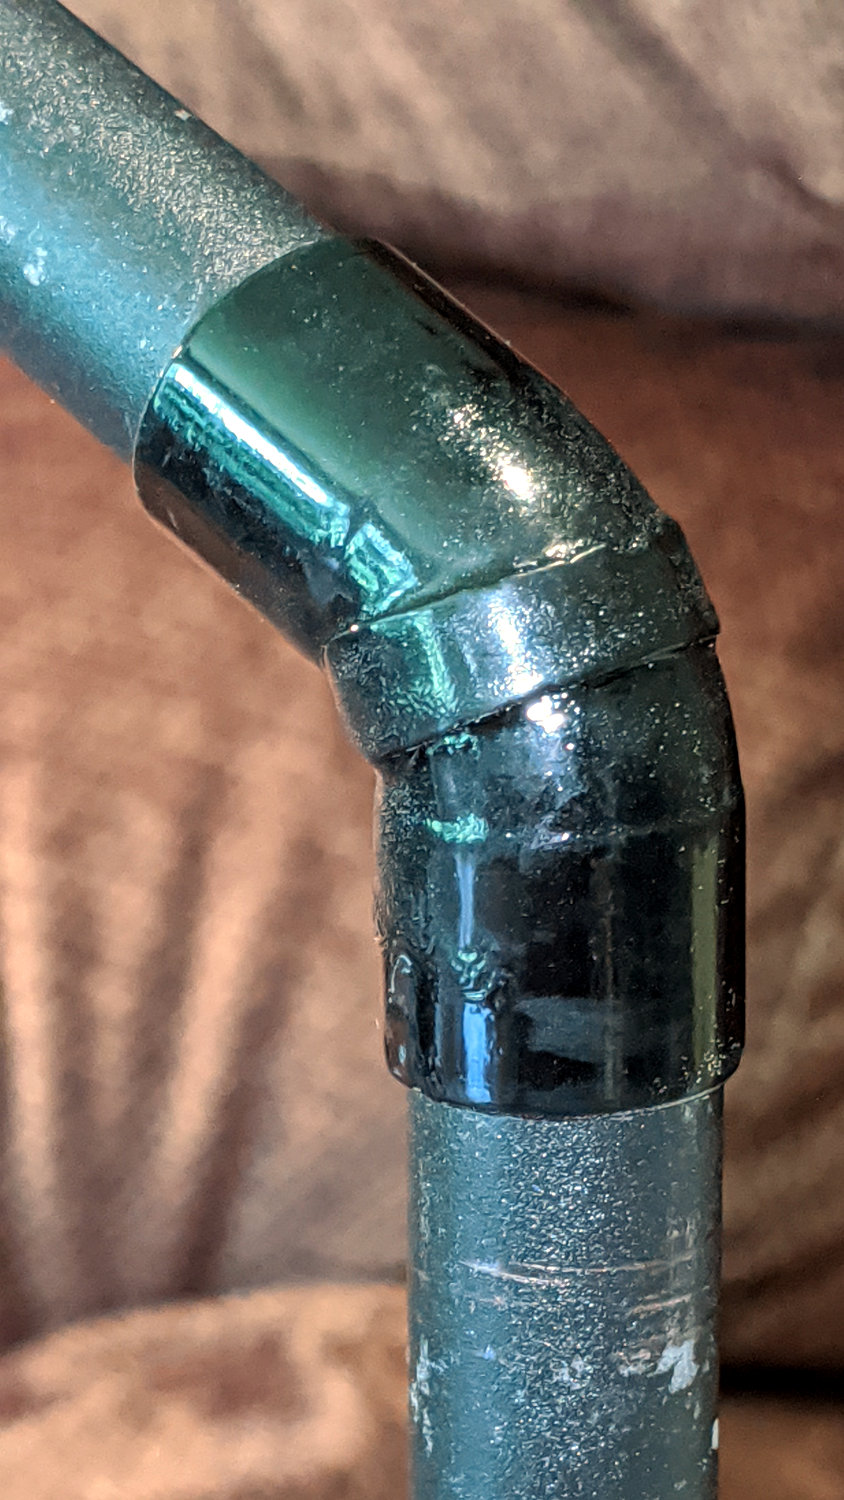
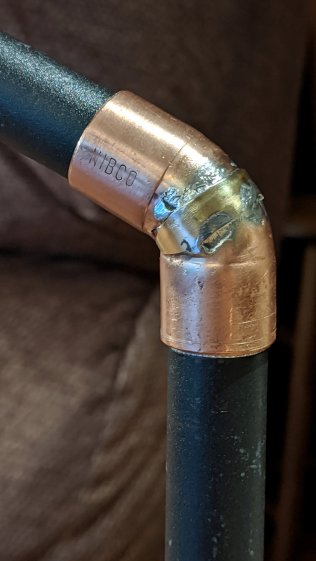
    Shooting the modified copper elbow with gloss black atop gray primer definitely improved its disposition:

    Floor Lamp - painted elbow - installed
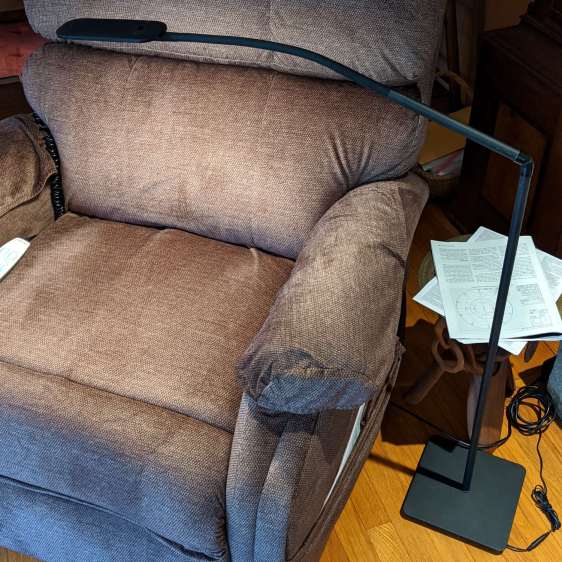
    Floor Lamp – painted elbow – installed

    I’d have been more inclined to apply several light coats if the wind weren’t blowing up a storm. As it was, I shot enough black to cover the not-quite-dry primer (“top coat at any time”) and called it a day.

    The scuffed tubes aren’t quite that ugly in person, but they have suffered some abuse along the way. Seen from a normal working distance, however, it’s all good:

    Floor Lamp - finished
    Floor Lamp – finished

    The lamp isn’t quite as tippy as I feared, so I’ll try it without the broken truck spring counterweight until something untoward happens.

    I loves me some happy ending …

  • Floor Lamp: Threaded Fittings

    Floor Lamp: Threaded Fittings

    The reshaped copper elbow on the floor lamp now has the right angle, but lacks threaded connections to the tubes. The OEM tube threads are close to M15×1, thus prompting the change gear exercise persuading Tiny Lathe™ to cut metric threads.

    Chuck up a length of 5/8 inch aluminum tube, clean up the end, and poke a thread runout slot into it:

    Floor Lamp - tube fitting - thread runout
    Floor Lamp – tube fitting – thread runout

    Turn the soon-to-be-thread OD to 14.7 mm, well under the minimum 14.794 mm major thread diameter. I figure it’s better to match the existing not-quite-standard tube threads than to get all fussy about tolerances:

    Floor Lamp - tube fitting - thread OD
    Floor Lamp – tube fitting – thread OD

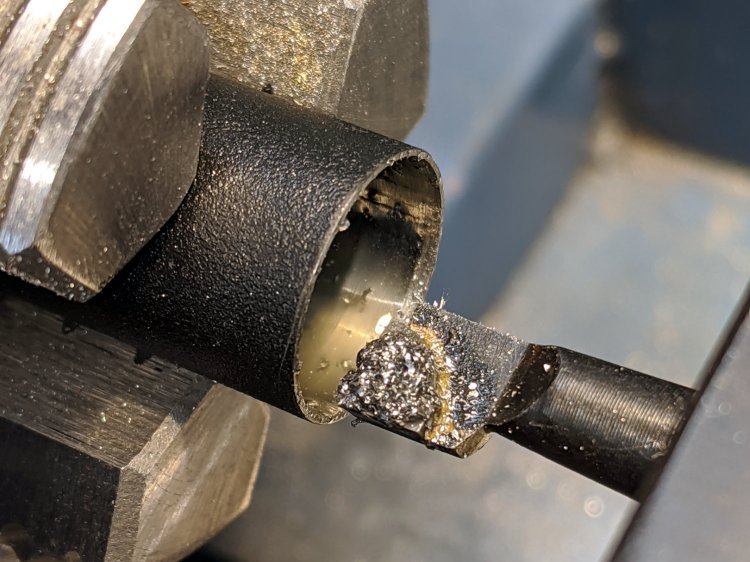
    Drill out the tube to 27/64 inch = 0.422 inch = 10.7 mm, a bit larger than the OEM fittings, to easily pass the JST-SM connector I added so I could take the lamp apart:

    Floor Lamp - tube fitting - drilling bore
    Floor Lamp – tube fitting – drilling bore

    Yeah, you’re not supposed to let the swarf build up like that, but it’s hard to stop when you’re getting good chip.

    Break the sharp edges:

    Floor Lamp - tube fitting - ready for threading
    Floor Lamp – tube fitting – ready for threading

    Set up for threading:

    Floor Lamp - tube fitting - external threading setup
    Floor Lamp – tube fitting – external threading setup

    That’s a really nice Warner laydown threader I won as a Cabin Fever door prize quite some years ago.

    A comprehensive discussion of threading may be handy.

    The compound is at 90° to the cross slide, because the DRO housing doesn’t let the compound swivel to the proper angle for thread cutting. I’m just ramming the threader straight into the tube, taking sissy cuts, and hoping for the best.

    Kiss the OD with the cutter, set the cross slide DRO to zero, position the cutter just off the end of the tube, close the split nuts around the leadscrew, engage the threading dial at a conspicuous mark:

    Mini-Lathe Threading Dial - aligned
    Mini-Lathe Threading Dial – aligned

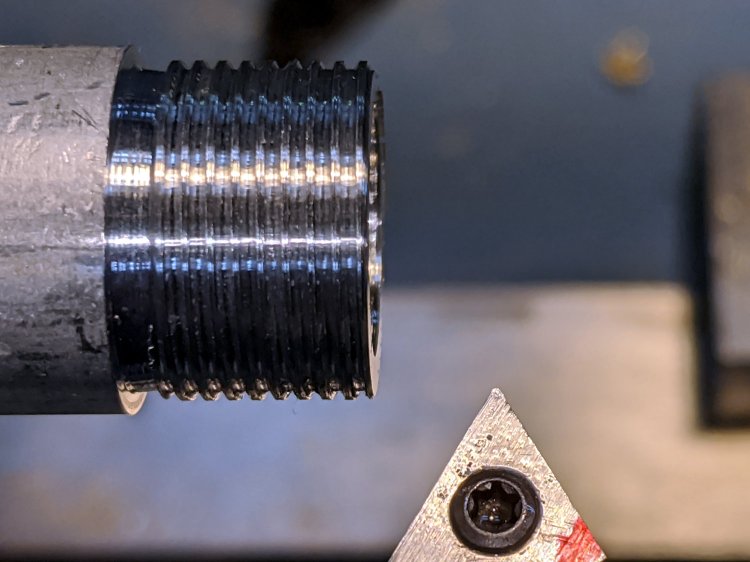
    The first real pass looked good:

    Floor Lamp - tube fitting - first thread pass
    Floor Lamp – tube fitting – first thread pass

    The runout slot is 1/16 inch = 1.6 mm wide and I’m running the lathe dead slow, so there’s plenty of time to punch the STOP button as the cutter enters the slot and let the spindle coast down. Flip the switch to REVERSE, crank the cross slide out a turn (1 mm with 0.3 mm of crank backlash), run the cutter back to the starting point, crank the cross slide in, and iterate until the fitting screws into one of the OEM lamp tubes:

    Floor Lamp - tube fitting - final thread
    Floor Lamp – tube fitting – final thread

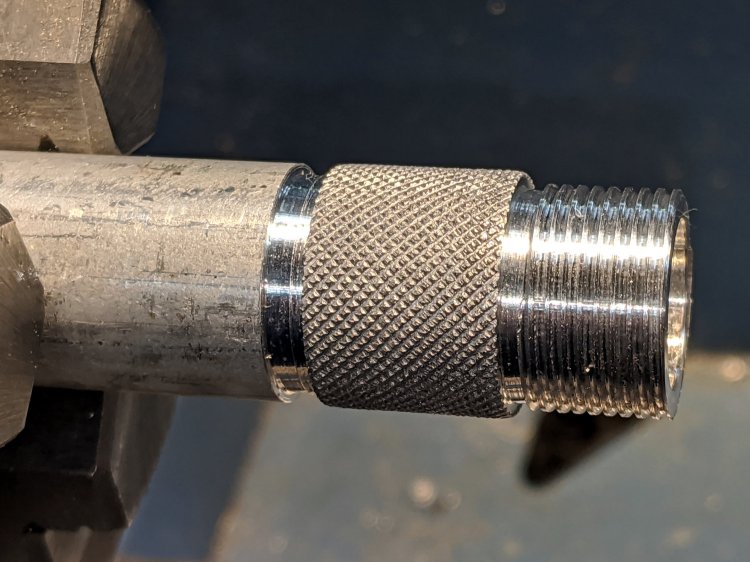
    The 5/8 inch tube is just a smidge too small for the copper fitting, so knurl the fitting to enlarge the OD slightly more than a smidge:

    Floor Lamp - tube fitting - knurled
    Floor Lamp – tube fitting – knurled

    Break the knurl edges, part off the fitting, clean up the new end, and do it all over again:

    Floor Lamp - tube fitting - threaded adapters
    Floor Lamp – tube fitting – threaded adapters

    The knurls got filed down to an exact slip fit in the copper elbow and will eventually be epoxied in place.

    The cut-off tube on the lamp head also needs internal threads, so bore out the interior to flatten the weld seam:

    Floor Lamp - tube fitting - cleaning tube bore
    Floor Lamp – tube fitting – cleaning tube bore

    No pix of the threading, but you have the general idea; the tube wall is a scant 0.6 mm thick, so this isn’t the place for full-spec threads. I stopped when the OEM tube screwed in place.

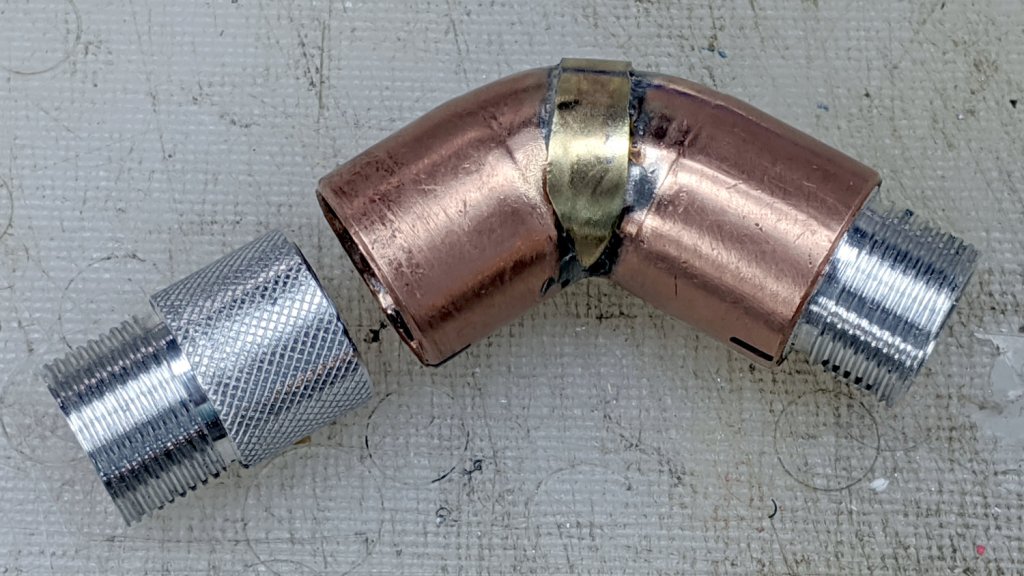
    Apart from the hideous solder job, it came together pretty well:

    Floor Lamp - tube fitting - unpainted
    Floor Lamp – tube fitting – unpainted

    It’s much more stable than Kapton-wrapped tubes jammed into a bare copper fitting, although that’s not saying much.

    A rattle-can finish seems appropriate …

  • Mini-Lathe: Threading Dial Alignment

    Mini-Lathe: Threading Dial Alignment

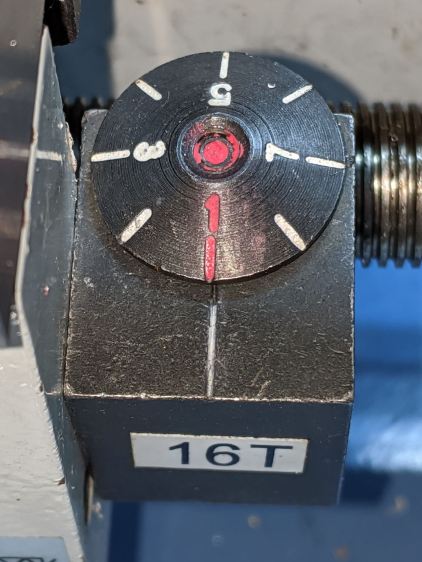
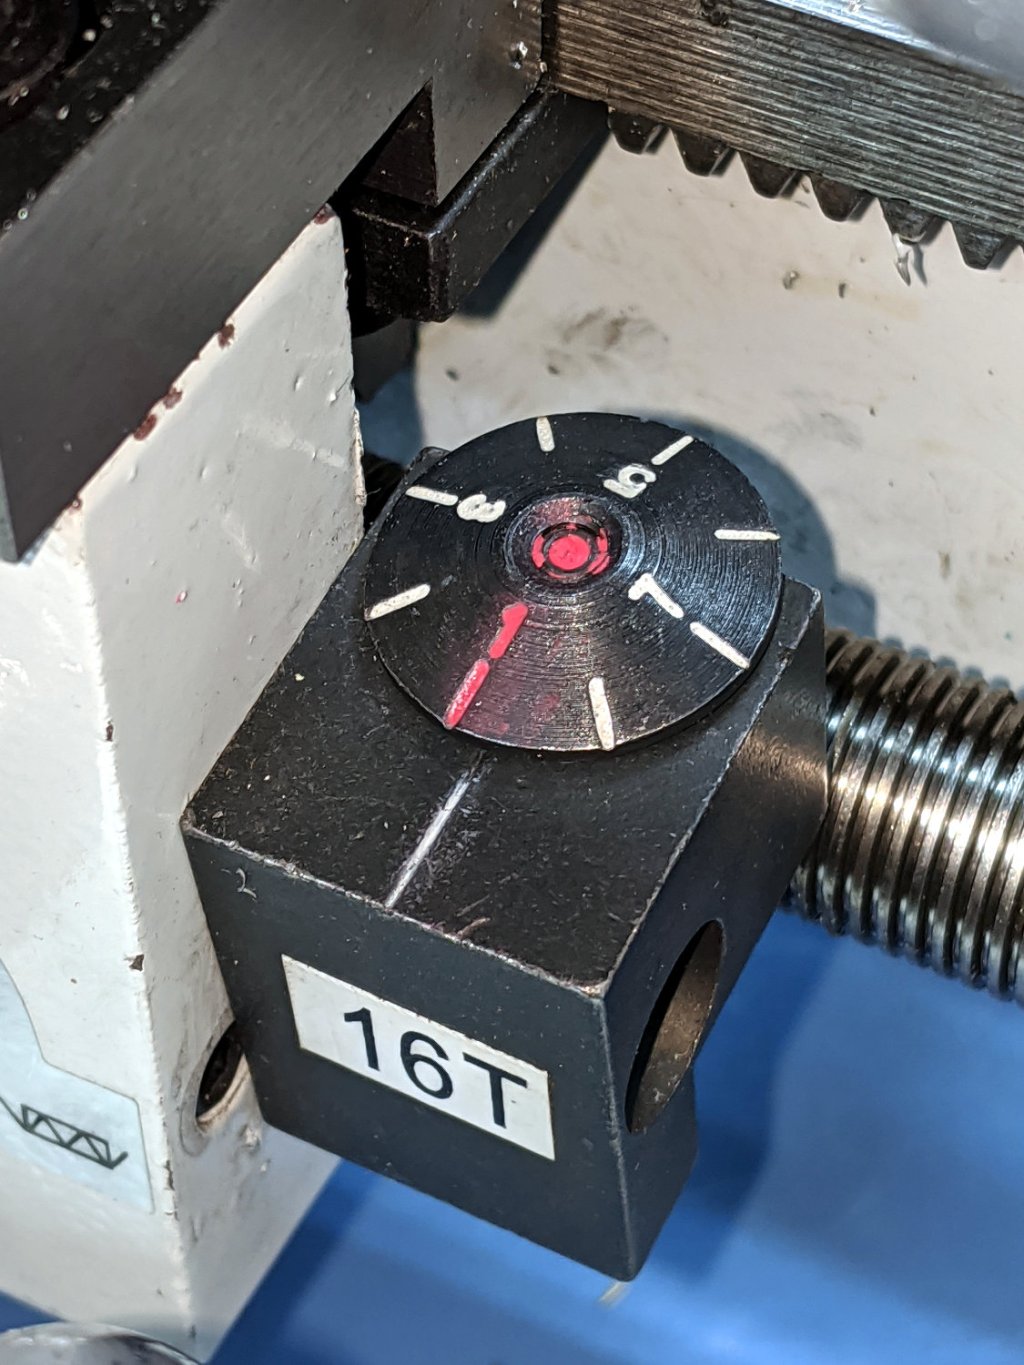
    As received, the mini-lathe’s threading dial was misaligned by about 1/4 division, which is nearly halfway to the next engagement point midway between the divisions:

    Mini-Lathe Threading Dial - as received - colorized
    Mini-Lathe Threading Dial – as received – colorized

    I added the red lacquer crayon while contemplating what to do, because I thought the dial was swaged onto the shaft. It turns out to be threaded, so I marked where the dial should be, grabbed the shaft in the (soft-jawed) bench vise, and twisted the dial with a Vise-Grip until it lined up:

    Mini-Lathe Threading Dial - aligned
    Mini-Lathe Threading Dial – aligned

    Well, it’s closer than it was, OK?

    There’s about that much slop on either side of the index line coming from the loose gear engaging the leadscrew, so that’s as good as it gets.

  • Mini-Lathe: Metric Change Gear Tables

    Mini-Lathe: Metric Change Gear Tables

    Running my assortment of custom 3D printed change gears through the LittleMachineShop calculator and copying the results into a spreadsheet for E-Z formatting produces a useful table:

    The same table in text-ish format, minus the colored highlights marking the custom gears:

    PitchABCDActualErrorIn 10 pitches
    0.10
    208020800.0990.786%0.008
    207920800.1000.468%0.005
    208020790.1000.468%0.005
    0.20
    207940800.2010.473%0.009
    208040790.2010.473%0.009
    407920800.2010.473%0.009
    408020790.2010.473%0.009
    0.25
    205535810.2490.225%0.006
    208135550.2490.225%0.006
    355520810.2490.225%0.006
    0.30
    205735650.3000.023%0.001
    206535570.3000.023%0.001
    0.40
    205545650.4000.088%0.004
    206545550.4000.088%0.004
    0.50
    215045600.5000.012%0.001
    216045500.5000.012%0.001
    218060500.5000.012%0.001
    423521800.5000.012%0.001
    605021800.5000.012%0.001
    0.60
    355740650.6000.022%0.001
    356540570.6000.022%0.001
    405735650.6000.022%0.001
    406535570.6000.022%0.001
    0.70
    355545650.6990.087%0.006
    356545550.6990.087%0.006
    455535650.6990.087%0.006
    456535550.6990.087%0.006
    507755810.7000.006%0.000
    508155770.7000.006%0.000
    557750810.7000.006%0.000
    0.75
    425045800.7500.012%0.001
    428045500.7500.012%0.001
    455042800.7500.012%0.001
    458042500.7500.012%0.001
    0.80
    405545650.7990.088%0.007
    406545550.7990.088%0.007
    455540650.7990.088%0.007
    456540550.7990.088%0.007
    205579570.8000.010%0.001
    205779550.8000.010%0.001
    1.00
    215060401.0000.012%0.001
    425045601.0000.012%0.001
    426045501.0000.012%0.001
    428060501.0000.012%0.001
    455042601.0000.012%0.001
    456042501.0000.012%0.001
    605042801.0000.012%0.001
    1.25
    215060321.2500.013%0.002
    354045501.2500.013%0.002
    424045601.2500.013%0.002
    428060401.2500.013%0.002
    454042601.2500.013%0.002
    602021801.2500.013%0.002
    604042801.2500.013%0.002
    1.50
    424045501.5000.013%0.002
    454042501.5000.013%0.002
    1.75
    654257801.7510.029%0.005
    2.00
    424060502.0000.012%0.003
    425060402.0000.012%0.003
    604042502.0000.012%0.003
    2.50
    423260502.5000.012%0.003
    424060402.5000.012%0.003
    425060322.5000.012%0.003
    602042802.5000.012%0.003
    603242502.5000.012%0.003
    3.00
    655080553.0020.061%0.018
    655580503.0020.061%0.018
    805065553.0020.061%0.018
    3.50
    574065423.5010.029%0.010
    574265403.5010.029%0.010
    652157803.5010.029%0.010
    654057423.5010.029%0.010
    654257403.5010.029%0.010
    4.00
    602042504.0000.012%0.005
    5.00
    552160504.9890.215%0.107
    553580404.9890.215%0.107
    554080354.9890.215%0.107
    602155504.9890.215%0.107
    803555404.9890.215%0.107
    804055354.9890.215%0.107
    354581205.0010.012%0.006
    455577205.0010.012%0.006
    772045555.0010.012%0.006
    Mini-Lathe Metric Change Gear Trains

    The basic formulas:

    TPI = 16 / ((A/B) x (C/D))
    Pitch = 25.4 / TPI = 1.5875 x ((A/B) x (C/D))

    So, for example, a 45-50-42-60 train will produce a 1 mm thread pitch with 120 ppm error adding up to a mere 1 micron in 10 pitches:

    Mini-Lathe change gears - stacked 50-42 - installed
    Mini-Lathe change gears – stacked 50-42 – installed

    Overall, the errors are so low as to not matter, even without using the custom gears, but it’s the principle of the thing …