The Smell of Molten Projects in the Morning

Ed Nisley's Blog: Shop notes, electronics, firmware, machinery, 3D printing, laser cuttery, and curiosities. Contents: 100% human thinking, 0% AI slop.

Author: Ed

  • High Impact Art: Coaster 5

    High Impact Art: Coaster 5

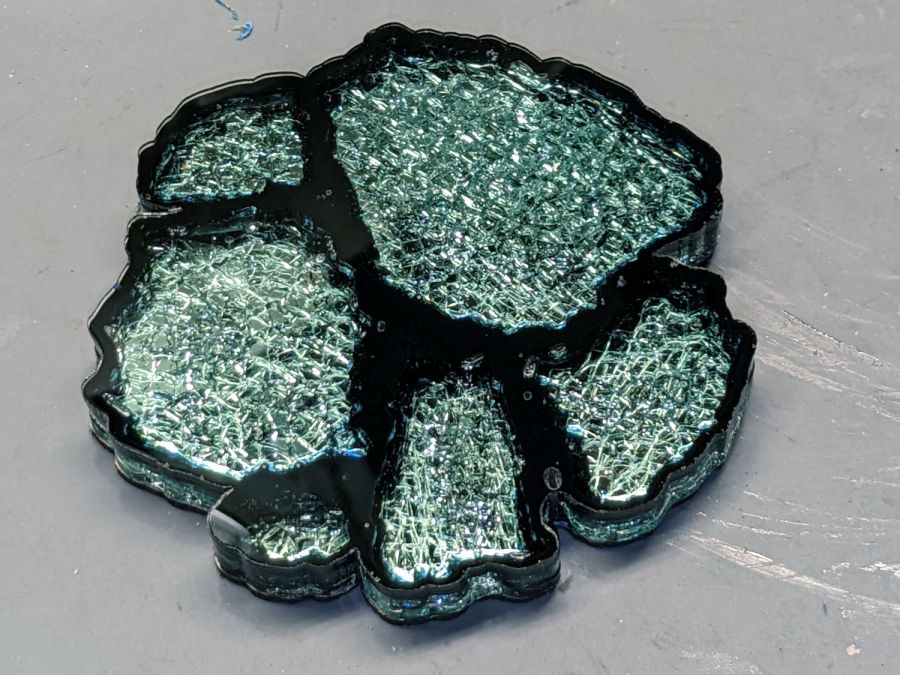
    This came out all glittery:

    Smashed Glass Coaster 5 - top view
    Smashed Glass Coaster 5 – top view

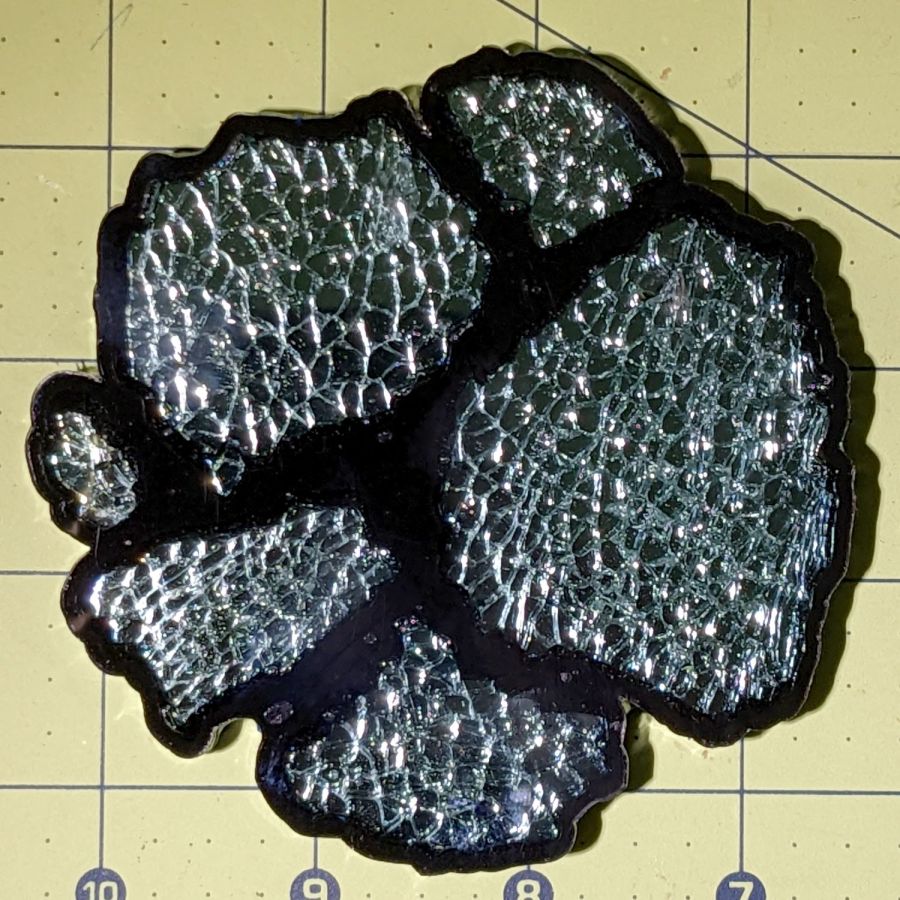
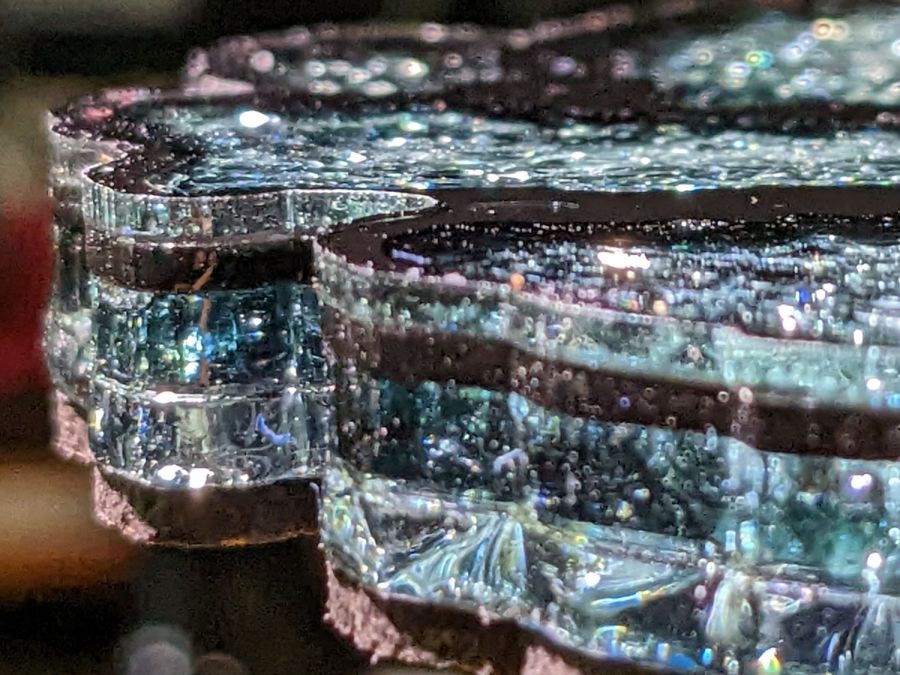
    Epoxy tinted with transparent black dye does a pretty good job of not obliterating the cracks between the cuboids. In person, the cracks seem less conspicuous around the borders of the glass pieces, but they’re visible enough for this ahem use case.

    Under the proper lighting, a few bubbles appear along and above the black layer:

    Smashed Glass Coaster 5 - oblique view
    Smashed Glass Coaster 5 – oblique view

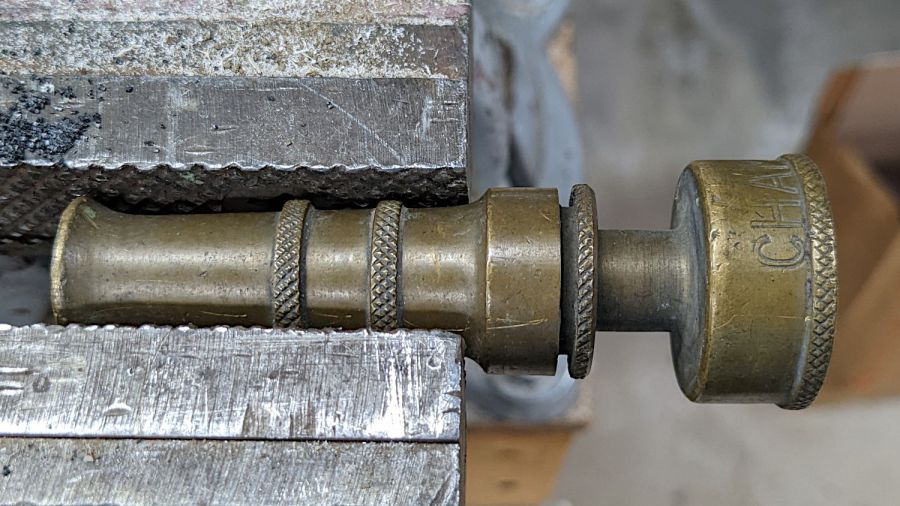
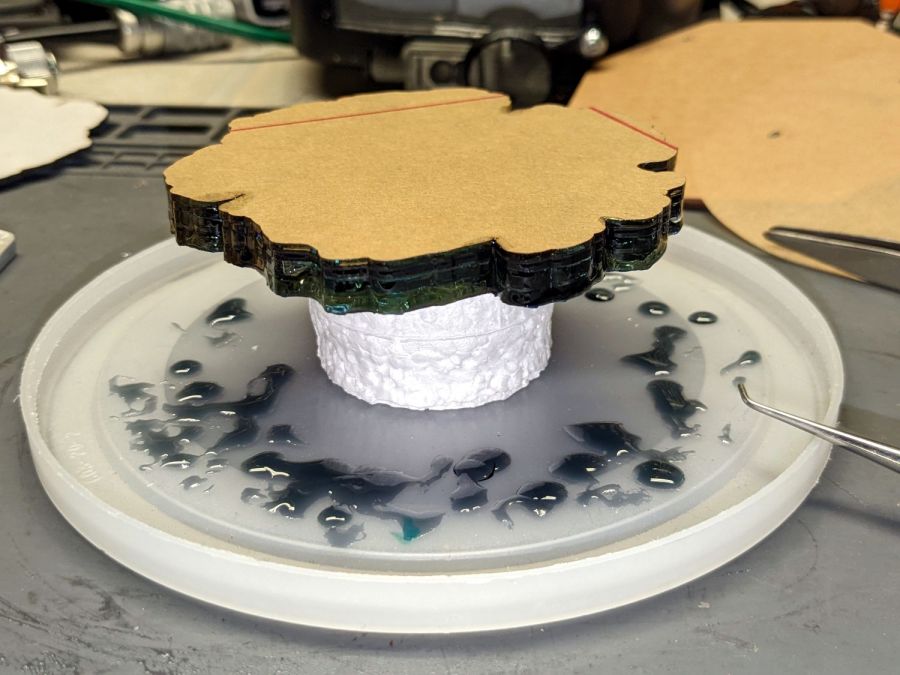
    The new thing this time around were three pins holding the layers in alignment while the epoxy cured:

    Smashed Glass Coaster 5 - alignment pin
    Smashed Glass Coaster 5 – alignment pin

    The conical end comes from grabbing an 8 mm snippet of 3/64 inch steel rod in a pin vise and twirling it against Mr Bench Grinder for a few seconds.

    The pins pretty much dropped into 1.1 mm holes created while cutting the sheets. The tiny circles mark the laser path around the pin holes:

    Coaster 5 - layers
    Coaster 5 – layers

    The “holes” in the top sheet (upper middle) are in the Tool 2 layer so they’re not cut, because it was easier to match-drill holes halfway into the top sheet with the drill press than to figure out how to convince the laser to not punch all the way through. Engraving (along the lines of the earring borders) might work, but I’m not sure how well a high-aspect-ratio hole will engrave.

    The mirror sheet is reversed left-to-right in order to cut it from the back of the reflective layer. I’m not certain this is necessary, because acrylic is basically opaque to 10.6 µm IR light and any doubly attenuated reflected light will diverge strongly from the focus point at the top surface, but it’s the recommended procedure and easy enough to do.

    The cork cuts with its adhesive layer up and blue tape on the bottom to prevent soot from accumulating in all the surface crevices.

    The alignment pins worked surprisingly well:

    Smashed Glass Coaster 5 - edge alignment A
    Smashed Glass Coaster 5 – edge alignment A

    The top sheet sticks out 0.3 mm on one side:

    Smashed Glass Coaster 5 - edge alignment B
    Smashed Glass Coaster 5 – edge alignment B

    Oddly, there’s no place where the top sheet is indented by any noticeable amount, so there may be slight size differences depending on all the colors and ages in that stack of plastic sheets.

    I’ll cure the next one top-side down, giving the bubbles an opportunity to rise toward the mirror layer and maybe become less conspicuous:

    Smashed Glass Coaster 5 - curing
    Smashed Glass Coaster 5 – curing

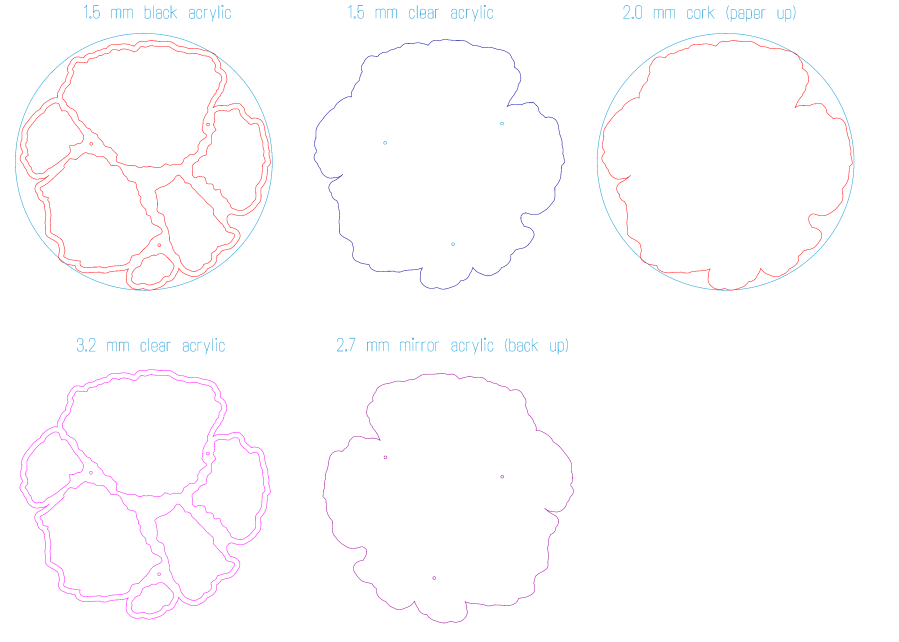
    The tricky part: finding and arranging glass chunks within a 100 mm circle!

    Avoiding narrow gaps and acute angles in the perimeter, as the notch on the left side, should simplify draining the epoxy.

  • Red Oaks Mill Eagle

    Red Oaks Mill Eagle

    We spotted a large bird on a walk to the Red Oaks Mill dam:

    Red Oaks Mill Eagle - A
    Red Oaks Mill Eagle – A

    Despite the crappy image (Google Pixel 6a, digitally zoomed as tight as it’ll go), it’s a second-year juvenile Bald Eagle. It followed ahead of us along Rt 376, landing atop successive utility poles as we walked toward the intersection:

    Red Oaks Mill Eagle - B
    Red Oaks Mill Eagle – B

    It sometimes perched on the (presumably) live primary wires, so a few kV of electric field doesn’t ruffle its feathers enough to worry about.

    Its duties included keeping an eye on us down by the creek:

    Red Oaks Mill Eagle - C
    Red Oaks Mill Eagle – C

    It eventually decided we needed no further supervision:

    Red Oaks Mill Eagle - D
    Red Oaks Mill Eagle – D

    Earlier this year it swooped along our driveway and landed atop a utility pole in our yard, causing great concern among the songbirds and rodents.

    Having an eagle in the neighborhood seems like a good sign …

  • Tour Easy: Chain Drop Pin

    Tour Easy: Chain Drop Pin

    Every now and again, an upshift to the large chainring on my Tour Easy would go awry and drop the chain off the outside, where it would sometimes jam between the pedal crank and the spider. In the worst case the flailing chain would also jam in the TerraCycle idler, but I fixed that a while ago.

    Contemporary chainrings (i.e., anything made since the trailing decades of the last millennium) generally have a chain drop pin positioned against the crank specifically to prevent such chain jamming.

    Making a chain drop pin is no big deal if you’ve got a lathe and an M4 tap:

    Tour Easy - DIY Chain Drop pin
    Tour Easy – DIY Chain Drop pin

    A closer look:

    Tour Easy - DIY Chain Drop pin - detail
    Tour Easy – DIY Chain Drop pin – detail

    That’s a 10 mm length of 5/16 inch brass rod drilled with a recess to fit the head of a 10 mm M4 socket-head cap screw.

    The pin should be a micro-smidgen shorter, as it just touches the crank, but, if anything, moving the chainring inward by one micro-smidgen improved the upshifts and I’m inclined to go with the flow.

    Should’a done it decades ago …

  • Tree Frog Season

    Tree Frog Season

    This year brings an abundance of tree frogs:

    Tree frog - on dahlia stem
    Tree frog – on dahlia stem

    Despite the snappy green color, they’re Gray Treefrogs:

    Tree frog - on patio step
    Tree frog – on patio step

    Their camouflage works better in the wild than atop a trash can lid:

    Tree frog - on trash can lid
    Tree frog – on trash can lid

    They are much smaller than you’d expect from their voices in the night:

    Tree frog - on trash can lid - thumb for scale
    Tree frog – on trash can lid – thumb for scale

    We think the drought brings them closer to the house in search of water, as Mary collects rainwater in the trash cans where the frogs easily walk up & down the inside surfaces.

  • Epson ET-3830 Refilling

    Epson ET-3830 Refilling

    Although the blurb for the Epson ET-3830 All-In-One scanner / printer says “up to 2 years of ink in the box”, the black ink hit the bottom line of the tank near the end of August:

    Epson ET-3830 - refilling black ink
    Epson ET-3830 – refilling black ink

    Refilling is totally without drama, which is worth a couple of bucks right there.

    Being that type of guy, I keep track of ink vs. time:

    Epson ET-3830 - ink status
    Epson ET-3830 – ink status

    In round numbers, it looks like we use nearly all of a 127 ml bottle of black ink and a bit more than half of an 70 ml bottle of color ink every eight months.

    I find it much easier to read long articles and tech documents while slumped in the Power Chair than to scroll through them on big or little screens, so we go through much more ink and paper than most folks.

  • Champion Hose Nozzle

    Champion Hose Nozzle

    An old brass hose nozzle emerged from my garden hydraulics toolbox when a much newer plastic nozzle failed. Unfortunately, this one leaked a bit too much to serve as a replacement, so I grabbed it in the vise while pondering how to disassemble it:

    Champion brass hose nozzle - disassembly
    Champion brass hose nozzle – disassembly

    It turns out the knurled ring is threaded into the nozzle and, even at this late date, responds well to gentle persuasion with a Vise-Grip:

    Champion brass hose nozzle - parts
    Champion brass hose nozzle – parts

    The washer is a lost cause, but I managed to find an O-ring that fit perfectly in the space available. Clearing some crud around the nozzle hole and buffing up the matching conical section improved its sealing ability, so I’ll call it a win.

    The word ITALY stamped opposite CHAMPION suggests this thing might be as old as I am; it’s been a while since either brass or Italy was competitive in the world of cheap manufactured goods.

  • Mini-Lathe: Adapting a Five Inch Four Jaw Chuck Adapter Plate

    Mini-Lathe: Adapting a Five Inch Four Jaw Chuck Adapter Plate

    The kludge required to trim the coaster rims disturbed the silt enough to reveal a long-lost 5 inch 4 jaw chuck that fit neither the old South Bend lathe nor the new mini-lathe. In any event, the chuck does have an adapter plate on its backside, it’s just not the correct adapter plate for the spindle on my mini-lathe.

    Making it fit required enlarging an existing recess to fit the spindle plate, a straightforward lathe job with the plate grabbed in the 3 jaw chuck’s outer jaws:

    5 inch 4 jaw chuck - boring spindle recess
    5 inch 4 jaw chuck – boring spindle recess

    Carbide inserts don’t handle interrupted cuts very well, but sissy cuts saved the day. The plate is kinda-sorta cast iron, so the “chips” are dust and a vacuum snout reduces the mess; you can see some chips inside the bore.

    A faceplate for the mini-lathe lathe located three holes matching the spindle plate, after I noticed the amazing coincidence of both parts having 26 mm bores. Making an alignment tool from a scrap of 3/4 inch (!) Schedule 40 PVC pipe was an easy lathe job:

    5 inch 4 jaw chuck - adapter plate alignment
    5 inch 4 jaw chuck – adapter plate alignment

    Transfer-punching those holes produced pips on the chuck side of the adapter plate:

    5 inch 4 jaw chuck - spindle bolt spotting
    5 inch 4 jaw chuck – spindle bolt spotting

    I thought about freehanding the holes, but came to my senses:

    5 inch 4 jaw chuck - adapter plate drilling
    5 inch 4 jaw chuck – adapter plate drilling

    Of course, the Sherline lacks enough throat for the plate, so each hole required clamping / locating / center-drilling / drilling / finish drilling. With all three drilled, hand-tapping the threads was no big deal:

    5 inch 4 jaw chuck - rebuIlt adapter plate
    5 inch 4 jaw chuck – rebuIlt adapter plate

    Those are M8×1.25 studs from LMS (although the ones I got look like the 30 mm version), with the long end sunk in the adapter plate to put the other end flush with the nut on the far side of the spindle plate:

    5 inch 4 jaw chuck - installed - spindle nuts
    5 inch 4 jaw chuck – installed – spindle nuts

    And then it fits just like it grew there, although the jaws don’t have much clearance inside the interlock cover:

    5 inch 4 jaw chuck - installed - front view
    5 inch 4 jaw chuck – installed – front view

    Now I’m ready for the next set of coasters and, if the jaws stick out too far, I can gimmick the interlock switch for the occasion.

    If the truth be known, I ordered two sets of those studs along with the 4 inch 4 jaw chuck intended for the mini-lathe, so, if anything, I’m now over-prepared.

    The description of the 4 inch chuck seems inconsistent with its listed dimensions, which may be why I ended up with the larger chuck in the first place. You can never have enough chucks: all’s well that ends well.