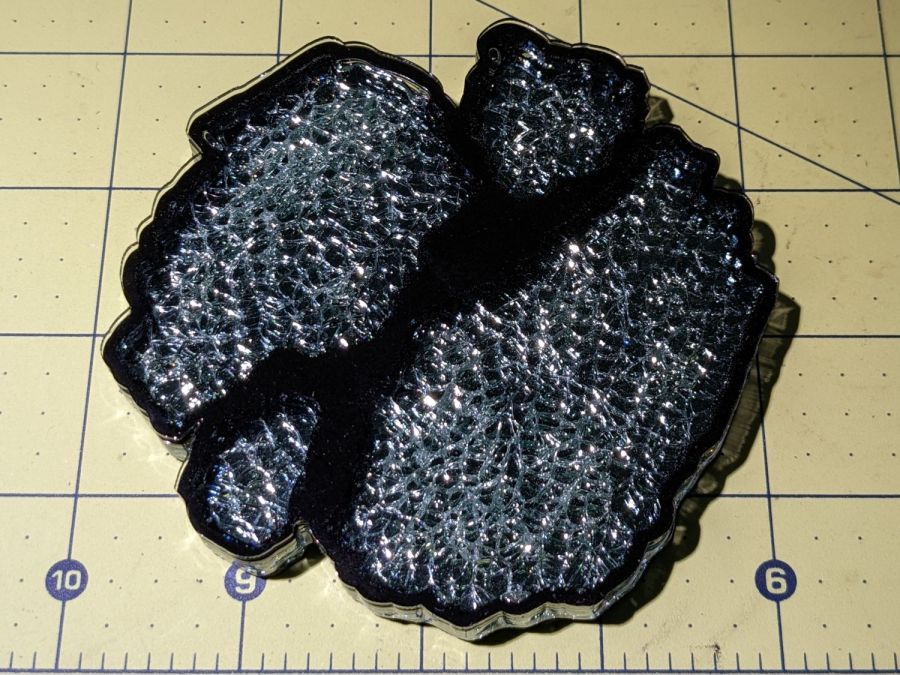
Snugging the perimeter around the smashed glass fragments definitely improves the result:

It’s just under 100 mm = 4 inch across the longest dimension and surprisingly glittery:
The coaster is a five-layer sandwich half an inch thick:
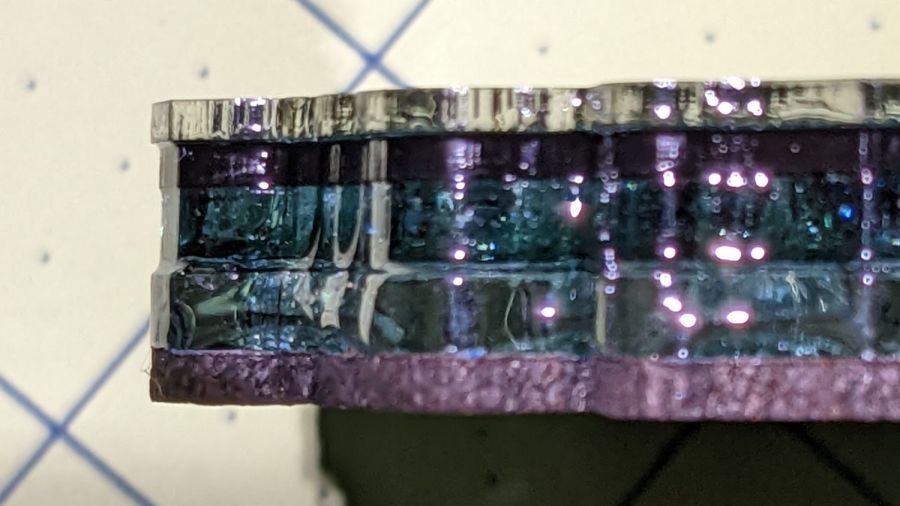
From the top:
- Clear acrylic: 1.5 mm = 1/16 inch
- Black acrylic: 1.5 mm = 1/16 inch
- Clear acrylic: 3.2 mm = 1/8 inch
- Mirror acrylic: 2.7 mm
- Cork: 2.7 mm cut from a standard round coaster base
The smashed glass pieces sit atop the mirror, so the trick is making the layers around it add up to the same thickness. This is not possible by adding the nominal dimensions, because cast acrylic sheet thickness isn’t well controlled; I’ve finally written the actual (metric!) thickness on the sheets so I can select which 1/8 Inch sheet has the proper thickness.
A chipboard template (seen atop the finished coaster) verified the glass pieces fit easily within their openings:

I laid the clear frame on the mirror, poured generous epoxy puddles along the middle of the fragment openings, eased the glass in place, and gently pressed the slabs down to get a uniform epoxy layer, with the excess oozing under the frame all around. Then lay the black frame around the glass atop the clear, squirt more epoxy along the gaps around the glass, pour more epoxy atop the fragments, ease the top sheet in place paying considerable attention to coaxing the bubbles along to the edge, align the sides, and wait.
The epoxy cured while stuck atop a styrofoam pillar to let it drain smoothly off the edges:

I encouraged the epoxy out of the acute corners, as shown by the larger puddles, over the next few hours until the epoxy stiffened up. Those puddles also show the transparent black tint, to the tune of four drops in 8 ml of epoxy, which turned out to just barely suffice for the job. The whole assembly sat level while curing, but the layers didn’t remain aligned even after gently shoving them around while the stack cured.
The black epoxy joins nicely with the black frame layer to conceal most of the remaining bubbles. A different color frame with matching epoxy might looks less ominous, but colors more transparent than dark gray would likely reveal the bubbles.
It Would Be Nice™ if the acrylic sheet on the top had a transparent plastic film cover, but it arrived with brown paper on both sides. Despite that, I spattered only a few tiny drops on the bare surface and managed to scrape most of them off without further damage.
Overall, I think the conformal perimeter looks much better than the polygonal outline smashed glass coasters.

Comments
One response to “Smashed Glass Coaster: Conformal Perimeter”
[…] new thing this time around were three pins holding the layers in alignment while the epoxy […]