Frequency Modulated DDS: SPI Mock 1

The general idea is to frequency modulate the sine wave coming from a DDS, thereby generating a signal suitable for upconverting in amateur repeaters now tied to unobtainable crystals. The crystals run from 4-ish to 20-ish MHz, with frequency multiplication from 3 to 36 producing RF outputs from 30-ish MHz through 900-ish MHz; more details as I work through the choices.

The demo code runs on a bare Teensy 3.6 as a dipstick test for the overall timing and functionality:

FM DDS - Teensy 3.6 SPI demo
FM DDS – Teensy 3.6 SPI demo

The fugliest thing you’ve seen in a while, eh?

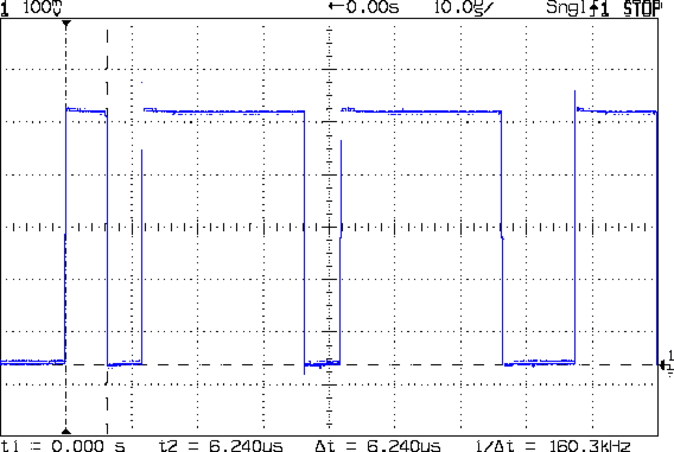
An overview of the results:

Analog 4 kHz @ 40 kHz - SPI demo overview
Analog 4 kHz @ 40 kHz – SPI demo overview

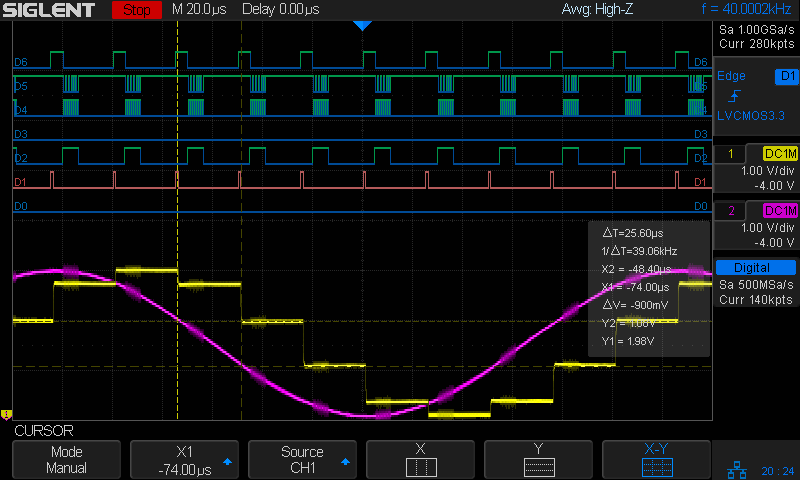
The pulses in D1 (orange digital) mark timer ticks at a 40 kHz pace, grossly oversampling the 4 kHz audio bandwidth in the hope of trivializing the antialiasing filters. The timer tick raises the DDS latch pin (D6, top trace) to change the DDS frequency, fires off another ADC conversion, and (for now) copies the previous ADC value to the DAC output:

void timer_callback(void) {
  digitalWriteFast(TIMER_PIN,HIGH);
  digitalWriteFast(DDS_FQUD_PIN,HIGH);                // latch previously shifted bits
  adc->startSingleRead(AUDIO_PIN, ADC_0);             // start ADC conversion
  analogWriteDAC0(AnalogSample);                      // show previous audio sample
  digitalWriteFast(TIMER_PIN,LOW);
}

The purple analog trace is the input sine wave at 4 kHz. The yellow analog stairstep comes from the DAC, with no hint of a reconstruction filter knocking off the sharp edges.

The X1 cursor (bold vertical dots) marks the start of the ADC read. I hope triggering it from the timer tick eliminates most of the jitter.

The Y1 cursor (upper dotted line, intersecting X1 just left of the purple curve) shows the ADC sample apparently happens just slightly after the conversion. The analog scales may be slightly off, so I wouldn’t leap to any conclusions.

The pulses in D2 mark the ADC end-of-conversion interrupts:

void adc0_isr(void) {
  digitalWriteFast(ANALOG_PIN,HIGH);
  AnalogSample = adc->readSingle();                     // fetch just-finished sample
  SPI.beginTransaction(SPISettings(8000000, MSBFIRST, SPI_MODE0));
  digitalWriteFast(DDS_FQUD_PIN, LOW);
  SPI.transfer(DDSBuffer.Phase);                // interleave with FM calculations
  SPI.transfer(DDSBuffer.Bits31_24);
  SPI.transfer(DDSBuffer.Bits23_16);
  SPI.transfer(DDSBuffer.Bits15_8);
  SPI.transfer(DDSBuffer.Bits7_0);
  SPI.endTransaction();                         // do not raise FQ_UD until next timer tick!
  digitalWriteFast(ANALOG_PIN,LOW);
}

The real FM code will multiply the ADC reading by the amplitude-to-frequency-deviation factor, add it to the nominal “crystal” frequency, convert the sum to the DDS delta-phase register value, then send it to the DDS through the SPI port. For now, I just send five constant bytes to get an idea of the minimum timing with the SPI clock ticking along at 8 MHz.

The tidy blurs in D4 show the SPI clock, with the corresponding data in D5.

D6 (top trace) shows the DDS FQ_UD (pronounced “frequency update”) signal dropping just before the SPI data transfer begins. Basically, FQ_UD is the DDS Latch Clock: low during the delta-phase value transfer, with the low-to-high transition latching all 40 control + data bits into the DDS to trigger the new frequency.

A closer look at the sample and transfer:

Analog 4 kHz @ 40 kHz - SPI demo detail
Analog 4 kHz @ 40 kHz – SPI demo detail

For reference, the digital players from bottom to top:

  • D0 – unused here, shows pulses marking main loop
  • D1 – 40 kHz timer ticks = ADC start conversion
  • D2 – ADC end of conversion,”FM calculation”, send DDS data
  • D3 – unused here, shows error conditions
  • D4 – SPI clock = rising edge active
  • D5 – SPI MOSI data to DDS = MSB first
  • D6 – SPI CS = FQ_UD = DDS latch

Remember, the yellow analog stairstepped trace is just a comfort signal showing the ADC actually samples the intended input.

The ARM CPU has floating-point hardware, but I suspect fixed-point arithmetic will once again win out over double-precision multiplies & divides.

Dropping the sampling to 20 kHz would likely work just as well and double the time available for calculations. At least now I can measure what’s going on.

All in all, it looks feasible.

And, yes, the scope is a shiny new Siglent SDS2304X with the MSO logic-analyzer option. It has some grievous UX warts & omissions suggesting an architectural botch job, but it’s mostly Good Enough for what I need. More later.

The TeensyDuino source code as a GitHub Gist:

// FM DDS
// Ed Nisley - KE4ZNU
// 2017-04-19 Demo 1
#include <IntervalTimer.h>
#include <ADC.h>
#include <SPI.h>
#define HEART_PIN 14
#define TIMER_PIN 15
#define ANALOG_PIN 16
#define GLITCH_PIN 17
#define AUDIO_PIN A9
#define DDS_FQUD_PIN 10
// data to DDS MOSI0 11
// no data from DDS MISO0 12
// DDS clock on SCK0 13 -- also LED
#define BUILTIN_LED 13
//---------------------
// Useful constants
int SamplePeriod = 25; // microseconds per analog sample
//---------------------
// Globals
ADC *adc = new ADC();
IntervalTimer timer;
volatile unsigned int AnalogSample;
typedef struct {
uint8_t Phase;
uint8_t Bits31_24;
uint8_t Bits23_16;
uint8_t Bits15_8;
uint8_t Bits7_0;
} DDS;
DDS DDSBuffer = {0x01,0x02,0x04,0x08,0x10};
double DDSFreq, EpsilonFreq, DDSStepFreq;
double CenterFreq, TestFreq;
//---------------------
// Handy routines
void FlipPin(int pin) {
digitalWriteFast(pin,!digitalRead(pin));
}
void PulsePin(int p) {
FlipPin(p);
FlipPin(p);
}
//---------------------
// Timer handler
void timer_callback(void) {
digitalWriteFast(TIMER_PIN,HIGH);
digitalWriteFast(DDS_FQUD_PIN,HIGH); // latch previously shifted bits
adc->startSingleRead(AUDIO_PIN, ADC_0); // start ADC conversion
analogWriteDAC0(AnalogSample); // show previous audio sample
digitalWriteFast(TIMER_PIN,LOW);
}
//---------------------
// Analog read handler
void adc0_isr(void) {
digitalWriteFast(ANALOG_PIN,HIGH);
AnalogSample = adc->readSingle(); // fetch just-finished sample
SPI.beginTransaction(SPISettings(8000000, MSBFIRST, SPI_MODE0));
digitalWriteFast(DDS_FQUD_PIN, LOW);
SPI.transfer(DDSBuffer.Phase); // interleave with FM calculations
SPI.transfer(DDSBuffer.Bits31_24);
SPI.transfer(DDSBuffer.Bits23_16);
SPI.transfer(DDSBuffer.Bits15_8);
SPI.transfer(DDSBuffer.Bits7_0);
SPI.endTransaction(); // do not raise FQ_UD until next timer tick!
digitalWriteFast(ANALOG_PIN,LOW);
}
//---------------------
// Hardware setup
void setup(void) {
pinMode(BUILTIN_LED,OUTPUT); // will eventually become SCK0
pinMode(HEART_PIN, OUTPUT); // show we arrived
digitalWrite(HEART_PIN,LOW);
PulsePin(HEART_PIN);
pinMode(TIMER_PIN,OUTPUT);
digitalWrite(TIMER_PIN,LOW);
pinMode(GLITCH_PIN,OUTPUT);
digitalWrite(GLITCH_PIN,LOW);
pinMode(ANALOG_PIN,OUTPUT);
digitalWrite(ANALOG_PIN,LOW);
pinMode(AUDIO_PIN,INPUT);
pinMode(DDS_FQUD_PIN,OUTPUT);
digitalWriteFast(DDS_FQUD_PIN,HIGH);
Serial.begin(115200);
int waited = 0;
while (!Serial && waited < 3000) { // fall out after a few seconds
delay(1);
waited++;
if (! (waited % 50))
FlipPin(BUILTIN_LED);
}
Serial.printf("FM Modulated DDS\nEd Nisley KE4ZNU\n");
Serial.printf(" serial wait: %d ms\n\n",waited);
SPI.begin();
SPI.usingInterrupt(255); // attached through analog IRQs
adc->setAveraging(0);
adc->setResolution(12);
adc->setConversionSpeed(ADC_CONVERSION_SPEED::MED_SPEED);
adc->setSamplingSpeed(ADC_SAMPLING_SPEED::MED_SPEED);
adc->enableInterrupts(ADC_0);
if (!timer.begin(timer_callback, SamplePeriod)) {
Serial.printf("Timer start failed\n");
while (true) {
FlipPin(BUILTIN_LED);
delay(50);
}
}
DDSFreq = 180.0e6;
EpsilonFreq = 1.0e-5;
DDSStepFreq = DDSFreq / (1LL << 32);
Serial.printf("DDS frequency: %18.7f Hz\n",DDSFreq);
Serial.printf(" epsilon: %18.7f Hz\n",EpsilonFreq);
Serial.printf(" step: %18.7f Hz\n\n",DDSStepFreq);
CenterFreq = 146520000.0;
TestFreq = CenterFreq;
Serial.printf("Center frequency: %18.7f Hz\n",CenterFreq);
Serial.printf("Setup done\n");
}
//---------------------
// Do things forever
void loop(void) {
digitalWrite(HEART_PIN,HIGH);
if (TestFreq < (CenterFreq + 100*EpsilonFreq))
TestFreq += EpsilonFreq;
else
TestFreq += DDSStepFreq;
Serial.printf(" %18.7f Hz\n",TestFreq);
digitalWrite(HEART_PIN,LOW);
delay(500);
}
view raw FMDDS.ino hosted with ❤ by GitHub

Teensy 3.6 Double Precision Floats

Having spent a bit of effort wringing enough precision from an Arduino to make the 60 kHz quartz resonator tester, this came as a relief:

DDS frequency:  180000000.0000000 Hz
      epsilon:          0.0000001 Hz
         step:          0.0419095 Hz

Center frequency:  146520000.0000000 Hz
  146520000.0000001 Hz
  146520000.0000002 Hz
  146520000.0000003 Hz
  146520000.0000004 Hz
  146520000.0000004 Hz
  146520000.0000005 Hz
  146520000.0000006 Hz
  146520000.0000007 Hz
  146520000.0000008 Hz
  146520000.0000009 Hz
  146520000.0000010 Hz

... snippage ...

  146520000.0000099 Hz
  146520000.0000100 Hz
  146520000.0419195 Hz
  146520000.0838290 Hz
  146520000.1257386 Hz
  146520000.1676481 Hz
  146520000.2095576 Hz
  146520000.2514671 Hz
  146520000.2933766 Hz
  146520000.3352861 Hz
  146520000.3771957 Hz
  146520000.4191052 Hz
  146520000.4610147 Hz
  146520000.5029242 Hz
  146520000.5448337 Hz
  146520000.5867432 Hz
  146520000.6286528 Hz
  146520000.6705623 Hz
  146520000.7124718 Hz
  146520000.7543813 Hz
  146520000.7962908 Hz
  146520000.8382003 Hz
  146520000.8801098 Hz
  146520000.9220194 Hz
  146520000.9639289 Hz
  146520001.0058384 Hz
  146520001.0477479 Hz
  146520001.0896574 Hz
  146520001.1315669 Hz
  146520001.1734765 Hz

Which comes from a PJRC Teensy 3.6 running this code:

double DDSFreq, EpsilonFreq, DDSStepFreq;
double CenterFreq, TestFreq;

... in setup() ...

  DDSFreq = 180.0e6;
  EpsilonFreq = 1.0e-7;
  DDSStepFreq = DDSFreq / (1LL << 32);
  Serial.printf("DDS frequency: %18.7f Hz\n",DDSFreq);
  Serial.printf("      epsilon: %18.7f Hz\n",EpsilonFreq);
  Serial.printf("         step: %18.7f Hz\n\n",DDSStepFreq);

  CenterFreq = 146520000.0;
  TestFreq = CenterFreq;
  Serial.printf("Center frequency: %18.7f Hz\n",CenterFreq);

... in loop() ...

  if (TestFreq < (CenterFreq + 100*EpsilonFreq))
    TestFreq += EpsilonFreq;
  else
    TestFreq += DDSStepFreq;

  Serial.printf(" %18.7f Hz\n",TestFreq);

The IEEE-754 spec says a double floating-point variable carries about 15.9 decimal digits, which agrees with the 9 integer + 7 fraction digits. The highlight lowlight (gray bar) in the first figure shows the slight stumble where adding 1e-7 changes the sum, but not quite enough to affect the displayed fraction.

In round numbers, an increment of 1e-5 would work just fine:

  
  146520000.0000100 Hz
  146520000.0000200 Hz
  146520000.0000300 Hz
  146520000.0000401 Hz
  146520000.0000501 Hz
  146520000.0000601 Hz
  146520000.0000701 Hz
  146520000.0000801 Hz
  146520000.0000901 Hz
  146520000.0001001 Hz
  146520000.0001101 Hz
  146520000.0001202 Hz
  146520000.0001302 Hz
  146520000.0001402 Hz
  146520000.0001502 Hz
  146520000.0001602 Hz
  146520000.0001702 Hz
  146520000.0001802 Hz
  146520000.0001903 Hz
  146520000.0002003 Hz
  146520000.0002103 Hz
  146520000.0002203 Hz
  146520000.0002303 Hz

You’d use the “smallest of all” epsilon in a multiplied increment, perhaps to tick a value based on a knob or some such. Fine-tuning a VHF frequency with millihertz steps probably doesn’t make much practical sense.

The DDS frequency increment works out to 41.9095 mHz, slightly larger than with the Arduino, because it’s fot a cheap DDS eBay module with an AD9851 running a 180 MHz (6 × 30 MHz ) clock.

Raspberry Pi Swap File Size

As part of some protracted flailing around while trying to get GNU Radio running on a Raspberry Pi 3, I discovered Raspbian defaults to a 100 MB swap file, rather than a swap partition, and everything I thought I knew about swap management seems inoperative. The key hint came from some notes on gr-gsm installation.

Tweak the /etc/dphys-swapfile config file to set CONF_SWAPFACTOR=2 for a 2 GB swap file = twice the size of the Pi’s 1 GB memory.

Start it up:

sudo dphys-swapfile swapoff
sudo dphys-swapfile setup
sudo dphys-swapfile swapon

And verify it worked:

cat /proc/meminfo 
MemTotal:         949580 kB
MemFree:          194560 kB
MemAvailable:     594460 kB
Buffers:           85684 kB
Cached:           377276 kB
SwapCached:            0 kB
Active:           600332 kB
Inactive:         104668 kB
Active(anon):     250408 kB
Inactive(anon):    20688 kB
Active(file):     349924 kB
Inactive(file):    83980 kB
Unevictable:           0 kB
Mlocked:               0 kB
SwapTotal:       1918972 kB
SwapFree:        1918972 kB
Dirty:                40 kB
Writeback:             0 kB
AnonPages:        242072 kB
Mapped:           136072 kB
Shmem:             29060 kB
Slab:              33992 kB
SReclaimable:      22104 kB
SUnreclaim:        11888 kB
KernelStack:        1728 kB
PageTables:         3488 kB
NFS_Unstable:          0 kB
Bounce:                0 kB
WritebackTmp:          0 kB
CommitLimit:     2393760 kB
Committed_AS:     947048 kB
VmallocTotal:    1114112 kB
VmallocUsed:           0 kB
VmallocChunk:          0 kB
CmaTotal:           8192 kB
CmaFree:            6796 kB

Then it became possible to continue flailing …

Ham-It-Up Test Signal Source: Simulation

Rather than bestir myself to measure the Test Signal Source on the Ham-It-Up upconverter:

Ham-It-Up Test Signal source - LTSpice schematic
Ham-It-Up Test Signal source – LTSpice schematic

The 74LVC2G14 Schmitt-Trigger Inverter datasheet supplies useful parameters:

Ham-It-Up Test Signal source - LTSpice Schmitt params
Ham-It-Up Test Signal source – LTSpice Schmitt params

All of which come together and produce a waveform (clicky for more dots):

Ham-It-Up Test Signal source - LTSpice waveform
Ham-It-Up Test Signal source – LTSpice waveform

Which suggests the Test Signal ticks along at tens-of-MHz, rather than the tens-of-kHz I expected from the birdies in the filtered 60 kHz preamp response.

Of course, hell hath no fury like that of an unjustified assumption, so actually measuring the waveform would verify the cap value and similar details.

WWVB Reception: 60 kHz Tuning Fork Resonator Filter

Some early morning data from the WWVB preamp with the 60 kHz tuning fork resonator filter in full effect (clicky for more dots):

WWVB - xtal filter - waterfall 5 fps RBW 109.9 Hz Res 0.02 s - gqrx window - 20171116_103542
WWVB – xtal filter – waterfall 5 fps RBW 109.9 Hz Res 0.02 s – gqrx window – 20171116_103542

The dotted line comes from WWVB’s 1 Hz PWM (-ish) modulation: yeah, it works!

The filter cuts out the extraneous RF around the WWVB signal, as compared with a previous waterfall and some truly ugly hash:

WWVB - 24 hr reception AGC - 2017-01-16 to 17 - cropped
WWVB – 24 hr reception AGC – 2017-01-16 to 17 – cropped

Well, not quite all the hash. Enabling the SDR’s hardware AGC and zooming out a bit reveals some strong birdies:

WWVB - xtal filter - waterfall - hardware AGC - 2017-11-16 0612 EST
WWVB – xtal filter – waterfall – hardware AGC – 2017-11-16 0612 EST

The big spike over on the left at 125.000 MHz comes from the Ham-It-Up local oscillator. A series of harmonics starting suspiciously close to 125.032768 kHz produces the one at 125.066 MHz, just to the right of the WWVB signal, which leads me to suspect a rogue RTC in the attic.

There is, in fact, a free running “Test Signal Source” on the Ham-It-Up board:

Ham-It-Up Test Signal source - schematic
Ham-It-Up Test Signal source – schematic

Although I have nary a clue about that bad boy’s frequency, measuring it and cutting the inverter’s power trace / grounding the cap may be in order.

The SDR’s AGC contributes about 30 dB of gain, compresses the hottest signals at -25 dB, and raises those harmonics out of the grass, so it’s not an unalloyed benefit. Manually cranking on 10 dB seems better:

WWVB - xtal filter - waterfall - 10 dB hardware preamp - 2017-11-16 0630 EST
WWVB – xtal filter – waterfall – 10 dB hardware preamp – 2017-11-16 0630 EST

The bump in the middle shows the WWVB preamp’s 2 kHz bandwidth around the 60 kHz filter output, so the receiver isn’t horribly compressed. The carrier rises 30 dB over that lump, in reasonable agreement with the manual measurements over a much narrower bandwidth:

60 kHz Preamp - Bandwidth - 1 Hz steps
60 kHz Preamp – Bandwidth – 1 Hz steps

With all that in mind, a bit of careful tweaking produces a nice picture:

WWVB - xtal filter - waterfall - 10 dB hardware preamp - 2017-11-16 0713 EST
WWVB – xtal filter – waterfall – 10 dB hardware preamp – 2017-11-16 0713 EST

I love it when a plan comes together …

Lightning Talk: Bose Hearphones

The PDF “slides” for a lightning talk I gave at this month’s MHV LUG meeting: MHVLUG Lightning Talk – Bose Hearphones.

You don’t get my patter, but perhaps you’ll get the gist from the pix.

Hearphone - Detail
Hearphone – Detail

Summary: I like ’em a lot, despite the awkward form factor and too-low battery capacity. If you’re more sensitive to appearances than I, wait for V 2.0.

FWIW, I tinkered up a beamforming microphone array with GNU Radio that worked surprisingly well, given a handful of hockey puck mics and a laptop. Bose does it better, of course, but I must revisit that idea.

Arduino Pseudo-Random White Noise Source

A reader (you know who you are!) proposed an interesting project that will involve measuring audio passbands and suggested using white noise to show the entire shape on a spectrum analyzer. He pointed me at the NOISE 1B Noise Generator based on a PIC microcontroller, which led to trying out the same idea on an Arduino.

The first pass used the low bit from the Arduino runtime’s built-in random() function:

Arduino random function bit timing

Well, that’s a tad pokey for audio: 54 μs/bit = 18.5 kHz. Turns out they use an algorithm based on multiplication and division to produce nice-looking numbers, but doing that to 32 bit quantities takes quite a while on an 8 bit microcontroller teleported from the mid 1990s.

The general idea is to send a bit from the end of a linear feedback shift register to an output to produce a randomly switching binary signal. Because successive values involve only shifts and XORs, it should trundle along at a pretty good clip and, indeed, it does:

Arduino Galois shift reg bit timing

I used the Galois optimization, rather than a traditional LFSR, because I only need one random bit and don’t care about the actual sequence of values. In round numbers, it spits out bits an order of magnitude faster at 6 μs/bit = 160 kHz.

For lack of anything smarter, I picked the first set of coefficients from the list of 32 bit maximal-length values at https://users.ece.cmu.edu/~koopman/lfsr/index.html:
0x80000057.

The spectrum looks pretty good, particularly if you’re only interested in the audio range way over on the left side:

Arduino Galois bit spectrum

It’s down 3 dB at 76 kHz, about half the 160 kHz bit flipping pace.

If you were fussy, you’d turn off the 1 ms timer interrupt to remove a slight jitter in the output.

It’s built with an old Arduino Pro Mini wired up to a counterfeit FTDI USB converter. Maybe this is the best thing I can do with it: put it in a box with a few audio filters for various noise colors and be done with it.

It occurs to me I could fire it into the 60 kHz preamp’s snout to measure the response over a fairly broad range while I’m waiting for better RF reception across the continent.

The Arduino source code as a GitHub Gist:

// Quick test for random bit generation timing
// Ed Nisley KE4ZNU - 2017-10-25
// Observe output bit on an oscilloscope
// LFSR info https://en.wikipedia.org/wiki/Linear-feedback_shift_register
// This code uses the Galois implementation
// Coefficients from https://users.ece.cmu.edu/~koopman/lfsr/index.html
#define PIN_RND 13
#include <Entropy.h>
uint32_t Rnd;
byte LowBit;
void setup() {
Serial.begin(57600);
Serial.println("Random bit timing");
Serial.println("Ed Nisley KE4ZNU - 2017-10-25");
Entropy.initialize();
pinMode(PIN_RND,OUTPUT);
uint32_t Seed = Entropy.random();
Serial.print("Seed: ");
Serial.println(Seed,HEX);
randomSeed(Seed);
do {
Rnd = random();
} while (!Rnd); // get nonzero initial value
}
void loop() {
// digitalWrite(PIN_RND,Rnd & 1); // about 55 us/bit
// Rnd = random();
LowBit = Rnd & 1;
digitalWrite(PIN_RND,LowBit); // about 6 us/bit
Rnd >>= 1;
Rnd ^= LowBit ? 0x80000057ul : 0ul;
}
view raw Random_Time.ino hosted with ❤ by GitHub