|
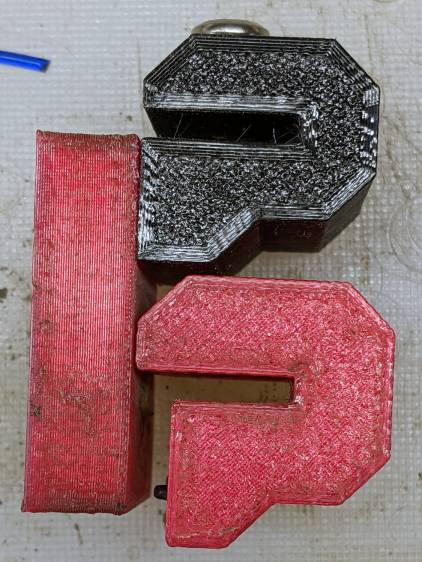
# HAL for Logitech Joggy Thing |
|
|
|
|
|
#################################################### |
|
# Load realtime and userspace modules |
|
|
|
loadusr -W hal_input -KA Dual |
|
|
|
#loadrt logic count=1 personality=0x104 |
|
loadrt constant count=13 |
|
loadrt and2 count=17 |
|
loadrt conv_float_s32 count=1 |
|
loadrt flipflop count=4 |
|
loadrt mux2 count=1 |
|
loadrt mux4 count=5 |
|
loadrt not count=8 |
|
loadrt or2 count=13 |
|
loadrt scale count=7 |
|
loadrt timedelay count=1 |
|
loadrt toggle count=1 |
|
|
|
|
|
#################################################### |
|
# Hook functions into threads |
|
|
|
#addf logic.0 servo-thread |
|
|
|
addf constant.0 servo-thread |
|
addf constant.1 servo-thread |
|
addf constant.2 servo-thread |
|
addf constant.3 servo-thread |
|
addf constant.4 servo-thread |
|
addf constant.5 servo-thread |
|
addf constant.6 servo-thread |
|
addf constant.7 servo-thread |
|
addf constant.8 servo-thread |
|
addf constant.9 servo-thread |
|
addf constant.10 servo-thread |
|
addf constant.11 servo-thread |
|
addf constant.12 servo-thread |
|
addf and2.0 servo-thread |
|
addf and2.1 servo-thread |
|
addf and2.2 servo-thread |
|
addf and2.3 servo-thread |
|
addf and2.4 servo-thread |
|
addf and2.5 servo-thread |
|
addf and2.6 servo-thread |
|
addf and2.7 servo-thread |
|
addf and2.8 servo-thread |
|
addf and2.9 servo-thread |
|
addf and2.10 servo-thread |
|
addf and2.11 servo-thread |
|
addf and2.12 servo-thread |
|
addf and2.13 servo-thread |
|
addf and2.14 servo-thread |
|
addf and2.15 servo-thread |
|
addf and2.16 servo-thread |
|
addf conv-float-s32.0 servo-thread |
|
addf toggle.0 servo-thread |
|
addf flipflop.0 servo-thread |
|
addf flipflop.1 servo-thread |
|
addf flipflop.2 servo-thread |
|
addf flipflop.3 servo-thread |
|
addf timedelay.0 servo-thread |
|
addf or2.0 servo-thread |
|
addf or2.1 servo-thread |
|
addf or2.2 servo-thread |
|
addf or2.3 servo-thread |
|
addf or2.4 servo-thread |
|
addf or2.5 servo-thread |
|
addf or2.6 servo-thread |
|
addf or2.7 servo-thread |
|
addf or2.8 servo-thread |
|
addf or2.9 servo-thread |
|
addf or2.10 servo-thread |
|
addf or2.11 servo-thread |
|
addf or2.12 servo-thread |
|
addf not.0 servo-thread |
|
addf not.1 servo-thread |
|
addf not.2 servo-thread |
|
addf not.3 servo-thread |
|
addf not.4 servo-thread |
|
addf not.5 servo-thread |
|
addf not.6 servo-thread |
|
addf not.7 servo-thread |
|
addf scale.0 servo-thread |
|
addf scale.1 servo-thread |
|
addf scale.2 servo-thread |
|
addf scale.3 servo-thread |
|
addf scale.4 servo-thread |
|
addf scale.5 servo-thread |
|
addf scale.6 servo-thread |
|
addf mux2.0 servo-thread |
|
addf mux4.0 servo-thread |
|
addf mux4.1 servo-thread |
|
addf mux4.2 servo-thread |
|
addf mux4.3 servo-thread |
|
addf mux4.4 servo-thread |
|
|
|
|
|
#################################################### |
|
# Set constants |
|
|
|
setp constant.0.value 0.1 |
|
setp constant.1.value 20 |
|
setp constant.2.value [TRAJ]MAX_LINEAR_VELOCITY |
|
setp constant.3.value [TRAJ]MAX_ANGULAR_VELOCITY |
|
setp constant.4.value 60 |
|
setp constant.5.value 0.50 |
|
setp constant.6.value 1.00 |
|
setp constant.7.value 0.10 |
|
setp constant.8.value 0.10 |
|
setp constant.9.value 0.0 |
|
setp constant.10.value -1.0 |
|
setp constant.11.value 0.020 |
|
setp constant.12.value 0.000 |
|
|
|
|
|
#################################################### |
|
# Connect Modules with nets |
|
|
|
# both rear top buttons for e-stop, bottom right to reset |
|
|
|
net estop-a input.0.btn-top2 and2.0.in0 |
|
net estop-b input.0.btn-base and2.0.in1 |
|
net n_13 and2.0.out halui.estop.activate |
|
|
|
net reset-estop input.0.btn-base2 halui.estop.reset |
|
|
|
# button to start manual mode (probably not needed with 2.8) |
|
|
|
net manual-mode halui.mode.manual input.0.btn-base3 |
|
|
|
net program-resume halui.program.resume input.0.btn-base4 |
|
|
|
net n_14 or2.3.in0 input.0.btn-base5 |
|
net n_15 or2.3.in1 input.0.btn-base6 |
|
net n_16 toggle.0.in or2.3.out |
|
net n_17 conv-float-s32.0.out input.0.abs-x-flat input.0.abs-y-flat input.0.abs-z-flat input.0.abs-rz-flat |
|
net n_18 constant.1.out conv-float-s32.0.in |
|
net n_19 constant.4.out scale.0.gain |
|
net n_20 constant.5.out scale.1.gain |
|
net n_21 constant.6.out scale.2.gain |
|
net n_22 constant.7.out scale.3.gain |
|
net n_23 scale.4.gain constant.8.out |
|
net n_24 constant.0.out halui.axis.jog-deadband |
|
net n_42 or2.7.in0 input.0.abs-x-is-pos |
|
net n_43 or2.7.in1 input.0.abs-x-is-neg |
|
net n_44 or2.8.in0 input.0.abs-y-is-pos |
|
net n_45 or2.8.in1 input.0.abs-y-is-neg |
|
net n_46 or2.9.in0 input.0.abs-z-is-pos |
|
net n_47 or2.9.in1 input.0.abs-z-is-neg |
|
net n_48 or2.10.in0 input.0.abs-rz-is-pos |
|
net n_49 or2.10.in1 input.0.abs-rz-is-neg |
|
net n_51 constant.10.out scale.5.gain scale.6.gain |
|
net n_57 and2.1.out halui.axis.x.minus halui.joint.0.minus |
|
net n_58 and2.2.out halui.axis.x.plus halui.joint.0.plus |
|
net n_59 and2.3.out halui.axis.y.minus halui.joint.1.minus |
|
net n_60 and2.4.out halui.axis.y.plus halui.joint.1.plus |
|
net n_61 and2.5.out halui.axis.z.minus halui.joint.2.minus |
|
net n_62 and2.6.out halui.axis.z.plus halui.joint.2.plus |
|
net n_63 and2.7.out halui.axis.a.minus halui.joint.3.minus |
|
net n_64 and2.8.out halui.axis.a.plus halui.joint.3.plus |
|
|
|
# sort out jog speeds |
|
|
|
net az-buttons-active or2.1.out or2.12.in1 |
|
net xy-buttons-active or2.5.out or2.12.in0 |
|
net any-buttons-active or2.12.out mux4.0.sel0 timedelay.0.in |
|
|
|
net n_54 constant.11.out timedelay.0.on-delay |
|
net n_55 constant.12.out timedelay.0.off-delay |
|
net n_56 timedelay.0.out and2.1.in1 and2.2.in1 and2.3.in1 and2.4.in1 and2.5.in1 and2.6.in1 and2.7.in1 and2.8.in1 |
|
|
|
net jog-crawl toggle.0.out mux4.0.sel1 |
|
net knob-fast scale.1.out mux4.0.in0 scale.3.in |
|
net button-fast scale.2.out mux4.0.in1 scale.4.in |
|
net knob-crawl scale.3.out mux4.0.in2 |
|
net button-crawl scale.4.out mux4.0.in3 |
|
net jog-speed mux4.0.out halui.axis.jog-speed halui.joint.jog-speed |
|
|
|
net angular_motion or2.11.out mux2.0.sel |
|
net n_25 constant.2.out mux2.0.in0 |
|
net n_26 constant.3.out mux2.0.in1 |
|
net vel-per-second mux2.0.out scale.0.in |
|
|
|
net vel-per-minute scale.0.out scale.1.in scale.2.in |
|
|
|
net az-reset and2.14.out flipflop.2.reset flipflop.3.reset |
|
net xy-reset and2.10.out flipflop.0.reset flipflop.1.reset |
|
|
|
# hold jog speed unchanged until machine turns on |
|
# mux S&H from https://wiki.linuxcnc.org/cgi-bin/wiki.pl?Simple_Remote_Pendant |
|
|
|
net jog-mux-enable halui.machine.is-on mux4.1.sel1 mux4.2.sel1 mux4.3.sel1 mux4.4.sel1 |
|
|
|
net axis-disabled-value constant.9.out mux4.1.in2 mux4.2.in2 mux4.3.in2 mux4.4.in2 |
|
|
|
net x-analog mux4.1.out mux4.1.in0 mux4.1.in1 halui.axis.x.analog halui.joint.0.analog |
|
net y-analog mux4.2.out mux4.2.in0 mux4.2.in1 halui.axis.y.analog halui.joint.1.analog |
|
net z-analog mux4.3.out mux4.3.in0 mux4.3.in1 halui.axis.z.analog halui.joint.2.analog |
|
net a-analog mux4.4.out mux4.4.in0 mux4.4.in1 halui.axis.a.analog halui.joint.3.analog |
|
|
|
#net x-amp-enable logic.0.in-00 |
|
#net y-amp-enable logic.0.in-01 |
|
#net z-amp-enable logic.0.in-02 |
|
#net a-amp-enable logic.0.in-03 |
|
|
|
net x-buttons-active or2.4.out or2.5.in0 |
|
net x-disable not.4.out and2.12.in1 |
|
net x-enable flipflop.0.out not.4.in mux4.1.sel0 |
|
net x-hat-minus or2.4.in1 input.0.abs-hat0x-is-neg and2.1.in0 |
|
net x-hat-plus or2.4.in0 input.0.abs-hat0x-is-pos and2.2.in0 |
|
net x-jog input.0.abs-x-position mux4.1.in3 |
|
net x-knob-active or2.7.out not.0.in and2.9.in0 |
|
net x-knob-inactive not.0.out and2.10.in0 and2.11.in0 |
|
net x-set and2.9.out flipflop.0.set |
|
|
|
net y-buttons-active or2.6.out or2.5.in1 |
|
net y-disable not.5.out and2.9.in1 |
|
net y-enable flipflop.1.out not.5.in mux4.2.sel0 |
|
net y-hat-minus or2.6.in1 input.0.abs-hat0y-is-neg and2.4.in0 |
|
net y-hat-plus or2.6.in0 input.0.abs-hat0y-is-pos and2.3.in0 |
|
net y-jog input.0.abs-y-position scale.5.in |
|
net y-jog-reversed scale.5.out mux4.2.in3 |
|
net y-knob-active not.1.in or2.8.out and2.11.in1 |
|
net y-knob-inactive not.1.out and2.10.in1 |
|
net y-select and2.12.in0 and2.11.out |
|
net y-set flipflop.1.set and2.12.out |
|
|
|
net z-button-minus or2.2.in0 input.0.btn-thumb and2.5.in0 |
|
net z-button-plus or2.2.in1 input.0.btn-top and2.6.in0 |
|
net z-buttons-active or2.2.out or2.1.in1 |
|
net z-disable not.6.out and2.16.in1 |
|
net z-enable not.6.in flipflop.2.out mux4.3.sel0 |
|
net z-jog input.0.abs-rz-position scale.6.in |
|
net z-jog-reversed scale.6.out mux4.3.in3 |
|
net z-knob-active not.3.in or2.10.out and2.13.in0 |
|
net z-knob-inactive not.3.out and2.15.in0 and2.14.in0 |
|
net z-set and2.13.out flipflop.2.set |
|
|
|
net a-button-minus or2.0.in0 input.0.btn-joystick and2.7.in0 |
|
net a-button-plus or2.0.in1 input.0.btn-thumb2 and2.8.in0 |
|
net a-buttons-active or2.0.out or2.1.in0 or2.11.in1 |
|
net a-disable not.7.out and2.13.in1 |
|
net a-enable or2.11.in0 flipflop.3.out not.7.in mux4.4.sel0 |
|
net a-jog input.0.abs-z-position mux4.4.in3 |
|
net a-knob-active or2.9.out not.2.in and2.15.in1 |
|
net a-knob-inactive not.2.out and2.14.in1 |
|
net a-select and2.16.in0 and2.15.out |
|
net a-set flipflop.3.set and2.16.out |