Ed Nisley's Blog: Shop notes, electronics, firmware, machinery, 3D printing, laser cuttery, and curiosities. Contents: 100% human thinking, 0% AI slop.
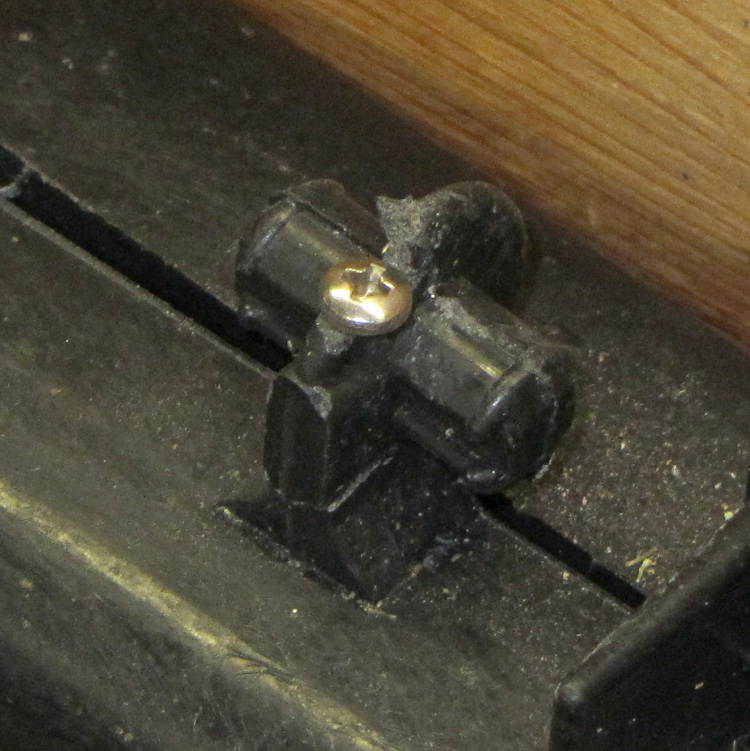
While extricating the sawhorses from the garage, one of the bright yellow cap strips fell off. Whether by coincidence or not, it was the same one I’d previously repaired after sawing completely through the poor thing, but this time the failure came from what’s called inherent vice in the molded bracket-and-pin feature that holds the cap in place:
Fractured sawhorse top pin
I filed a flat on the top of the bracket, drilled a 4-40 clearance hole, and then held everything in place while drilling a 4-40 tapping hole into the sawhorse. There was just enough plastic to make all that work, at least for the not very strenuous conditions it should experience around here:
Fractured sawhorse top pin – with screw
While trying to reassemble the cap, I discovered why the bracket broke. The yellow cap has a bulkhead with an opening for the pin, plus a solid bulkhead that butts against the hinge along the top of the sawhorse. The bulkheads lie too close together: you simply cannot get the opening over the pin on this end with the cap parallel to the top of the sawhorse, which you must do in order to get the pin in the corresponding hole on that end.
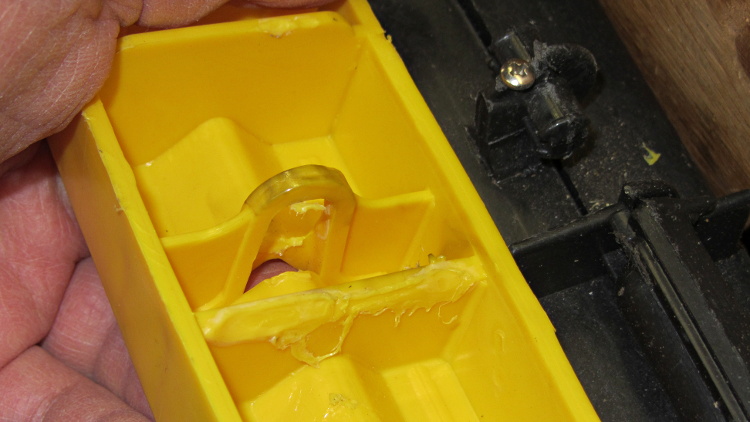
Evidently they had the same problem at the factory and “solved” it by melting the bulkhead with a hot blade:
Sawhorse top cover – factory bodge
That didn’t really help me, but I carved off a few more slices to weaken the solid bulkhead enough to bend it around the hinge. I think the strain involved in the original assembly, plus what happened when I had to take it apart to fix the sawed-off end, weakened the bracket enough to snap off at some point over the winter.
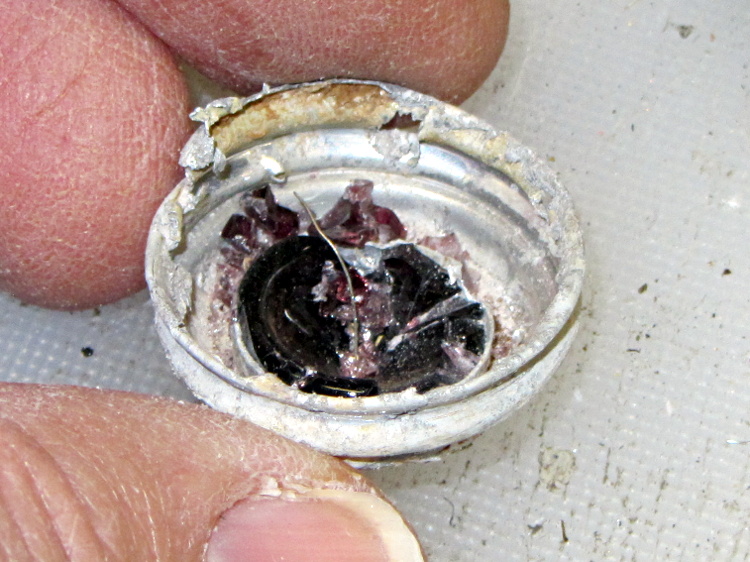
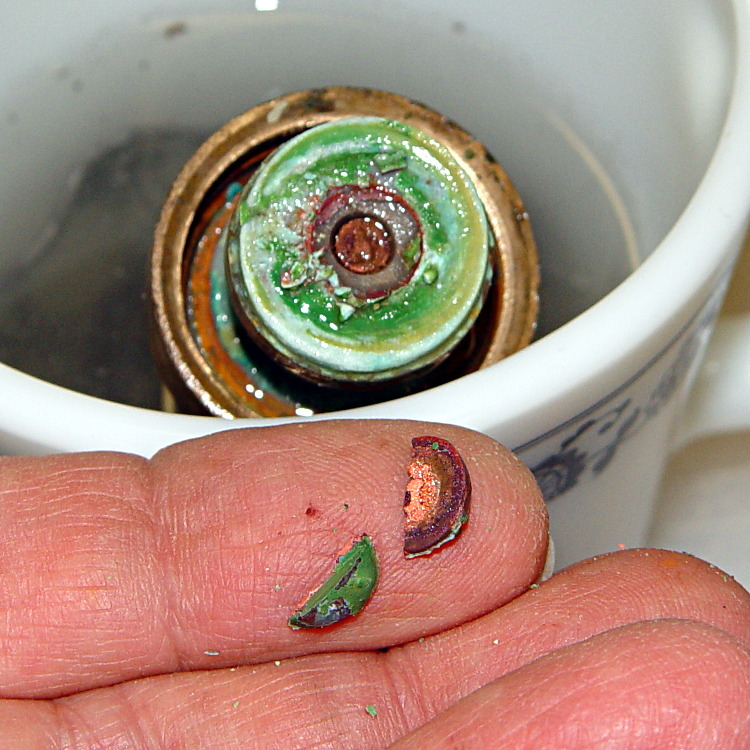
Mad Phil asked me to replace the bulb in a lamp along the walkway to their garage, which turned into a bit of a circus: the bulb had shattered, leaving only the base in the socket. After clearing away the rubble, I was confronted with this:
Corroded lamp socket
I removed the entire lamp housing, laid it out on my workbench, and eventually resorted to jamming needle-nose pliers into the base and forcibly unscrewing it. That worked:
Corroded lamp base
Fortunately, the aluminum lamp base had corroded against the brass socket, not the other way around, so buffing the socket with a brass wheel in a Dremel handset and polishing the base contacts brought it back to life.
Mary has been listening to library books while she quilts and sews; some of the older books actually come on cassette tapeand our tape players still work. The newer books come on CDs, but it seems the library hasn’t gotten into audio e-reader files yet. She actually prefers tapes, because she can simply stop the tape and restart it from the same place without any further intervention.
In any event, a recent tape stalled about 1/4 of the way through and refused to either rewind or fast forward.
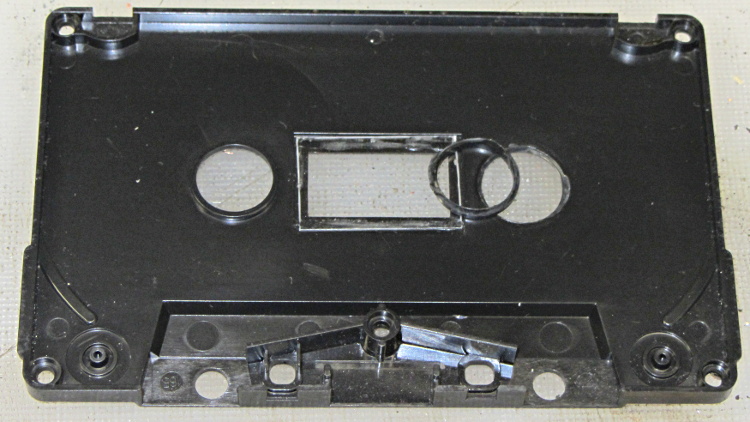
Rather than returning it to the library, which I’m certain all previous borrowers did, I took the cassette apart. This is no big deal, I’ve done it many times before cassettes fell into the dustbin of history.
That made the failure quite obvious:
Cassette tape case – detached bushing
The bushing around one of the hub openings had completely fractured and come loose, jamming the tape hub in place.
A ring of solvent adhesive around both parts, a few minutes of clamping, and it’s all good again.
Don’t tell the library; they get tetchy about DIY repairs…
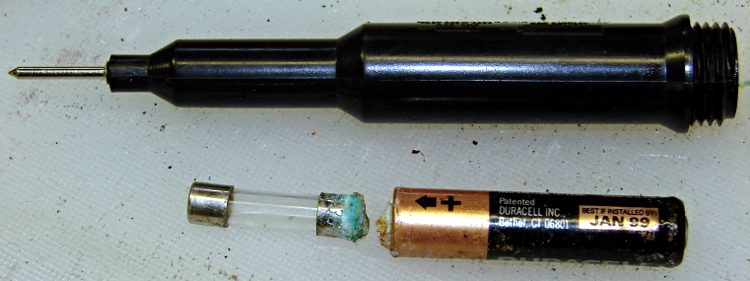
Judging from the much-folded Dayton 4X221 Snap-Around Ammeter Operating Instructions (a scanned copy that I folded around the original and tucked inside the case), the ammeter dates back to 1979, which says Mad Phil probably used it in the early 80s, when he was repairing AV equipment. Unlike most vintage clamp-on ammeters, this one can also measure voltage and resistance:
Dayton 4X221 Snap-Around Ammeter – Specifications
The resistance function requires a single AAA alkaline cell in the bulky probe, so this should come as no surprise:
The probe housing contains a 1 A fast-blow fuse, which blocked the corrosion from getting deeper into the probe tip:
Dayton 4X221 Resistance Probe – battery and fuse
The AAA cell was “Best if installed by Jan 1999”, which I’m sure was true. Somehow, you never recognize the last time you use something; I suppose old instruments get used to not seeing the light over the workbench after a while.
Anyhow.
Douse the corrosion with vinegar to neutralize the potassium hydroxide, rinse out the probe body, polish the top of the fuse, buff up the battery contact on the test lead, and it’s all good again.
That comment suggested scroll ring failures on a Kensington Expert Mouse (it’s a trackball) might occur when the apertures become misaligned from the IR emitter-detector pair, although later results were equivocal. I tore apart a failed unit to see what the alignment looked like for a known-bad scroll ring.
The right side view shows the receiver roughly centered in an aperture:
Kensington Expert Mouse – Scroll Ring aperture – right
The left side view shows that the ring is almost flush against the circuit board, with the isolating cutout just in front, and it’s not obvious how to lower it any further:
Kensington Expert Mouse – Scroll Ring aperture – left
So I think there’s no way to realign this one, other than to raise the aperture ring a bit, but that doesn’t seem like it would make any difference: the detector already has a good view of the emitter.
If your trackball has a failed scroll ring, tweaking the aperture ring’s alignment certainly can’t hurt: try it and report back.
If you don’t expect a miracle, you probably won’t be disappointed, alas.
Hi, I wanted to leave a comment for your page here: [this url]
I’ve got an expert mouse trackball that was having intermittent scroll ring problems, then finally quit working altogether. Dismantled it easily using the instructions on this site.
Cleaned it and it still wasn’t working. Tried changing the alignment of the IR emitter/detectors and it still wasn’t working. Then we kept on fiddling with the alignment and voilà.
Like others have said, the alignment seems to be SUPER sensitive. So if any others are reading this with the same problem, keep persevering.
Thanks to everyone who has posted to help find solutions!
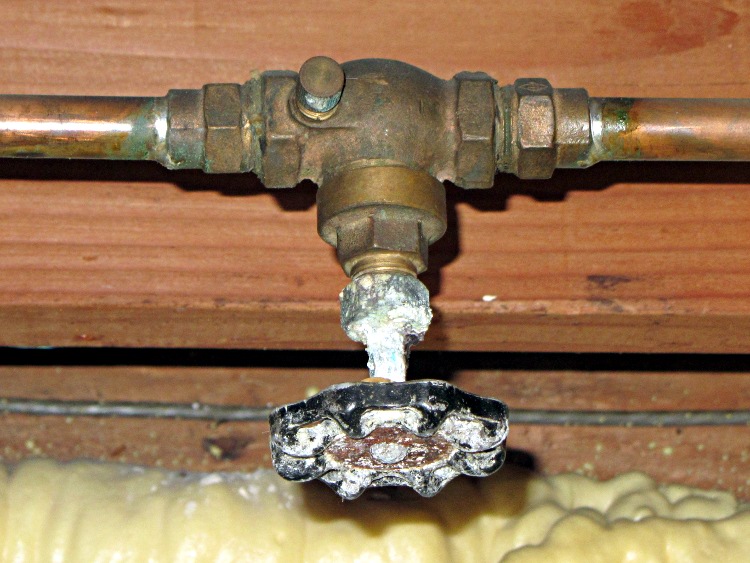
After replacing the hose valve in the garage, I promised to repair its leaky upstream shutoff valve:
Corroded gate valve
I shut off the hard water supply, dismantled the valve, and let everything soak in a cup of white vinegar for a few hours. The fizzing was a wonder to behold and the parts came out much cleaner without any effort at all.
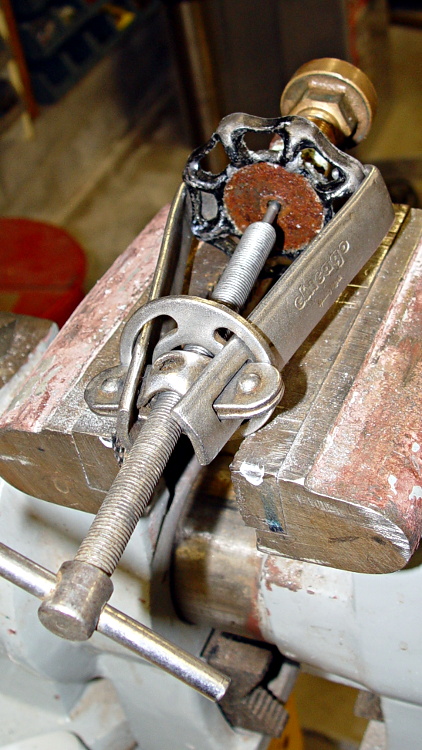
Removing the handle required the handle puller and considerable rapping on the corroded-in-place handle at the tapered shaft. That reddish disk used to be a tin-plated steel data plate, but now it’s just a corroded sheet:
Shutoff valve – handle puller
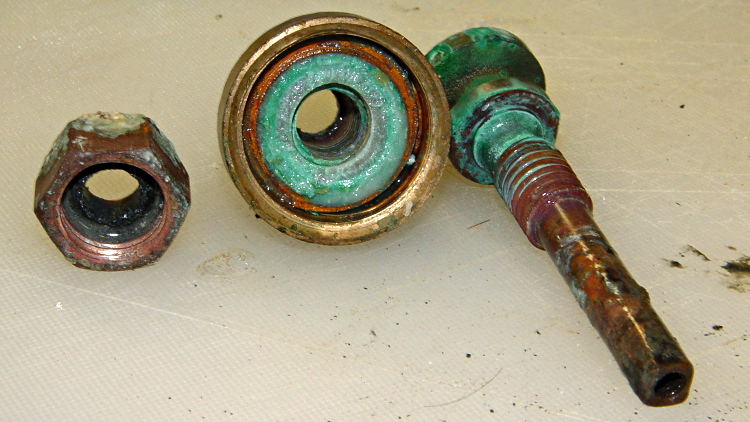
Because a shutoff valve will be open nearly all the time, it has a large washer that seals the cap and valve stem in addition to the usual stem packing:
Shutoff valve – full-open washer
Attempting to remove the screw from the stem broke the head into two pieces:
Shutoff valve – broken washer screw
Worse, the screw shaft was a soft mass of corroded brass, so I had to drill it out and chase the threads with a 10-32 tap. I replaced the full-open washer with a slightly smaller one from the supply box, which required drilling out the hole to suit, adding some packing string under the main cap, and replacing the packing around the stem. But, eventually, putting everything back together works fine with no leaks at all.
This turned out to be slightly less horrible than I expected, which probably doesn’t justify procrastinating until the evening before the coldest night of the season.
To that end, here’s a checklist for creating a new Eagle device corresponding to a HAL module.
Remember: although this process has a tremendous number of moving parts, you do it exactly once when you need a device that doesn’t already exist. After that, you just click to add an existing device to your schematic, wire it up, then the tedious write-only HAL overhead happens automagically.
Cross-check the documentation with the actual component code!
The man page lists the names, pins, parameters, and suchlike, but may have typos. This isn’t a criticism, it’s a fact of life.
Before investing a ton o’ time creating an Eagle device, load the module and find out what’s really there:
halrun
halcmd: loadrt conv_float_s32
halcmd: show all
Loaded HAL Components:
ID      Type  Name                                      PID   State
     4  RT    conv_float_s32                                  ready
     3  User  halcmd2395                                 2395 ready

Component Pins:
Owner   Type  Dir         Value  Name
     4  float IN              0  conv-float-s32.0.in
     4  s32   OUT             0  conv-float-s32.0.out
     4  bit   OUT         FALSE  conv-float-s32.0.out-of-range

... snippage ...

Parameters:
Owner   Type  Dir         Value  Name
     4  bit   RW          FALSE  conv-float-s32.0.clamp
     4  s32   RO              0  conv-float-s32.0.time
     4  s32   RW              0  conv-float-s32.0.tmax

... snippage ...

Exported Functions:
Owner   CodeAddr  Arg       FP   Users  Name
 00004  fc0a9000  fc0630b8  YES      0   conv-float-s32.0
... snippage ...
Achtung!
The module name uses underscores as separators: loadrt conv_float_s32
The function name uses h-y-p-h-e-n-s as separators: conv-float-s32.0
Unlike in the Linux kernel, the two characters are not equivalent
Add the HAL Module to the Conversion Script
The hal-write.ulp script contains a table of all the module names, so you must update the script in parallel with the hal-config.lbr Eagle library.
However, you can create an Eagle device that is not a HAL module by omitting it from the script. In that case, the Eagle device name will become part of the net names that define and interconnect the pins, but the script will not create a statement to load a module. For example, the hal_input userspace program creates a set of pins for each input device that start with input.n, but there’s no corresponding HAL module. I’ll put up an example of all this in a bit.
Create a Schematic Symbol
The name of the symbol is not critical: CONVERT.sym
use either dashes or hyphens as you prefer
The >NAME string must be on layer 95-Names
No need for a >VALUE string, but put it on layer 96-Values if present
HAL pins become symbol pins
Use the HAL pin name, with hyphens
Set Visibility to Pin
Set Direction to in / out / io to match the HAL description
Set Function to None to indicate an ordinary net connection
Verify the pins against the HAL device!
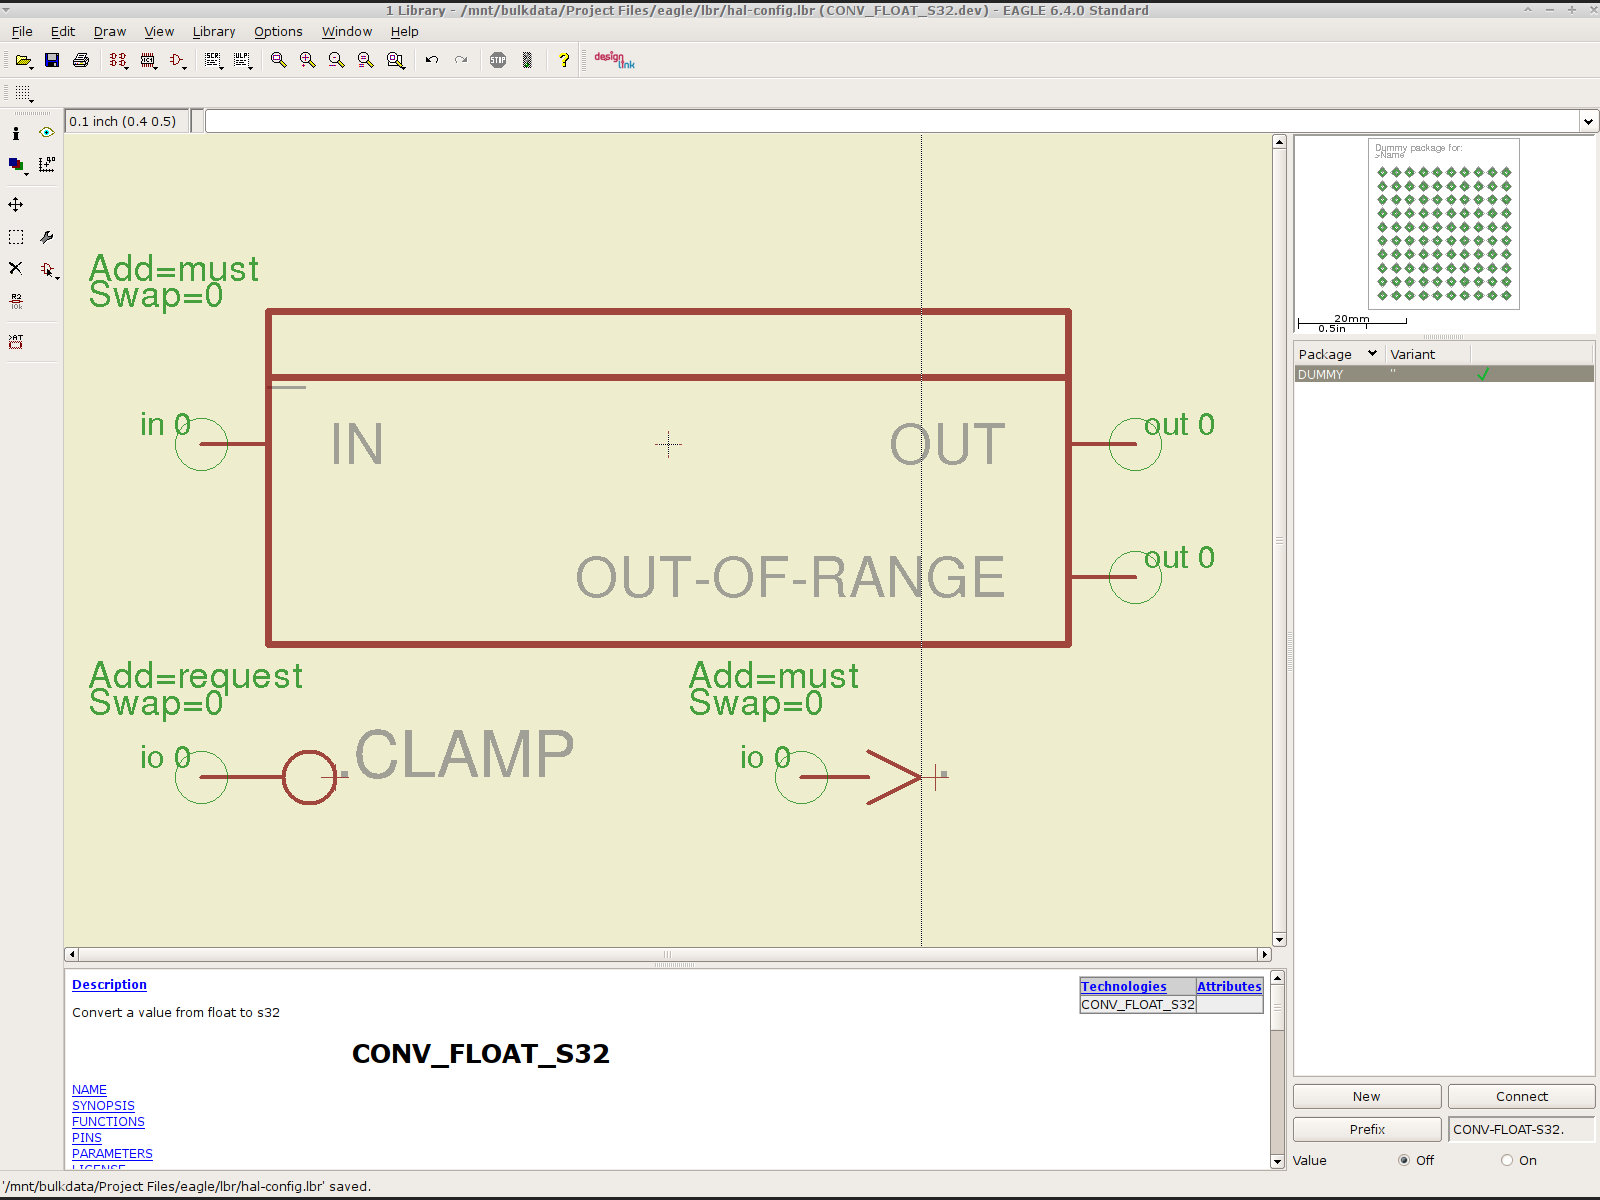
Create a HAL Schematic Device
The new device name must match the HAL module name, with underscores, as entered in the conversion script table
CONV_FLOAT_S32.dev
Set the Prefix to the HAL function name, plus a trailing period, with hyphens
CONV-FLOAT-S32.
Create the Description using copy-and-paste from the HTML source: use the man page in the LinuxCNC doc
Ctrl-U in Firefox reveals the HTML source, Ctrl-A and Ctrl-C, flip windows, then Ctrl-V
Delete all the boilerplate at the top, leave the centered Title, ditch the reference links
Add the symbol you created earlier or reuse an existing symbol
Set the symbol NAME to a single underscore: _
Change the Add level to must
Add a PIN_FUNCTION symbol to the device
Change the symbol name from G$1 (or whatever) to a single period: .
Change the Add Level to must
Add PIN_PARAMETER symbols as needed
Change the symbol name from G$1 (or whatever) to the parameter name preceded by a single period: .CLAMP
Change the Add Level to request
Change the Direction as needed
Add the DUMMY physical package, then connect all the pins to pads
Create a non-HAL Schematic Device
The new device name may be anything that’s not in the conversion script table
The Prefix must match the desired pin names, plus a trailing period. For hal_input pins:
INPUT.
Create the Description as above
Add the symbol you created earlier
Set the symbol NAME to a single underscore: _
Change the Add level to must
Do not add a PIN_FUNCTION symbol, because it has no corresponding module
Add PIN_PARAMETER symbols as needed
Change the symbol name from G$1 (or whatever) to the parameter name preceded by a single period: .CLAMP
Change the Add Level to request
Change the Direction as needed
Add the DUMMY physical package, then connect all the pins to pads
Devices may have multiple Symbols, with different Add Level options; can seems appropriate. As nearly as I can tell, you must name each Symbol as a suffix to the full name to differentiate them within the Device; I use a hyphen before the suffix, so that -KEYS generates INPUT.0-KEYS. Those suffixes don’t appear elsewhere in the generated HAL configuration file.
Save the library, update it in the schematic editor (Library → Update ...), and you’re set.
Although it’s tempting, do not include a version number in the library file name, because Eagle stores the file name inside the schematic file along with the devices from that file. As a result, when you bump the library version number and use devices from the new library file, the schematic depends on both library files and there’s no way within Eagle to migrate devices from one library to the other; you must delete the existing devices from the schematic and re-place them from the new library. Or you can do like I did: hand-edit the XML fields inside the library file.
Eagle HAL Device
You’ll almost certainly drive this procedure off the rails, so let me know what I’ve screwed up. It does, in fact, work wonderfully well and, as far as I’m concerned, makes HAL usable, if only because HAL is a write-only language to start with and now you need not read it to modify it.