The Smell of Molten Projects in the Morning

Ed Nisley's Blog: Shop notes, electronics, firmware, machinery, 3D printing, laser cuttery, and curiosities. Contents: 100% human thinking, 0% AI slop.

Tag: M2

Using and tweaking a Makergear M2 3D printer

  • Overstuffed First Solid Infill Layer Debugging: FAIL

    The first pass at the lip balm holders suffered from a grossly overstuffed first solid infill layer:

    Overfilled layer 2
    Overfilled layer 2

    The skirt measured the usual scant 0.25 mm and was level all around, so the platform alignment and home position were just fine. That’s rarely a problem, but it’s good to verify before proceeding.

    Previewing the G-Code didn’t show any problems; all the second-layer threads looked just fine. With that said, I did create an issue for gcode.ws pointing out that the profusion of thread colors wasn’t useful and suggesting some alternative methods.

    The first layer requires 15-ish minutes to print, so I decided to reproduce the problem in a solid calibration box sliced with the same settings as the holder:

    Calibration boxes - solid
    Calibration boxes – solid

    That still life represents these tests:

    • Solid 3 mm tall box, 20 mm square
    • 30 mm square
    • 25 mm square, with text in Arial
    • Again, because I can’t believe it hasn’t failed yet
    • With rectilinear first layer
    • Back to Hilbert with text in Zapf Chancery

    All of those printed without trouble; every layer came out exactly as it should. In particular, the first solid infill layer atop the Hilbert Curve bottom layer had the precisely filled threads I’m used to seeing, each one butted against its neighbors without any excess plastic.

    I modified the OpenSCAD source code to extract a 20x20x3 sample block from the lip balm holder model, including a snippet of the actual text. That worked fine.

    Expanding the sample produced the irregular chunk in the front row, also 3 mm tall, including a section of the lilypads surrounding the tubes. Another successful print!

    I’ll leave to your imagination a pile of half a dozen first layers topped with small sections of grossly overstuffed solid infill, printed in between the successful blocks and as a result of the variations mentioned below, with identical text and slicer settings. The test blocks work fine, but the actual holder and sections from it do not.

    Having eliminated the obvious causes, it was time for more drastic measures.

    I build OpenSCAD and Slic3r from the latest source files on GitHub. Nothing in this leads me to suspect the OpenSCAD models and using the most recent stable Slic3r version produced the same results.

    Rebuilding the Slic3r configuration files from scratch produced the same results.

    That’s where I gave up, set the 3D Honeycomb infill to start with Layer 2, and completed the mission.

    Lacking any better ideas, I decided to throw all the balls in the air at once …

  • Improved Lipstick and Lip Balm Holder With Text

    For reasons that aren’t relevant here, Mary asked me to make four sets of improved lipstick / lip balm / sunscreen holders with five smaller tubes plus the central one and an inscription on the bottom. I ran off one with the last of the cyan PETG and the other three in natural PETG:

    Improved Lipstick Holder - on platform
    Improved Lipstick Holder – on platform

    I embossed the text into the bottom three layers. The tiny spots of detached infill for lowercase letters like a didn’t adhere to the platform, mostly because the retraction settings that work well for larger areas don’t push enough plastic out to bond with the platform before retracting and moving away.

    The bridging layer over the text shows Slic3r doing the best it can (clicky for more far more dots). Laying a uniform patch over all the letters in one shot would work better, but I don’t know how you’d define an algorithm that specifies when such a situation occurs:

    Lip Balm Holder - text bridge layer - Slic3r preview
    Lip Balm Holder – text bridge layer – Slic3r preview

    The solid infill layer directly over the Hilbert Curve bottom layer came out grossly severely excessively overstuffed, to the extent that the accumulation reduced the flow of molten plastic and caused the filament drive to strip:

    Overfilled layer 2
    Overfilled layer 2

    Previewing the G-Code show nothing out of the ordinary and, after considerable flailing around, I finally set Slic3r to begin the 3D Honeycomb infill directly atop the Hilbert Curve bottom layer. That provided enough open space to complete the mission, but more debugging was in order.

    The OpenSCAD source code as a GitHub gist:

    // Lipstick and Balm Tube Holder
    // Ed Nisley KE4ZNU – February 2016
    //- Extrusion parameters – must match reality!
    ThreadThick = 0.25;
    ThreadWidth = 0.40;
    function IntegerMultiple(Size,Unit) = Unit * ceil(Size / Unit);
    Protrusion = 0.1;
    HoleWindage = 0.2;
    //——
    // Dimensions
    RawDia = [27,18,16,18,16,18]; // actual tube diameters in desired order, center = largest first
    NumTubes = len(RawDia);
    Clearance = 2.0;
    TubeDia = [for (i=[0:NumTubes-1]) (RawDia[i] + Clearance)]; // actual tube diameters
    TubeRad = TubeDia / 2;
    echo(str("NumTubes: ",NumTubes));
    Wall = 2.0;
    BaseThick = 2.0;
    BaseFactor = 2.0;
    NumSides = 12*4;
    // per-tube info, first element forced to 0 to make entries match RawDia vector indexes
    Radius = [0, for (i=[1:NumTubes-1]) (TubeRad[0] + TubeRad[i] + Wall)]; // Tube[i] distance to center point
    echo(str("Radius: ",Radius));
    CtrToCtr = [0, for (i=[1:NumTubes-2]) (TubeRad[i] + TubeRad[i+1] + Wall)]; // Tube[i] distance to Tube[i+1]
    echo(str("CtrToCtr: ",CtrToCtr));
    Angle = [0, for (i=[1:NumTubes-2]) acos((pow(Radius[i],2) + pow(Radius[i+1],2) – pow(CtrToCtr[i],2)) / (2 * Radius[i] * Radius[i+1]))];
    echo(str("Angle: ",Angle));
    TotalAngle = sumv(Angle,len(Angle)-1);
    echo(str("TotalAngle: ",TotalAngle));
    //———————-
    // Useful routines
    // vector sum cribbed from doc
    function sumv(v,i,s=0) = (i==s ? v[i] : v[i] + sumv(v,i-1,s));
    //———————-
    //- Build it
    difference() {
    union() {
    for (i=[0:NumTubes-1])
    rotate(90 – TotalAngle/2 + sumv(Angle, (i>0) ? (i-1) : 0))
    translate([Radius[i],0,0]) {
    resize([0,0,2*BaseThick]) // bases
    difference() {
    sphere(r=BaseFactor*TubeRad[i],$fn=NumSides);
    translate([0,0,-BaseFactor*TubeDia[i]])
    cube(2*BaseFactor*TubeDia[i],center=true);
    }
    difference() { // tubes
    cylinder(r=TubeRad[i] + Wall,h=1.5*TubeDia[i] + BaseThick,$fn=NumSides);
    cylinder(d=TubeDia[i],h=1.5*TubeDia[i] + BaseThick + Protrusion,$fn=NumSides);
    }
    }
    for (i=[1:NumTubes-2]) // gap plugs
    rotate(90 – TotalAngle/2 + sumv(Angle,i-1) + (Angle[i])/2)
    translate([(TubeRad[0] + Wall),0,0])
    cylinder(r=2*Wall,h=1.5*min(TubeDia[i],TubeDia[i+1]) + BaseThick,$fn=3);
    }
    translate([0,0,-Protrusion]) // text
    mirror([1,0,0])
    linear_extrude(height=3*ThreadThick + Protrusion) {
    translate([0,25,0])
    text(text="Linda",size=7,spacing=1.05,font="Arial:style=Bold Italic",halign="center");
    translate([0,15,0])
    text(text="FDQ ExComm",size=5,spacing=1.05,font="Arial:style=Regular",halign="center");
    translate([0,7,0])
    text(text="2014 – 2016",size=5,spacing=1.05,font="Arial:style=Regular",halign="center");
    translate([0,-3,0])
    text(text="Thank you!",size=6,spacing=1.05,font="Arial:style=Regular",halign="center");
    translate([0,-15,0])
    text(text="Mary Nisley",size=7,spacing=1.10,font="ITC Zapf Chancery:style=Medium Italic",halign="center");
    }
    }
  • Refrigerator Drawer Strut Tab: Now With Inserts

    A spate of cleaning put the little tab that fixed the never-sufficiently-to-be-damned strut supporting the lower refrigerator drawers into my hands:

    Refrigerator Drawer Strut - new tab in place
    Refrigerator Drawer Strut – new tab in place

    I discovered that 4-40 knurled inserts perfectly match the available space, so I drilled the 3D printed holes out to 11/16 inch (the OD of the smaller knurls) and rammed the inserts into place:

    Refrigerator Drawer Strut Tab - knurled inserts
    Refrigerator Drawer Strut Tab – knurled inserts

    No epoxy, no heat, nothing but a friction fit.

    Looks much better, ought to work just as well, and will definitely outlive the refrigerator; if I never take that thing apart again, it’ll be fine with me.

  • Filament Drive Gear Calculations

    Some equations relevant to indentations produced by a filament drive gear:

    Filament Drive Gear Indentations
    Filament Drive Gear Indentations

    For reference, the smaller indentations are 0.25 mm deep and 1.3 mm across the bottom.

    Variables:

    • d = filament (a.k.a. circle) diameter
    • r = filament radius
    • m = chord depth (inward from circle)
    • c = chord length
    • Θ = angle across chord from circle center, degrees
    • A = chord area (a.k.a. indentation face area)

    The length of the chord at the bottom of the indentation, perpendicular to the filament axis:

    c = 2 sqrt(2mr - m2)

    The chord angle:

    Θ = 2 arcsin(c/2r)

    The chord area, which would be the indentation face if it were perpendicular, which it isn’t:

    A = (r2 / 2) x ((πΘ / 180) - sin(Θ))

    If you measured Θ in radians, the π/180 factor would Go Away.

    Some doodles showing that reducing the indentation from 0.25 to 0.15 reduces the chord area by a factor of two:

    Filament Drive Gear - indentation doodles
    Filament Drive Gear – indentation doodles

    The implication being that you must maintain fairly constant force on the drive bearing against the filament to prevent stripping the indentations.

  • M2 Platform Alignment Check

    Five single-thread thinwall boxes scattered across the platform had an average height of  2.99 mm, with a range of +0.04 mm, -0.06 mm:

    Thinwall open box - 1 thread walls
    Thinwall open box – 1 thread walls

    The wall widths work out to 0.39 mm, with a range of +0.2 mm, -0.01 mm.

    Close enough, given that I can’t recall the last time I tweaked the platform height. I update the filament diameter setting in Slic3r every now & again as the printer gradually works through the spool, but, with one exception, this cyan PETG has been quite consistent and my tweaks didn’t really amount to much.

    Frankly, given that any of the measurements may be off by ±0.02, the best I can hope for is an overall warm fuzzy feeling. When the printed results stop looking good, these results will (probably) provide some indication of whatever just changed.

    The raw measurement data, such as it is:

    Thinwall box measurements - 2016-04-01
    Thinwall box measurements – 2016-04-01
  • Thinwall and Solid Boxes for 3D Printer Calibration

    A revision to my Fundamental Calibration Object adds some variations …

    The classic thinwall open box:

    Calibration Box - open - 1 thread - solid model
    Calibration Box – open – 1 thread – solid model

    A solid box:

    Calibration Box - solid - solid model
    Calibration Box – solid – solid model

    A solid box with text embossed on the lower surface:

    Calibration Box - solid text - solid model
    Calibration Box – solid text – solid model

    You must consider how the slicer settings interact with the solid model parameters, particularly now that slicers can produce adaptive infill for small gaps between perimeter threads. Previewing the slicer’s output will show you what assumptions it makes and prevent surprising results out there on the platform.

    A single-thread wall comes out properly:

    Thinwall open box - 0.40 wall - Slic3r
    Thinwall open box – 0.40 wall – Slic3r

    The results look just like the preview, with firmly bonded layers and no fluff:

    Thinwall open box - 1 thread walls
    Thinwall open box – 1 thread walls

    This wall should be two threads wide, but Slic3r inserts very very thin infill thread:

    Thinwall open box - 0.80 wall - Slic3r
    Thinwall open box – 0.80 wall – Slic3r

    I think that’s a result of forcing the two perimeter threads to sit with their centers exactly one thread width apart, making the (nominal, ideal) inner walls tangent to each other.  Setting the wall to 1.9 mm eliminates the hair-fine infill thread, at the cost of producing an object 0.1 mm smaller than it looks.

    Unfortunately, that fine infill doesn’t produce enough plastic flow for a continuous thread. The PET I’m using accumulates on the nozzle until enough of a glob forms to stick on the previous layer, but hair-fine strands connect those globs to each other and the nozzle, producing awful results:

    Thinwall open box - 2 thread walls
    Thinwall open box – 2 thread walls

    A triple-thread wall allows Slic3r to produce a fatter infill thread that works the way you’d expect:

    Thinwall open box - 1.20 wall - Slic3r
    Thinwall open box – 1.20 wall – Slic3r

    The threads bond firmly in all directions:

    Thinwall open box - 3 thread walls
    Thinwall open box – 3 thread walls

    It’s not obvious from that picture, but the bond between successive infill threads produces a glass-clear vertical plastic slab that relays images from the bottom to the top. The perimeter threads are also firmly bonded, albeit with not quite the same optical quality.

    To use these boxes:

    • Set the OpenSCAD extrusion parameters to match whatever the slicer will use
    • Set the wall height and thickness to whatever you like
    • Compile-and-render, export the result as a solid model in STL / AMF / whatever
    • Feed the solid model into your favorite slicer and save the G-Code
    • Feed the G-Code into your printer, watch it magically create a little box
    • Measure the printed results and compare with the ideal settings
    • Change the slicing configuration and iterate until satisfied

    Verify these measurements before adjusting anything else:

    • Filament diameter: actual vs. nominal will be different
    • Extruder steps per millimeter: mark 100 mm on filament, extrude 100 mm, compare

    Then you can verify / adjust some finicky settings:

    • Extrusion multiplier: does the actual single wall width match slicer’s nominal value?
    • Infill density: 100% infill should perfectly fill the solid box
    • Initial Z offset: does actual height match the model setting?
    • Platform alignment: print five boxes at platform center + corners, verify heights
    • First layer adhesion: if these don’t stick, the platform has weak adhesion
    • Minimum time per layer: if the walls slump, you’re printing too fast
    • Extrusion temperature: good bonding and no delamination along any axis

    The OpenSCAD source code as a GitHub gist:

    // Simple calibration boxes
    // Thin wall open box – verify Extrusion Multiplier
    // Solid box – verify infill settings
    // Ed Nisley – KE4ZNU
    // https://softsolder.com/
    Layout = "Open"; // Open Solid
    Texting = "Text!"; // text message on solid box or empty string to suppress
    //——-
    //- Extrusion parameters must match reality!
    ThreadThick = 0.25;
    ThreadWidth = 0.40;
    Protrusion = 0.1; // make holes end cleanly
    function IntegerMultiple(Size,Unit) = Unit * ceil(Size / Unit);
    //——-
    // Dimensions
    WallThick = 1.0 * ThreadWidth;
    echo(str("Wall thickness: ",WallThick));
    BoxSize = 20.0;
    echo(str("Overall size: ",BoxSize));
    NominalHeight = 3.0;
    echo(str("Nominal height: ",NominalHeight));
    Height = IntegerMultiple(NominalHeight,ThreadThick);
    echo(str("Actual height: ",Height));
    Rotation = 0; // 45 to exercise X and Y axis motors at same time
    CornerRadius = 2.0;
    CornerSides = 8*4;
    //——–
    module Solid() {
    difference() {
    hull()
    for (i=[-1,1], j=[-1,1])
    translate([i*(BoxSize – 2*CornerRadius)/2,j*(BoxSize – 2*CornerRadius)/2,0])
    cylinder(r=CornerRadius,h=Height,$fn=CornerSides);
    if (len(Texting))
    translate([0,0,-Protrusion/2])
    linear_extrude(height=3*ThreadThick + Protrusion)
    mirror([1,0,0])
    text(text=Texting,size=6,spacing=1.05,font="ITC Zapf Chancery:style=Italic",halign="center",valign="center");
    }
    }
    module Thinwall() {
    difference() {
    Solid();
    hull()
    for (i=[-1,1], j=[-1,1])
    translate([i*(BoxSize – 2*CornerRadius)/2,j*(BoxSize – 2*CornerRadius)/2,-Protrusion])
    cylinder(r=(CornerRadius – WallThick),h=(Height + 2*Protrusion),$fn=CornerSides);
    }
    }
    //——-
    rotate(Rotation)
    if (Layout == "Open")
    Thinwall();
    else
    Solid();
  • Square Chain Mail Armor: Back From The Abyss

    After a Slic3r commit fixed the bridging regression, I ran off chain mail patches to celebrate:

    Square Chain Mail Armor - 3.3 3.5 4.0 thread bars
    Square Chain Mail Armor – 3.3 3.5 4.0 thread bars

    Two more Scli3r improvements calculate thin-wall and gap infill based on the available space, then vary the extrusion width to make the answers come out right for a given nozzle diameter. As a result, infill between close-set perimeter walls works much better than before; some of my long-held assumptions became invalid.

    The only differences between the sheets: tweaking the BarWidth and SheetSize parameters. The links recalculate themselves around those values.

    The OpenSCAD source code as a GitHub gist:

    // Chain Mail Armor Buttons
    // Ed Nisley KE4ZNU – December 2014
    Layout = "Build"; // Link Button LB Joiner Joiners Build PillarMod
    //——-
    //- Extrusion parameters must match reality!
    // Print with 1 shell and 2+2 solid layers
    ThreadThick = 0.25;
    ThreadWidth = 0.40;
    HoleWindage = 0.2;
    Protrusion = 0.1; // make holes end cleanly
    function IntegerMultiple(Size,Unit) = Unit * ceil(Size / Unit);
    //——-
    // Dimensions
    //- Set maximum sheet size
    SheetSizeX = 125; // 170 for full sheet on M2
    SheetSizeY = 125; // 230 …
    //- Diamond or rectangular sheet?
    Diamond = false; // true = rotate 45 degrees, false = 0 degrees for square
    BendAround = "X"; // X or Y = maximum flexibility *around* designated axis
    Cap = true; // true = build bridge layers over links
    CapThick = 4 * ThreadThick; // flat cap on link: >= 3 layers for solid bridging
    Armor = true && Cap; // true = build armor button atop (required) cap
    ArmorThick = IntegerMultiple(2.0,ThreadThick); // height above cap surface
    ArmorSides = 4;
    ArmorAngle = true ? 180/ArmorSides : 0; // true -> rotate half a side for best alignment
    //- Link bar sizes
    BarThick = 3 * ThreadThick;
    BarWidth = 3.3 * ThreadWidth;
    BarClearance = 3 * ThreadThick; // vertical clearance above & below bars
    VertexHack = false; // true to slightly reduce openings to avoid coincident vertices
    //- Compute link sizes from those values
    //- Absolute minimum base link: bar width + corner angle + build clearance around bars
    // rounded up to multiple of thread width to ensure clean filling
    BaseSide = IntegerMultiple((4*BarWidth + 2*BarWidth/sqrt(2) + 3*(2*ThreadWidth)),ThreadWidth);
    BaseHeight = 2*BarThick + BarClearance; // both bars + clearance
    echo(str("BaseSide: ",BaseSide," BaseHeight: ",BaseHeight));
    //echo(str(" Base elements: ",4*BarWidth,", ",2*BarWidth/sqrt(2),", ",3*(2*ThreadWidth)));
    //echo(str(" total: ",(4*BarWidth + 2*BarWidth/sqrt(2) + 3*(2*ThreadWidth))));
    BaseOutDiagonal = BaseSide*sqrt(2) – BarWidth;
    BaseInDiagonal = BaseSide*sqrt(2) – 2*(BarWidth/2 + BarWidth*sqrt(2));
    echo(str("Outside diagonal: ",BaseOutDiagonal));
    //- On-center distance measured along coordinate axis
    // the links are interlaced, so this is half of what you think it should be…
    LinkOC = BaseSide/2 + ThreadWidth;
    LinkSpacing = Diamond ? (sqrt(2)*LinkOC) : LinkOC;
    echo(str("Base spacing: ",LinkSpacing));
    //- Compute how many links fit in sheet
    MinLinksX = ceil((SheetSizeX – (Diamond ? BaseOutDiagonal : BaseSide)) / LinkSpacing);
    MinLinksY = ceil((SheetSizeY – (Diamond ? BaseOutDiagonal : BaseSide)) / LinkSpacing);
    echo(str("MinLinks X: ",MinLinksX," Y: ",MinLinksY));
    NumLinksX = ((0 == (MinLinksX % 2)) && !Diamond) ? MinLinksX + 1 : MinLinksX;
    NumLinksY = ((0 == (MinLinksY % 2) && !Diamond)) ? MinLinksY + 1 : MinLinksY;
    echo(str("Links X: ",NumLinksX," Y: ",NumLinksY));
    //- Armor button base
    ButtonHeight = BaseHeight + BarClearance + CapThick;
    echo(str("ButtonHeight: ",ButtonHeight));
    //- Armor ornament size & shape
    // Fine-tune OD & ID to suit the number of sides…
    TotalHeight = ButtonHeight + ArmorThick;
    echo(str("Overall Armor Height: ",TotalHeight));
    ArmorOD = 1.0 * BaseSide; // tune for best base fit
    ArmorID = 10 * ThreadWidth; // make the tip blunt & strong
    //——-
    module ShowPegGrid(Space = 10.0,Size = 1.0) {
    RangeX = floor(95 / Space);
    RangeY = floor(125 / Space);
    for (x=[-RangeX:RangeX])
    for (y=[-RangeY:RangeY])
    translate([x*Space,y*Space,Size/2])
    %cube(Size,center=true);
    }
    //——-
    // Create link with armor button as needed
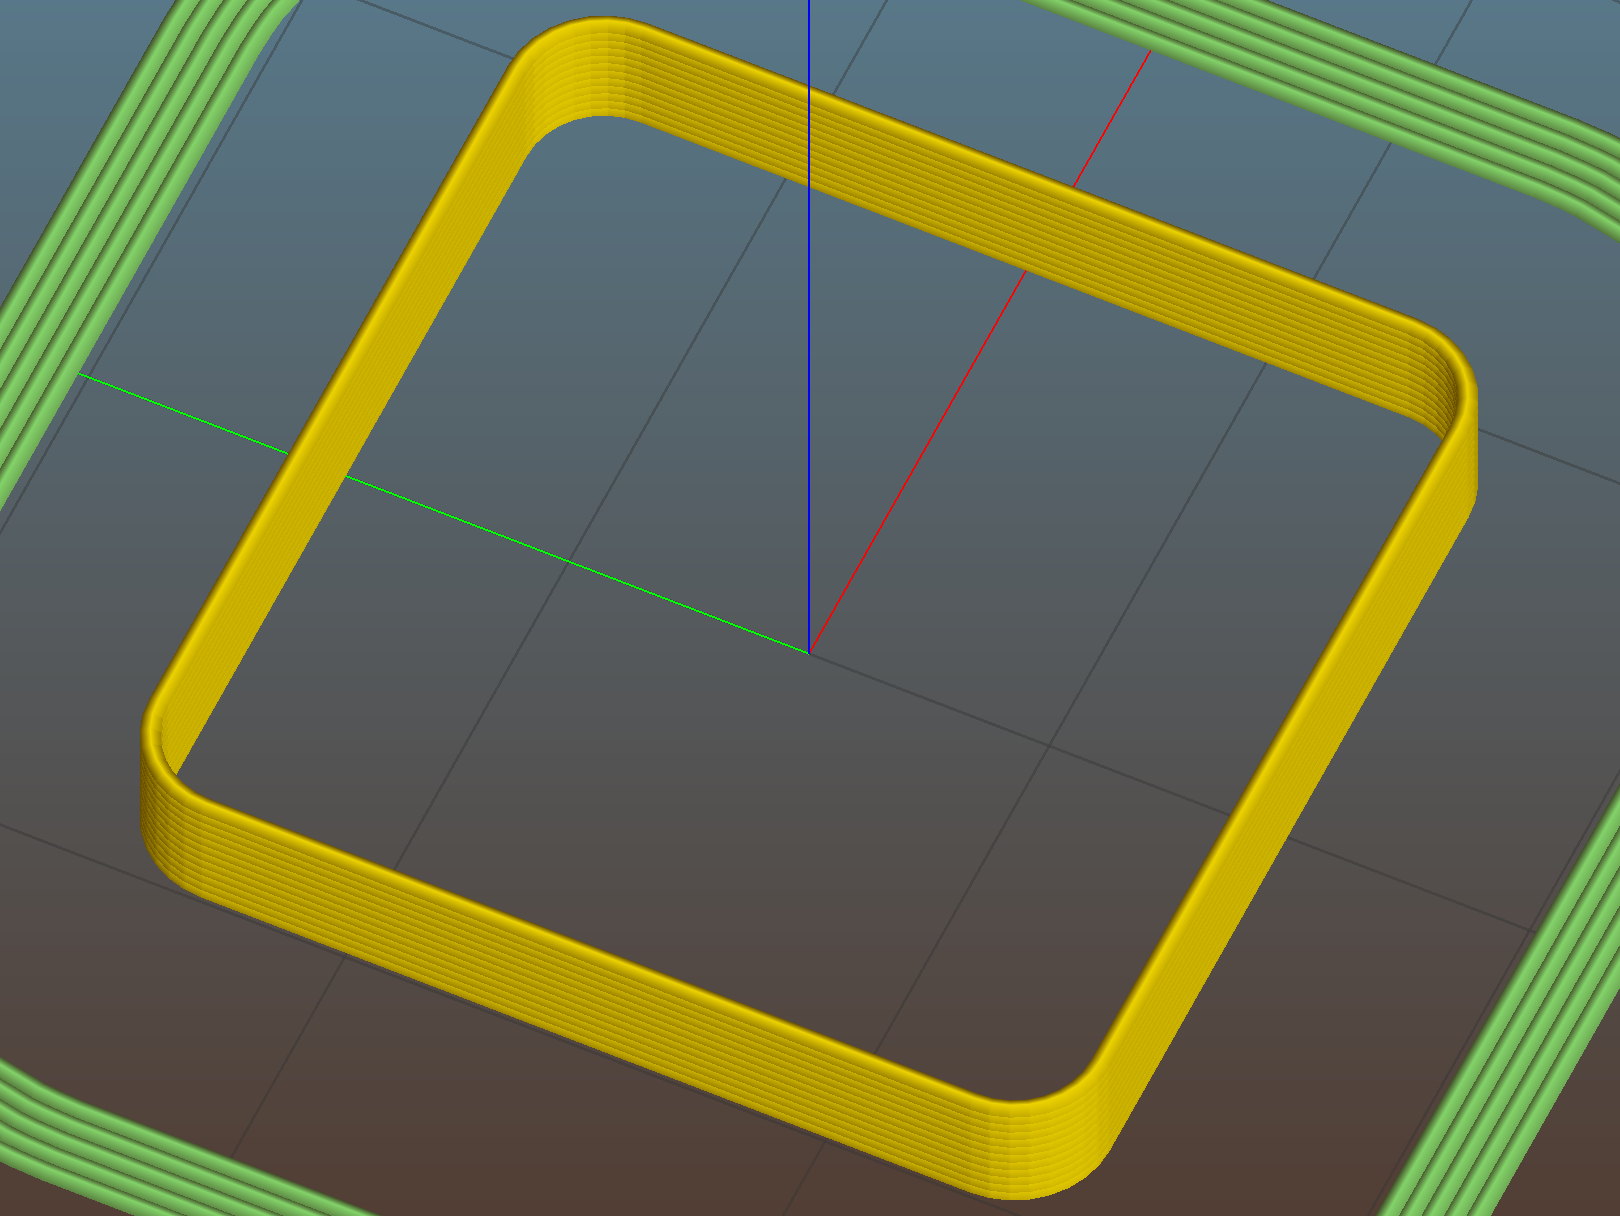
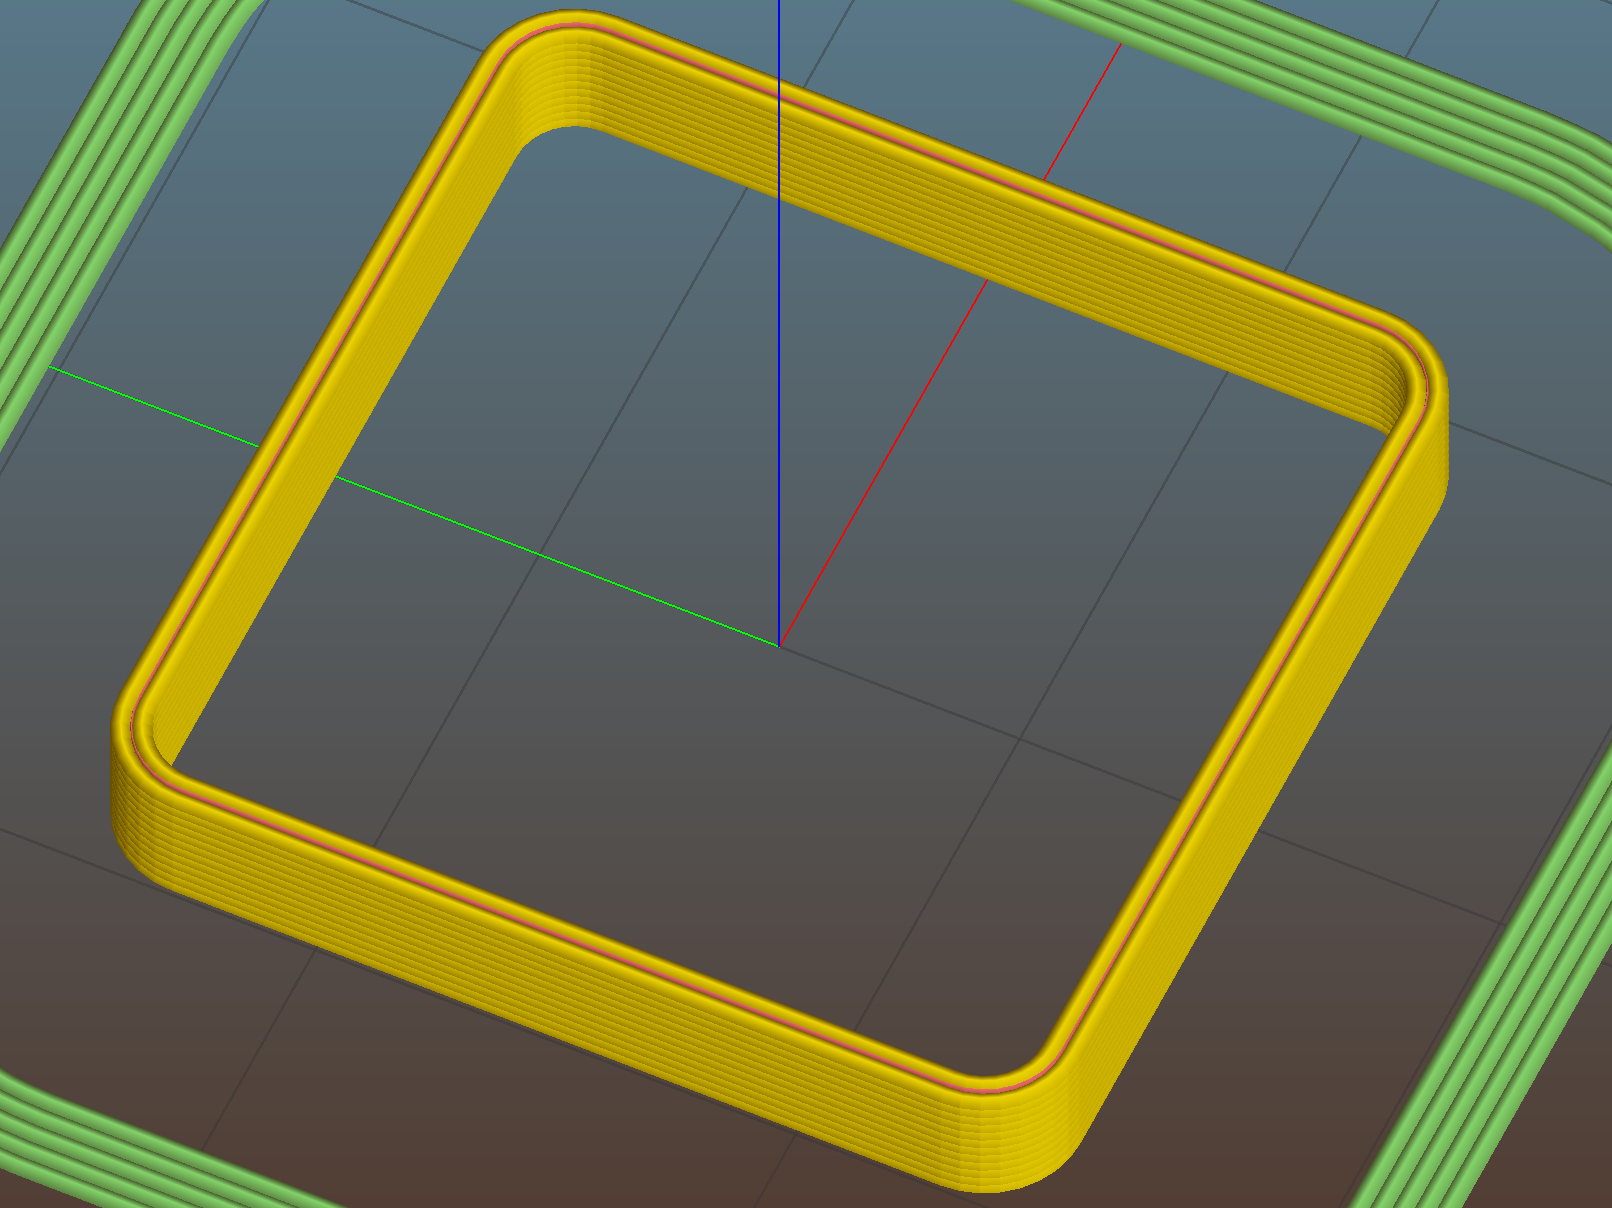
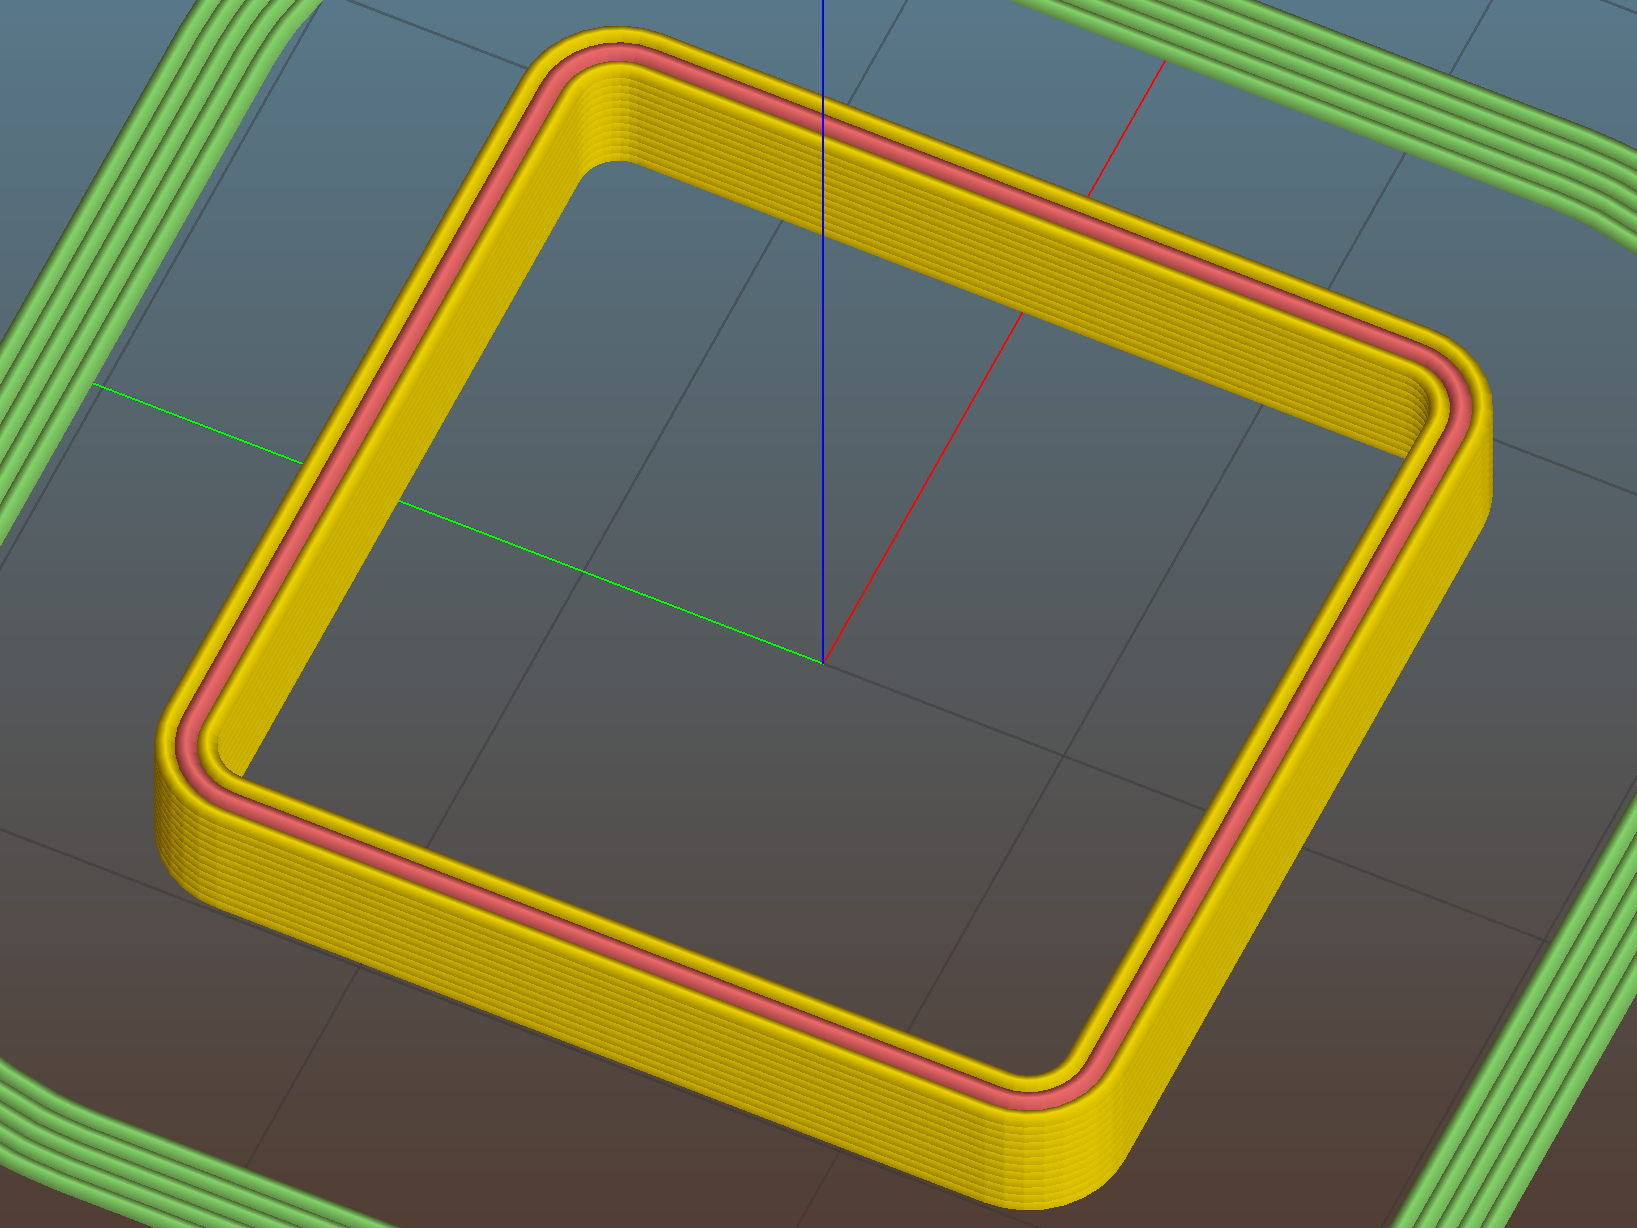
    module Link(Topping = false) {
    LinkHeight = (Topping && Cap) ? ButtonHeight : BaseHeight;
    render(convexity=3)
    rotate((BendAround == "X") ? 90 : 0)
    rotate(Diamond ? 45 : 0)
    union() {
    difference() {
    translate([0,0,LinkHeight/2]) // outside shape
    intersection() {
    cube([BaseSide,BaseSide,LinkHeight],center=true);
    rotate(45)
    cube([BaseOutDiagonal,BaseOutDiagonal,(LinkHeight + 2*Protrusion)],center=true);
    }
    translate([0,0,(BaseHeight + BarClearance + 0*ThreadThick – Protrusion)/2])
    intersection() { // inside shape
    cube([(BaseSide – 2*BarWidth),
    (BaseSide – 2*BarWidth),
    (BaseHeight + BarClearance + 0*ThreadThick + (VertexHack ? Protrusion/2 : 0))],
    center=true);
    rotate(45)
    cube([BaseInDiagonal,
    BaseInDiagonal,
    (BaseHeight + BarClearance + 0*ThreadThick + (VertexHack ? Protrusion/2 : 0))],
    center=true);
    }
    translate([0,0,((BarThick + 2*BarClearance)/2 + BarThick)]) // openings for bars
    cube([(BaseSide – 2*BarWidth – 2*BarWidth/sqrt(2) – (VertexHack ? Protrusion/2 : 0)),
    (2*BaseSide),
    BarThick + 2*BarClearance – Protrusion],
    center=true);
    translate([0,0,(BaseHeight/2 – BarThick)])
    cube([(2*BaseSide),
    (BaseSide – 2*BarWidth – 2*BarWidth/sqrt(2) – (VertexHack ? Protrusion/2 : 0)),
    BaseHeight],
    center=true);
    }
    if (Topping && Armor)
    translate([0,0,(ButtonHeight – Protrusion)]) // sink slightly into the cap
    rotate(ArmorAngle)
    cylinder(d1=ArmorOD,d2=ArmorID,h=(ArmorThick + Protrusion), $fn=ArmorSides);
    }
    }
    //——-
    // Create split buttons to join sheets
    module Joiner() {
    translate([-LinkSpacing,0,0])
    difference() {
    Link(false);
    translate([0,0,BarThick + BarClearance + TotalHeight/2 – Protrusion])
    cube([2*LinkSpacing,2*LinkSpacing,TotalHeight],center=true);
    }
    translate([LinkSpacing,0,0])
    intersection() {
    translate([0,0,-(BarThick + BarClearance)])
    Link(true);
    translate([0,0,TotalHeight/2])
    cube([2*LinkSpacing,2*LinkSpacing,TotalHeight],center=true);
    }
    }
    //——-
    // Build it!
    //ShowPegGrid();
    if (Layout == "Link") {
    Link(false);
    }
    if (Layout == "Button") {
    Link(true);
    }
    if (Layout == "LB") {
    color("Brown") Link(true);
    translate([LinkSpacing,LinkSpacing,0])
    color("Orange") Link(false);
    }
    if (Layout == "Build")
    for (ix = [0:(NumLinksX – 1)],
    iy = [0:(NumLinksY – 1)]) {
    x = (ix – (NumLinksX – 1)/2)*LinkSpacing;
    y = (iy – (NumLinksY – 1)/2)*LinkSpacing;
    translate([x,y,0])
    color([(ix/(NumLinksX – 1)),(iy/(NumLinksY – 1)),1.0])
    if (Diamond)
    Link((ix + iy) % 2); // armor at odd,odd & even,even points
    else
    if ((iy % 2) && (ix % 2)) // armor at odd,odd points
    Link(true);
    else if (!(iy % 2) && !(ix % 2)) // connectors at even,even points
    Link(false);
    }
    if (Layout == "Joiner")
    Joiner();
    if (Layout == "Joiners") {
    NumJoiners = max(MinLinksX,MinLinksY)/2;
    for (iy = [0:(NumJoiners – 1)]) {
    y = (iy – (NumJoiners – 1)/2)*2*LinkSpacing + LinkSpacing/2;
    translate([0,y,0])
    color([0.5,(iy/(NumJoiners – 1)),1.0])
    Joiner();
    }
    }
    if (Layout == "PillarMod") // Slic3r modification volume to eliminate pillar infill
    translate([0,0,(BaseHeight + BarClearance)/2])
    cube([1.5*SheetSizeX,1.5*SheetSizeY,BaseHeight + BarClearance],center=true);