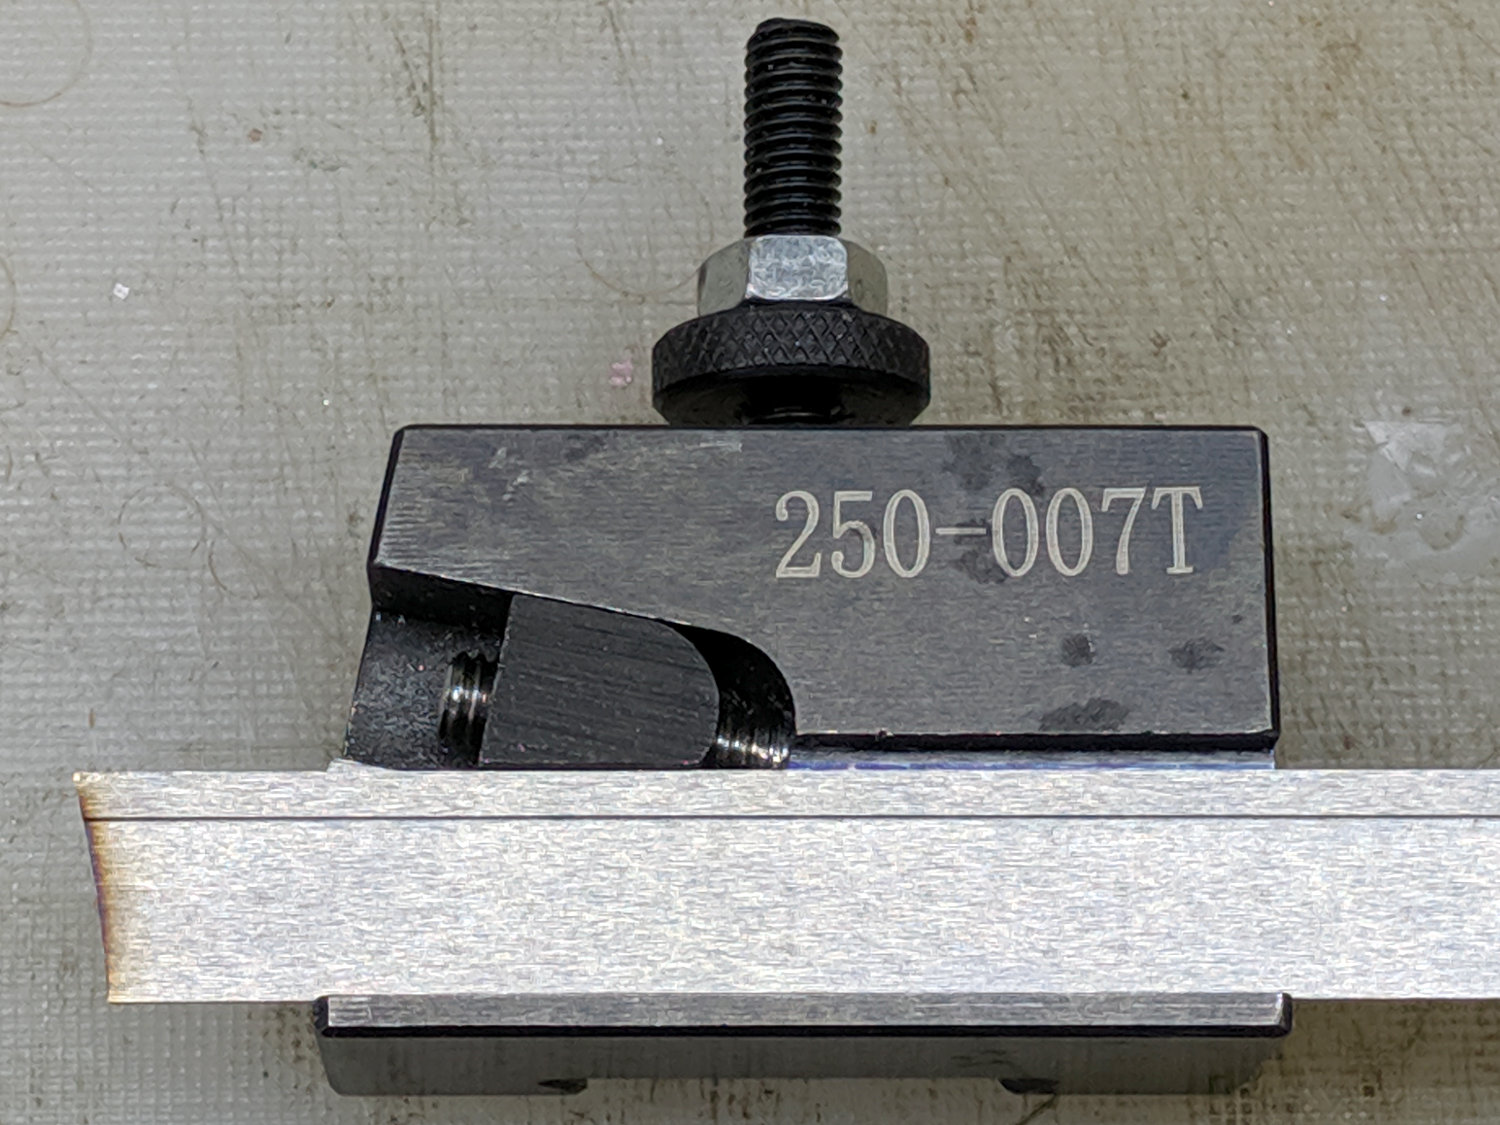
The Smell of Molten Projects in the Morning

Ed Nisley's Blog: Shop notes, electronics, firmware, machinery, 3D printing, laser cuttery, and curiosities. Contents: 100% human thinking, 0% AI slop.

Tag: CNC

Making parts with mathematics

  • Mini-Lathe Cut-Off Tool Holder: Improved Clamp Screw

    Apparently all mini-lathe cutoff tool holders suffer from the same problem:

    Lathe Cutoff Tool - OEM swaged screw
    Lathe Cutoff Tool – OEM swaged screw

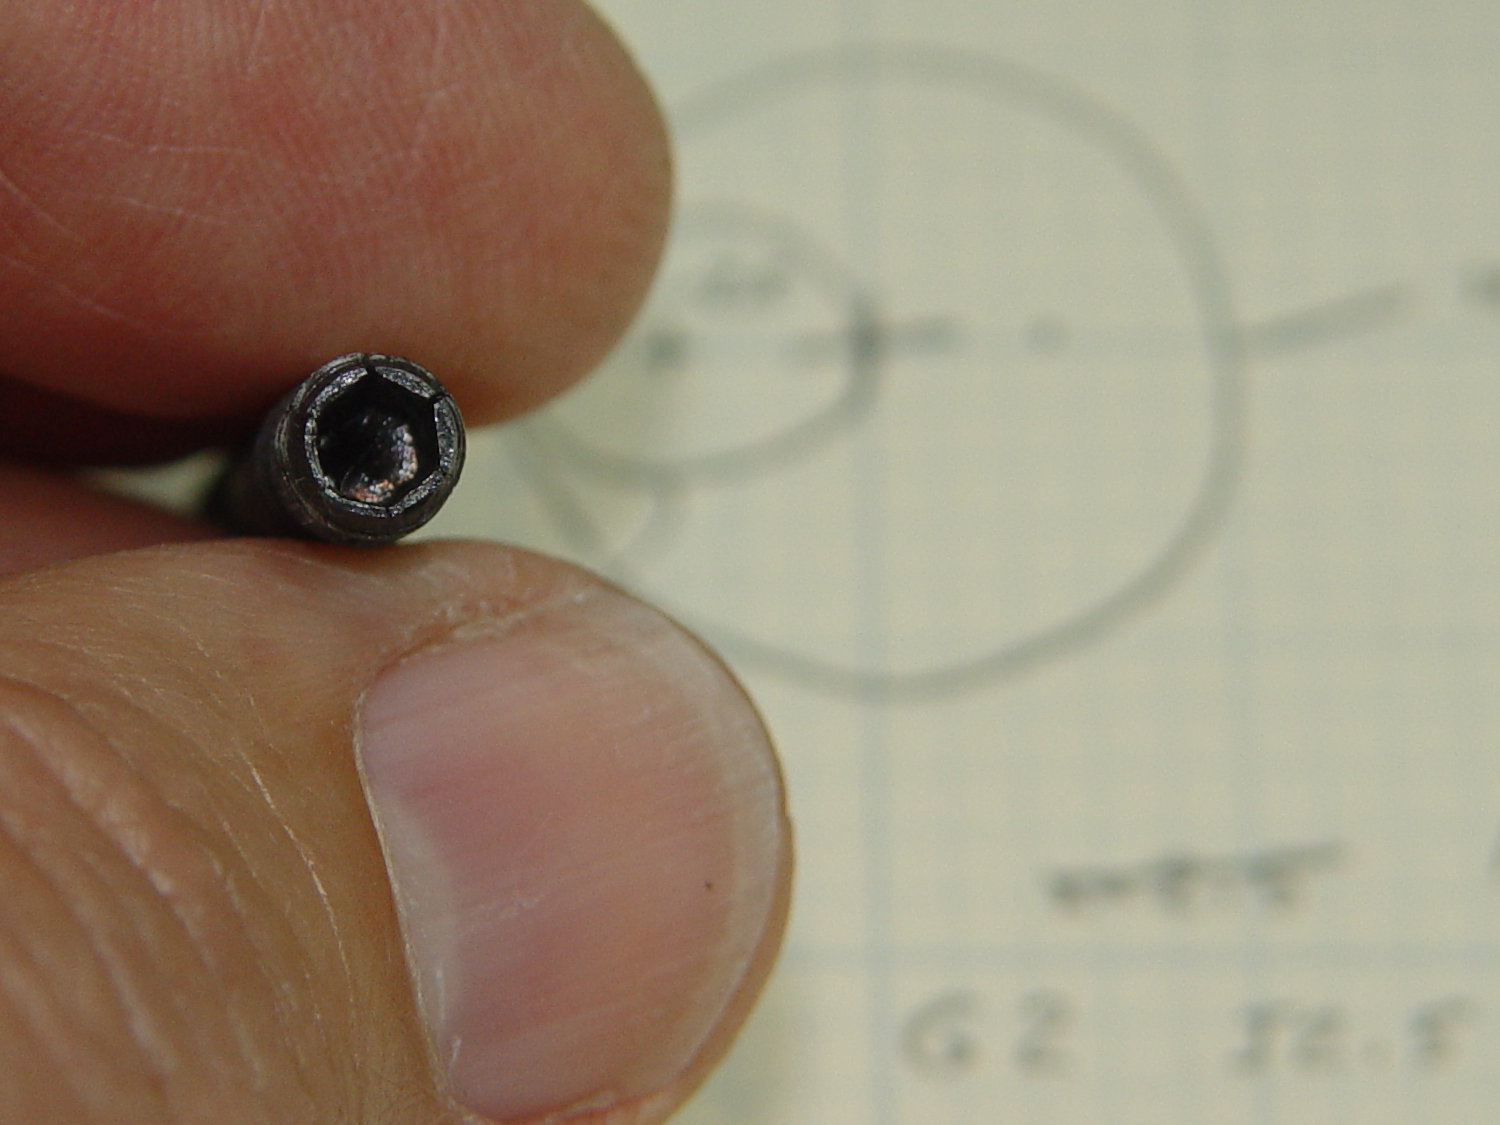
    The clamp tightening screw is made from butter-soft Chinese steel with a swaged hex socket. As you’d expect, the hex wrench eventually (as in, after a few dozen adjustments, tops) rips the guts right out of the socket.

    The screw has a M6×1.0 mm threads, but the thread around the hex recess is left-handed. While I could, in principle, print a 127 tooth change gear, rebuild the lathe’s banjo to accommodate it, then single-point a backassward M6 thread, it’s easier to just use a standard socket head cap screw:

    Lathe Cutoff Tool - rebuilt screw
    Lathe Cutoff Tool – rebuilt screw

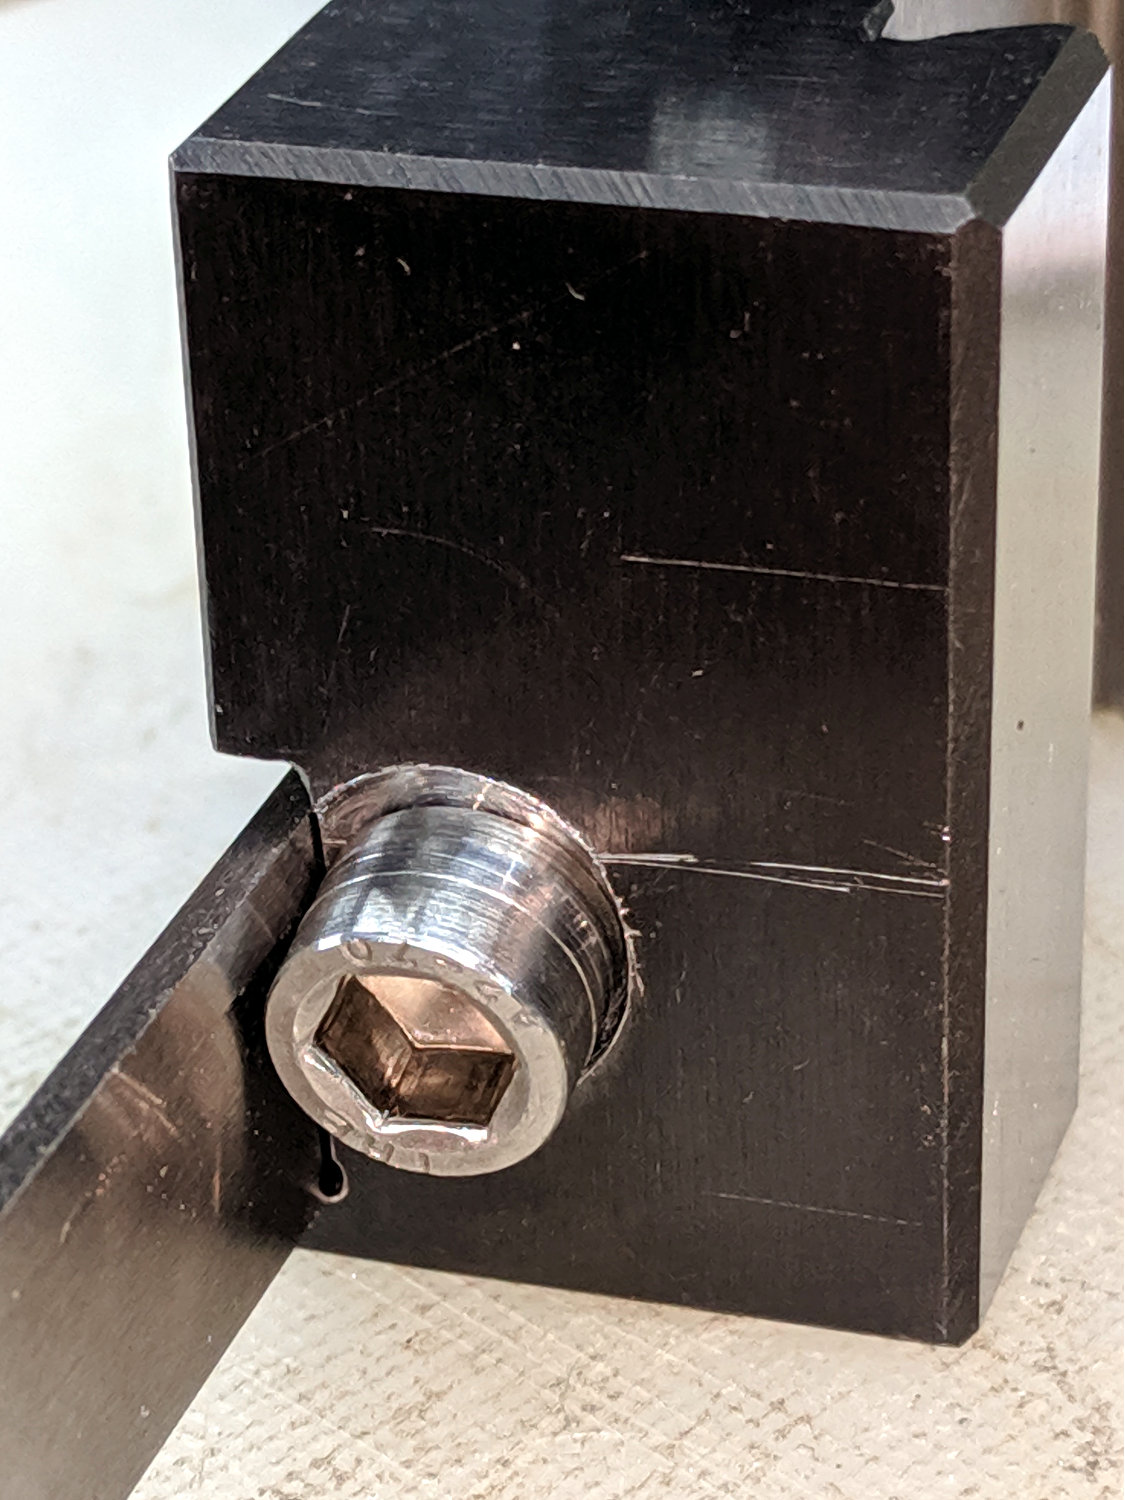
    The clamp screw passes through the block at an angle:

    Lathe Cutoff Tool - blade view
    Lathe Cutoff Tool – blade view

    Fortunately, the screw is perpendicular to the angled side over on the left, making it easy to clamp in the Sherline’s vise:

    Lathe Cutoff Tool - aligning to screw
    Lathe Cutoff Tool – aligning to screw

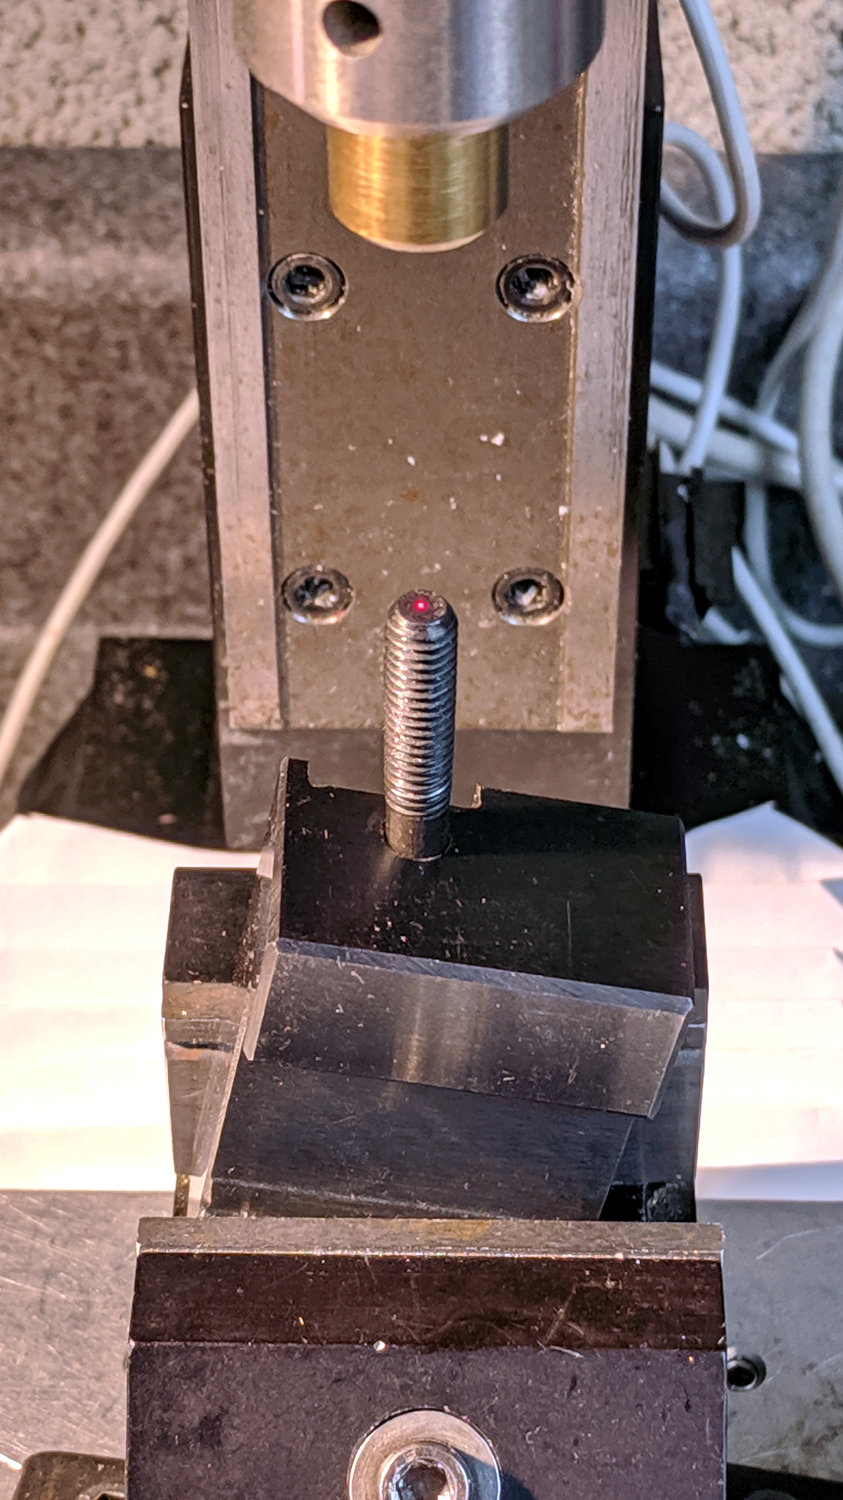
    Using the laser aligner seemed like a good idea at the time, but the top of the screw wasn’t particularly well-centered on the hole’s axis. I couldn’t screw the left-hand part (with the socket) in from the bottom and center the block near its surface, because then I couldn’t extract the screw before proceeding.

    I used a diamond burr to grind out a flat for the screw head:

    Lathe Cutoff Tool - clearing screw recess
    Lathe Cutoff Tool – clearing screw recess

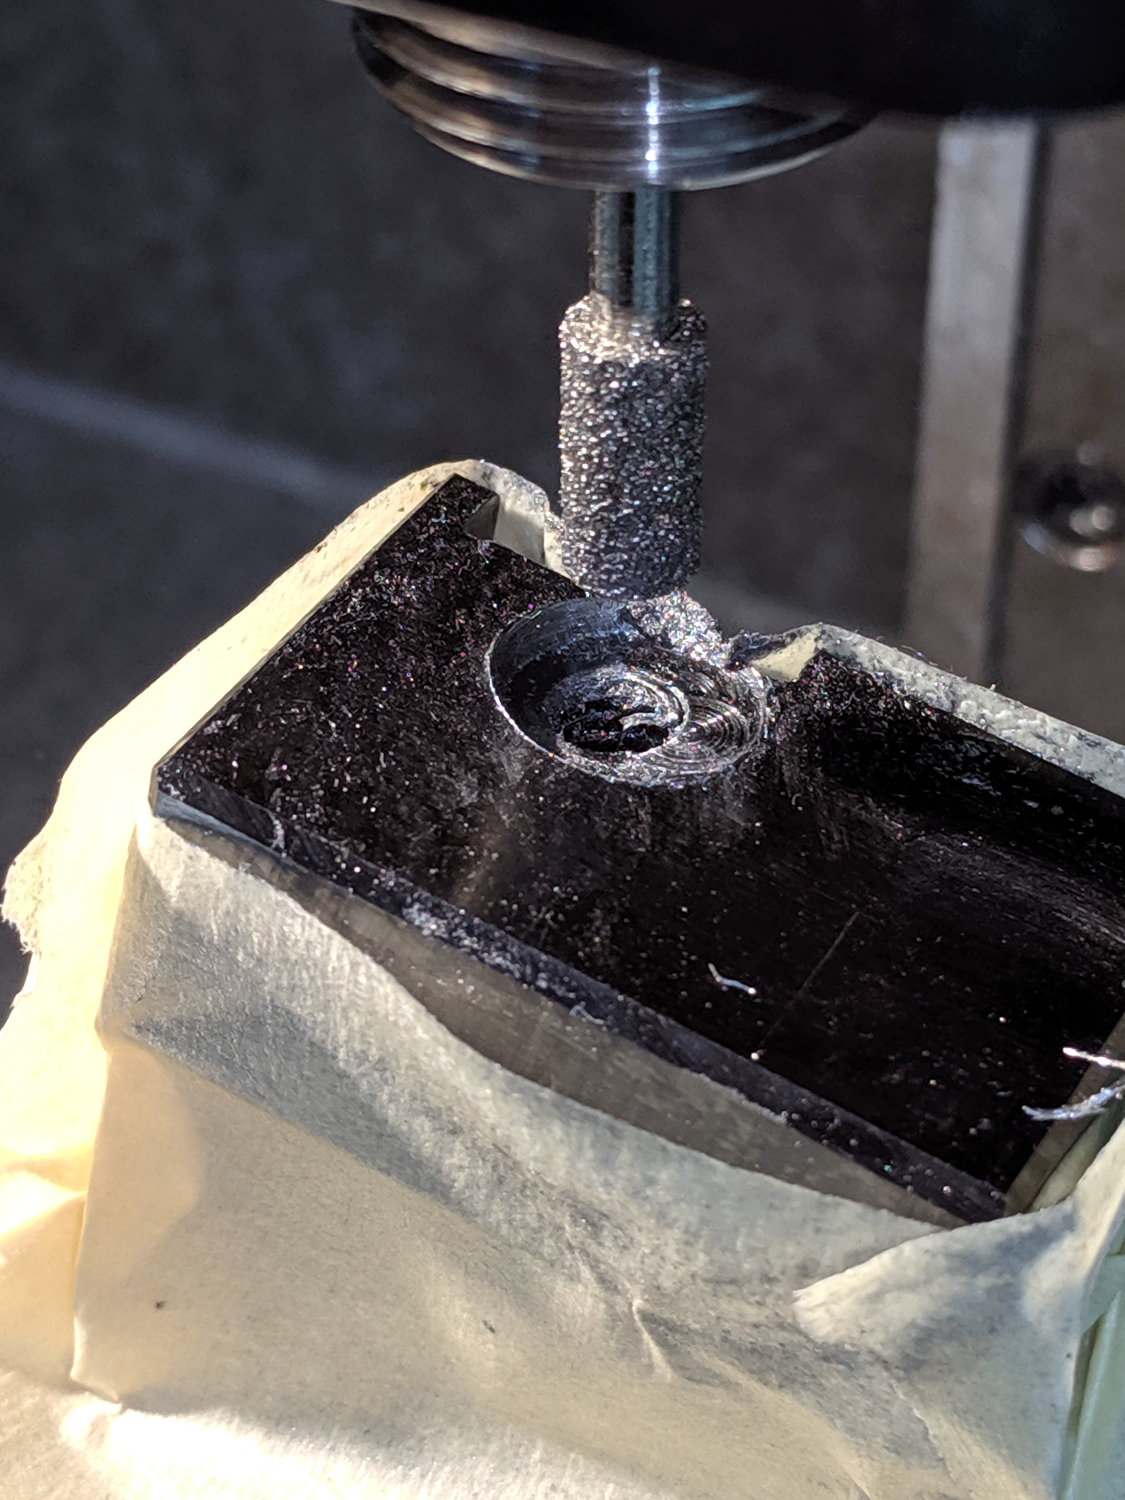
    The flat came from about twenty manual G2 I-2.5 full-circle passes, stepping down through the hard steel block 0.1 mm per pass, at a too-slow 4000 RPM and a too-fast 30 mm/min feed, with plenty of water squirted from one side into a shop vac snout on the other. The doodle in the background of the first picture shows a first pass at the layout, with the burr centered at X=-2.5; I actually did the grinding from X=+2.5 so most of the passes started in thin air.

    The screw head started just shy of 10 mm OD and the burr just over 5.2 mm, so the ensuing 5 mm circles created a flat barely large enough. If the flat were perfectly centered on the screw axis, I wouldn’t have had to grind out another millimeter on the left side (toward the bottom of the tool holder body), but it worked out OK:

    Lathe Cutoff Tool - 6 mm SHCS test fit
    Lathe Cutoff Tool – 6 mm SHCS test fit

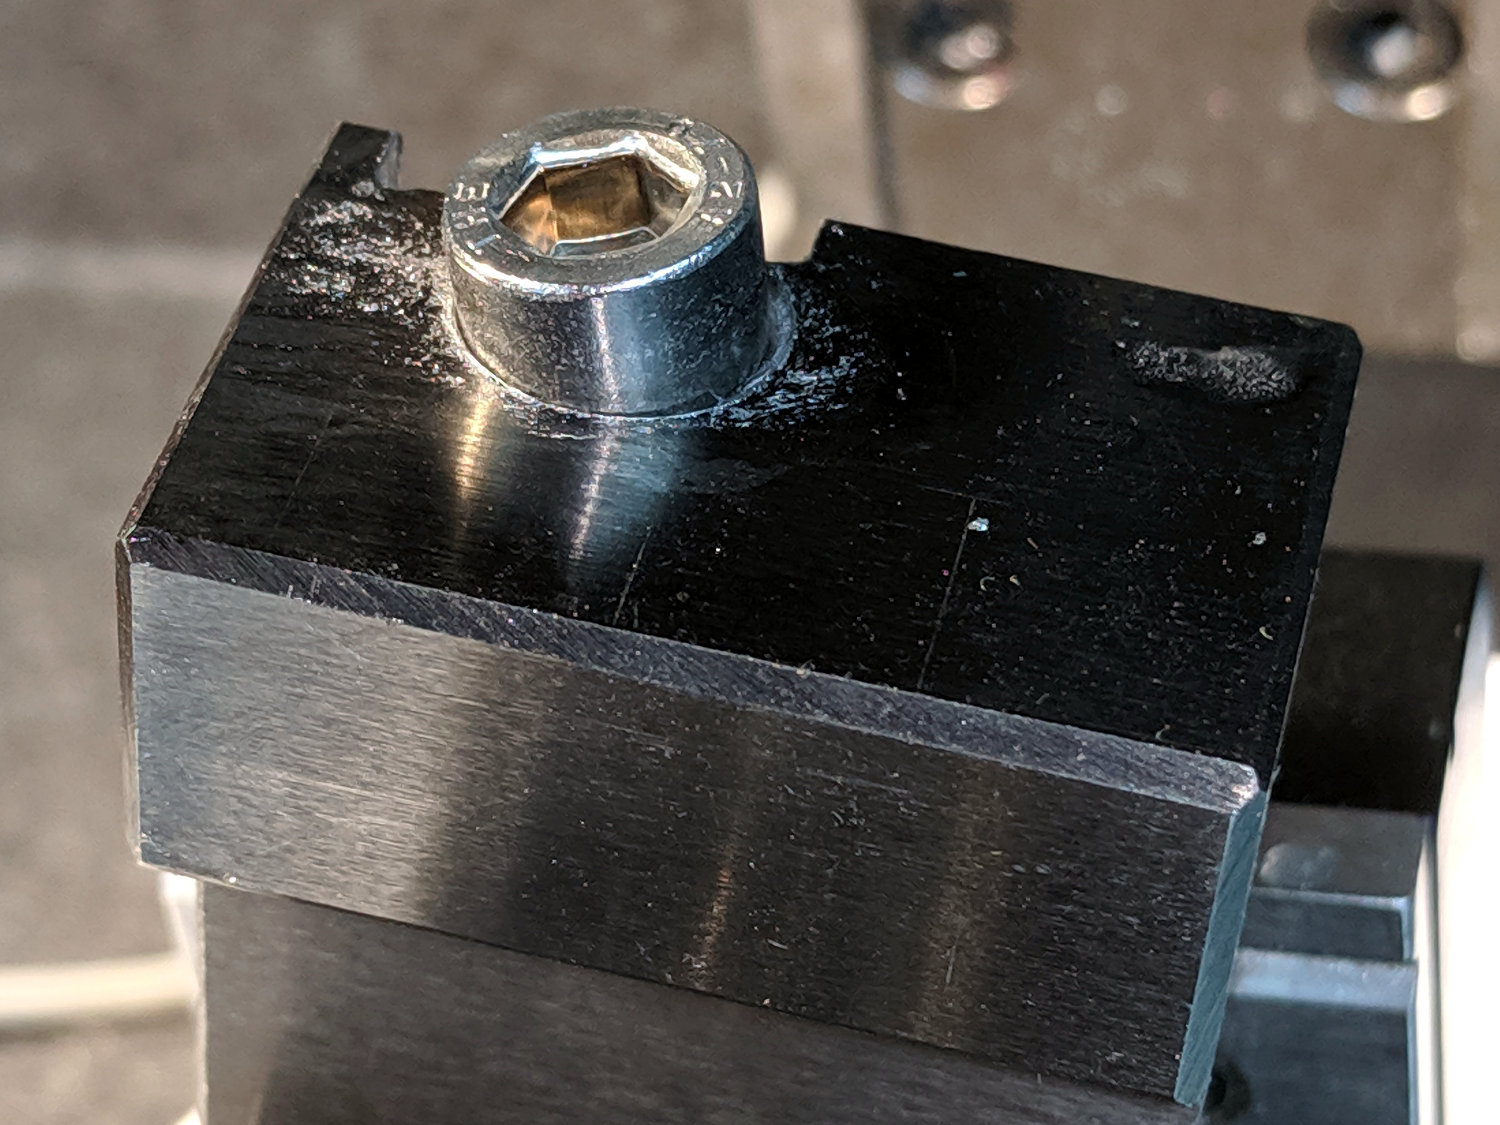
    The trial fitting also showed the head stuck out ever so slightly beyond the far side of the block, where it would interfere with the blade, so I turned off 0.4 mm off its OD.

    If I had a 50 mm SHCS in hand, I’d have used it. Instead, I extended the threads of a 75 mm screw, then lopped off the end to the proper length. I’ll spare you the ordeal, including the moment when I reached for the cutoff tool to shorten the screw. A bag of such screws will arrive shortly, in preparation for future need.

    Now the [deleted] cut-off holder works the way it should have from the beginning.

  • Wrapping GCMC Text Around Arcs

    GCMC includes a typeset function converting a more-or-less ASCII string into the coordinate points (a “vectorlist” containing a “path”) defining its character strokes and pen motions. The coordinates are relative to an origin at the lower-left corner of the line, with the font’s capital-X height set to 1.0, so you apply a scale function to make them whatever size you want and hand them to the engrave library routine, which squirts the corresponding G-Code into the output file.

    Such G-Code can annotate plots:

    Guilloche 213478839
    Guilloche 213478839

    Given that the plots appear on relentlessly circular CDs and hard drive platters, It Would Be Nice to wrap text around a circular arc, thusly:

    Diamond Scribe - LM3UU - arc text - first light
    Diamond Scribe – LM3UU – arc text – first light

    The scaled coordinates cover a distance L along a straight line, so putting them on an arc will cover the same distance. The arc is part of a circle with radius R and a circumference 2πR, so … polar coordinates to the rescue!

    The total text length L corresponds to the total angle A along the arc:

    A = 360° L / 2πR

    It’s entirely possible to have a text line longer than the entire circumference of the circle, whereupon the right end overlaps the left. Smaller characters fit better on smaller circles:

    Arc Lettering - Small radius test - NCViewer
    Arc Lettering – Small radius test – NCViewer

    The X coordinate of each point in the path (always positive from the X origin) in the path gives its angle (positive counterclockwise) from 0°:

    a = 360° x / 2πR (say "eks")

    You can add a constant angle of either sign to slew the whole text arc around the center point.

    The letter baseline Y=0 sits at radius R, so the Y coordinate of each point (positive above and negative below the Y=0 baseline) gives its radius r:

    r = R - y

    That puts the bottom of the text outward, so it reads properly when you’re facing the center point.

    Homework: Tweak the signs so it reads properly when you’re standing inside the circle reading outward.

    Converting from polar back to XY:

    x = r × cos(a) (say "times")
    y = r × sin(a)

    You can add an XY offset to the result, thereby plunking the point wherever you want.

    This obviously works best for small characters relative to the arc radius, as the lines connecting the points remain resolutely straight. That’s probably what you wanted anyway, but letters like, say, “m” definitely manspread.

    Overall, it looks pretty good:

    Arc Lettering - test plot overview - NCViewer
    Arc Lettering – test plot overview – NCViewer

    A doodle helped lay out the geometry:

    Arc Lettering - geometry doodles
    Arc Lettering – geometry doodles

    The GCMC source code as a GitHub Gist:

    // Map text to circular arcs
    // Ed Nisley KE4ZNU – 2019-06
    //—–
    // Command line parameters
    // -D OuterDia=number
    if (!isdefined("OuterDia")) {
    OuterDia = 120mm – 2mm; // CD = 120, 3.5 inch drive = 95
    }
    OuterRad = OuterDia / 2.0;
    comment("Outer Diameter: ",OuterDia);
    comment(" Radius: ",OuterRad);
    //—–
    // Library routines
    include("tracepath.inc.gcmc");
    include("engrave.inc.gcmc");
    //—–
    // Bend text around an arc
    function ArcText(TextPath,Center,Radius,BaseAngle,Align) {
    PathLength = TextPath[-1].x – TextPath[1].x;
    Circumf = 2*pi()*Radius;
    TextAngle = to_deg(360 * PathLength / Circumf);
    AlignAngle = BaseAngle + (Align == "Left" ? 0 :
    Align == "Center" ? -TextAngle / 2 :
    Align == "Right" ? -TextAngle :
    0);
    ArcPath = {};
    foreach(TextPath; pt) {
    if (!isundef(pt.x) && !isundef(pt.y) && isundef(pt.z)) { // XY motion, no Z
    r = Radius – pt.y;
    a = 360deg * (pt.x / Circumf) + AlignAngle;
    ArcPath += {[r*cos(a) + Center.x, r*sin(a) + Center.y,-]};
    }
    elif (isundef(pt.x) && isundef(pt.y) && !isundef(pt.z)) { // no XY, Z up/down
    ArcPath += {pt};
    }
    else {
    error("Point is not pure XY or pure Z: " + to_string(pt));
    }
    }
    return ArcPath;
    }
    //—–
    // Set up for drawing
    TravelZ = 1.0mm; // no clamps above workpiece!
    PlotZ = -1.0mm; // tune for best results
    TextSpeed = 100mm; // minimal shaking
    DrawSpeed = 500mm; // smooth curve drawing
    TextFont = FONT_HSANS_1_RS;
    TextSize = [2.0mm,2.0mm];
    TextLeading = 5.0mm; // line spacing
    DiskCenter = [0mm,0mm]; // middle of the platter
    if (1) {
    comment("Circles begin");
    TextRadius = OuterRad;
    for (r = OuterRad; r >= 25mm; r -= TextLeading) {
    feedrate(DrawSpeed);
    goto([-,-,TravelZ]);
    goto([r,0,-]);
    move([-,-,PlotZ]);
    circle_cw([0,0]);
    goto([-,-,TravelZ]);
    tp = scale(typeset("Radius: " + to_string(r),TextFont),TextSize);
    tpa = ArcText(tp,DiskCenter,r,115deg,"Left");
    feedrate(TextSpeed);
    engrave(tpa,TravelZ,PlotZ);
    }
    }
    if (1) {
    comment("Depth variations begin");
    TextRadius = OuterRad;
    feedrate(TextSpeed);
    for (pz = 0.0mm; pz >= -0.6mm; pz -= 0.10mm) {
    comment(" depth: " + to_string(pz));
    ts = "Depth: " + to_string(pz) + " at " + to_string(TextSpeed) + "/s";
    tp = scale(typeset(ts,TextFont),TextSize);
    tpa = ArcText(tp,DiskCenter,TextRadius,-5deg,"Right");
    engrave(tpa,TravelZ,pz);
    TextRadius -= TextLeading;
    }
    }
    if (1) {
    comment("Feedrate variations begin");
    TextRadius = OuterRad;
    for (ps = 50mm; ps <= 350mm; ps += 50mm) {
    feedrate(ps);
    comment(" speed: " + to_string(ps) + "/s");
    ts = "Speed: " + to_string(ps) + "/s at " + to_string(PlotZ);
    tp = scale(typeset(ts,TextFont),TextSize);
    tpa = ArcText(tp,DiskCenter,TextRadius,5deg,"Left");
    engrave(tpa,TravelZ,PlotZ);
    TextRadius -= TextLeading;
    }
    }
    if (1) {
    comment("Off-center text arcs begin");
    feedrate(TextSpeed);
    tc = [-40mm/sqrt(2),-40mm/sqrt(2)]; // center point
    r = 8mm;
    s = [1.5mm,1.5mm];
    ts = "Radius: " + to_string(r) + " Size: " + to_string(s);
    tp = scale(typeset(ts,TextFont),s);
    tpa = ArcText(tp,tc,r,0deg,"Center");
    engrave(tpa,TravelZ,PlotZ);
    r = 5mm;
    s = [1.0mm,1.0mm];
    ts = "Radius: " + to_string(r) + " Size: " + to_string(s);
    tp = scale(typeset(ts,TextFont),s);
    tpa = ArcText(tp,tc,r,0deg,"Center");
    engrave(tpa,TravelZ,PlotZ);
    r = 15mm;
    s = [3.0mm,3.0mm];
    ts = "Radius: " + to_string(r) + " Size: " + to_string(s);
    tp = scale(typeset(ts,TextFont),s);
    tpa = ArcText(tp,tc,r,0deg,"Center");
    engrave(tpa,TravelZ,PlotZ);
    }
    if (1) {
    comment("Attribution begins");
    tp = scale(typeset("Ed Nisley – KE4ZNU – softsolder.com",TextFont),TextSize);
    tpa = ArcText(tp,DiskCenter,15mm,0deg,"Center");
    feedrate(TextSpeed);
    engrave(tpa,TravelZ,PlotZ);
    }
    goto([-,-,10mm]);
    goto([0mm,0mm,-]);
    comment("Done!");
    view raw ArcLetter.gcmc hosted with ❤ by GitHub
    #!/bin/bash
    # Arc Lettering Generator
    # Ed Nisley KE4ZNU – 2019-06
    Diameter='OuterDia=116mm'
    Flags='-P 3 –pedantic'
    # Set these to match your file layout
    LibPath='/opt/gcmc/library'
    Prolog='/mnt/bulkdata/Project Files/Mostly Printed CNC/Firmware/gcmc/prolog.gcmc'
    Epilog='/mnt/bulkdata/Project Files/Mostly Printed CNC/Firmware/gcmc/epilog.gcmc'
    Script='/mnt/bulkdata/Project Files/Mostly Printed CNC/Patterns/Arc Lettering/ArcLetter.gcmc'
    ts=$(date +%Y%m%d-%H%M%S)
    fn='ArcLetter_'${ts}'.ngc'
    echo Output: $fn
    rm -f $fn
    echo "(File: "$fn")" > $fn
    gcmc -D $Diameter $Flags \
    –include "$LibPath" –prologue "$Prolog" –epilogue "$Epilog" \
    "$Script" >> $fn
    view raw ArcLetter.sh hosted with ❤ by GitHub
  • MPCNC Diamond Engraver: LM3UU Bearings, First Pass

    Gripping a diamond engraver in a collet chuck worked well enough, but the MPCNC’s pen holder lacks sufficient downforce and lateral stiffness. The bit has a chrome-ish plated 3 mm shank, so I tinkered up a mount for a pair of LM3UU linear bearings from the LM12UU drag knife holder:

    Diamond Scribe - LM3UU - Rev 1 - point view
    Diamond Scribe – LM3UU – Rev 1 – point view

    The shank isn’t exactly a precision part, but a few licks with a diamond file knocked off enough of the high spots so it slides reasonably well through the bearings. The bearing alignment is more critical than a simple 3D printed plastic part can provide, so a real version may need bearings in a metal shaft press-fit into the plastic; brute-forcing the bearings into alignment sufficed for now.

    The butt end of the shank press-fits into a disk held down with three springs, similar to the LM12UU mount:

    Diamond Scribe - LM3UU - Rev 1 - top view
    Diamond Scribe – LM3UU – Rev 1 – top view

    It draws Guilloché patterns just fine:

    Diamond Scribe - LM3UU - Rev 1 - first light
    Diamond Scribe – LM3UU – Rev 1 – first light

    I don’t like how the spring-around-screw motion works, even if it’s OK for small excursions.

  • The Last Tee

    There’s a good reason this was the last pneumatic tee fitting on the rack:

    Malformed pneumatic fitting
    Malformed pneumatic fitting

    The center fitting should be a male 1/4 inch NPT connection, but it’s completely un-machined. Alas, I no longer have a 1/4 NPT die in my tool chest, so it’s not an easy fix.

    The two female connections are fine, so it must have been one of those rare QC escapes.

    Lowe’s marked it down to $0.47 on clearance and I still couldn’t justify buying the thing.

  • Seam Ripper Cover

    The cover for Mary’s favorite seam ripper cracked long ago, has been repaired several times, and now needs a replacement:

    Seam Ripper cover - overview
    Seam Ripper cover – overview

    The first pass (at the top) matched the interior and exterior shapes, but was entirely too rigid. Unlike the Clover seam ripper, the handle has too much taper for a thick-walled piece of plastic.

    The flexy thinwall cover on the ripper comes from a model of the interior shape:

    Seam Ripper Cover - handle model
    Seam Ripper Cover – handle model

    It’s not conspicuously tapered, but OpenSCAD’s perspective view makes the taper hard to see. The wedge on top helps the slicer bridge the opening; it’s not perfect, just close enough to work.

    A similar model of the outer surface is one thread width wider on all sides, so subtracting the handle model from the interior produces a single-thread shell with a wedge-shaped interior invisible in this Slic3r preview:

    Seam Ripper Cover - exterior - Slic3r preview
    Seam Ripper Cover – exterior – Slic3r preview

    The brim around the bottom improves platform griptivity. The rounded top (because pretty) precludes building it upside-down, but if you could tolerate a square-ish top, that’s the way to go.

    Both models consist of hulls around eight strategically placed spheres, with the wedge on the top of the handle due to the intersection of the hull and a suitable cube. This view shows the situation without the hull:

    Seam Ripper Cover - handle model - cube intersection
    Seam Ripper Cover – handle model – cube intersection

    The spheres overlap, with the top set barely distinguishable, to produce the proper taper. I measured the handle and cover’s wall thicknesses, then guesstimated the cover’s interior dimensions from its outer size.

    The handle’s spheres have a radius matching its curvature. The cover’s spheres have a radius exactly one thread width larger, so the difference produces the one-thread-wide shell.

    Came out pretty nicely, if I do say so myself: the cover seats fully with an easy push-on fit and stays firmly in place. Best of all, should it get lost (despite the retina-burn orange PETG plastic), I can make another with nearly zero effort.

    The Basement Laboratory remains winter-cool, so I taped a paper shield over the platform as insulation from the fan cooling the PETG:

    Seam Ripper Cover - platform insulation
    Seam Ripper Cover – platform insulation

    The shield goes on after the nozzle finishes the first layer. The masking tape adhesive turned into loathesome goo and required acetone to get it off the platform; fortunately, the borosilicate glass didn’t mind.

    The OpenSCAD source code as a GitHub Gist:

    // Cover for old seam ripper
    // Ed Nisley – KE4ZNU
    // 2019-03
    /* [Layout Options] */
    Layout = "Build"; // [Show,Build]
    Part = "Handle"; // [Handle,CoverSolid,Cover]
    /* [Extrusion Parameters] */
    ThreadWidth = 0.40;
    ThreadThick = 0.25;
    HoleWindage = 0.2;
    Protrusion = 0.1;
    //—–
    // Dimensions
    /* [Dimensions] */
    WallThick = 1*ThreadWidth;
    CapInsideLength = 48.0;
    CornerRadius = 2.0; // handle at base
    Base = [11.0,5.5,0.0]; // handle at base
    Tip = [8.2,3.7,CapInsideLength]; // inferred at tip
    HandleOC = [Base – 2*[CornerRadius,CornerRadius,0.0],
    Tip – 2*[CornerRadius,CornerRadius,CornerRadius/2]
    ];
    NumSides = 2*3*4;
    //—–
    // Useful pieces
    // Handle is basically the interior of the cover
    module Handle() {
    intersection() {
    hull()
    for (i=[-1,1], j=[-1,1], k=[0,1])
    translate([i*HandleOC[k].x/2,j*HandleOC[k].y/2,k*HandleOC[k].z])
    sphere(r=CornerRadius,$fn=NumSides);
    translate([0,0,-CornerRadius/2]) // chop tip for better bridging
    rotate([45,0,0])
    cube([2*Base.x,CapInsideLength*sqrt(2),CapInsideLength*sqrt(2)],center=true);
    }
    }
    module CoverSolid() {
    hull()
    for (i=[-1,1], j=[-1,1], k=[0,1])
    translate([i*HandleOC[k].x/2,j*HandleOC[k].y/2,k*HandleOC[k].z])
    sphere(r=CornerRadius + WallThick,$fn=NumSides);
    }
    module Cover() {
    difference() {
    CoverSolid();
    Handle();
    translate([0,0,-CornerRadius])
    cube(2*Base + [0,0,2*CornerRadius],center=true);
    }
    }
    //—–
    // Build things
    if (Layout == "Build") {
    Cover();
    }
    if (Layout == "Show")
    if (Part == "Handle")
    Handle();
    else if (Part == "CoverSolid")
    CoverSolid();
    else if (Part == "Cover")
    Cover();
  • YAGV Hackage

    I’ve been using YAGV (Yet Another G-Code Viewer) as a quick command-line Guilloché visualizer, even though it’s really intended for 3D printing previews:

    YAGV previewer.png
    YAGV previewer.png

    Oddly (for a command-line program), it (seems to) lack any obvious keyboard shortcut to bail out; none of my usual finger macros work.

    A quick hack to the main /usr/share/yagv/yagv file makes Ctrl-Q bail out, thusly:

    diff yagv /usr/share/yagv/yagv 
    18a19
    > import sys
    364a366,367
    > 		if symbol==pyglet.window.key.Q and modifiers & pyglet.window.key.MOD_CTRL:
    > 			sys.exit()

    I tacked the code onto an existing issue, but yagv may be a defunct project. Tweaking the source works for me.

    The Ubuntu 18.04 LTS repo has what claims to be version 0.4, but the yagv GitHub repository (also claiming to be 0.4) includes code ignoring G-Code comments. Best to build the files from source (which, being Python, they already are), then add my Ctrl-Q hack, because my GCMC Guilloché generator adds plenty of comments.

  • Engraving Guilloché Patterns

    Flushed with success from engraving a hard drive platter for the 21HB5A tube, I bandsawed an acrylic square from a scrap sheet and unleashed the diamond drag bit on it:

    Guilloche 540237875 - engraved at -0.50mm
    Guilloche 540237875 – engraved at -0.50mm

    That’s side-lit against a dark blue background. The long scratch and assorted dirt come from its protracted stay in the scrap pile.

    If you look closely, you’ll see a few slightly wider loops, which came from a false start at Z=-0.1 mm.

    Engraving at -0.5 mm looked pretty good:

    Guilloche 540237875 - engraved at -0.50mm - detail
    Guilloche 540237875 – engraved at -0.50mm – detail

    Despite an angular resolution of 2°, the curves came out entirely smooth enough. The gritty scratchiness resulted in a pile of chaff covering the engraved area; perhaps some oil or lube or whatever would help.

    Rescaling the pattern to fit a CD platter worked fine, too:

    Guilloche 540237875 - CD engraving
    Guilloche 540237875 – CD engraving

    Polycarbonate seems to deform slightly, rather than scratch, leaving the final product with no chaff at all:

    In this case, the doubled lines come from the reflection off the aluminized lower surface holding all the data.

    That CD should be unreadable by now …

    [Update: Welcome, Adafruit! More on Guilloché pattern generation and engraving them with the MPCNC. ]