|
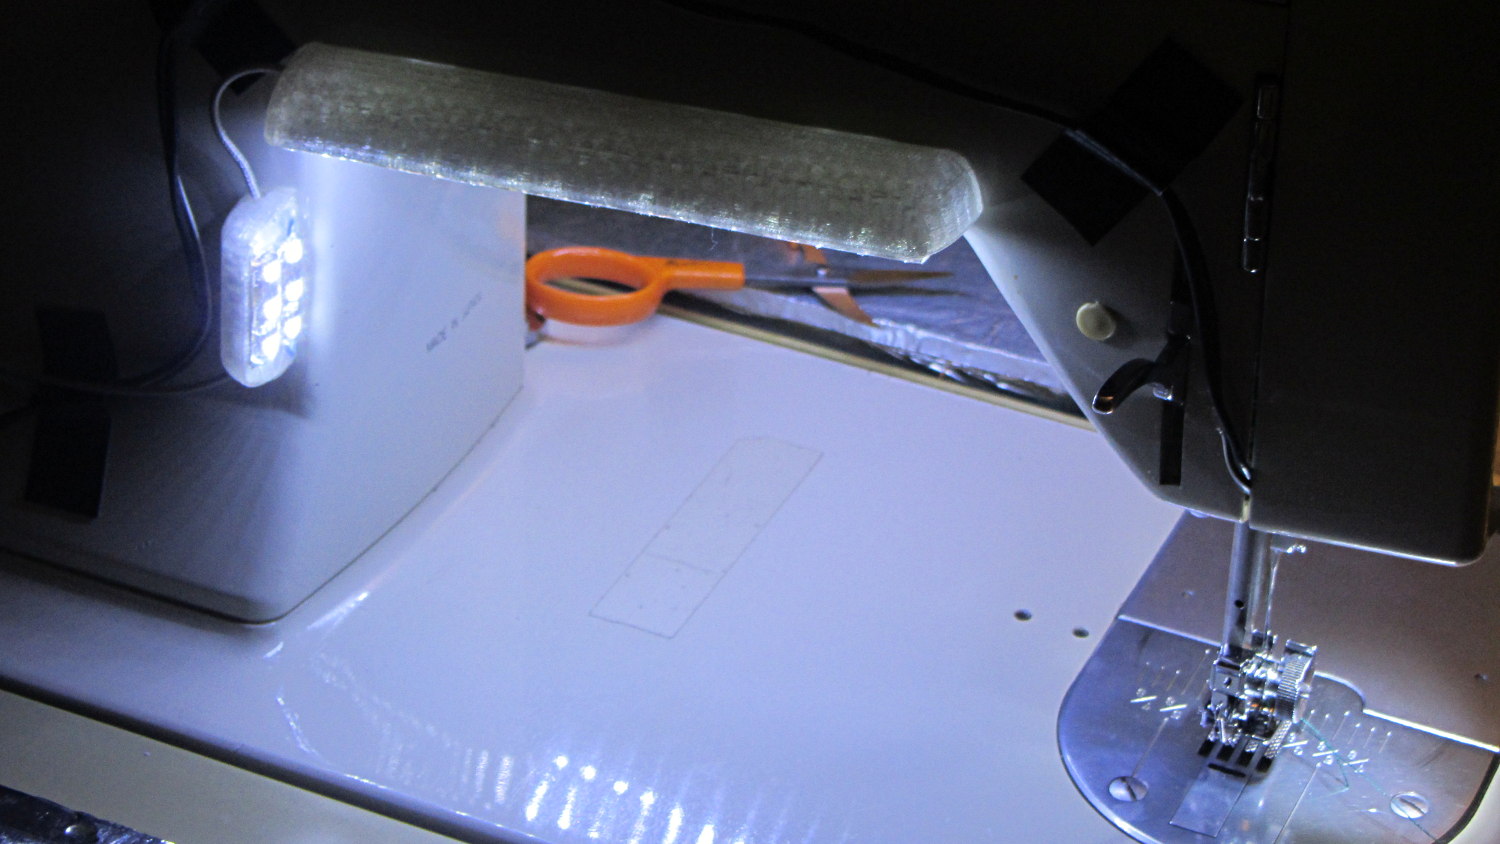
// Juki TL-2010Q Sewing Machine – COB LED Light Bars |
|
// Ed Nisley – KE4ZNU |
|
// 2019-01 |
|
|
|
/* [Layout Options] */ |
|
|
|
Layout = "Build"; // [Bracket,Endcap,Show,Build] |
|
|
|
Wiring = [1,0]; // left and right wire holes |
|
|
|
BuildSupport = true; |
|
|
|
/* [Extrusion Parameters] */ |
|
|
|
ThreadWidth = 0.40; |
|
ThreadThick = 0.20; |
|
|
|
HoleWindage = 0.2; |
|
|
|
Protrusion = 0.1; |
|
|
|
//—– |
|
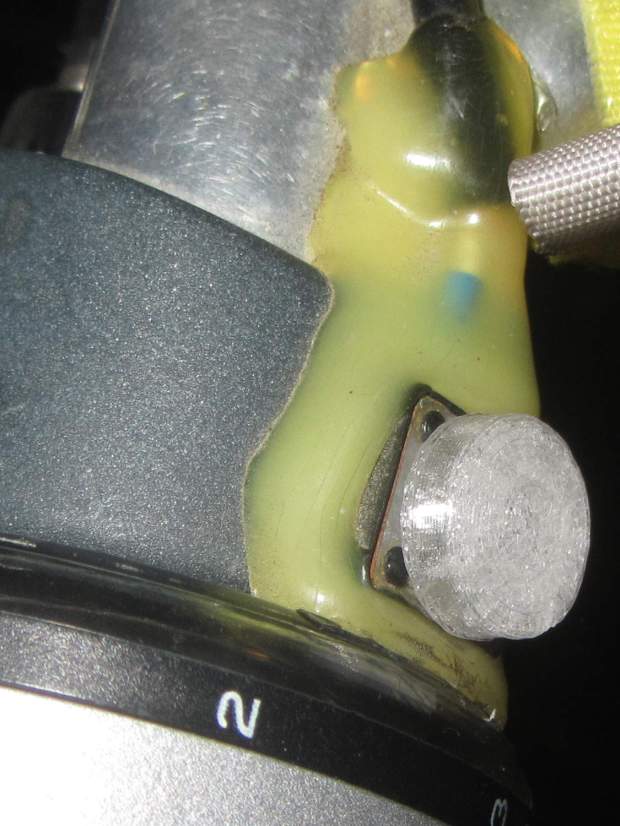
// Shelf bracket used as LED heatsink |
|
|
|
/* [Hidden] */ |
|
|
|
LEDPlate = [15.0,2.4]; // 2D coords from end of LED |
|
|
|
BktOuter = [15.9,12.6 + LEDPlate.y]; // 2D coords as seen from end of extrusion |
|
BktWalls = [1.3,2.2 + LEDPlate.y]; // … extend base to cover LED |
|
BktCap = [2.5,3.0]; |
|
|
|
BracketPoints = [ |
|
[0,0], |
|
[BktOuter.x,0], |
|
[BktOuter.x,BktOuter.y], |
|
[(BktOuter.x – BktCap.x),BktOuter.y], |
|
[(BktOuter.x – BktCap.x),(BktOuter.y – BktCap.y)], |
|
[(BktOuter.x – BktWalls.x),(BktOuter.y – BktCap.y)], |
|
[(BktOuter.x – BktWalls.x),BktWalls.y], |
|
[BktWalls.x,BktWalls.y], |
|
[BktWalls.x,(BktOuter.y – BktCap.y)], |
|
[BktCap.x,(BktOuter.y – BktCap.y)], |
|
[BktCap.x,BktOuter.y], |
|
[0,BktOuter.y], |
|
[0,0] |
|
]; |
|
|
|
BracketPlugInsert = 10.0; // distance into bracket end |
|
|
|
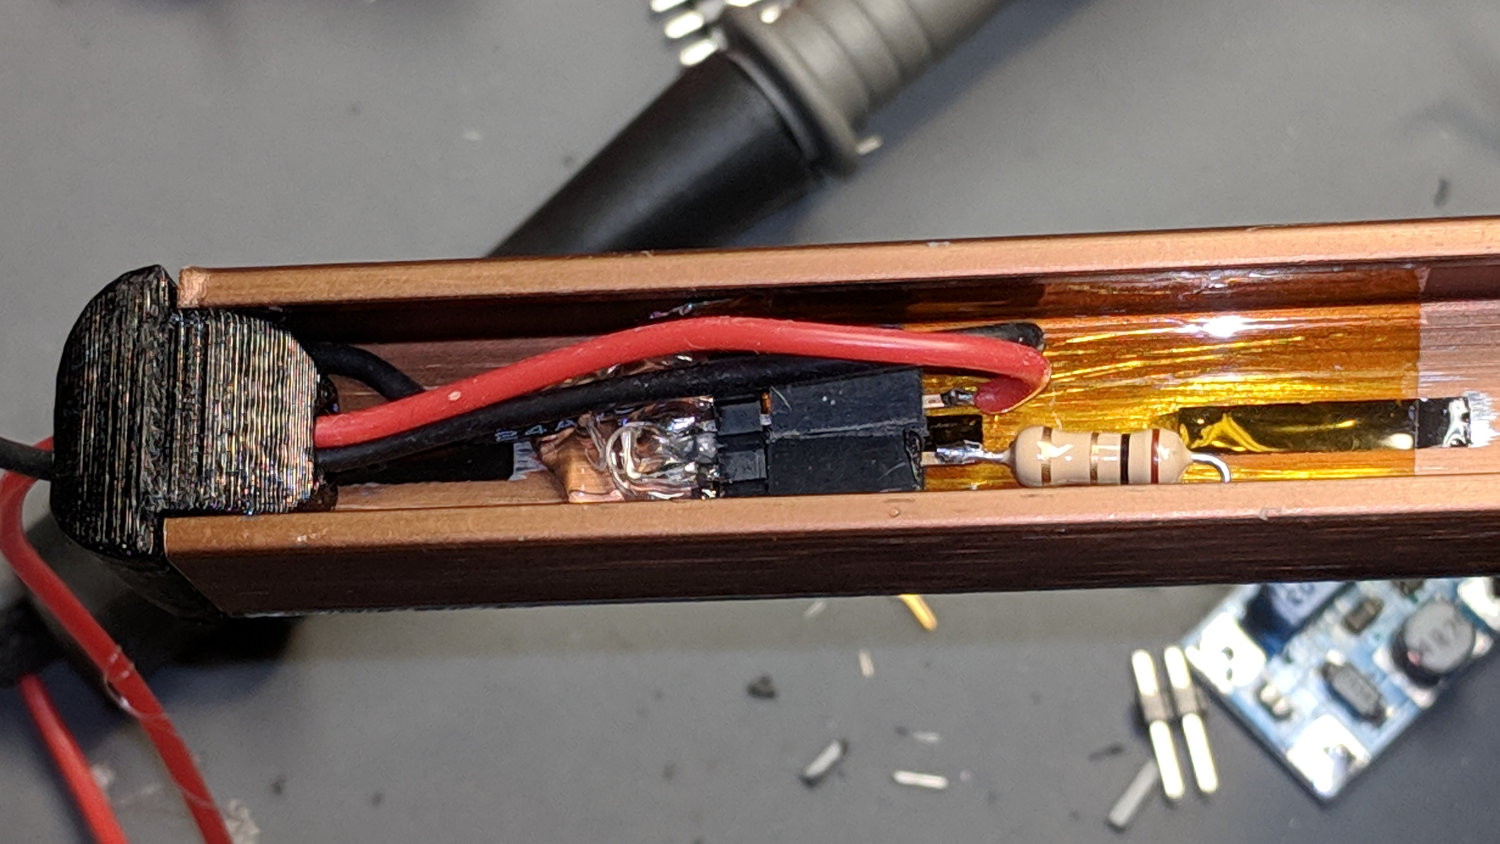
WireOD = 1.6; // COB LED jumpers – 24 AWG silicone |
|
WireOC = BktOuter.x – 2*BktWalls.x – WireOD; |
|
echo(str("Wire OC: ",WireOC)); |
|
|
|
CableOD = 4.0; // power entry cable |
|
|
|
CapSides = 2*3*4; |
|
|
|
//—– |
|
// Useful routines |
|
|
|
module PolyCyl(Dia,Height,ForceSides=0) { // based on nophead's polyholes |
|
|
|
Sides = (ForceSides != 0) ? ForceSides : (ceil(Dia) + 2); |
|
|
|
FixDia = Dia / cos(180/Sides); |
|
|
|
cylinder(r=(FixDia + HoleWindage)/2, |
|
h=Height, |
|
$fn=Sides); |
|
} |
|
|
|
//—– |
|
// Endcap with smooth rounding |
|
// Wires = true to punch holes for LED wires |
|
|
|
module Endcap(Wires = true) { |
|
|
|
// arc length to flatten inside of cap |
|
// not needed to build in normal orientation |
|
|
|
m = BktOuter.x/2 – sqrt(pow(BktOuter.x/2,2) – pow(BktOuter.x – 2*BktCap.x,2)/4); |
|
|
|
difference() { |
|
translate([0,0,BktOuter.y/2]) // basic endcap shape |
|
intersection() { |
|
cylinder(d=BktOuter.x,h=BktOuter.y,$fn=CapSides,center=true); |
|
rotate([90,0,0]) |
|
rotate(180/CapSides) |
|
cylinder(d=BktOuter.y,h=BktOuter.x,$fn=CapSides,center=true); |
|
} |
|
|
|
translate([-BracketPlugInsert,0,0]) // extrusion + LED plate |
|
Bracket(BracketPlugInsert); |
|
|
|
if (false) // flatten inner end |
|
translate([-BktOuter.y + m,0,BktOuter.y/2]) |
|
cube([BktOuter.y,BktOuter.x,BktOuter.y],center=true); |
|
|
|
if (Wires) { |
|
for (j=[-1,1]) // COB LED connections |
|
translate([WireOD – BktOuter.x/2,j*WireOC/2,(BktWalls.y + WireOD – Protrusion)/2]) |
|
rotate([0,00,0]) |
|
cube([BktOuter.x,WireOD + Protrusion,BktWalls.y + WireOD + Protrusion],center=true); |
|
translate([0,0,BktOuter.y/2]) // power entry / exit |
|
rotate([0,90,0]) |
|
translate([0,0,-BktOuter.x]) |
|
rotate(180/6) |
|
PolyCyl(CableOD,2*BktOuter.x,6); |
|
} |
|
} |
|
} |
|
|
|
// Totally ad-hoc support structures |
|
|
|
module Support(Wiring = false) { |
|
|
|
Spacing = 4*ThreadWidth; |
|
NumBars = floor((BktOuter.y/2) / Spacing); |
|
echo(str("Support bars: ",NumBars)); |
|
|
|
color("Yellow") { |
|
render() difference() { |
|
union() { |
|
for (i=[1:NumBars]) // inside extrusion |
|
translate([-i*Spacing,0,(BktWalls.y + WireOD)/2]) |
|
cube([2*ThreadWidth,BktOuter.x – 0*BktWalls.x,BktWalls.y + WireOD],center=true); |
|
|
|
if (true) |
|
for (j=[-1:1]) // reduce outside curve uplift |
|
translate([0.3*BktOuter.y,j*BktOuter.x/3,BktOuter.y/10]) |
|
cube([BktOuter.y/3,2*ThreadWidth,BktOuter.y/5],center=true); |
|
} |
|
minkowski() { // all-around clearance |
|
Endcap(Wiring); |
|
cube(2.0*ThreadThick,center=true); |
|
} |
|
if (Wiring) { |
|
translate([0,0,BktOuter.y/2]) // remove rubble from wire bore |
|
rotate([0,90,0]) |
|
translate([0,0,-BktOuter.x]) |
|
rotate(180/6) |
|
PolyCyl(CableOD,2*BktOuter.x,6); |
|
} |
|
} |
|
|
|
if (false) |
|
translate([-(BktOuter.x/4 + ThreadWidth),0,ThreadThick/2]) // adhesion pad |
|
cube([BktOuter.x/2,BktOuter.x – BktWalls.x,ThreadThick],center=true); |
|
|
|
// translate([BktOuter.x/3,0,ThreadThick/2]) // adhesion pad |
|
// cube([0.3*BktOuter.x,0.7*BktOuter.x,ThreadThick],center=true); |
|
|
|
if (false) |
|
for (j = [-1:1]) // tie pad to bottom of cap |
|
translate([-(4*ThreadWidth)/2,j*(BktOuter.x – 2*ThreadWidth)/2,ThreadThick/2]) |
|
cube([4*ThreadWidth,2*ThreadWidth,ThreadThick],center=true); |
|
} |
|
} |
|
|
|
//—– |
|
// Heatsink extrusion + LED plate |
|
// Centered on Y with Length extending in +X |
|
|
|
module Bracket(Length = 10) |
|
translate([0,-BktOuter.x/2,0]) |
|
rotate([90,0,90]) |
|
linear_extrude(height = Length,convexity=3) |
|
polygon(points=BracketPoints); |
|
|
|
//—– |
|
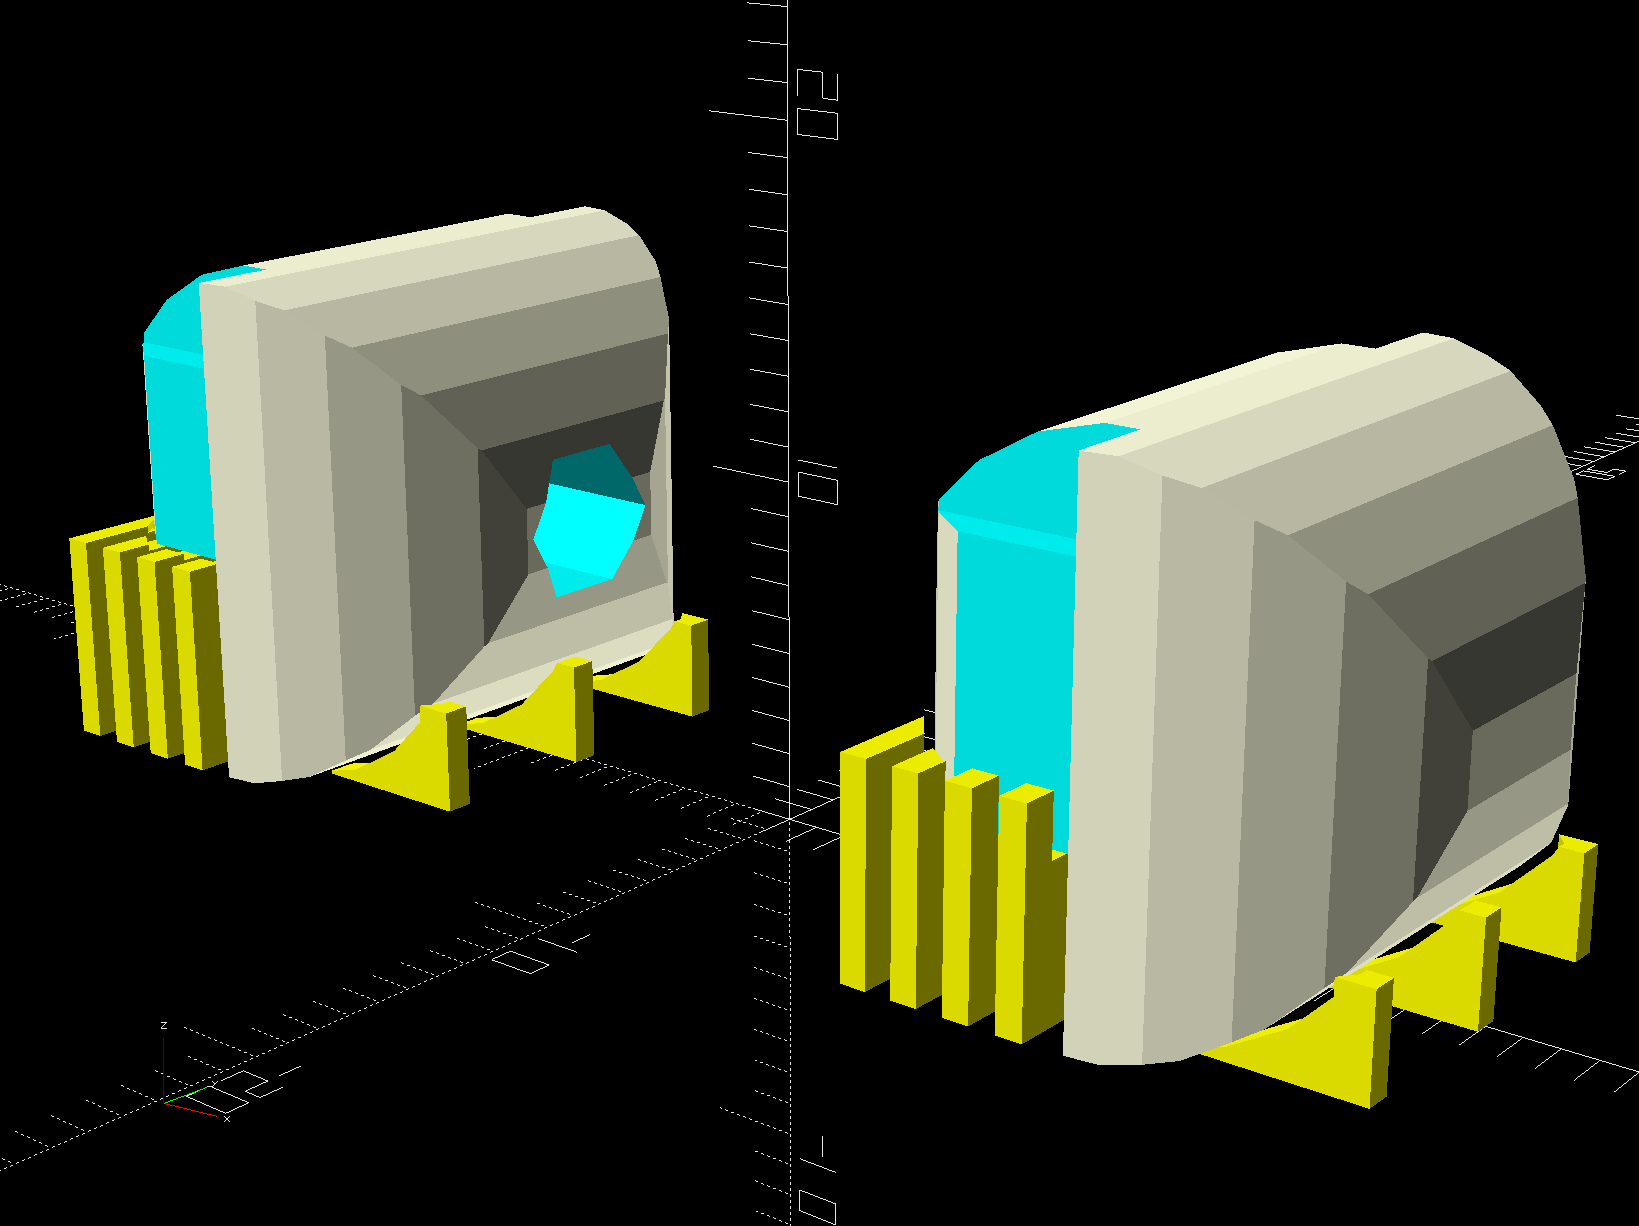
// Build things |
|
|
|
if (Layout == "Bracket") |
|
Bracket(); |
|
|
|
if (Layout == "Endcap") |
|
Endcap(); |
|
|
|
if (Layout == "Show") { |
|
translate([BktOuter.x,0,0]) |
|
Endcap(Wiring[1]); |
|
translate([-BktOuter.x,0,0]) |
|
rotate(180) |
|
Endcap(Wiring[0]); |
|
color("Yellow",0.35) |
|
translate([-BktOuter.x/2,0,0]) |
|
Bracket(BktOuter.x); |
|
} |
|
|
|
if (Layout == "Build") { |
|
translate([BktOuter.y,0,0]) { |
|
Endcap(Wiring[0]); |
|
if (BuildSupport) |
|
Support(Wiring[0]); |
|
} |
|
translate([-BktOuter.y,0,0]) { |
|
Endcap(Wiring[1]); |
|
if (BuildSupport) |
|
Support(Wiring[1]); |
|
} |
|
} |