They’re everywhere:
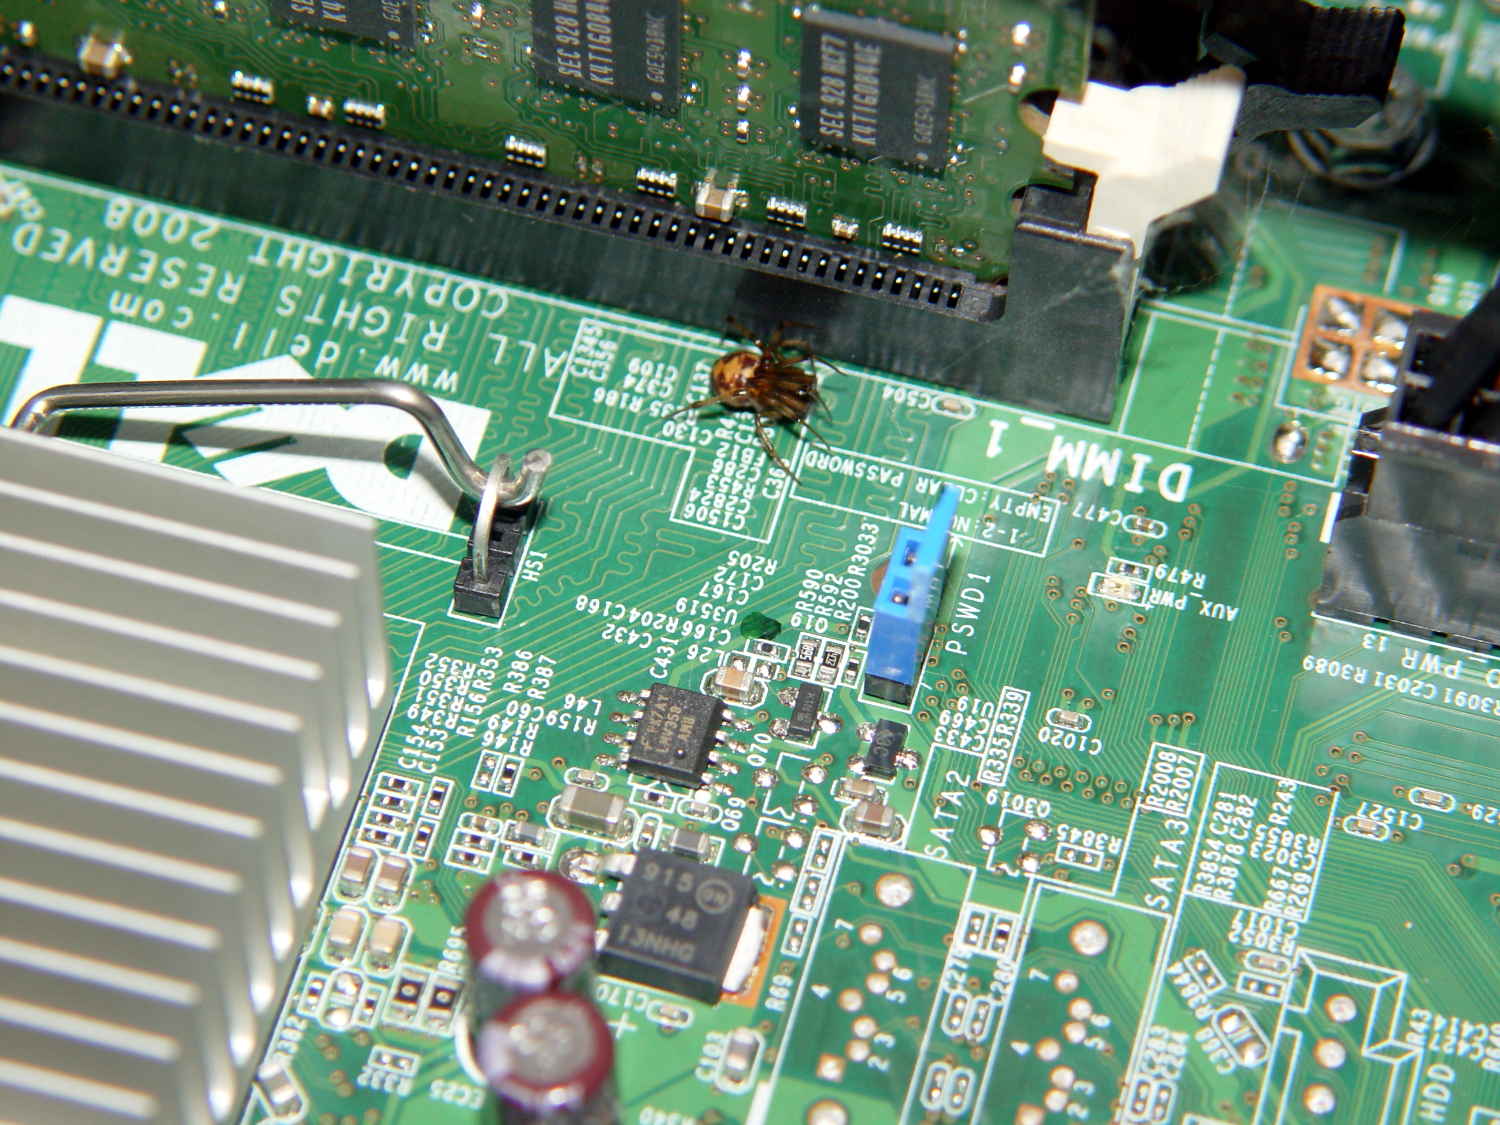
Found it while shuffling video cards…
The Smell of Molten Projects in the Morning
Ed Nisley's Blog: Shop notes, electronics, firmware, machinery, 3D printing, laser cuttery, and curiosities. Contents: 100% human thinking, 0% AI slop.
Remembering which tweaks worked
They’re everywhere:
Found it while shuffling video cards…
It turns out, for some reasons that aren’t relevant here, that I’ll be using the Adafruit Arduino LCD panel for the sewing machine control panel, at least to get started. In mulling that over, the notion of putting text on the buttons suggests using getting simple pictures with Unicode characters.
Herewith, some that may prove useful:
Of course, displaying those characters require a font with deep Unicode support, which may explain why your browser renders them as gibberish / open blocks / whatever. The speed glyphs look great on the Unicode table, but none of the fonts around here support them; I’m using the Droid font family to no avail.
Blocks of interest:
The links in the fileformat.info table of Unicode blocks lead to font coverage reports, but I don’t know how fonts get into those reports. The report for the Miscellaneous Symbols block suggested the Symbola font would work and a test with LibreOffice show it does:

An all-in-one-page Unicode symbol display can lock up your browser hard while rendering a new page.
Unicode is weird…
Surely you’ve seen the reports on the plumber who sold his Ford F-250 pickup, only to have it reappear on the Syrian front lines, recycled into an anti-aircraft gun platform:

That’s the most spectacular example I’ve seen of what happens when you leave personal data on hardware that’s no longer under your control, but imagine what would happen if your junked hard drive wound up holding, oh, say, a few gigabytes of kiddy porn, along with your old letters and spreadsheets.
A visit from the DHS agents would look downright appealing.
You could always scrub the platters clean:
The gun has shrapnel shields and might actually be an anti-aircraft gun, but it’s obviously pounding ground-level targets…
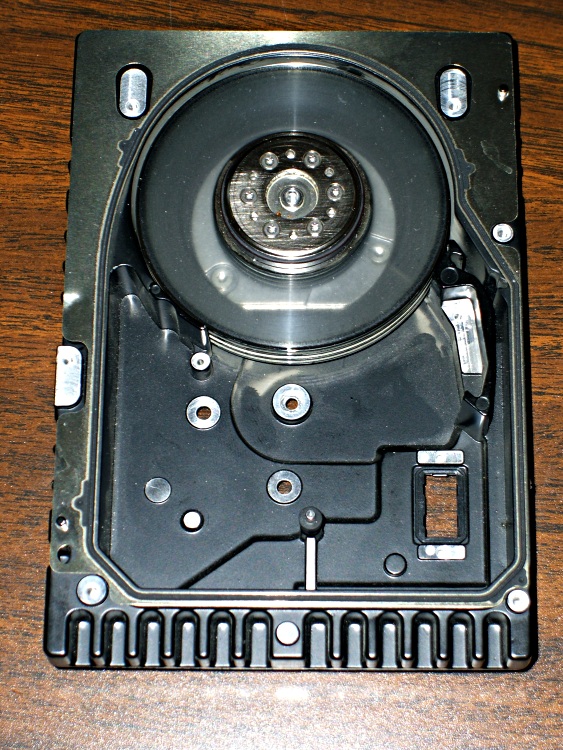
I recently exhumed an Iomega 500 GB Home Network Hard Drive (model MDHD-500-N) from the Big Box o’ Drives, with the intent of dumping video files from the Sony HDR-AS30 helmet camera thereupon.
Remember Iomega of ZIP Drive fame? Seems EMC Borged ’em a while back, collided with Lenovo, discarded all the old hardware support, and that’s the end of that story.
Exhuming the setup password from my backup stash wasn’t worth the effort, so I experimentally determined that holding the Reset switch closed while turning the drive on blows away the existing configuration. It woke up, asked for an IP address, got 192.168.1.52 from the DHCP server (you can find that by checking the router’s tables), and popped up the administration console at 192.168.1.52:80 as you’d expect.
The userid will always be admin, but you can change the password from admin to whatever you like; you may safely assume I have done somewhat better than what you see below.
Twiddling the configuration through the IOmega web-based console:
Changing either the IP address or the password requires logging in again, of course.
I reformatted the drive, just to be sure.
Then, after a bit of Googling to remember how all this works…
A line in /etc/hosts (left over from the last time I did this) gives the new static IP address:
192.168.1.10 nasty
Install the cifs-utils package to enable mounting the drive.
Create a mount point:
sudo mkdir /mnt/video
Create a file (/root/.nas-id) holding the super-secret credentials used to gain access to the drive:
domain=WHATSMYNET
username=ed
password=not-admin
Then restrict the file to the eyes of the root user:
sudo chmod 700 /root/.nas-id
It’s not clear that the username or domain really make any difference in this situation, but there they are.
Define where and how to mount the network drive with a new line at the bottom of /etc/fstab, which refers to the aforementioned super-secret credentials file:
//nasty/PUBLIC /mnt/video cifs noauto,uid=ed,credentials=/root/.nas-id 0 0
Mounting it with my userid gives the shared directories & files proper permissions for me (and nobody else, not that anybody else around here cares).
So the manual mounting process looks like this:
sudo mount /mnt/video
Adding the user mount option would eliminate the sudo, but manual mounting won’t be necessary after a normal boot when the automagic startup script does the deed.
The drive must have the noauto attribute to prevent the upstart Pachinko machine from trying to mount the network drives before the network comes up. Actually mounting the drive at the proper time requires an additional line in /etc/init/local.conf:
description "Stuff that should be in /etc/rc.local"
author "Ed Nisley - KE4ZNU"

start on (local-filesystems and net-device-up IFACE=em1)
stop on shutdown

emits nfs-mounted

script

logger Starting local init...

logger Mounting NFS (and CIFS) filesystems
mount /mnt/bulkdata
mount /mnt/userfiles
mount /mnt/diskimages
mount /mnt/music
mount /mnt/video
initctl emit nfs-mounted
logger Ending local init

end script
The reason the drive wound up in the Big Box o’ Hard Drives was its lethargic transfer speed; copying a 4 GB video file from either the MicroSDXC card (via an SD adapter) or the previous 750 GB USB-attached hard drive to the IOmega NAS trundles along at a little over 6 MB/s. The camera stores 25 Mb/s = 3 MB/s of data in 1080p @ 60 fps, so figure 1/2 hour of copying per hour of riding. The USB drive can write data from the aforementioned MicroSDXC card at 18 MB/s, so the card and USB interface aren’t the limiting factors.
I’m not (generally) in a big hurry while copying files from the camera’s SD card, because that’s now automated:
#!/bin/sh
thisdate=$(date --rfc-3339=date)
echo Date is [$thisdate]
# IOmega NASalready mounted as /mnt/video in fstab
mkdir /mnt/video/$thisdate
sudo mount -o uid=ed /dev/sdb1 /mnt/part
rsync -ahu --progress /mnt/part/MP_ROOT/100ANV01/ /mnt/video/$thisdate
if [ $? -eq 0 ] ; then
 rm /mnt/part/MP_ROOT/100ANV01/*
 sudo umount /mnt/part
fi
I’ve been discarding the oldest month of videos as the USB hard drive fills up, which will happen a bit more often than before: the drive’s 466 GB can hold barely 35 hours of ride video.
While looking for something else, I found the old Trust Multimedia Mouse and discovered its nice grippy rubber surfaces had become adhesive slime. Graduated efforts with water, rubbing alcohol, and denatured alcohol being unavailing, I finally hit it with xylene and that did the trick:
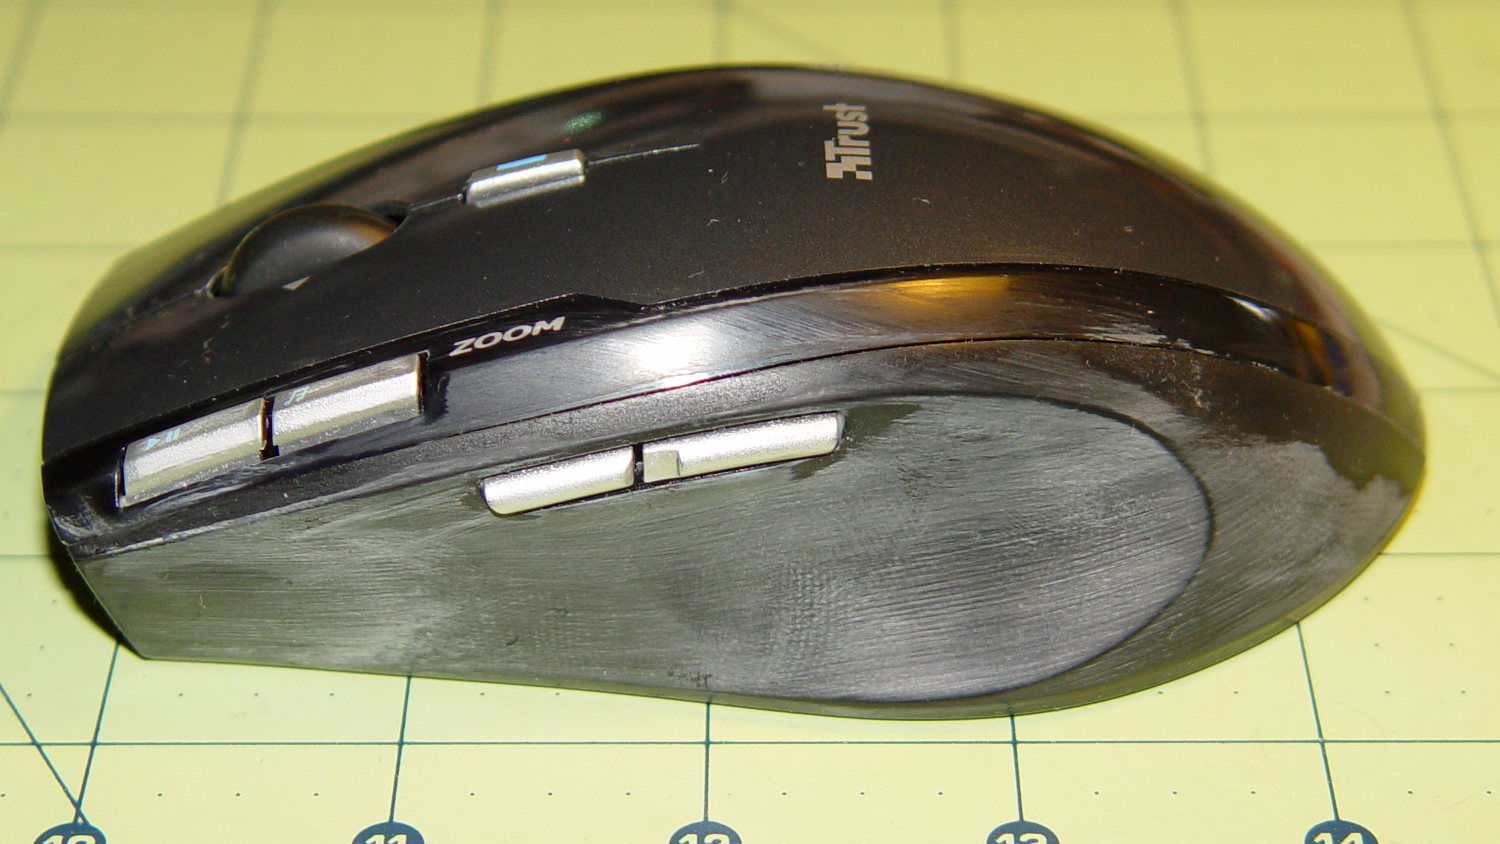
Of course, xylene also wiped away the fancy button markings and irretrievably scarred the surface, but at least I can pick the mouse up without having it stick to my hand. Not that I pick it up that often, obviously.
Several other gadgets have a similar grippy finish, so now I know what to do when it turns gummy: throw the gadgets out…
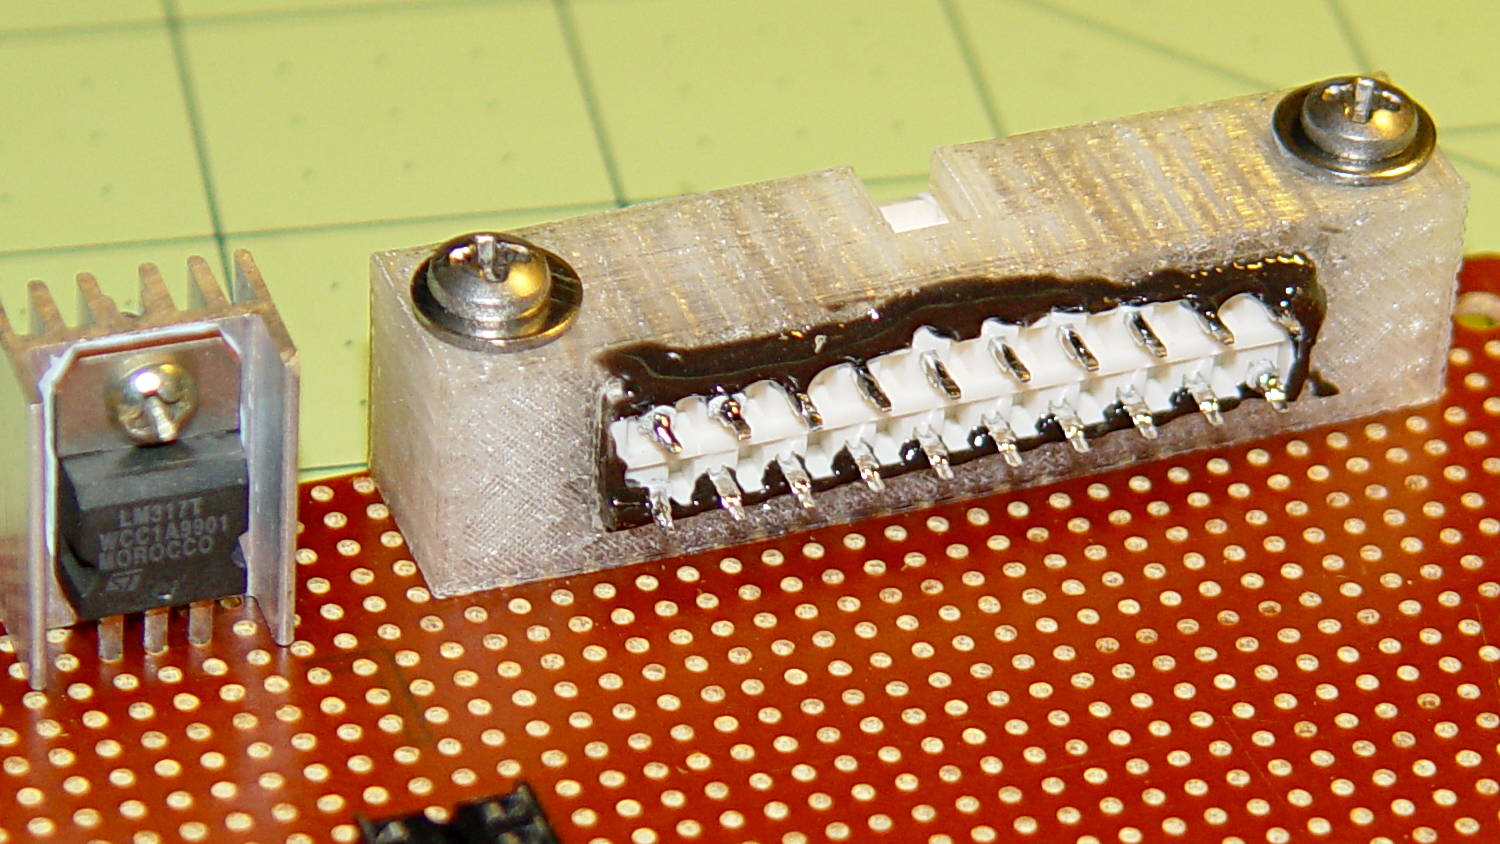
The GX270 case contains a perfectly serviceable ATX power supply that can power all the bits & pieces that don’t run directly from the AC power line. I torched the connector off the system board, but there’s no practical way to mount it standing up through the prototyping board I’m using for the low voltage electronics. This bracket surrounds that connector and holds it at right angles to the board, with a pair of screws clamping it in place:

I invoked the shade of Willy McCoy, slashed the outside of the connector with a razor knife, buttered it up with epoxy, and shoved it flush inside the adapter. That messy epoxy bead around the joint should prevent it from pulling out to the front:
The solid model looks like you’d expect:
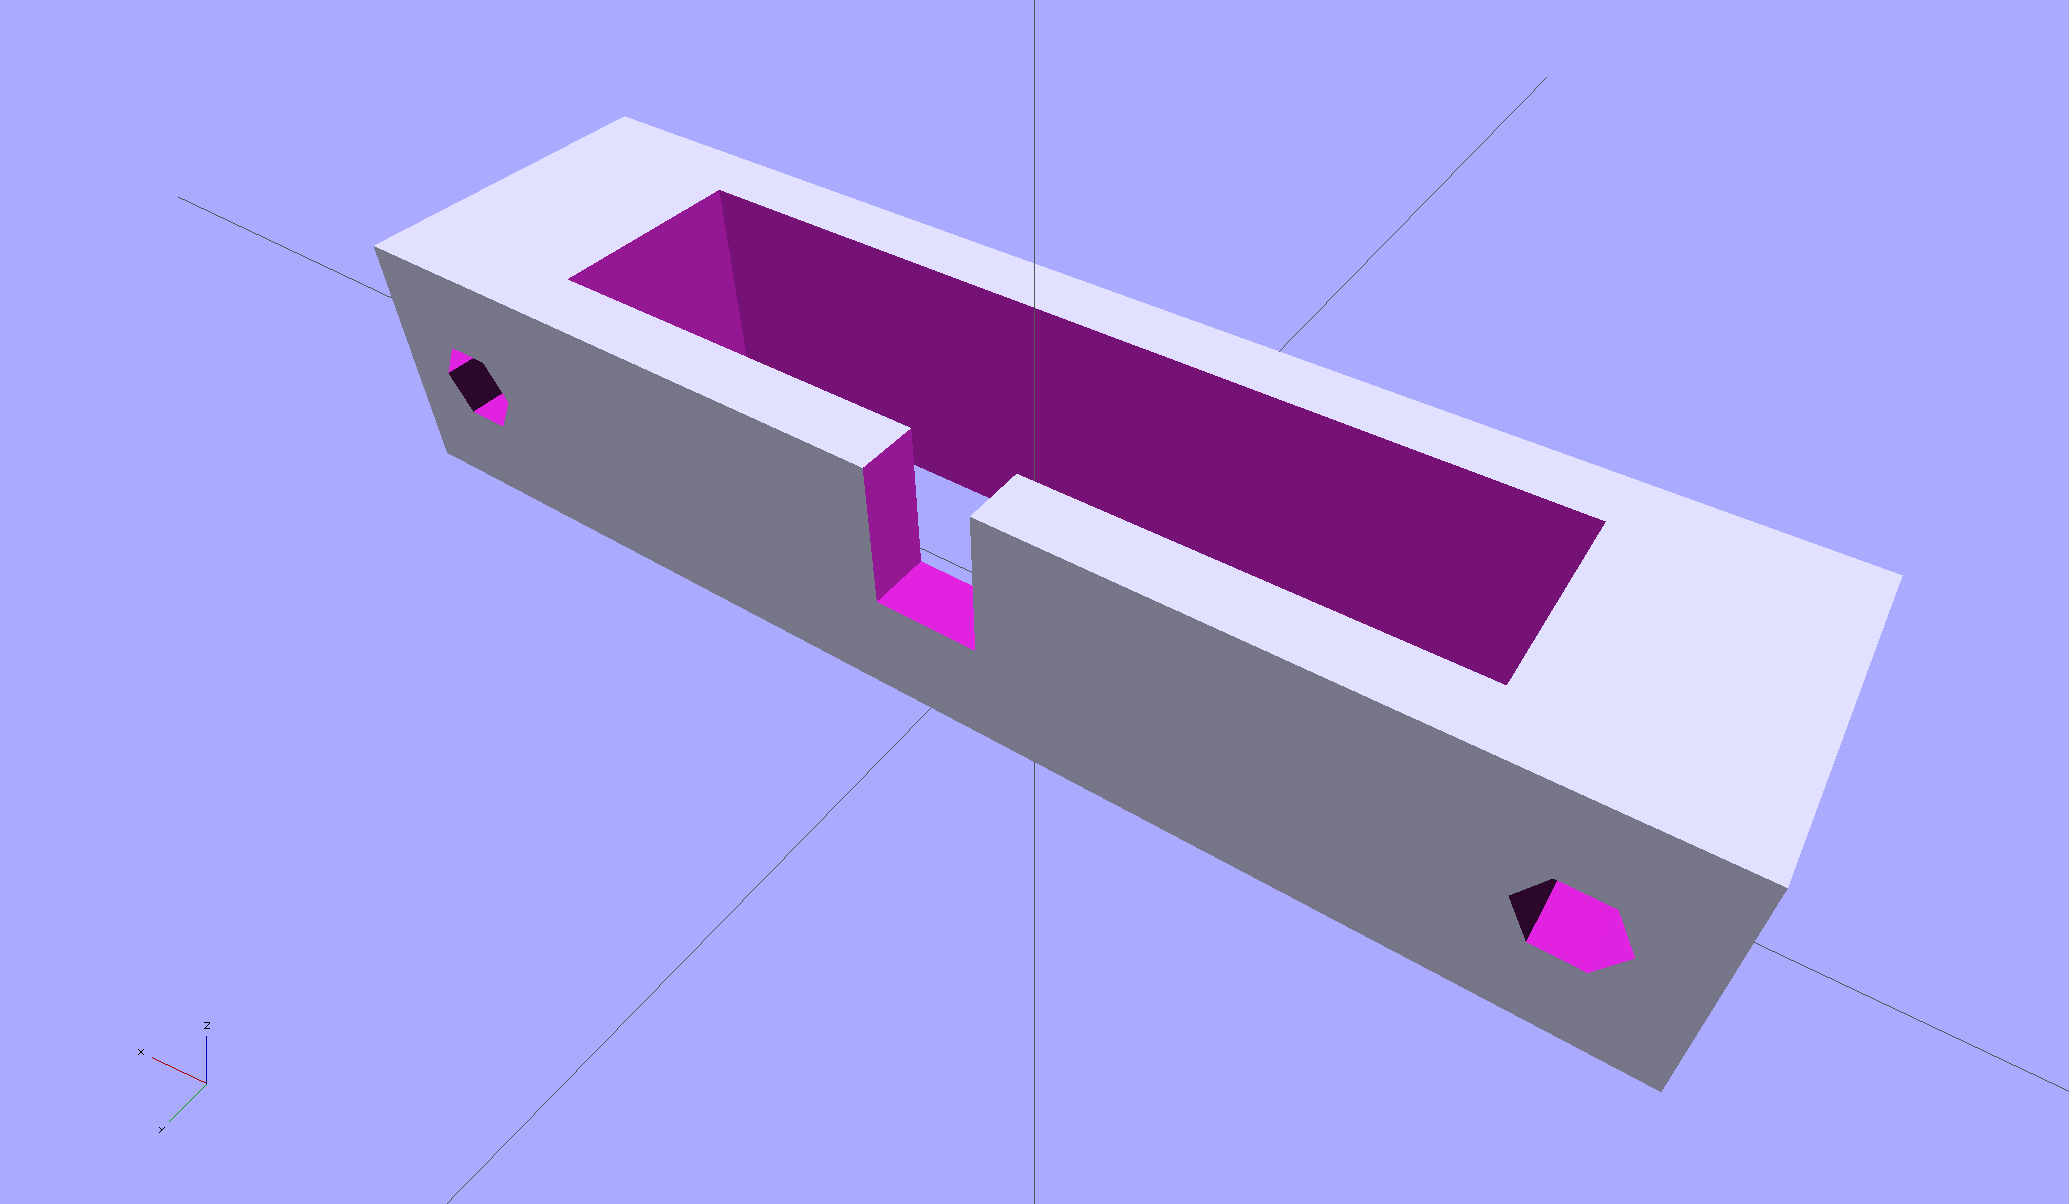
In the unlikely event you need one, make sure the slot clears the locking clip on your ATX connector, as they differ between (at least) the 20 and 24 pin versions. This is actually a split 20/24 connector, with the smaller connector terminating elsewhere to power the LED strips.
The OpenSCAD source code:
// ATX power supply connector mounting bracket
// Ed Nisley - KE4ZNU - September 2014

//- Extrusion parameters must match reality!

ThreadThick = 0.20;
ThreadWidth = 0.40;

HoleWindage = 0.2;			// extra clearance

Protrusion = 0.1;			// make holes end cleanly

AlignPinOD = 1.70;			// assembly alignment pins: filament dia

function IntegerMultiple(Size,Unit) = Unit * ceil(Size / Unit);

//----------------------
// Dimensions

Screw = [3.5,7.0];						// mounting screws
OD = 0;
HEAD_OD = 1;

Wall = 3.0;

ATX = [43.5,9.75,12.0];					// connector outline

Shell = ATX + [2*(2*Wall + Screw[OD]),2*Wall,0.0];	// mount outline

Latch = [5.0,5.0,7.0];							// latch overlay

ScrewOC = ATX[0] + Screw[OD] + 2*Wall;

echo(str("Screw OC: ",ScrewOC," mm"));

//----------------------
// Useful routines

module PolyCyl(Dia,Height,ForceSides=0) {			// based on nophead's polyholes

  Sides = (ForceSides != 0) ? ForceSides : (ceil(Dia) + 2);

  FixDia = Dia / cos(180/Sides);

  cylinder(r=(FixDia + HoleWindage)/2,
           h=Height,
           $fn=Sides);
}

module ShowPegGrid(Space = 10.0,Size = 1.0) {

  RangeX = floor(100 / Space);
  RangeY = floor(125 / Space);

	for (x=[-RangeX:RangeX])
	  for (y=[-RangeY:RangeY])
		translate([x*Space,y*Space,Size/2])
		  %cube(Size,center=true);

}

ShowPegGrid();

difference() {
	translate([0,0,Shell[2]/2])						// mount shell
		cube(Shell,center=true);
	translate([0,0,ATX[2]/2])					// connector shell
		cube(ATX + [0,0,2*Protrusion],center=true);

	translate([0,(Latch[1]/2 + ATX[1]/2 - Protrusion),(-Latch[2]/2 + Shell[2])])
		cube(Latch + [0,Protrusion,Protrusion],center=true);

	for (i=[-1,1])
		translate([i*ScrewOC/2,(Shell[1]/2 + Protrusion),Shell[2]/2])
			rotate([90,0,0])
				PolyCyl(Screw[OD],(Shell[1] + 2*Protrusion));

}
The general idea is to gut an old Dell Optiplex GX270 and stuff the high-voltage parts of the sewing machine controller inside a well constructed and solidly grounded metal shield inside a not-too-ugly plastic box. It’d be nice to reuse the power control button and status LEDs on the front panel…
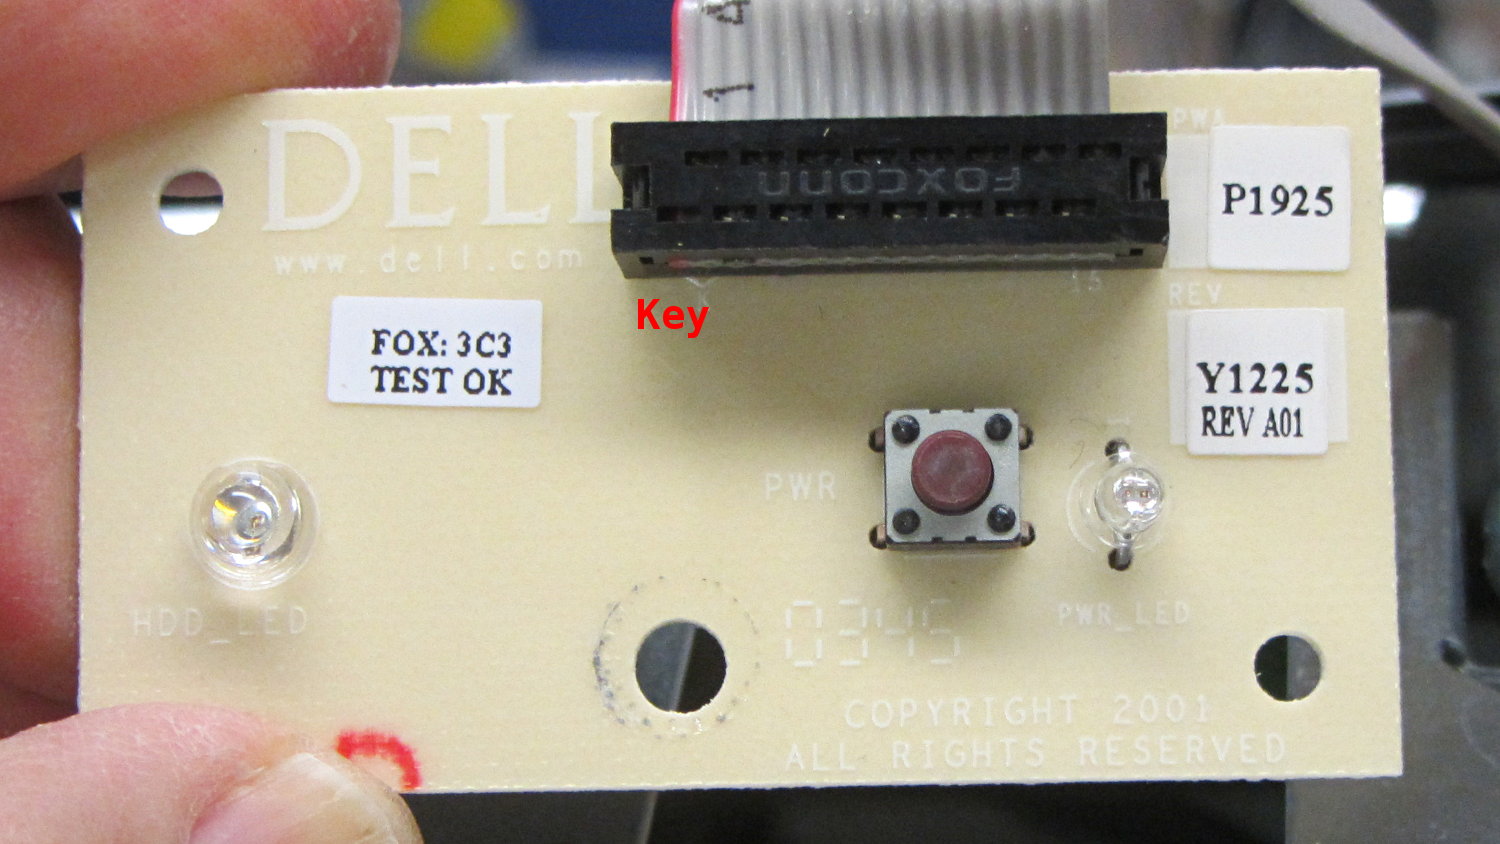
The few parts on the front of the through-hole board:
The copper side, with annotations:
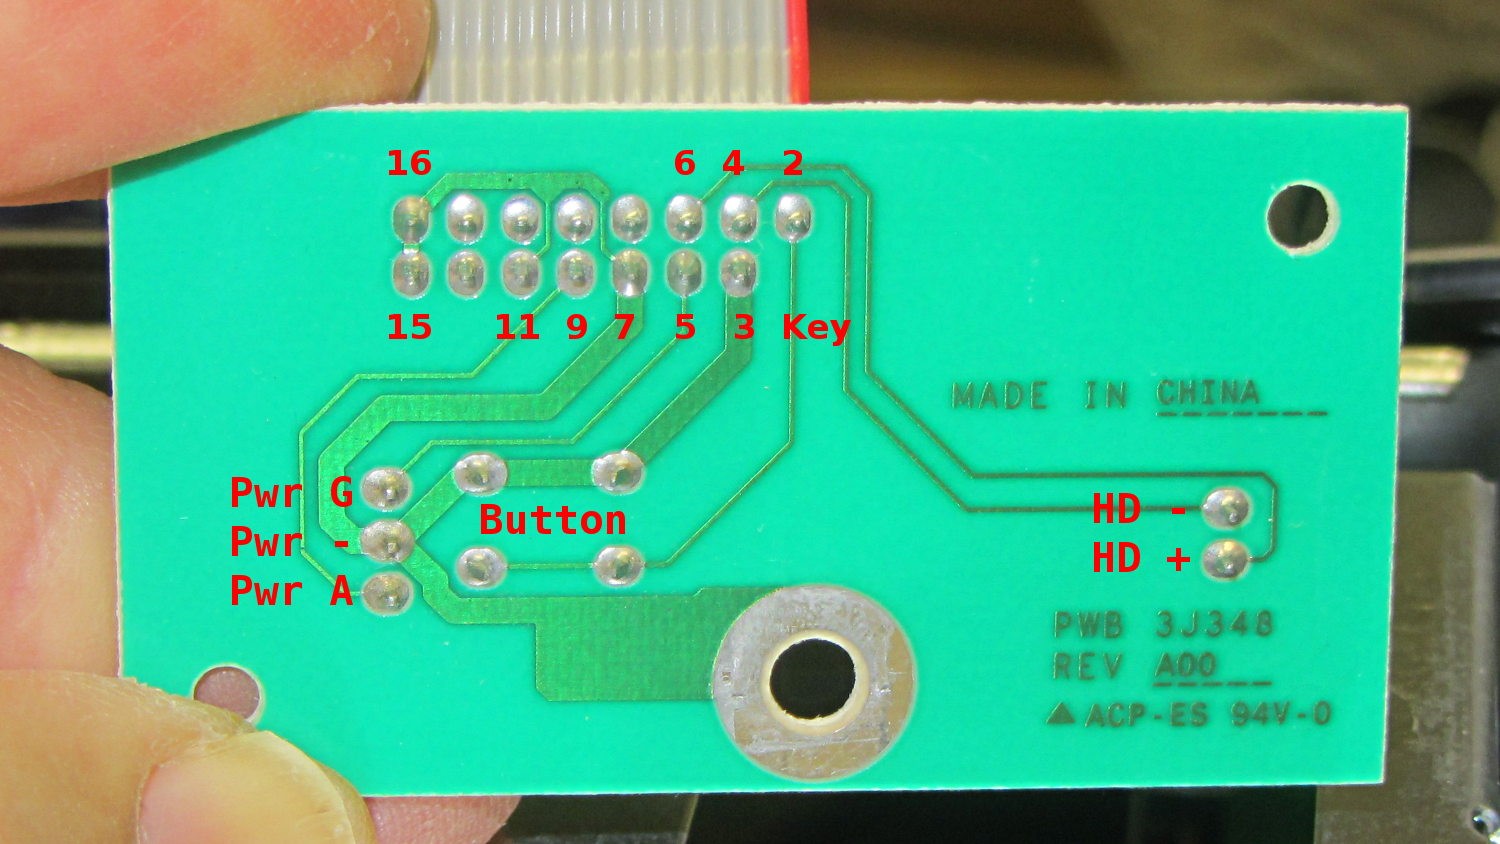
The red tracer on the ribbon cable goes to Pin 1, which is a blind key on the PCB.
The LEDs do not have ballast resistors, so those must go on a circuit board somewhere else.
The connections:
| 16 | 14 | 12 | 10 | 8 | 6 | 4 | 2 |
| Gnd | nc | nc | nc | nc | HD+ | HD- | Button+ |
| Gnd | nc | Gnd | Pwr Y+ | Gnd | Pwr G+ | Gnd | Key |
| 15 | 13 | 11 | 9 | 7 | 5 | 3 | 1 |
