The Smell of Molten Projects in the Morning

Ed Nisley's Blog: Shop notes, electronics, firmware, machinery, 3D printing, laser cuttery, and curiosities. Contents: 100% human thinking, 0% AI slop.

Category: PC Tweakage

Remembering which tweaks worked

  • RPi: Logitech QuickCam for Notebook vs. fswebcam

    Combining the camera data I collected a while ago with a few hours of screwing around with this old Logitech camera:

    Logitech QuickCam for Notebook Plus - front
    Logitech QuickCam for Notebook Plus – front

    I’m convinced it’s the worst camera I’d be willing to use in any practical application.

    The camera offers these controls:

    fswebcam --list-controls
    --- Opening /dev/video0...
    Trying source module v4l2...
    /dev/video0 opened.
    No input was specified, using the first.
    Available Controls Current Value Range
    ------------------ ------------- -----
    Brightness 128 (50%) 0 - 255
    Contrast 128 (50%) 0 - 255
    Gamma 4 1 - 6
    Exposure 2343 (8%) 781 - 18750
    Gain, Automatic True True | False
    Power Line Frequency Disabled Disabled | 50 Hz | 60 Hz
    Sharpness 2 0 - 3
    Adjusting resolution from 384x288 to 320x240.
    

    Putting the non-changing setup data into a fswebcam configuration file:

    cat ~/.config/fswebcam.conf
    # Logitech QuickCam for Notebook Plus -- 046d:08d8
    device v4l2:/dev/video0
    input gspca_zc3xx
    resolution 320x240
    scale 640x480
    set sharpness=1
    #jpeg 95
    set "power line frequency"="60 hz"
    

    Trying to use 640×480 generally produces a Corrupt JPEG data: premature end of data segment error, which looks no better than this and generally much worse:

    Logtech 08d8 - 640x480
    Logtech 08d8 – 640×480

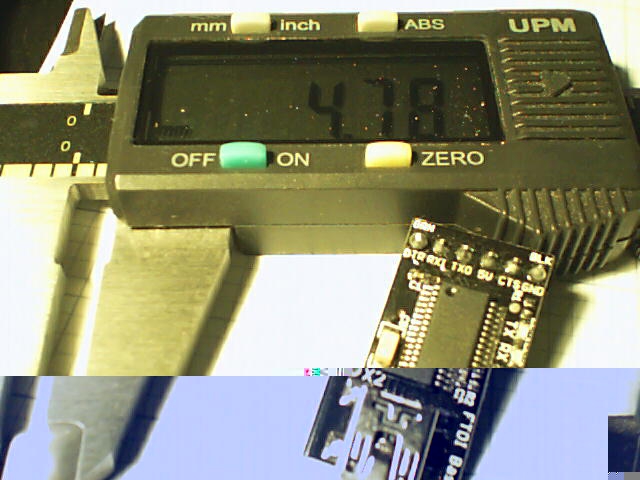
    The top of the picture looks pretty good, with great detail on those dust particles, but at some point the data transfer coughs and wrecks the rest of the image. I could crop the top half to the hipster 16:9 format of 640×360, but the transfer doesn’t always fail that far down the image.

    The -R flag that specifies using direct reads instead of mmap, whatever that means, doesn’t help. In fact, the camera generally crashes hard enough to require a power cycle.

    Delaying a second with -D1 and / or skipping a frame with -S1 don’t help, either.

    The camera works perfectly at 640×480 using fswebcam under Xubuntu 14.04 on a Dell Latitude E6410 laptop, so I’m pretty sure this is a case of the Raspberry Pi being a bit underpowered for the job / the ARM driver taking too long / something totally obscure. A random comment somewhere observed that switching from Raspbian to Arch Linux (the ARM version) solved a similar video camera problem, so there’s surely room for improvement.

    Dragorn of Kismet reports that the Raspberry Pi USB hardware doesn’t actually support USB 2.0 data rates, which also produces problems with Ethernet throughput. The comments in that slashdot thread provide enough details: the boat has many holes and it’s not a software problem.

    For lack of anything more adventurous, the config file takes a 320×240 image and scales it up to 640×480, which looks about as crappy as you’d expect:

    Logtech 08d8 - 320x240 scaled
    Logtech 08d8 – 320×240 scaled

    Even that low resolution will occasionally drop a few bytes along the way, but much less often.

    The picture seems a bit blown out, so set the exposure to the absolute minimum:

    fswebcam -c ~/.config/fswebcam.conf --set exposure=781 "Logitech 08d8 - expose 781.jpg"
    

    Which looks like this:

    Logitech 08d8 - expose 781
    Logitech 08d8 – expose 781

    Given that’s happening a foot under a desk lamp aimed well away from the scene, the other end of the exposure scale around 18000 produces a uselessly burned out image. I think a husky neutral-density filter would be in order for use with my M2’s under-gantry LED panels. The camera seems to be an early design targeting the poorly illuminated Youtube / video chat market segment (I love it when I can talk like that).

    There’s probably a quick-and-dirty Imagemagick color correction technique, although Fred’s full-blown autocorrection scripts seem much too heavy-handed for a Raspberry Pi…

  • RPi: Static WiFi Addressing

    Having configured ssh on the Raspberry Pi for public keys, the next step is to cut the cord by configuring the USB WiFi dongle to automagically come up with a static IP.

    [Update: As of 2017, set a static IP by tweaking /etc/dhcpcd.conf instead. Search the blog for that to find recent descriptions. ]

    Make /etc/network/interfaces look like this:

    auto lo
    
    iface lo inet loopback
    
    #iface eth0 inet dhcp
    
    auto eth0
    #iface eth0 inet static
    iface eth0 inet manual
     address 192.168.1.209
     gateway 192.168.1.1
     netmask 255.255.255.0
     network 192.168.1.0
     broadcast 192.168.1.255
    
    allow-hotplug wlan0
    
    #iface wlan0 inet manual
    iface wlan0 inet static
     address 192.168.1.9
     gateway 192.168.1.1
     netmask 255.255.255.0
     network 192.168.1.0
     broadcast 192.168.1.255
    
    #wpa-roam /etc/wpa_supplicant/wpa_supplicant.conf
    wpa-conf /etc/wpa_supplicant/wpa_supplicant.conf
    
    iface default inet dhcp
    

    Then set up /etc/wpa_supplicant/wpa_supplicant.conf thusly:

    ctrl_interface=DIR=/var/run/wpa_supplicant GROUP=netdev
    update_config=1
    
    network={
    	ssid="whatever it might be"
    	psk="choose your own password"
    }
    

    You want different IP addresses for the eth0 and wlan0 devices, because you never know when you’ll be forced to use them at the same time.

    Using wpa-conf rather than wpa-roam prevents the machinery from automagically doing things when you’re not watching.

    The router can hand out IP addresses based on MACs, but that means bottling up all that configuration in a single device that might go toes up. Forcibly configuring each device to a static IP adds a bit of resilience to the network, right up to the point where you must change all of them at once.

    Alas, the router seemed to lose track of the Pi after a day. Pinging from my desktop box reported Destination Host Unreachable, even though signing on through the USB keyboard showed the USB WiFi link (a netis WF2123) was still up. Signing on to the router and refreshing the DHCP list (even though the RPi has a static IP) knocked things loose: suddenly the RPi became pingable.

    It seems the WiFi link turns itself off after a while, which can be averted by tweaking the options:

    sudo nano /etc/modprobe.d/8192cu.conf
    # Disable power saving
    options 8192cu rtw_power_mgnt=0 rtw_enusbss=0


    The WordPress sourcecode tag seems to turn underscores into blanks [Update: on the last line of a sourcecode block, which I’ve now forced to be a blank line; the options should read rtw_power_mgmt and rtw_enusbss, respectively.

    Anyhow, the rtw_enusbss option prevents the USB interface from going down. It was already zero in the default configuration, but I presume there’s no harm in clearing it again.

  • Raspberry Pi Setup Tweaks

    Things to remember during Raspberry Pi setups…

    You can do some of this through raspi-config.

    The NOOBS setup configures the HDMI video parameters to work with the worst possible display, so edit the /boot/config.txt (per the Official Doc):

    • Comment out all the NOOBS auto-configuration entires at the bottom
    • Set disable_overscan=1

    The highest mutually compatible setting for the U2711 monitor was 1920×1080@60Hz, which turned out to be CEA Mode 16 and was automagically selected as the monitor’s “native” mode. Disabling overscan lets the X session use the entire monitor screen, rather than being confined within the (huge) black overscan borders.

    That requires a power off-on cycle to take effect. Shut down properly with sudo shutdown -H now or just sudo halt.

    To set the default size of the lxterminal window so that it’s big enough to be useful, edit the Exec entry (down near the bottom) in /usr/share/raspi-ui-overrides/applications/lxterminal.desktop to read:

    Exec=lxterminal --geometry=80x60
    

    The Droid font family seems more readable than the default selection.

    Create a user for yourself, just so SSH will eventually work the way it does for all the other boxes. The group list comes from the default pi user:

    sudo adduser ed
    sudo usermod -a -G pi,adm,dialout,cdrom,sudo,audio,video,plugdev,games,users,netdev,input,spi,gpio ed
    

    Regrettably, the default pi user has the same numeric ID as the one I use on all the other boxes, which leads to problems with file sharing permissions. I may need to swap numeric IDs to make this work out correctly.

    To set a static IP, edit /etc/network/interfaces thusly:

    #iface eth0 inet dhcp     <-- comment this out to stop DHCP
    
    auto eth0
    iface eth0 inet static
     address 192.168.1.9      <-- obviously, pick your own
     gateway 192.168.1.1
     netmask 255.255.255.0
     network 192.168.1.0
     broadcast 192.168.1.255
    

    Change the hostname in /etc/hostname and /etc/hosts.

    Set up SSH for public-key access on an unusual port by editing /etc/ssh/sshd_config:

    1. Port 12345 <— choose your own
    2. PermitRootLogin no
    3. PasswordAuthentication no

    Create the ~/.ssh directory and put your own public key in it, which you can do from the remote system:

    scp ~/.ssh/id_rsa.pub octopi-1:.ssh/authorized_keys
    # a dummy line to reveal underscores in the previous line
    

    Twiddle ~/.ssh/config on the remote box to include the Pi and specify the unusual port:

    Host octopi-1 thisone thatone anotherone
    	ForwardX11	yes
    	Port	12345   <--- pick your own
    	User	ed
    

    Using ssh-agent -t 4h helps relieve the tedium of typing your passphrase all the time. Then sudo service ssh restart on the pi will require you to use your key passphrase; it’s a Good Idea to remain signed in through Port 22 with the original authorization while you fiddle with this stuff, then sign out when it all works.

    Update with the usual routine:

    sudo apt-get update
    sudo apt-get upgrade
    sudo apt-get dist-upgrade    <-- for system-level update
    sudo apt-get clean           <-- flushes /var/cache/apt/archives to save space
    
  • CD Ripping: Fractional Tracks

    Mary gets books-on-CD at the annual library book sale, but she’s found they’re easier to use in MP3 format. We regard format transformation for our own use as covered by the First Sale Doctrine and Fair Use, but, obviously, various legal opinions differ.

    I use Asunder to rip audio CDs, although it doesn’t handle non-recoverable errors very well at all. Wiping the offending disc with nose oil or ripping from a different drive will resolve most of the issues, but a recent acquisition had a nasty circumferential scratch in the middle of Track 7 that just didn’t respond to Black Magic.

    CDparanoia can rip portions of a track, so a little binary search action extracts the usable data from Track 7:

    cdparanoia "7-7[4:35]" Track7a.wav
    cdparanoia III release 10.2 (September 11, 2008)
    
    Ripping from sector  177155 (track  7 [0:00.00])
    	  to sector  197780 (track  7 [4:35.00])
    
    outputting to Track7a.wav
    
     (== PROGRESS == [                              | 197780 00 ] == :^D * ==)   
    
    Done.
    
    cdparanoia "7[5:30]-7" Track7b.wav
    cdparanoia III release 10.2 (September 11, 2008)
    
    Ripping from sector  201905 (track  7 [5:30.00])
    	  to sector  208894 (track  7 [7:03.14])
    
    outputting to Track7b.wav
    
     (== PROGRESS == [                              | 208894 00 ] == :^D * ==)   
    
    Done.
    

    With that in hand, you import the two WAV files into Audacity with a five second gap between them, drop two seconds of A-440 sine wave in the gap, and export to MP3.

    The M3U playlist entry has the track time in seconds, so I hand-carved that entry to match the abbreviated length:

    #EXTINF:376,Disc 14 Track 7
    14-07 - Track 7.mp3
    

    Done!

  • Thunderbird: Disabling an ISP Email Account

    For reasons that probably make sense to them, Optimum Online (the ISP part of Cablevision) uses totally insecure password-in-the-clear user authentication to the POP3 and SMTP servers. That’s marginally OK for access through their own cable network, but, should you access those servers through a different ISP, you’ve just exposed some sensitive bits to the Internet at large.

    Disabling an account in Evolution requires removing one checkmark:

    Edit → Preferences → Mail Accounts tab → uncheck the account → done!

    Doing the same in Thunderbird, however, requires arcane knowledge and deft surgery, documented in the usual obscure forum post containing most of the information required to pull it off:

    Edit → Preferences → Advanced tab → Config Editor button

    Search for server.server and find the .name entry corresponding to the ISP account. Note the digit identifying the server, which in my case was 1: server1.

    Search for server1 and find the number of the mail.account.* entry with that string in the value field. In my case, that was account1.

    Search for accountmanager to find the mail.accountmanager.accounts entry and remove the account you found from the Value string.

    Done!

    Make a note of all that information, because you must un-futz the accountmanager string to re-enable the account. Of course, if you add or remove any accounts before that, all bets are off.

    There, now, wasn’t that fun?

  • Samba Setup Woes

    As with all Windows boxes, the old Lenovo Q150 (dual booted with Win 7 Home Premium) became slow and cranky, despite not being used for anything other than monthly science and annual taxes. Various fixes and tweaks being unavailing, I swapped in an Optiplex 780 (dual booted with Win 7 Pro), replaced the IBM L191p monitor with the recapped Dell 2005FPW, reinstalled all the programs, and discovered that Samba was intermittent.

    For future reference…

    Win 7 Pro includes the Remote Desktop Protocol server that’s missing from Win 7 Home Premium. Oddly, RDP works better than UltraVNC, using Remmina as a client.

    The file server in the basement runs Xubuntu 14.04 with Samba 4.1.6 and works perfectly with smbclient, showing no glitches at all. Even when the Win 7 box doesn’t show the server shares at all, it’s rock solid to my desktop Xubuntu box.

    The familiar sudo service samba restart doesn’t actually do that any more, so get used to the two-step dance:

    sudo service nmbd restart
    sudo service smbd restart
    

    However, that sometimes seems to start a spurious third copy of smbd (there should be two, for unknown reasons), so it’s better to use a four-step dance:

    sudo service nmbd stop
    sudo service nmbd start
    sudo service smbd stop
    sudo service smbd start
    

    The old SysV init system wasn’t good enough, so they invented the run-all-the-things upstart, then systemd Borged upstart, all while Samba, one of the most critical Windows interfaces, still hasn’t emerged from the original init scripts. They call this progress, but I’m not sure.

    Telling the Samba server to not be the domain controller, which should resolve intermittent pissing matches over who’s on first, had no effect.

    When the Win 7 box does show the shared files, everything works fine: files read & write with the proper permissions, the owners & groups are fine, all is right with the world. In between those moments, however, nothing works, because the share simply doesn’t appear.

    Then, seconds or minutes or tens of minutes later, it’s back!

    Setting map to guest = bad password, as found in the usual random blog comment, had no effect.

    The most recent Samba update replaced the /etc/samba/smb.conf file, so we’ll restart from scratch and see what happens next.

    My general approach to Samba has been to futz around until it mysteriously starts working. That seems not to be of any avail this time around; we may put the tax data on a USB stick and move on.

  • Dell Inspiron E1405 vs. Ubuntu 14.04LTS vs. Broadcom Drivers

    So the ancient Dell E1405 laptop on the Electronics Bench, connected to this-and-that, woke up without network connections. As in, right after booting, the link and activity lights jammed on solid, the usual eth0 device wasn’t there, WiFi was defunct, and nothing made any difference.

    After a bit of searching, the best summary of what to do appears on the Ubuntu forums. The gist of the story, so I need not search quite so much the next time, goes like this:

    The laptop uses the Broadcom BCM4401 Ethernet and BCM4311 WiFi chips, which require the non-free Broadcom firmware found in the linux-nonfree-firmware package. There’s a proprietary alternative in bcmwl-kernel-source that apparently works well for most Broadcom chips, but not this particular set.

    Guess which driver installed itself as part of the previous update?

    The key steps:

    sudo apt-get purge bcmwl-kernel-source
    egrep 'blacklist (b43|ssb)' /etc/modprobe.d/*
    ... then manually kill any files that appear ...
    

    Apparently that problem has been tripping people for at least the last four years. That this is the 14.04 Long Term Support version evidently has little to do with anything at all.

    While I was at it, I deleted all the nVidia packages that somehow installed themselves without my noticing; the laptop has Intel 945 integrated graphics hardware.

    I vaguely recall what I intended to do before this happened…