Ed Nisley's Blog: Shop notes, electronics, firmware, machinery, 3D printing, laser cuttery, and curiosities. Contents: 100% human thinking, 0% AI slop.
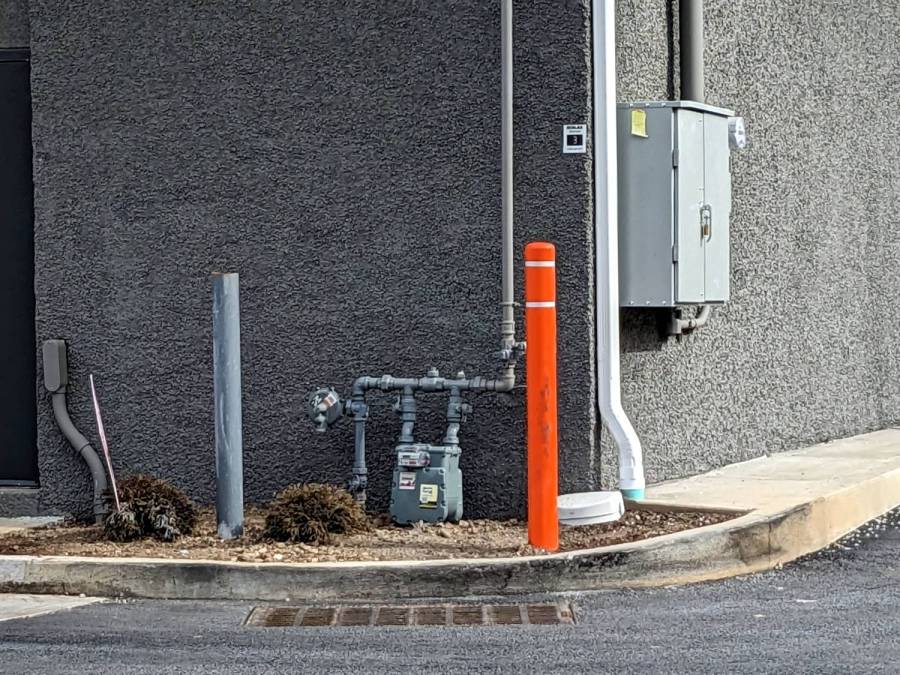
I can’t tell whether the bollard stands in more concrete this time, but the gray pipe to the left of the gas meter is definitely new.
In round numbers, it took less than a week for the first impact, a week for the first repair, and … we shall see.
The white disk just behind it is a rat trap, with a subtle explanatory sign directly above it. The building has three such traps, so they’re apparently trying to stay ahead of a known problem; we find similar traps around most commercial establishments.
Being that type of guy, I wanted to salvage a loooong square-head bolt from the utility pole stub formerly holding up the mailboxes, which would require a few gazillion turns of its square head with the Adjustable Elephant Wrench. After verifying I couldn’t just hammer the mumble thing through the pole, I gave a few turns of the Universal Socket on a ratchet:
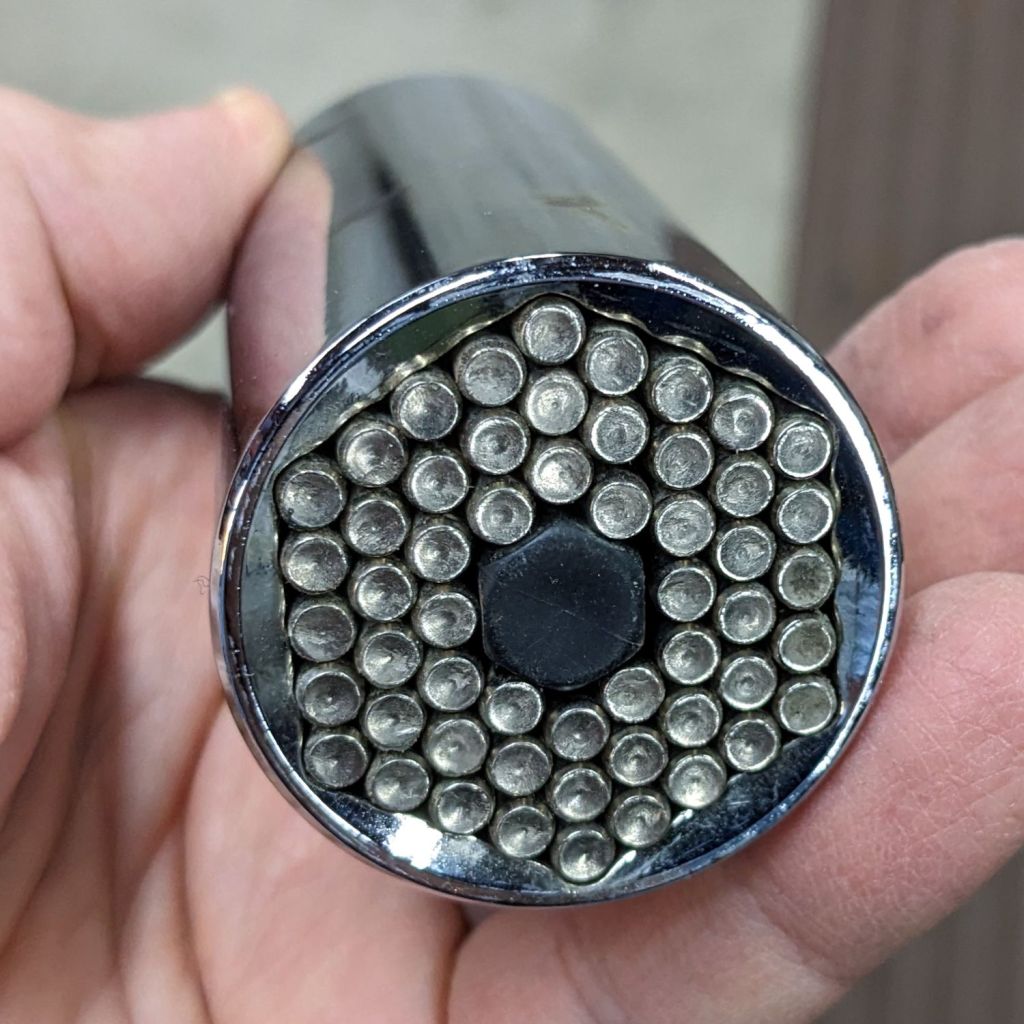
Universal Socket Wrench
It’s intended for goobered hex heads up to 1-¼ inch, but the pins slide down around pretty much anything that sticks out and jam against the shell, so it’s handy for those last-ditch extraction events.
After verifying doing this by hand would occupy me until just before the heat death of the universe, I followed Mad Phil’s signal connector adage: “If you can get to BNC, you can get to anything.”
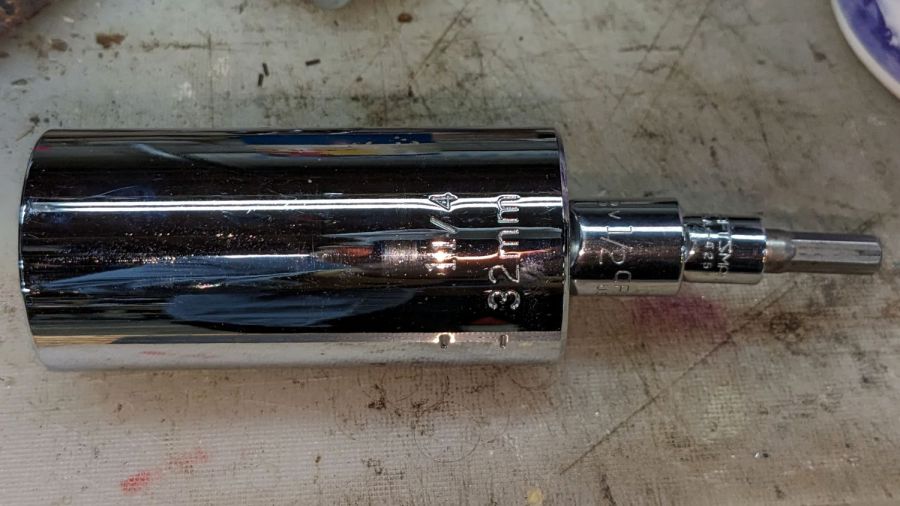
Some rummaging produced this unsteady mechanical ziggurat:
Universal Socket to quarter-inch hex – adapter stack
From bottom to top:
Universal Socket with ½ inch square drive socket
1/2 inch square drive to ¾ inch hex
19 mm (close enough to ¾ inch) 12-point socket to ⅜ inch square drive socket
⅜ inch square drive to ¼ inch square drive socket
¼ inch square drive to ¼ inch hex drive
Then stick the teeny end into the hand drill, rig engines for reverse running, and whine away on that bolt, which obligingly backed right out.
After the fact, I found the obviously missing ¼ to ½ inch square drive adapter hiding in the Drawer o’ Sockets:
Universal Socket – short adapter stack
Which doesn’t make any more sense, but is less likely to fall apart under normal use.
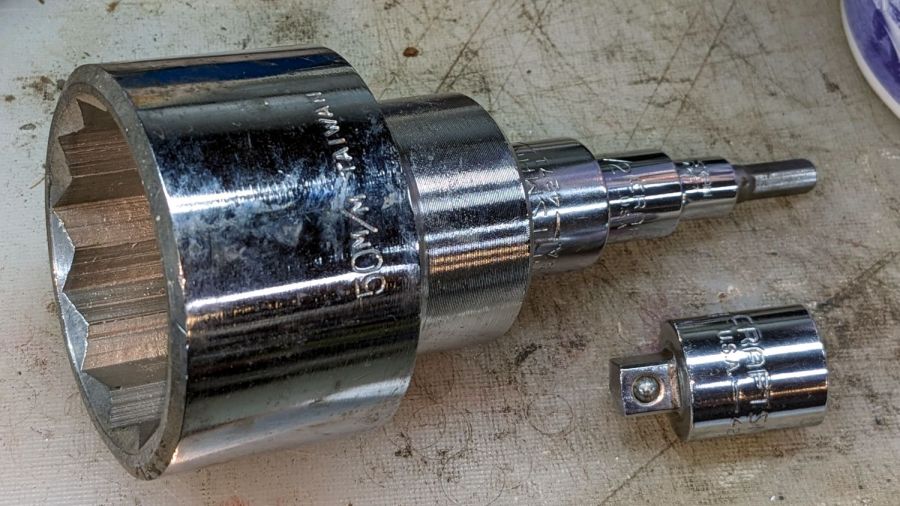
Aaaaand one more adapter makes this possible:
Improper square drive adapter stack
That’s a 50 mm socket turned by ¼ inch hex drive in four easy steps, although I’m reasonably sure it still won’t get the idler bogies off my armored personnel carrier.
The stray adapter steps down from ½ square to ⅜ square, should a need for a breaker bar occur during eyeball surgery.
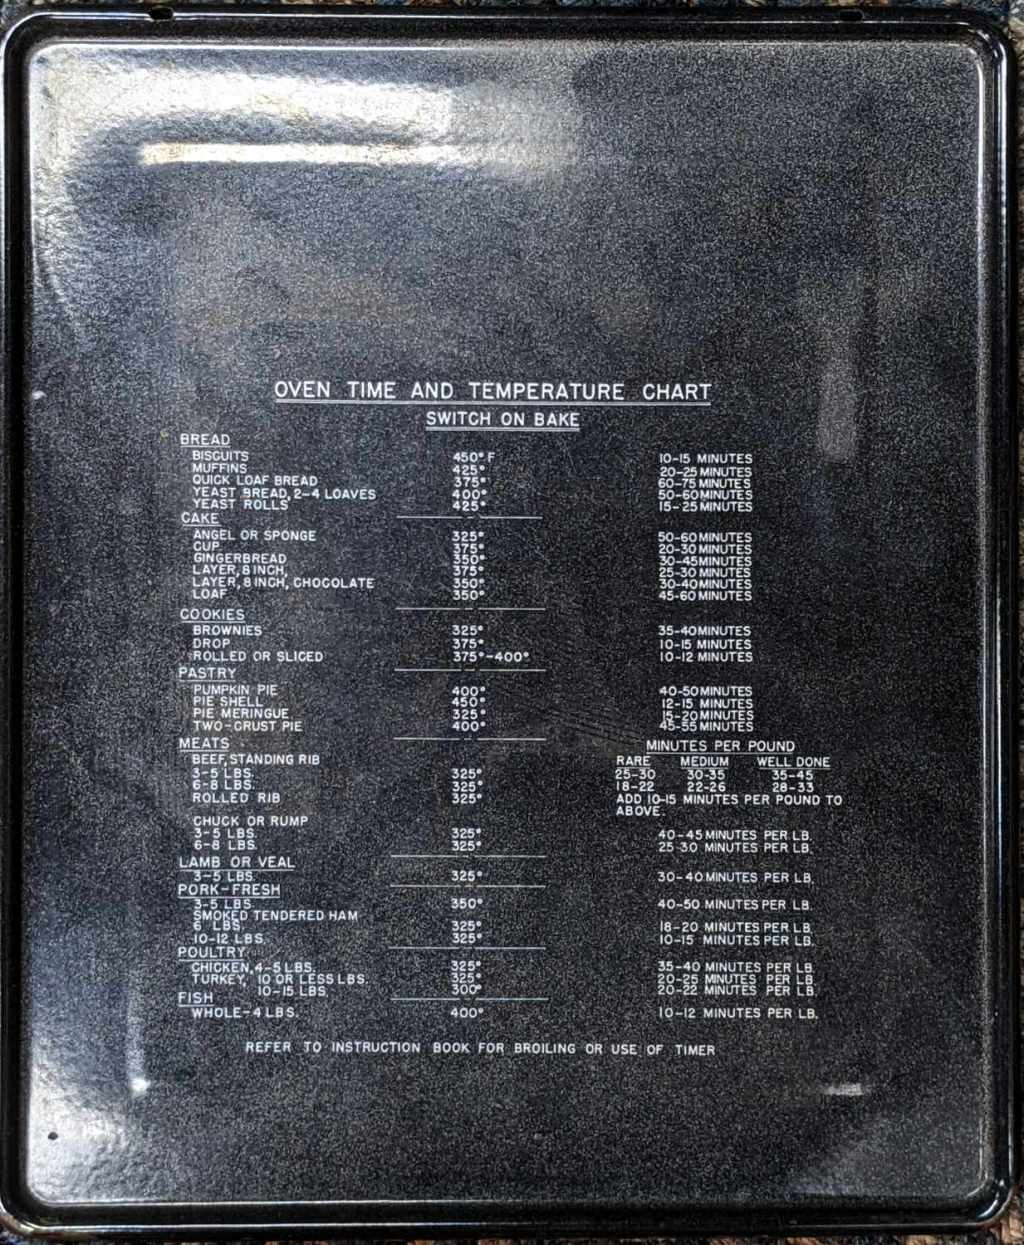
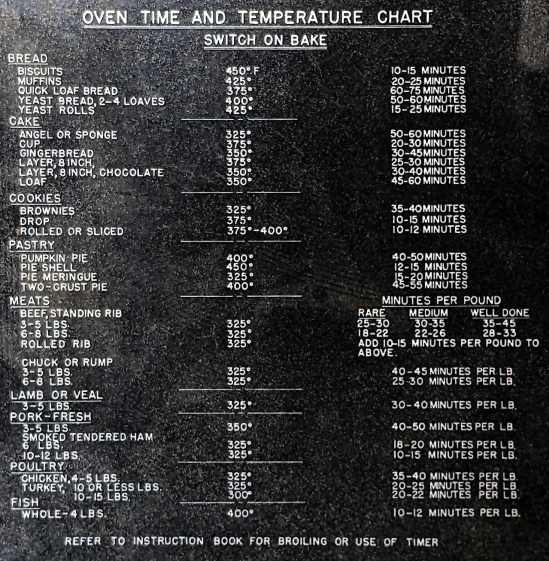
I can’t vouch for their accuracy, but finding recommended baking temperatures and times printed exactly where they will come in handy seems like a great idea.
It’s another example of the rule Eks taught me: When you must look up something, write it where you will need it the next time.
A LightBurn forum discussion about problems making Z-scale (1:220) bricks led me to trying a few ideas on the way to figuring out what was going wrong.
Each brick is about 1.0×0.5 mm, so an entire wall doesn’t cover much territory:
Z-scale bricks – assortment
Yes, those are millimeters along the scale.
The kerf on my 60 W CO₂ laser seems slightly wider than the “mortar” lines should be, so I made a layout with the vertical lines slightly inset from the horizontal ones:
Z Scale Brick Wall – LB layout
That let the kerf complete the lines without burning into the adjacent bricks:
Z Scale Brick Wall – laser lines
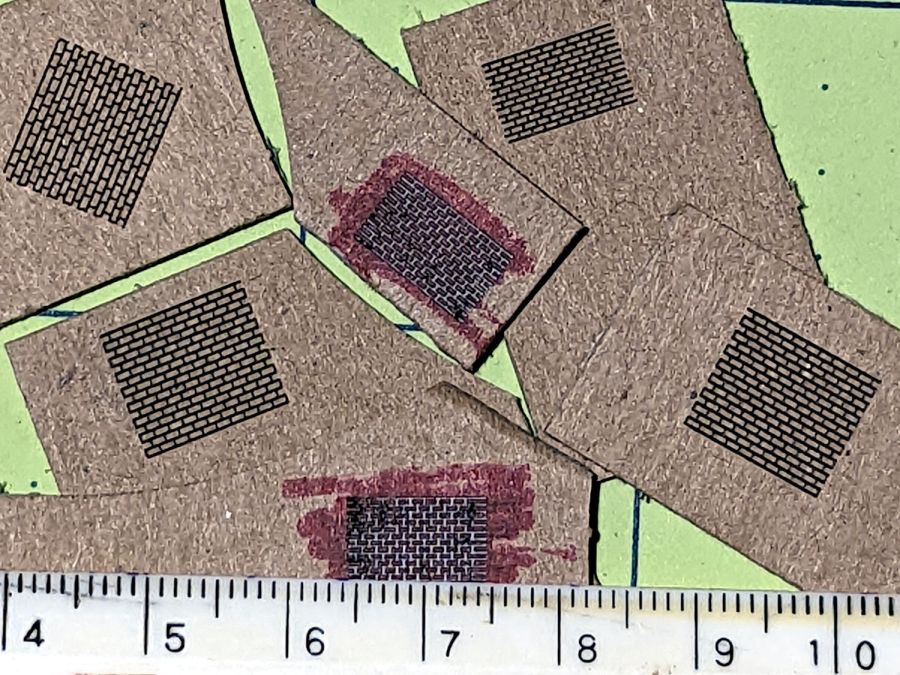
The cuts are obviously too wide (and deep!), but just for fun I colored the chipboard with red marker and rubbed a pinch of flour into the lines:
Z Scale Brick Wall – color and flour
Which looks chunky, but not terrible, for what it is. Maybe concrete blocks would look better?
The next attempt started with a raster bitmap scaled at 254 dpi = 10 pix/mm, so that single-pixel “mortar” lines between 10×5 pixel bricks would be 0.1 mm wide:
Raster Z-Scale Bricks
Scanning the image at 100 mm/s makes each pixel 1 ms “wide” and, because the power supply risetime is on the order of 1 ms, the laser won’t quite reach the 10% power level across the vertical lines:
Raster Z-Scale Bricks – LB layer settings
The raster lines come out lighter and (IMO) better looking:
Z Scale Brick Wall – raster lines
The horizontal lines are darker because the beam remains on at 10% across their full length, but the overall result seems much closer to the desired result.
The original poster will use a diode laser and, combining all the ideas we came up with, now has a path toward making good, albeit invisibly small, bricks.
Rt 376 had accumulated some sleet overnight and freezing rain was still falling. The driver apparently lost control around the curve, missed the fire hydrant behind me, and went up the embankment sideways at a pretty good clip.
As far as I can make out, the left front door took out the mailbox post, which was the stump of a utility pole installed long before we bought the property:
Mailbox killer – snapped post
Admittedly, the post was rotten around its base, but remained a substantial chunk of wood. The black plastic curl is the air deflector formerly sealing the front of the car’s undercarriage.
Seen from the far end of the debris field, the car smashed dead center into the mighty honeysuckle bush, shed a variety of small parts, recoiled backwards, and tagged the tree as it rolled down the embankment:
Mailbox killer – yard view
The mailboxes sit on the shoulder to the right of the car.
No serious injuries to the driver or passengers, although they got an ambulance ride to the ER to make sure.
Those dents just ain’t gonna buff out:
Mailbox killer – flatbed
I did get three years out of the repaired mailbox hinges and perhaps I should preemptively transfer the hardware to the new mailbox.