Between the ACM presentation, an upcoming Digital Machinist column, and homeowner stuff “not relevant here”, I’ll be posting intermittently for a week or so.
Algorithmic Artifacts will be getting more attention!
The Smell of Molten Projects in the Morning
Ed Nisley's Blog: Shop notes, electronics, firmware, machinery, 3D printing, laser cuttery, and curiosities. Contents: 100% human thinking, 0% AI slop.
Things around the home & hearth
Between the ACM presentation, an upcoming Digital Machinist column, and homeowner stuff “not relevant here”, I’ll be posting intermittently for a week or so.
Algorithmic Artifacts will be getting more attention!
We spotted this near our usual parking spot during a recent grocery trip:

The bush was pretty well uprooted, suggesting the vehicle stopped atop the bush after demolishing the wall.
Wondering how it got there, I looked across the parking lot:
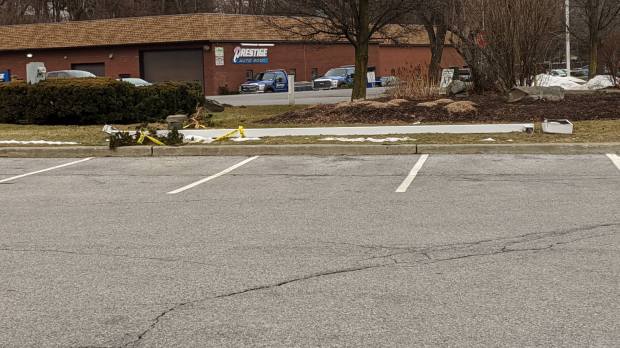
Yes, that’s a dead lamp post. The impact dislodged its concrete base by about four inches:

The greenery came from another eviscerated bush:

I expected to see tire gouges in the grass, but … nope.
The bush got a haircut, although the right half seems undamaged:

The boulder won its disagreement with the vehicle, although there’s surprisingly little shattered plastic and other debris along the trail:
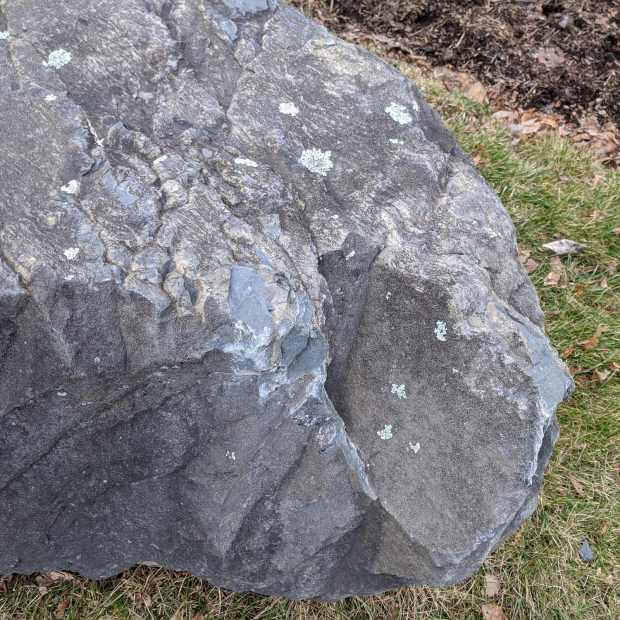
The impact dislodged the boulder, which came to rest about four feet from its origin:

The damage lies along a straight line from the middle of the Adams entrance intersection to the wall impact:
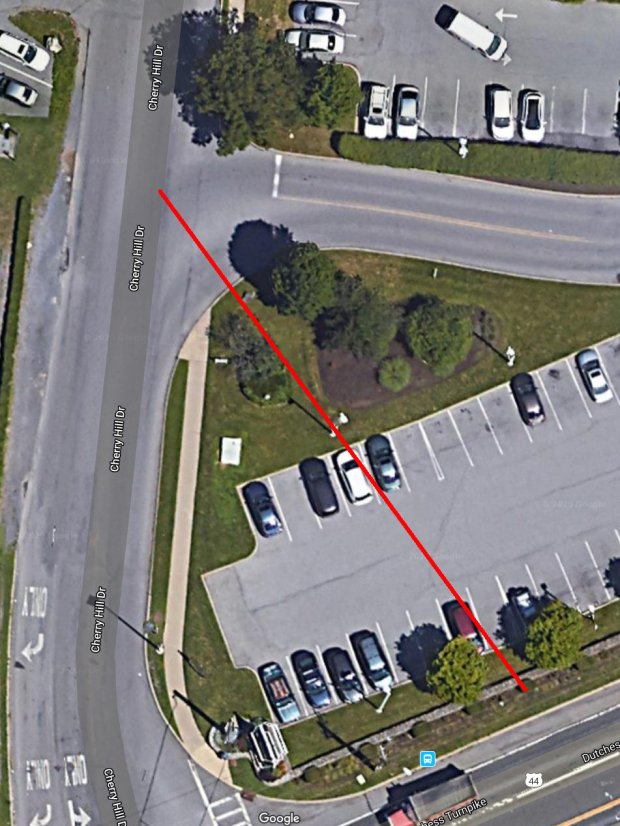
There are no obvious skid marks, undercarriage scrapes, or gouges in the grass anywhere along the trajectory, suggesting the vehicle remained mostly airborne and ballistic during the whole event, and even the three (!) curbs involved have no marks.
The nice lady at the Adams Customer Service counter didn’t know what happened and, as usual, the Poughkeepsie Journal (newspaper) has nothing to say.
I did not check for a high-clearance pickup truck with tall tires and severe front-end damage in the body shop across the street, although one seems a likely suspect. Whatever the vehicle may have been, it was definitely traveling at the usual (tautological) “high rate of speed” …
As one might expect, the holiday season offers many suboptimal dietary choices and interferes with regular exercise:

I re-origined the skin-fold measurement series for the 2020 chart to move it further from the weight series. The 2 mm jump is close to the repeatability limit, particularly as I’m now eyeballing the measurement site based on a nearby freckle, rather than depending on a fading Sharpie dot.
You’re supposed to just rotate the wiper blade holder and have it pop out of the mount on the end of the arm:
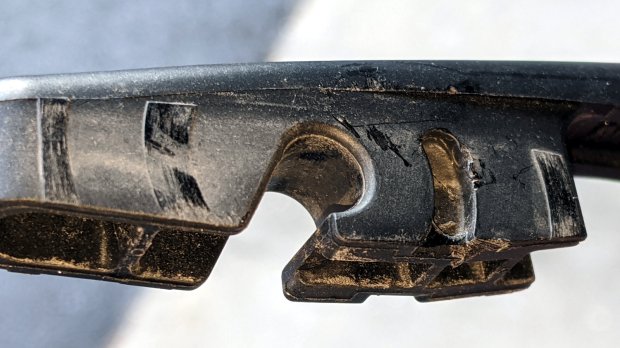
The blade holder has two opposed pegs fitting into those curved notches to the right of the hook for the holder’s pivot, with the intent of preventing it from rotating too far and sliding out. I was unwilling to apply sufficient force to disengage those pegs, as the penalty for breaking the wrong piece of plastic seemed very high. Apparently, the pegs should ride up over the slightly lower edge of their notch, bending the holder’s sides outward as they do.
So I jammed a little screwdriver beside one of the pegs, managed to encourage it out of its notch, repeated the treatment on the other side, and the blade holder popped right out.
The front wiper arms have J-hooks on their ends and disengage easily, at least after you realize the flat panel on the blade holder is actually a latch you’re suppose to pull up-and-out to release the hook. This goes more easily when assisted with the aforementioned small screwdriver.
The blades were in good shape after five years, mostly because the Forester spends most of its time in the garage. A trio of silicone wipers should last the rest of its life, with the OEM wipers tucked into the spare tire well Just In Case.
Back in the day, one could replace just the blades, not the entire holder, but I suppose this is progress.
A Yubikey 5 NFC turns out to be perfectly compatible with any website using Symantec’s (no longer available) hardware key and VIP Access (definitely a misnomer) app to generate TOTP access codes, because the sites use bog-standard TOTP. The only difficulty comes from Symantec’s proprietary protocol creating the token linking an ID with a secret value to generate the TOTP codes, which is how they monetize an open standard.
Fortunately, Cyrozap reverse-engineered the Symantec protocol, dlenski mechanized it with a Python script, and it works perfectly:
python3 -m venv symkey-env
source symkey-env/bin/activate
pip3 install https://github.com/dlenski/python-vipaccess/archive/HEAD.zip
vipaccess provision -t SYMC
deactivate
That spits out a file containing the ID and secret, from which you create a QR code for the Yubikey Authenticator app:
qrencode -t UTF8 'otpauth://totp/VIP%20Access:SYMCidnumbers?secret=longsecretgibberish&issuer=Symantec&algorithm=SHA1&digits=6'Fire up the app, wave the Yubikey behind the phone, scan the QR code, wave the Yubikey again to store it, sign in to the Schwab site, turn on 2FA, enter the ID & current TOTP value from the Yubikey Authenticator, and It Just Works™.
Of course, you can kiss Schwab’s tech support goodbye, because you’re on your own. If you ever lose the Yubikey, make sure you know the answers to your allegedly secret questions.
Equally of course, you’re downloading and running random shit from the Intertubes, but …
Now, if only all my financial institutions would get with the program.
A needle case emerged from the bottom of a drawer in need of repair:

The original joint used solvent glue and I suppose I could refresh it with acetone, but two blobs of hot melt glue seemed easier and, IMO, more durable.
In any event, it’s once more ready for use:
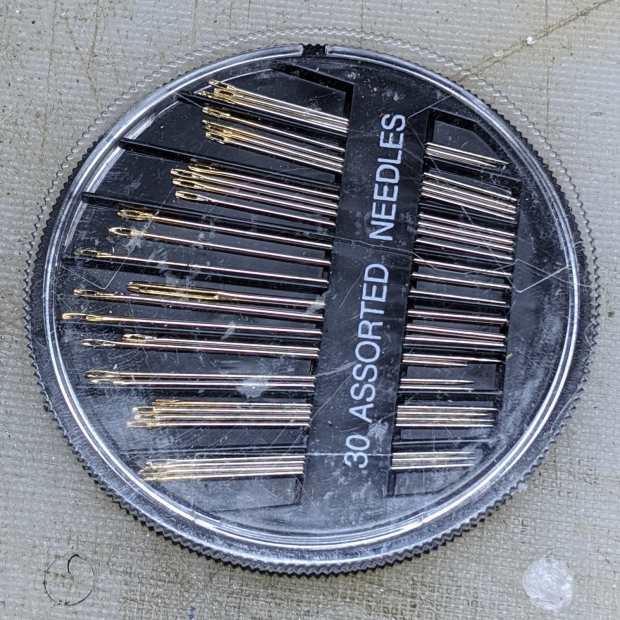
Hooray for another zero-dollar repair, although you can see why nobody else does them these days.
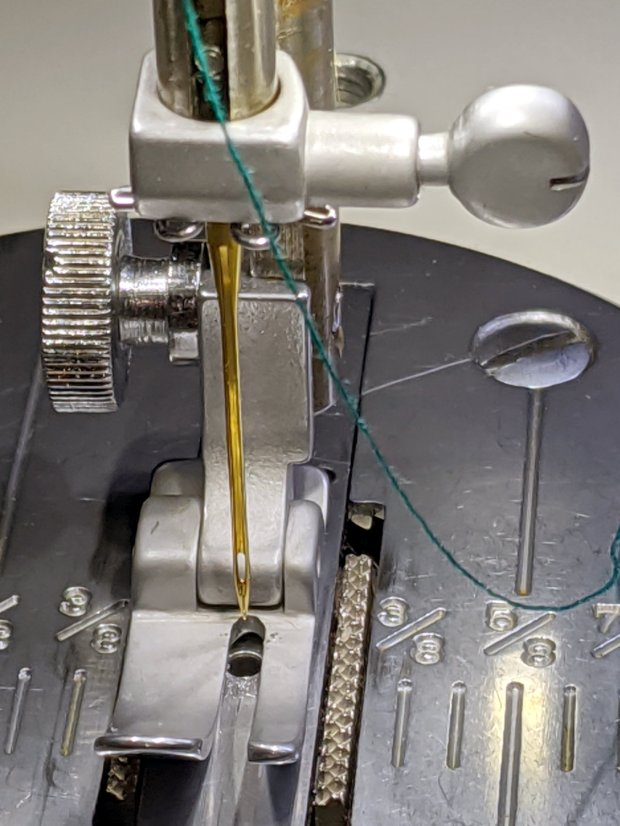
The matte mailing labels on the Kenmore 158’s hand hole cover plate did such a good job reducing the glare from the additional LEDs as to make the shiny hardware around the needle seem overly bright. I suggested gentle sandblasting might improve the situation without changing any surfaces in contact with the fabric.
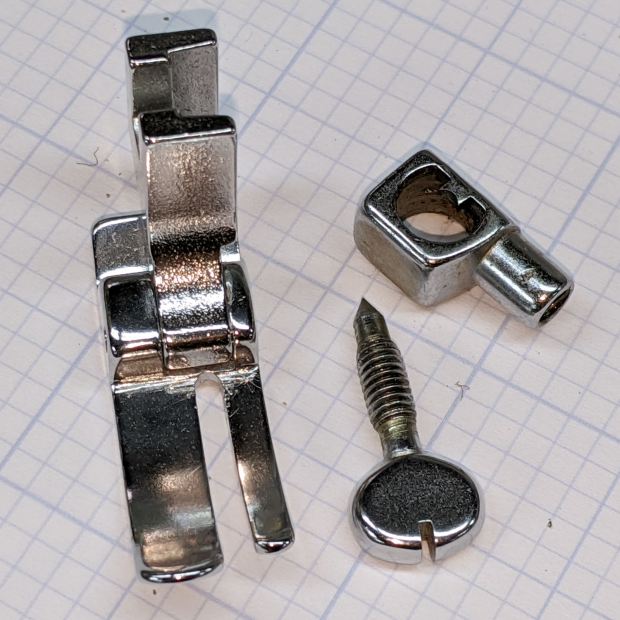
I was given a spare presser foot to demonstrate my case:
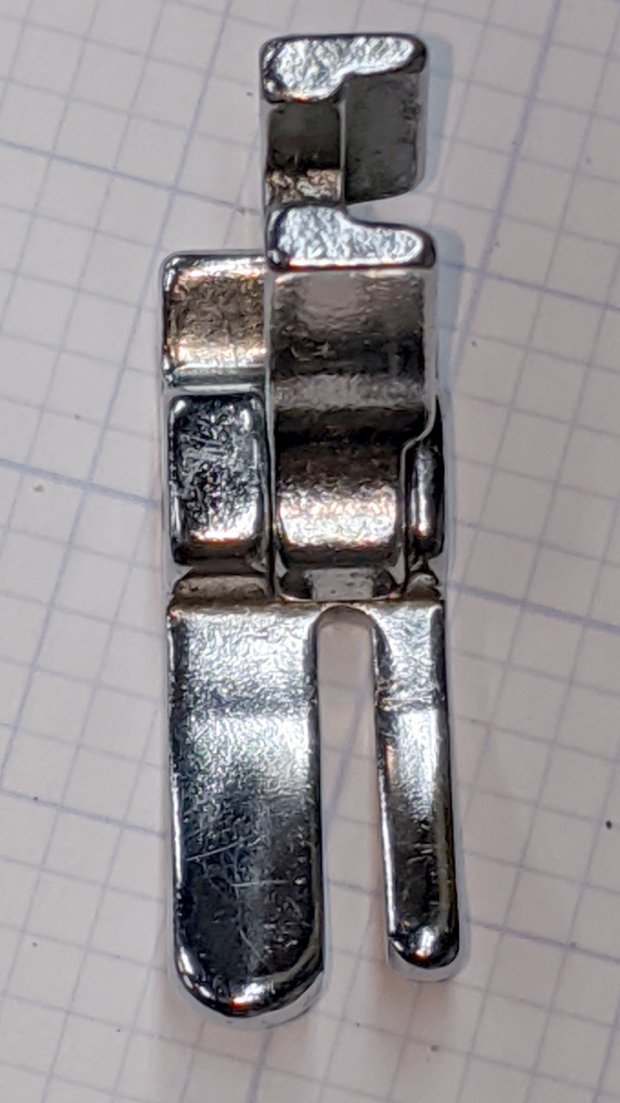
The overhead light in the shop produces glare from the nice, shiny steel surfaces similar to what Mary sees from the sewing machine.
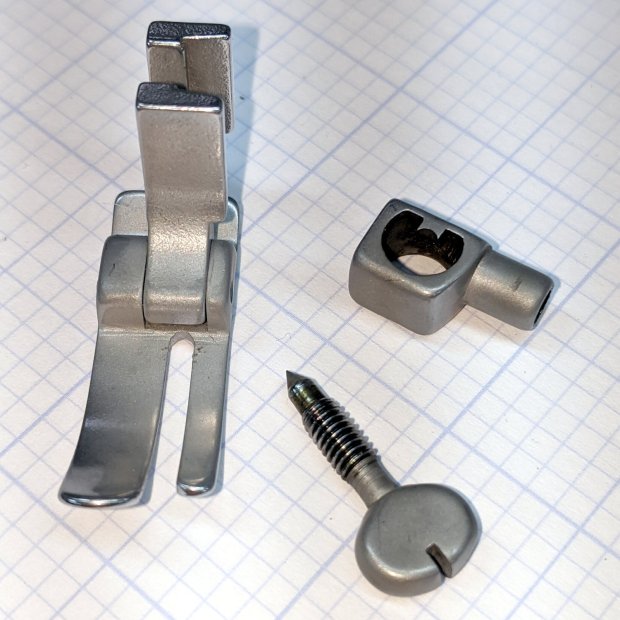
A few minutes applying 220 grit blast media with Tiny Sandblaster™ definitely changed its appearance:
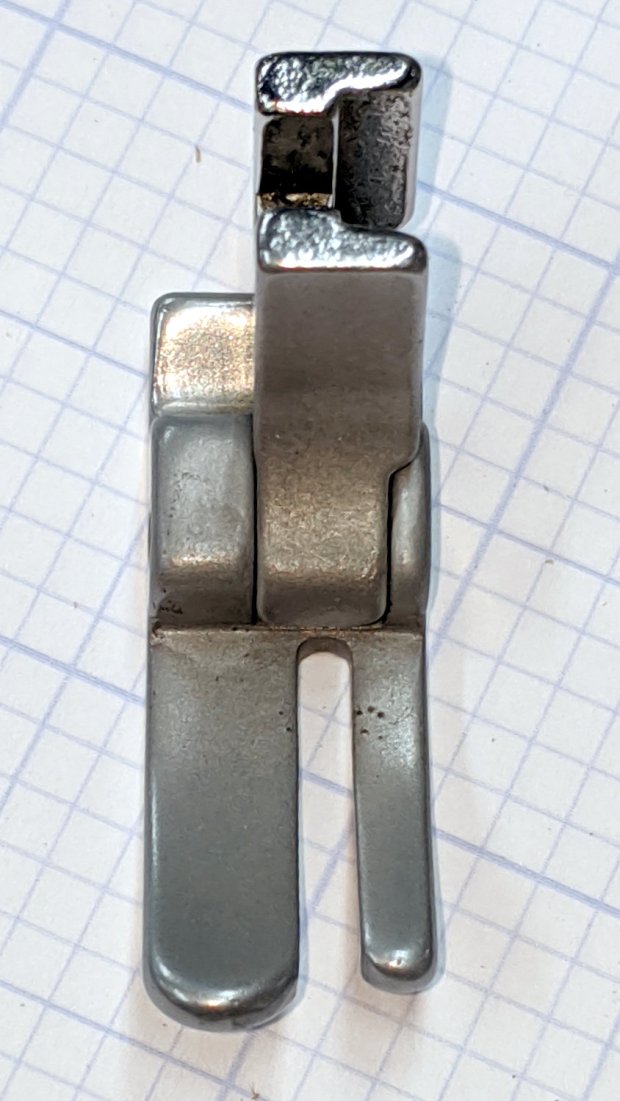
In person, the finish is neutral gray overall, with those odd brown areas appearing only in photographs, perhaps due to the various lights in the shop. The slight texture variations seem to correspond to minor differences in the plating (?) over the steel surface. It definitely cuts down the glare:
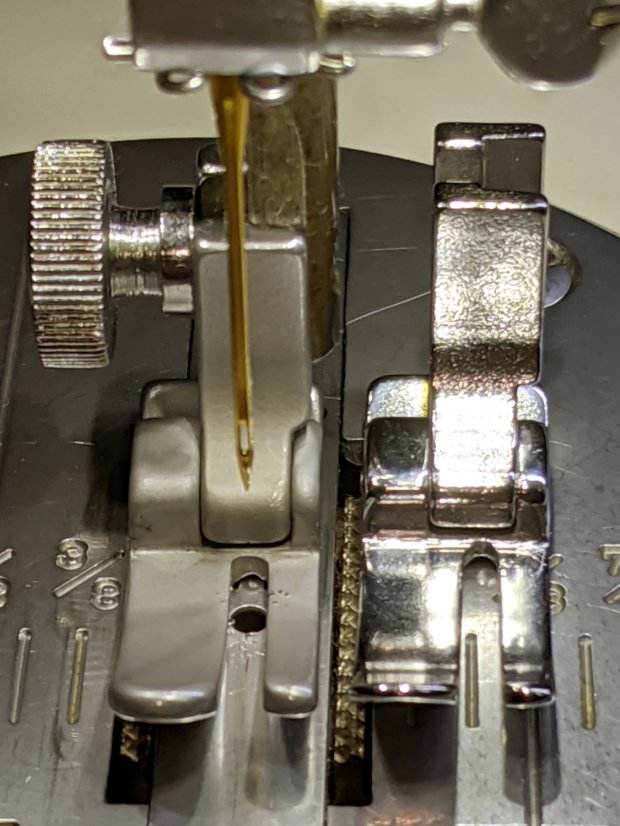
The needle clamp and screw across the top of that picture travel up and down, so we decided to deglare them along with the “good” foot:
Another Tiny Sandblaster™ session knocked back their shine:
Those parts came out slightly less matte, perhaps due to reduced pressure in the propellant can. Seeing as how I’ve had the sandblaster for a couple of decades, I figured it’s time to use the propellant but, as expected, the in-can valve doesn’t re-seal properly, so I’ll be using compressed air the next time around.
After rinsing and blowing and rinsing and blowing the grit out of the threads, everything went back together as expected:
I’m not doing either of the plates until we have more experience with the matte hardware, but it looks pretty good to me.
