Ed Nisley's Blog: Shop notes, electronics, firmware, machinery, 3D printing, laser cuttery, and curiosities. Contents: 100% human thinking, 0% AI slop.
I picked up five 12 V 40 W cartridge heaters from the usual eBay source for some extruder experiments and did a quick check to make sure they actually worked:
Cartridge heater test
The bench supply is good for 3 A, which isn’t quite enough to light them up all the way, but at 8 V they drew anywhere from 2.67 to 2.20 A, declining by about 0.1 A as they heated over the course of maybe 5 s, which is about as long as you want to run them outside of whatever they’re supposed to be heating.
Those dissipations are a bit lower than I expected; at 8 V you’d expect to see about 27 W = 2/3 * 40 W, not the 18 to 21 W I actually measured. Current & power don’t scale linearly, so I must gimmick up a larger block and make some better measurements when I get the LinuxCNC hardware set up.
The insulating tubes on the wires emerging from the cartridge, inside the main sheath, show the usual attention to detail I’ve come to know and love from eBay suppliers:
Cheap cartridge heater insulation
Ah, well, it keeps my toy budget under control…
There’s a story behind the dark vertical smudge just to the right of the cartridge. More on that in a bit.
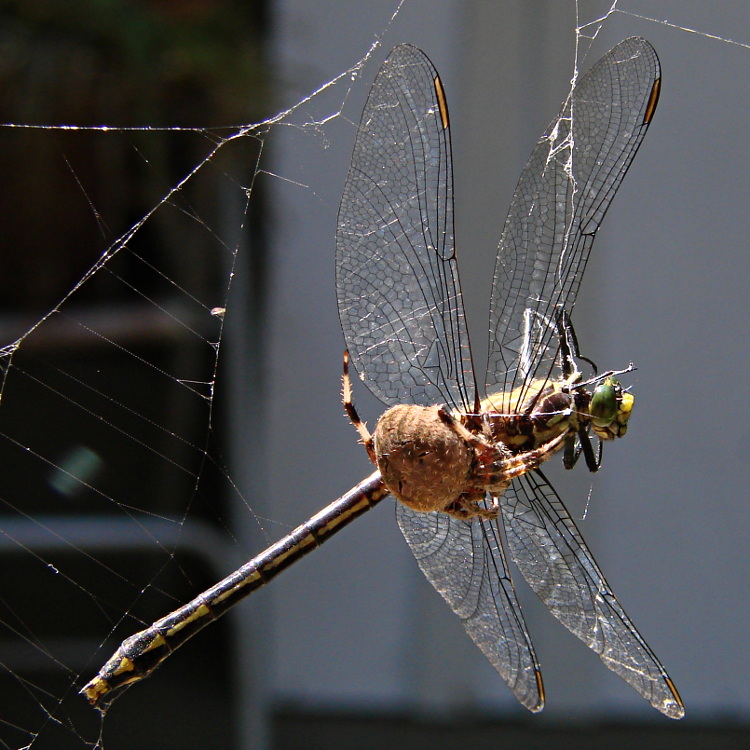
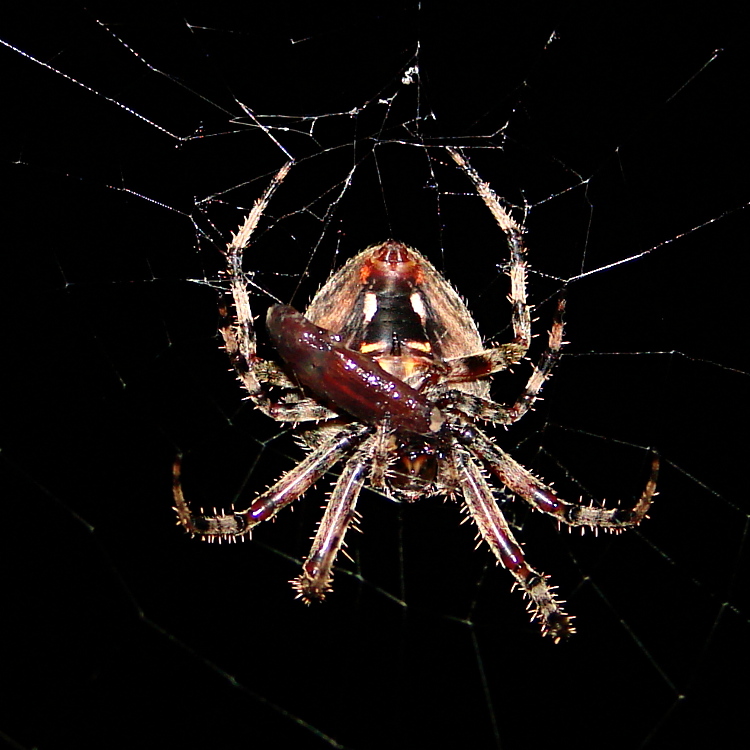
Late August is, as always, the season for giant orb-weaving spiders, one of which spun a web between two tall cactus plants on the patio and greeted us with this sight one morning:
Spider vs. Dragonfly – overview
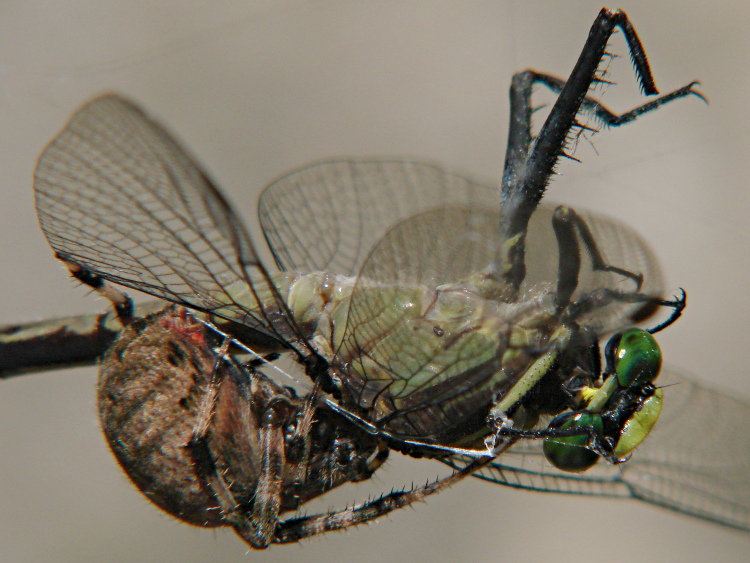
We’re big fans of both spiders and dragonflies, but it was obvious who came out on top in this contest:
Spider vs. Dragonfly – front
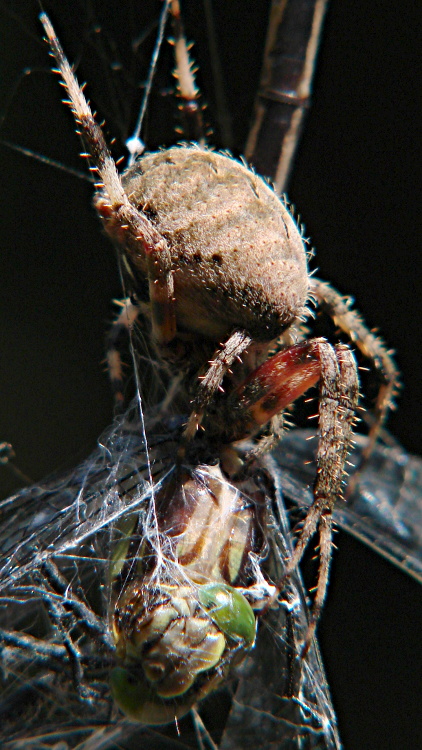
These things are unimaginably weird:
Spider vs. Dragonfly – bottom detail
Even with the spider busy at lunch, she has four eyes to spare. They reflect the flash and appear as white-centered dark dots near the middle of the image:
Spider vs. Dragonfly – many eyes
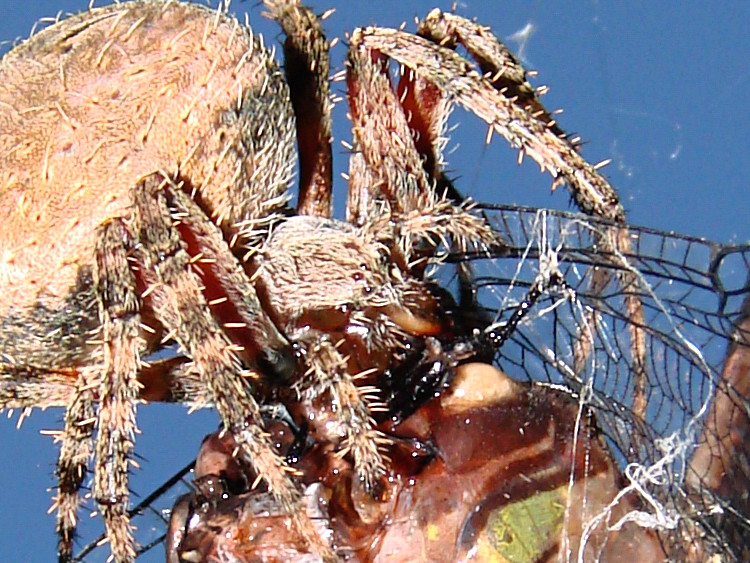
I’m sure the red spinnerets are diagnostic:
Spider vs. Dragonfly – side detail
The spider tossed the empty husk over the side, then spent the next two nights and days parked in her lair, presumably digesting that big meal, and didn’t bother repairing the web:
Spider vs. Dragonfly – spider at home
She spun a fresh web on the third night and caught a more manageable insect:
Spider with smaller prey
All hand-held with the Sony DSC-H5, some with a 2x close-up lens. All the pix are tight crops, crushed to fit my arbitrary 750 pixel maximum and 200 kB size limit. If you need high-res original images for anything, drop me a note; I took far too many pictures of this encounter…
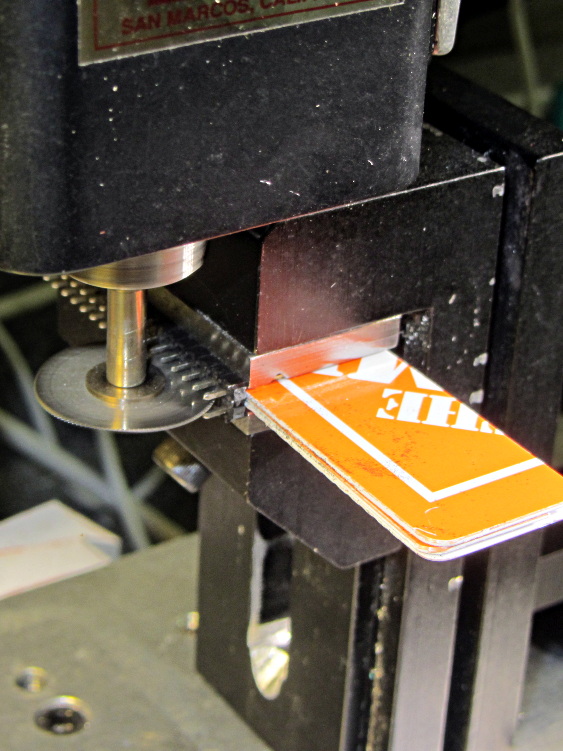
My stock of single-row header pins seems to be running short, so it’s time for another slitting session:
Header pin slicing
Manual CNC, typing bare G-Code directly into LinuxCNC Axis: no reason to turn the cranks by hand.
This makes absolutely no economic sense, but it’s a sticky-hot day and the Basement Laboratory has the dehumidifier. Some day I’ll run into a killer surplus sale of single-row headers and that’ll solve the problem forever…
Prompted by that suggestion, here’s the current collection of Devilspie2 scripts (in ~/.config/devilspie2/) that make my dual-monitor setup (left: 2560×1440 landscape, right: 1050×1680 portrait) usable with a single X session in Xubuntu 12.10. The window manager understands about the monitor layout, so maximizing a window will fill whatever monitor it’s currently occupying.
acroread.lua — maximized on portrait
if (get_window_name()=="Adobe Reader") then
      unmaximize();
      set_window_geometry(0,0,1000,100);
      set_window_geometry(2561,0,1000,100);
      maximize();
end
chromium.lua — right half of landscape
if (get_application_name()=="Chromium" and get_window_name() ~= "Print") then
   set_window_geometry(1400,0,1150,1200);
   maximize_vertically();
end
digikam.lua — right half of landscape, force large Search dialog, dammit
if (get_application_name() == "Digikam") then
	debug_print("DigiKam conditional - top");
	if (get_window_name() == "Advanced Search") then
		debug_print("Digikam - Adv Search");
		set_window_geometry(750,100,1000,1300);
	else
		debug_print("Main DigiKam window");
		set_window_geometry(0,0,1400,1000);
		maximize_vertically();
	end
end
firefox.lua — left half of landscape, enlarge dialogs
if (get_application_name()=="Firefox") then
	debug_print("FF conditional - top");
	if (get_window_name() == "Print") then
		set_window_position(700,350);
	elseif (0 == string.find(get_window_name(),"Password")) then
		set_window_position(0,0);
		maximize_vertically();
	end
end
gimp.lua — force Gutenprint dialog to the top, dammit
if (get_application_name() == "GNU Image Manipulation Program") then
	debug_print("GIMP conditional - top");
	if (string.find(get_window_name(),"Print")) then
		debug_print("GIMP - GutenPrint")
		set_window_position(700,350);
		make_always_on_top();
	else
		debug_print("GIMP - Main window");
	end
end
passwords.lua — put password dialogs in mid-screen
if (get_window_name()=="Password Required") then
	debug_print("Password");
	set_window_position(700,350);
end
pronterface.lua — force to middle-ish of Desktop 2
if (get_window_name()=="Printer Interface") then
   set_window_workspace(2);
   set_window_position(1200,750);
end
slic3r.lua — force to right side of Desktop 2
if (get_window_name()=="Slic3r") then
   set_window_workspace(2);
   set_window_geometry(1600,0,700,700);
end
terminal.lua — maximized on portrait
if (get_window_name()=="Terminal") then
   set_window_position(2561,0);
   maximize();
end
thunderbird.lua — left half of landscape, force big dialogs
if (get_application_name() == "Thunderbird") then
	debug_print("TBird conditional - top");
	if (1 == string.find(get_window_name(),"Print")) then
		debug_print("TBird - print...");
		set_window_position(700,350);
	elseif (string.find(get_window_name(),"Sending") or
			string.find(get_window_name(),"Confirm") or
			string.find(get_window_name(),"Processing")) then
		debug_print("TBird - generic dialog");
		set_window_position(200,600);
	elseif (string.find(get_window_name(),"Write:")) then
		debug_print("TBird - writing");
		set_window_geometry(1300,0,900,600);
		maximize_vertically();
	elseif (0 == string.find(get_window_name(),"Password")) then
		debug_print("Main TBird window?");
		debug_print(" name: ",get_window_name());
		set_window_geometry(0,0,1300,1200);
		maximize_vertically();
	end
end
The Basement Warehouse Wing has an essentially unlimited supply of pristine CD cases (remember CDs?) that, with a bit of deft bandsaw work, will each emit a pair of 4×4 inch sheets of perfectly transparent acrylic plastic. The sheets are about 1.3 mm = 50 mils thick, which is just about exactly what you want for a Nixie-style display that doesn’t require high voltages, because you can edge-light a sheet with 0603 amber SMD LEDs. Obviously, this is not a Shining New Idea, but this post collects my doodles so they don’t get lost along the way.
The Squidwrench StickerLab session prodded me into lashing a prototype together to see how this would work; they have a Silhouette Cameo vinyl cutter driven with Robotcut that works well. I’d hoped to do some laser cutting at the subsequent session, but our schedules didn’t mesh.
The compelling advantage of laser cutting is that you could crack the CD cases apart, throw out the CD holder gimcrackery, lay the sheets flat on the cutter table with the latches & other junk upward, and burn the digits out of the middle without any further preparation. I think I could get much the same effect, at least for a crude prototype, by milling & engraving with the Sherline.
The sheets are about 4 threads of 3D printed plastic extruded at the M2’s default 0.4 mm width. You could print a black baseplate with slots to hold the sheets, put two threads between each sheet, and have the sheet 6 threads apart on center = 2.4 mm spacing:
Tab vs 3D thread size doodle
Ten such sheets would produce a standard 0-to-9 display about an inch deep, plus protective sheets front and back, so the whole affair would be maybe 1.25 inch deep. You’d probably want to offset the tabs on adjacent sheets to reduce light leakage between LEDs. The baseplate fits atop a PCB with LEDs at the right locations, so you get an opaque holder for the sheets that’s easy to produce and easy to assemble:
Sheet tab layout doodle
If you were clever, you could have different tab locations on each sheet so they’d fit only in the proper orientation; that might be important for cough mass production.
The M2 has a platform big enough to build an entire clock base in one pass, plus a matching piece to capture the tops of the digits. I think edge-lit acrylic needs a complete opaque surround for each digit sheet to block light leaking from the edges; it might be easier to build the mount in the other direction, lying flat on the platform, stack the mounts together with the digit sheets, then bolt the whole assembly from the front; that would ensure perfect alignment of everything.
In that case, the 3D printed layers are 0.25 mm (or smaller), but the resolution for the tabs would be 0.4 mm. If you were exceedingly brave & daring, you could lay the digit sheets in place during the build and come out with a monolithic unit; that might require a bit of clearance atop each sheet, as a grazing touch from a hot nozzle would be painfully obvious.
There’s also no reason you couldn’t use a wider “digit” sheet and engrave, say, the days of the week or the units of measurement or something like that on each panel.
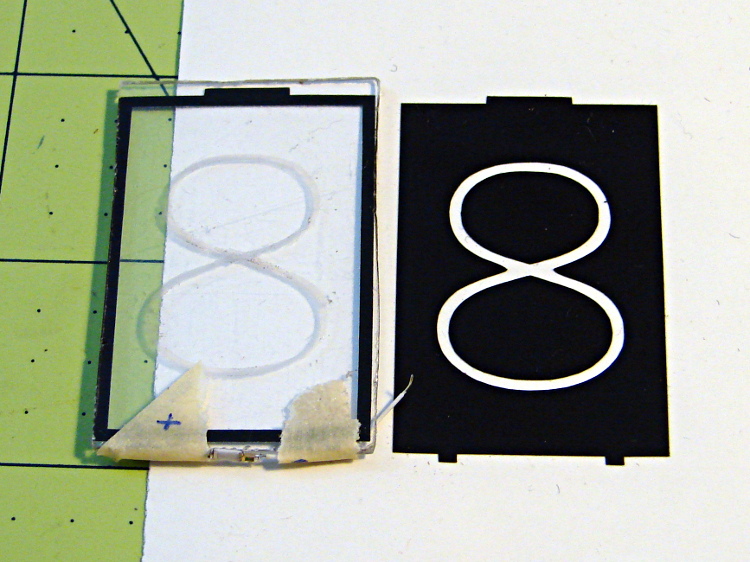
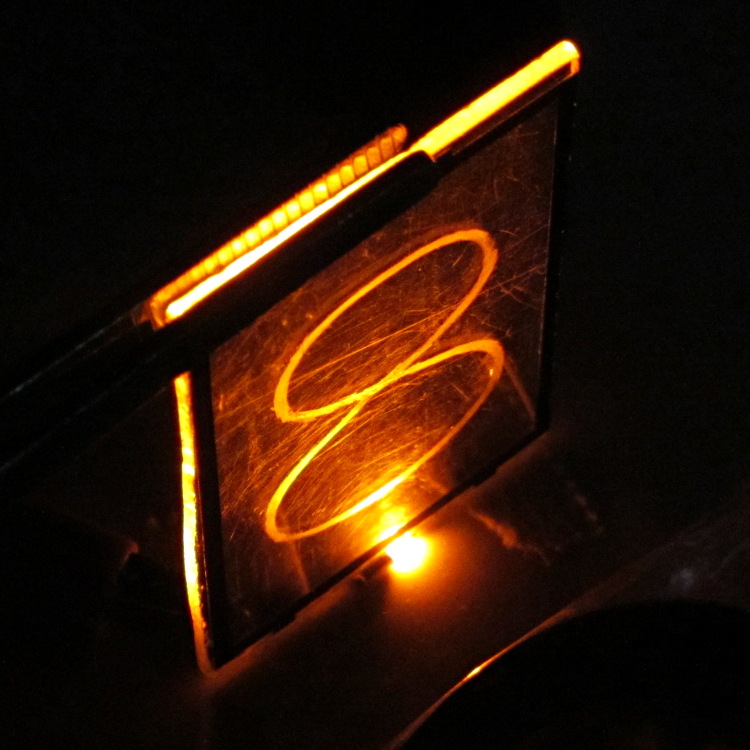
If the display will be 30 mm deep, then the digits must be large enough that the depth doesn’t turn each digit into a tunnel. Large Nixe tubes had digits about 40 mm tall, so I went with a 30 x 45 panel, plus 1 mm tabs on the top and bottom:
Crude edge-lit acrylic panel vs vinyl stencil
The “engraved” digit on the left came from a vinyl mask similar to the one on the right, using fine sandpaper to rough up the acrylic surface. I deliberately started with a battered old CD case in order to prevent myself from getting too compulsive with neatness; as you’ll see, edge-lit acrylic reveals any surface imperfections, so cleanliness is important.
The black border could be a light-shield gasket around the outer edge of the display panel to reduce glare from the edges. This might be more important for laser-cut pieces with highly reflective edges or for milled pieces with diffuse edges; there’s no way to tell without actually building one to see. I simply bandsawed the sheet around the edges of the mask, then filed off the larger chunks: the edges are very, very rough, indeed.
There doesn’t seem to be an easy way to stash the Inkscape SVG file on WordPress.
I solder-blobbed some wire-wrap wire, a 1206 SMD resistor, and a 0603 LED together:
Crude 0603 SMD LED lashup
The 0603 SMD LED fits neatly along the edge of the sheet:
0603 SMD on CD case edge
A 3rd hand holds it upright on the bench over the LED lashup:
Edge-lit acrylic – front layout
It looks marginally better with the lights out, but you can see all the scratches:
Edge-lit acrylic – front detail
The hot spot at the bottom of the digit isn’t nearly that awful in person.
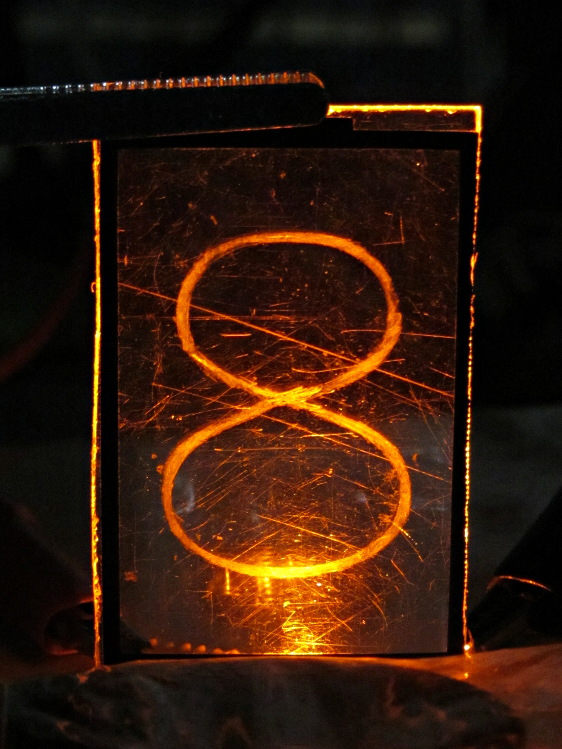
A top view shows the glowing edges, plus the nuclear glow from the LED:
Edge-lit acrylic – top view
A touch of soft focus, plus moving the LED under a tab location, helps a bit:
Edge-lit acrylic – front soft focus
You’d want two LEDs per digit and maybe one at the top, but that’s in the nature of fine tuning.
All in all, I like how it looks. Getting from this crud to a workable display will require far more effort than I can devote to it right now…
Once upon a time, the current Dutchess Rail Trail was an active railroad line, complete with all the usual switchgear and signals. This relic, abandoned in place near the east entrance to the Walkway Over the Hudson, looks like it changed the direction of motion at a right angle:
DCRT Abandoned Switchgear – rod in tree trunk
I think the rod near the top of the picture came from a control lever, with the clevis to the right attached to a rod that moved the switch points.
And, yes, the rod passes right through that tree trunk. The metal gadgetry just in front of the trunk once captured the rod between rollers:
DCRT Abandoned Switchgear – rod in tree trunk – detail
The body casting speaks of a bygone age of industrial might:
DCRT Abandoned Switchgear – General Railway Signal Co casting