The Smell of Molten Projects in the Morning

Ed Nisley's Blog: Shop notes, electronics, firmware, machinery, 3D printing, laser cuttery, and curiosities. Contents: 100% human thinking, 0% AI slop.

Author: Ed

  • Dummy 9 mm Luger Cartridge

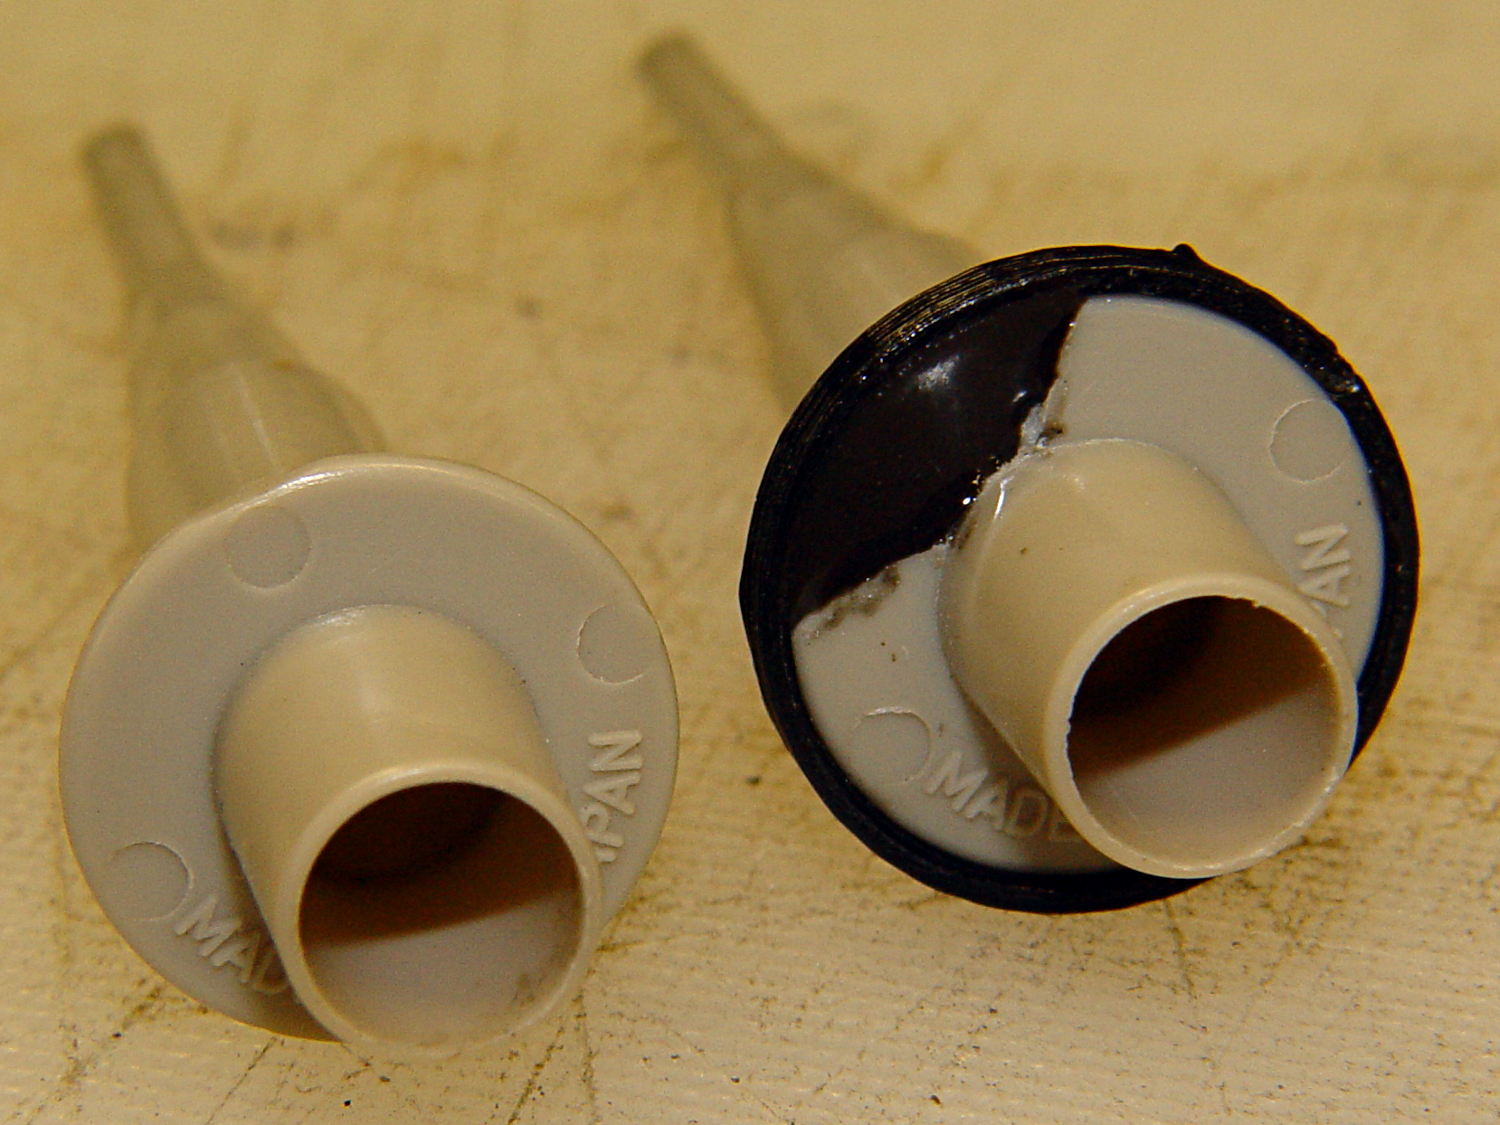
    An interesting project requires a handful of 9 mm Luger (aka 9 mm NATO) dummy cartridges with real brass. You can buy exact form / fit / weight dummies or plastic training rounds, but these will suit my simple needs:

    Dummy 9 mm Luger cartridges
    Dummy 9 mm Luger cartridges

    That’s a snap cap on the left and a real 9 mm Luger cartridge on the right. The holes in the dummy brass indicate that they are absolutely, positively, unquestionably not loaded cartridges.

    Start by drilling a 1/8 inch hole in the side of each unfired, primerless case:

    Dummy 9 mm Luger - drilling case
    Dummy 9 mm Luger – drilling case

    I set up the chuck on the rotary table, thinking I might drill three holes in each cartridge, but came to my senses. It’s lined up by eye, flush with the end of the jaws, and the hole is just above the inside of the base.

    The solid model has the same overall length and proportion as a 115 grain FMJ bullet, but doesn’t match the proper ogive or base diameter. Basically, I stretched a 9 mm sphere and stuck it atop a slightly tapered base cylinder:

    Dummy 9 mm Luger bullet - solid model
    Dummy 9 mm Luger bullet – solid model

    For reasons I don’t profess to understand, the sphere has a slightly different diameter at its equator than the top of the cylinder, even though they’re both the same BulletOD diameter with the same number of faces. Fortunately, that didn’t affect the final results.

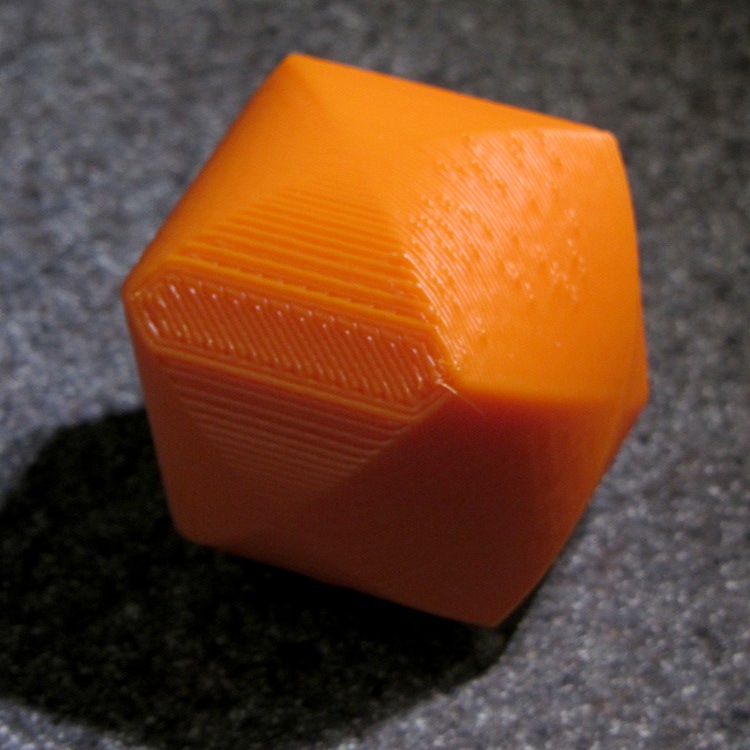
    Print up a handful of the things:

    Dummy 9 mm Luger bullets - on platform
    Dummy 9 mm Luger bullets – on platform

    The shadow from the flash makes the bases look slightly fatter than they really are.

    Using a thinner layer would look better in this orientation. They’d definitely look better if they were split, printed with the long axis parallel to the plate, and glued together, as the grain would run lengthwise; I’m not sure there’s enough room for alignment pins, though.

    At this diameter and number of faces, the M2 produces almost perfectly accurate dimensions, so the bullets press-fit just like you’d expect. They’re twisted into a dab of urethane glue inside the brass that foams just enough to hold them place.

    Rather than use a real seating die, I deployed a closed chuck on the drill press. The trick is to set the depth stop to produce slightly too-long cartridges, then shim the platform without changing the stop and seat the bullet to the proper depth:

    Dummy 9 mm Luger - seating bullet
    Dummy 9 mm Luger – seating bullet

    The OAL tolerance for various 9 mm Luger cartridges seems to range from 1.08 inch to 1.17 inch, so anything in that range should be fine. I used 1.10 inch.

    These are not intended for firing. You could fire them with just a primer (in a non-drilled case) and (maybe) not melt or shatter the plastic, but they’re slightly larger than the nominal 8.82 mm land diameter and won’t obturate or spin-stabilize worth diddly: expect short range and keyholing.

    The sectional density is a whopping 0.008, should you keep track of such things: 0.47 gram = 7.2 grain. Note that the US small arms definition of sectional density has units of pound/inch2, not the pound/foot2 you’ll find right next to values computed using inches; the magic number 1/7000 just converts from grains to pounds. In the rest of the (metric) world, it’s entirely different.

    The OpenSCAD source code:

    // Dummy 9mm Luger bullet
    // Ed Nisley KE4ZNU November 2013
    
    //----------------------
    // Dimensions
    
    BulletOD = 9.05;			// main diameter
    BulletBaseOD = 8.8;			//  ... easy insertion
    
    BulletOAL = 14.0;			// overall length
    BaseLength = 8.0;			// cylindrical base length
    
    NoseLength = BulletOAL - BaseLength;
    
    NumSides = 8*4;
    
    //----------------------
    // Useful routines
    
    module ShowPegGrid(Space = 10.0,Size = 1.0) {
    
      Range = floor(50 / Space);
    
    	for (x=[-Range:Range])
    	  for (y=[-Range:Range])
    		translate([x*Space,y*Space,Size/2])
    		  %cube(Size,center=true);
    }
    
    //-------------------
    // Build it...
    
    ShowPegGrid();
    
    color("Orange")
    cylinder(r1=BulletBaseOD/2,r2=BulletOD/2,h=BaseLength,$fn=NumSides);
    
    color("DarkOrange")
    translate([0,0,BaseLength])
    	resize([0,0,2*NoseLength])
    		sphere(BulletOD/2,$fn=NumSides);
    
  • Shagbark Hickory Nut Season

    Mary managed to outcompete the local squirrels to the tune of 10 pounds of Shagbark Hickory nuts, which we’ve been enjoying after supper. The thickly armored nuts shrug off ordinary nutcrackers, so we deploy heavy weaponry: good old 10WR Vise-Grip pliers:

    Cracking nickory nuts with a Vise-Grip
    Cracking nickory nuts with a Vise-Grip

    She describes the process better than I; for what it’s worth, I work on one nut at a time. We both celebrate when a shell releases its nut with minimal damage; most often, we extract fragments into a pile like the one shown. I can process half a dozen nuts before deciding I’ve had enough.

    I’d be in favor of a genetic modification producing a fluorescent green shell, because overlooking a minute piece of shell in that pile of nutmeat is a Very Bad Thing…

    Some Vise-Grip history may be of interest.

  • Recoil Starter Lube

    This being leaf season, I just discovered that the recoil starter on the hulking 8 HP tangential leaf blower retracts very, very slowly. Having already started the engine, I did one pass around the yard with the pull cord dangling over the handlebar, but that’s not to be tolerated.

    The starter mounts on the back of the motor with five screws, so removing it posed no problem at all. Removing the central screw released the friction clutch that helps extend the pawls, exposing the central boss that’s the combination hold-it-all-together point and gritty bearing for the rope spool:

    Leaf blower recoil starter
    Leaf blower recoil starter

    Pulling the rope turns the spool and extends the pawls that engage the crankshaft. After the motor starts, the pawls retract and none of that stuff moves, so there are no high-speed bearings and not much need for strength.

    I brushed off some of the larger chunks, worked machine oil around the central post, wiped off & lubed the pawls, took the friction clutch apart & lightly lubed it, put everything back together, and the starter now works fine again; there may be too little friction in the clutch, but that’s in the nature of fine tuning.

    The leaf blower Came With The House™ and dates back to the era when Kohler made cast-iron engine blocks. It runs lean on the oxygenated fuel that’s mandated for Dutchess County these days, so it now runs lightly choked.

    Tip: before you yank the rope on a small engine, pull it slowly until the crankshaft stops turning freely, then let the rope retract. That positions the piston at the start of the compression stroke with the valves closed, so your next full-strength yank will do the most good.

  • Monthly Image: Bees in Squash Flower

    Back in August, the squash vines were in full flower:

    Bees in Squash Flower - overview
    Bees in Squash Flower – overview

    Here’s a closer look:

    Bees in Squash Flower - detail
    Bees in Squash Flower – detail

    Pop quiz: how many bees do you count?

    With the benefit of watching them move, I counted nine bees in that blossom!

    Winter squash vines bear large flowers (that blossom is the size of my outstretched hand) that attract large bees: bumblebees and their cousins, carpenter bees. Quite often, bumblebees spend the night huddled inside the blossom and emerge early the next day when they reach flying temperature. Honeybees, being more social, return to their hives overnight; we’re pleased to see that there’s at least one feral hive in the neighborhood.

  • Hall Effect Current Control PCB: First Light

    After winding the toroid the right direction, resoldering the ATmega2560, and fixing a scope probe, the brassboard PCB lit right up:

    VG 1193 mV - ID 50 mA-div - 1 ms PWM filter - overview
    VG 1193 mV – ID 50 mA-div – 1 ms PWM filter – overview

    The top trace is the gate drive at 200 mV/div, the bottom trace is the LED current at 50 mA/div. Expanding the timebase gives a closer look at the fuzz:

    VG 1193 mV - ID 50 mA-div - 1 ms PWM filter
    VG 1193 mV – ID 50 mA-div – 1 ms PWM filter

    Yup, that’s what deriving an analog voltage from a PWM output looks like. Verily, you’re seeing a 32 kHz PWM passed through a 1 ms = 160 Hz low-pass RC filter; the PWM frequency is 2 decades + 1 octave above the filter, so the 5 Vpp digital signal should be down 46 dB. Squinting at the ripple, it’s maybe 40 mV = -42 dB, which is certainly close enough, all things considered.

    The MOSFET controlling the LED current operates in its linear region (the whole point of this exercise!) and acts as a Class A amplifier. The datasheet says the forward transconductance is 21 S at VDS = 5 V and ID = 8 A, which certainly isn’t what we have here (about 1 V and 150 mA); you’d expect a 40 mV ripple to produce 840 mA of sawtooth. Under these conditions, the transconductance seems to be 2.5 S = 100 mA/40 mV.

    Anyhow, because the gate drive comes from an Arduino PWM output, it has 0.4% resolution and the voltage steps by a bit under 20 mV per PWM increment. Here’s what increasing the PWM output by one count looks like:

    VG 1213 mV - ID 50 mA-div - 1 ms PWM filter - overview
    VG 1213 mV – ID 50 mA-div – 1 ms PWM filter – overview

    Expanding the timebase:

    VG 1213 mV - ID 50 mA-div - 1 ms PWM filter
    VG 1213 mV – ID 50 mA-div – 1 ms PWM filter

    The gate drive is 20 mV higher and the current is 50 mA higher, so the transconductance again works out to 2.5 S.

    Note bene: The smallest gate voltage increment produces 50 mA more LED current. It works the same way in the other direction, too, putting a lower limit on the allowable LED current: when the ripple becomes larger than the nominal current, what’s the point?

    So, not surprisingly, precise LED current control isn’t possible with an Arduino’s PWM output, at least under these conditions. Using 16 bit PWM would increase the resolution (by a factor of 256), but the PWM ripple means the LED current varies by nearly 2/3 of the setpoint: 100 mApp for a 160 mA nominal LED current.

    You could apply a more drastic low-pass filter, but remember that the whole point is to blink the LEDs, not gradually turn them on and off. Eyeballometrically, the LED current risetime = 7 ms, which is very roughly what you’d expect from the 1 ms filter time constant: 5 τ = 99.3%. Doubling the filter time constant wouldn’t be a step in the right direction…

    To do this right, you need a real DAC with maybe 10 or 12 bit output (and careful attention to analog layout), which would be absurd in a circuit with an Arduino Pro Mini jammed on top.

    Given that it’s just blinking LEDs, none of this really matters: the LEDs are shatteringly bright and blink most satisfactorily. It’s a keeper, even with all that ripple…

  • HP Scope Probe Flange Repair

    Quite some time ago I manage to break the finger flange on one of my scope probes and, what with it being made of an un-glueable engineering plastic, a simple repair job failed quickly. It’s entirely round and a perfect lathe project, but … this is easier:

    HP Scope Probe Flange Repair
    HP Scope Probe Flange Repair

    You can see remnants of that failed repair just below the fracture:

    HP scope probe flanges - repair disk
    HP scope probe flanges – repair disk

    Some epoxy around the rim of the flange, plus filling the missing sector, looks about as grubby as you’d expect:

    HP Scope Probes - rear
    HP Scope Probes – rear

    That’s a tiny zit at about 1 o’clock which came off with fingernail pressure.

    From the business end, it actually looks pretty snappy:

    HP Scope Probes - front
    HP Scope Probes – front

    I’m mildly tempted to preemptively reinforce the other probes…

    The OpenSCAD source code joins two parts with coincident faces, but it worked out OK for once:

    // Tek Scope Probe Flange
    // Ed Nisley KE4ZNU November 2013
    
    //- Extrusion parameters must match reality!
    //  Print with 2 shells and 3 solid layers
    
    ThreadThick = 0.25;
    ThreadWidth = 0.40;
    
    HoleWindage = 0.2;
    
    Protrusion = 0.1;			// make holes end cleanly
    
    function IntegerMultiple(Size,Unit) = Unit * ceil(Size / Unit);
    
    //----------------------
    // Dimensions
    
    FlangeOD = 16.0;
    FlangeID = 8.75;
    FlangeThick = IntegerMultiple(1.25,ThreadThick);
    
    DiskOD = FlangeOD + 4*ThreadWidth;
    DiskThick = FlangeThick + 4*ThreadThick;
    
    NumSides = 8*4;
    
    //----------------------
    // Useful routines
    
    module PolyCyl(Dia,Height,ForceSides=0) {			// based on nophead's polyholes
    
      Sides = (ForceSides != 0) ? ForceSides : (ceil(Dia) + 2);
    
      FixDia = Dia / cos(180/Sides);
    
      cylinder(r=(FixDia + HoleWindage)/2,
               h=Height,
    	   $fn=Sides);
    }
    
    module ShowPegGrid(Space = 10.0,Size = 1.0) {
    
      Range = floor(50 / Space);
    
    	for (x=[-Range:Range])
    	  for (y=[-Range:Range])
    		translate([x*Space,y*Space,Size/2])
    		  %cube(Size,center=true);
    
    }
    
    //----------------------
    // Build it
    
    ShowPegGrid();
    
    	difference() {
    		union() {
    			translate([0,0,2*ThreadThick])
    				cylinder(r=DiskOD/2,h=DiskThick,$fn=NumSides);			// main repair part
    			cylinder(r1=(DiskOD - 2*ThreadWidth)/2,r2=DiskOD/2,h=2*ThreadThick,$fn=NumSides);
    		}
    		translate([0,0,(DiskThick - FlangeThick)])				// flange clearance
    			PolyCyl(FlangeOD,2*FlangeThick,NumSides);
    		translate([0,0,-DiskThick/2])
    			PolyCyl(FlangeID,2*DiskThick,NumSides);
    	}
    
  • Improved Alignment Pin Hole for Split 3D Prints

    I’ve been working on an object (more on this later) that requires precise alignment of two parts that capture a nut deep inside. This calls for alignment pins, similar to the ones I used for, say, the Triple-Cylinder Thing:

    Cylinder Thing - rotated
    Cylinder Thing – rotated

    The general idea is to design holes that fit the pins, then locate them at the parting line of the model, where they’re subtracted from the solid and appear in exactly the proper places when the model splits for printing:

    Cylinder Thing - alignment pegs
    Cylinder Thing – alignment pegs

    You slather solvent glue on both halves, jam pins into the holes, slap the parts together, and clamp until cured. Works fine, I use pins all over the place.

    The gotcha of using just a (polygonal) cylinder as the hole: if you glue one end of the pin at a time, a small rim of dissolved plastic may form around the pin at the surface. That can bond the two halves together or prevent them from joining properly after being disassembled.

    Sooo, here’s a new alignment pin hole with a gutter around the pin on both surfaces to capture the glop:

    Alignment pin hole - overview
    Alignment pin hole – overview

    Remember, that’s the negative volume that will hold the pin, not the pin itself!

    Here’s how it works in real plastic, with a 1.75 mm peg glued into one hole with a bit of crud in the gutter:

    Alignment Hole and Pin
    Alignment Hole and Pin

    The secret to making the gutter work: offset the second layer by half the thread width, so that it’s reasonably well supported on the first layer. If you don’t do that, the inner layers simply drop down through the hole and fill the gutter. Even doing that, notice the distortion of the first few layers inside the hole.

    The OpenSCAD source code looks about like you’d expect:

    //-- Locating pin hole with glue recess
    
    module LocatingPin(Dia=PinOD,Len=5.00) {
    
    	translate([0,0,-ThreadThick])
    		PolyCyl((Dia + 2*ThreadWidth),2*ThreadThick,4);
    
    	translate([0,0,-2*ThreadThick])
    		PolyCyl((Dia + 1*ThreadWidth),4*ThreadThick,4);
    
    	translate([0,0,-(Len/2 + ThreadThick)])
    		PolyCyl(Dia,(Len + 2*ThreadThick),4);
    }
    

    Ideally, the pin length should extend at least two diameters into each side of the object, but you can feed in whatever you need to make it come out right.

    The PolyCyl() routine produces a low-vertex-count polygon that circumscribes the nominal diameter, which is what you need for vertical holes in 3D printed objects:

    module PolyCyl(Dia,Height,ForceSides=0) {			// based on nophead's polyholes
    
      Sides = (ForceSides != 0) ? ForceSides : (ceil(Dia) + 2);
    
      FixDia = Dia / cos(180/Sides);
    
      cylinder(r=(FixDia + HoleWindage)/2,
               h=Height,
    	   $fn=Sides);
    }
    

    Tip o’ the cycling helmet to nophead for figuring out the polyhole idea and explaining why they’re needed…