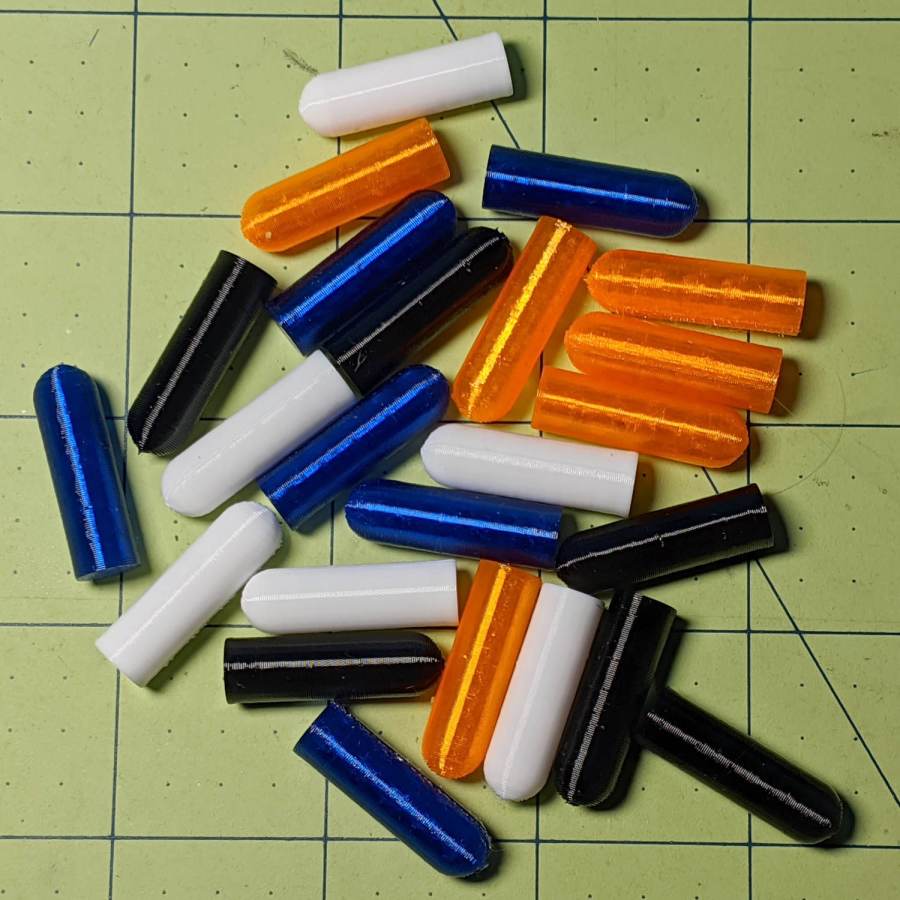
For reasons not relevant here, I made replacement pegs for the Shuttles board game:
Not the most challenging solid model I’ve ever conjured from the vasty digital deep, but 3D printing is really good for stuff like this.
The OEM pegs have a hollow center, most likely to simplify stripping them from the injection mold, which I dutifully duplicated:

It turns out the additional perimeter length inside the pegs requires 50% more printing time, far offsetting the reduced 10% infill. Given that each solid set takes just under an hour, I decided to lose half an hour of verisimilitude.
I plunked a nice round cap atop the OEM peg’s flat end, but stopped short of printing & installing a round plug for the butt end.
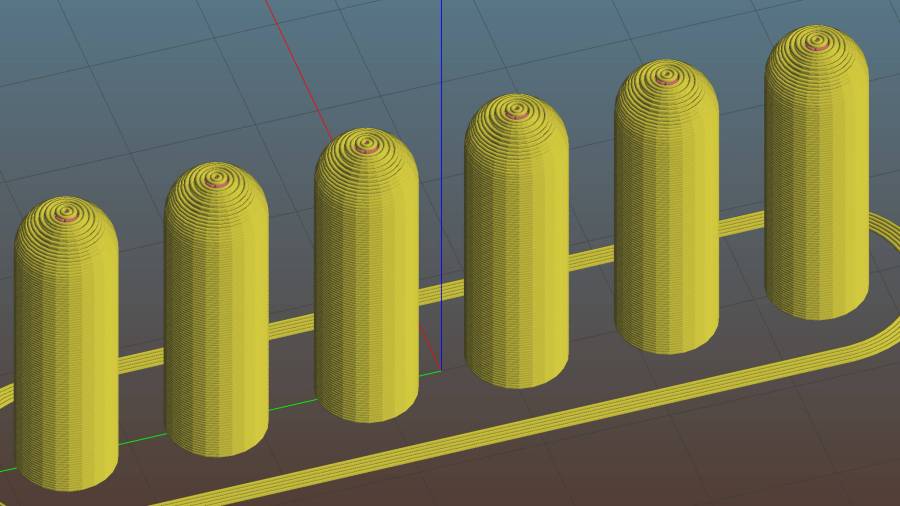
While the 3D printer’s hot, ya may as well make a bunch:
Game on …
The OpenSCAD source code as a GitHub Gist:
Update: They’re a bit too large, so the Gist now produces tapered pegs.
| // Shuttles game pegs | |
| // Ed Nisley KE4ZNU – July 2020 | |
| /* [Layout Options] */ | |
| Layout = "Peg"; // [Build, Peg] | |
| Hollow = false; | |
| //——- | |
| //- Extrusion parameters must match reality! | |
| /* [Hidden] */ | |
| ThreadThick = 0.25; | |
| ThreadWidth = 0.40; | |
| HoleWindage = 0.2; | |
| Protrusion = 0.1; // make holes end cleanly | |
| ID = 0; | |
| OD = 1; | |
| LENGTH = 2; | |
| //——- | |
| // Dimensions | |
| /* [Dimensions] */ | |
| Peg = [4.0,7.5,26.0]; // overall length, including the rounded Cap | |
| Taper = 1.0; | |
| CapRadius = Peg[OD]/2; | |
| PegBaseLength = Peg[LENGTH] – CapRadius; | |
| NumPegs = [1,6]; // lay out in array | |
| ArrayCenter = [NumPegs[0] – 1,NumPegs[1] – 1] / 2; | |
| NumSides = 6*4; | |
| //——- | |
| module PolyCyl(Dia,Height,ForceSides=0) { // based on nophead's polyholes | |
| Sides = (ForceSides != 0) ? ForceSides : (ceil(Dia) + 2); | |
| FixDia = Dia / cos(180/Sides); | |
| cylinder(r=FixDia/2 + HoleWindage,h=Height,$fn=Sides); | |
| } | |
| //——- | |
| // One peg | |
| module Peg() { | |
| union() { | |
| translate([0,0,PegBaseLength]) | |
| difference() { | |
| sphere(d=Peg[OD],$fn=NumSides); | |
| translate([0,0,-Peg[OD]/2]) | |
| cube([2*Peg[OD],2*Peg[OD],Peg[OD]],center=true); | |
| } | |
| difference() { | |
| cylinder(d1=Peg[OD] – Taper,d2=Peg[OD],h=PegBaseLength,$fn=NumSides); | |
| if (Hollow) | |
| translate([0,0,-Protrusion]) | |
| PolyCyl(Peg[ID],PegBaseLength+Protrusion,NumSides); | |
| } | |
| } | |
| } | |
| //——- | |
| // Build it! | |
| if (Layout == "Peg") | |
| Peg(); | |
| if (Layout == "Build") | |
| for (i=[0:NumPegs[0] – 1], j=[0:NumPegs[1] – 1]) | |
| translate([(i – ArrayCenter.x)*1.5*Peg[OD],(j – ArrayCenter.y)*1.5*Peg[OD],0]) | |
| Peg(); |

Comments
2 responses to “Shuttles Board Game: Replacement Pegs”
[…] so Slic3r uses set-and-forget temperature and speed values, and I manually change colors only on those rare occasions when color matters. Most clogs occur after switching from a higher- to a lower-temperature plastic (PETG to PLA), […]
[…] is all too common with 3D printed replacement parts done remotely, the first Shuttles game pegs didn’t quite fit into the game board’s holes. Fortunately, living in the future means […]