
During the course of my Makerbot Thing-O-Matic experience, I concluded:
- Enthusiasm may get a product out, but engineering makes it work
- Plywood and plastic do not produce a stable 3D printer
- Measurements matter
- 8-bit microcontrollers belong in the dustbin of history
With that in mind, I’ve long thought that LinuxCNC (formerly EMC2) would provide a much better basis for the control software required for a 3D printer than the current crop of Arduino-based microcontrollers. LinuxCNC provides:
- Hard real time motion control with proven performance
- A robust, well-defined hardware interface layer
- Ladder-logic machine control
- Isolated userspace programming
- Access to a complete Linux distro’s wealth of programs / utilities
- Access to an x86 PC’s wealth of hardware gadgetry
Rather than (try to) force-fit new functions in an Arduino microcontroller, I decided it would be interesting to retrofit a DIY 3D printer with a LinuxCNC controller, improve the basic hardware control and sensing, instrument the extruder, then take measurements that might shed some light on DIY 3D printing’s current shortcomings.
The overall plan looks like this:
- Start with a Makergear M2
- See what the stock hardware can do
- Replace the RAMBo controller with LinuxCNC
- See what the hardware can do with better drivers
- Adapt the G-Code / M-Code processing to use more-or-less stock Marlin G-Code
- Add useful controllers along the lines of the Joggy Thing
- Improve the platform height / level sensing
- Rebuild the extruder with temperature and force sensors
- Start taking measurements!
My reasons for choosing the Makergear M2 as the basis for this project should be obvious:
- All metal: no plywood, no acrylic (albeit a plastic filament drive)
- Decent stepper motors (with one notable exception)
- Reasonable hot end design
- Good reputation
The first step of the overall plan included a meticulously documented M2 build that I figured would take a month or two, what with the usual snafus and gotchas that accompany building any complex mechanism. Quite by coincidence, a huge box arrived on my birthday (the Thing-O-Matic arrived on Christmas Eve, so perhaps this is a tradition), the day when I learned that Mad Phil had entered his final weeks of life.
As the Yiddish proverb puts it: If you wish to hear G*d laugh, tell him of your plans.
So I converted a box of parts into a functional M2 3D printer over the course of four intense days, alternating between our living room floor and a card table in Phil’s home office, showing him how things worked, getting his advice & suggestions, and swapping “Do you remember when?” stories. Another few days sufficed for software installation, configuration, and basic tuneup; I managed to show him some shiny plastic doodads just before he departed consensus reality; as nearly as I can tell, we both benefited from the distractions.
Which means I don’t have many pictures or much documentation of the in-process tweakage that produced a functional printer. The next week or so of posts should cover the key points in enough detail to be useful.
Not to spoil the plot or anything: a stock M2 works wonderfully well.
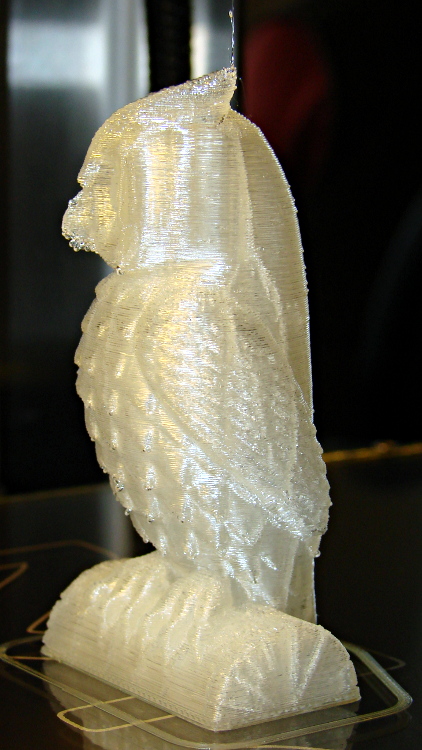
For example, a half-scale cushwa owl printed in PLA at 165 °C with no bed cooling and these Slic3r parameters:
- 500 mm/s move
- 300 mm/s infill
- 200 mm/s solid infill
- 100 mm/s internal perimeter
- 50 mm/s bottom layer
- 30 mm/s external perimeter
- 1 mm retract @ 300 mm/s
The beak came out slightly droopy and each downward-pointing feather dangles a glittery drop. There’s room for improvement, but that’s pretty good a week after opening a box o’ parts…

Comments
8 responses to “Makergear M2 vs. LinuxCNC: Project Overview”
I still think the 8-bit microcontrollers have a place (generally a dangerous place where swapping a cheap DIP-packaged part is a useful thing to be able to do). I also think the x86 architecture belongs in the dustbin of history. But both are supported by a huge amount of inertia, so we’re basically stuck with them unless we want to spend more time, money, and effort getting less popular (if arguably better) approaches working.
At this point, the hideous x86 architecture is history: I, for one, don’t miss writing x86 real-mode assembler in the least! What used to be known as the protected mode architecture isn’t all that bad; there’s enough money powering development to smooth out the rough spots and produce really good performance at dirt-cheap commodity prices.
On the other end, an 8 bit microcontrollers in a SOT-23 packages shows the victory of software over hardware: now you can have a tiny generic hardware block that does exactly what you need, at least if you need it in millisecond-scale time.
I want to concentrate more on the higher-level machinery, not re-re-rewriting motion control logic on Yet Another Platform…
The light finally kicks on and now I see the clues you have left in the past and the final project. Congrats on the M2 and more importantly, I’m watching what happens with your software tool chain to feed it. Nice work!!!!
That’ll be the tricky part to get right. Dan Newman is on board: he will keep me honest…
What are you planning to use for drivers? The RAMPs setup or the Leadshone types that you got from China? I am just in the beginning phase of ordering pieces for a Mendel and had the same thought that this would all be better driven from a computer directly like my little portal CNC is. I will be following your project with much interest!
Those 2M542 bricks, most likely, driven from a Mesa card (that I have yet to order). I think all the outboard electronics will go in a recycled PC case, tapping into that power supply for low-current stuff and using a 24 VDC supply for the steppers. It’ll be garish, but amenable to on-the-fly tweaking…
[…] So I figured I’d build enough subassemblies to reduce the clutter, then put them together into the chassis while working on Phil’s card table. […]
[…] seen the overview pictures of the half-scale cushwa Owl earlier, so here are some […]