The Smell of Molten Projects in the Morning

Ed Nisley's Blog: Shop notes, electronics, firmware, machinery, 3D printing, laser cuttery, and curiosities. Contents: 100% human thinking, 0% AI slop.

Tag: Repairs

If it used to work, it can work again

  • Kenmore Gas Stove Oven Temperature Control Encoder

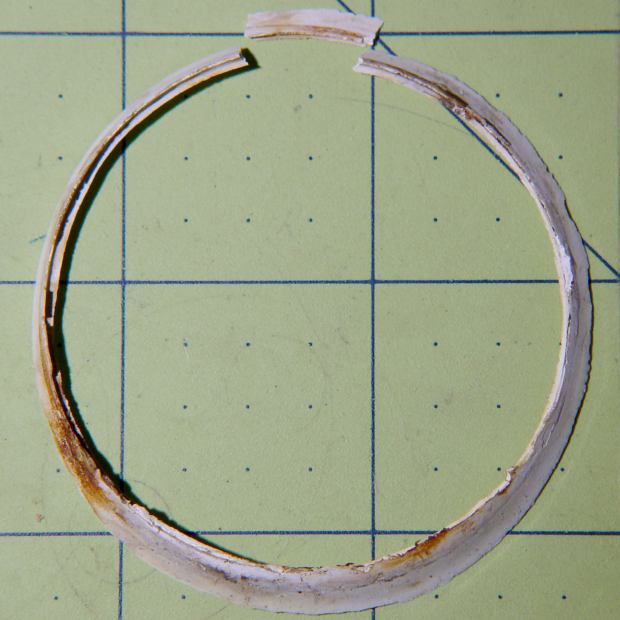
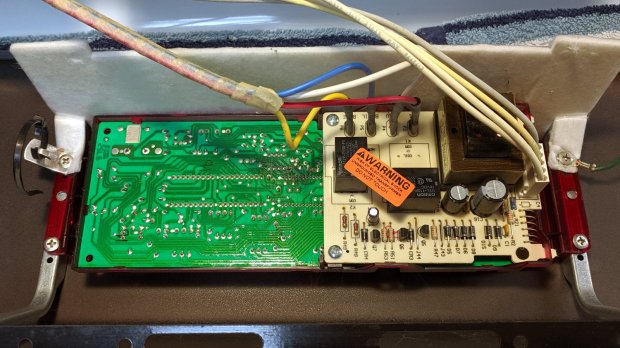
    For the last year or so, the oven temperature control on our Kenmore gas stove has been decreasingly stable, sometimes varying by 100 °F from the setpoint before settling down somewhere close to what it should be. Spotting a replacement control board for a bit over $100, I decided the board used an absolute rotary encoder of the open-frame variety, so I took the thing apart:

    Kenmore oven control - PCB overview
    Kenmore oven control – PCB overview

    The encoder was, indeed, an open frame:

    Kenmore oven control - rotary encoder
    Kenmore oven control – rotary encoder

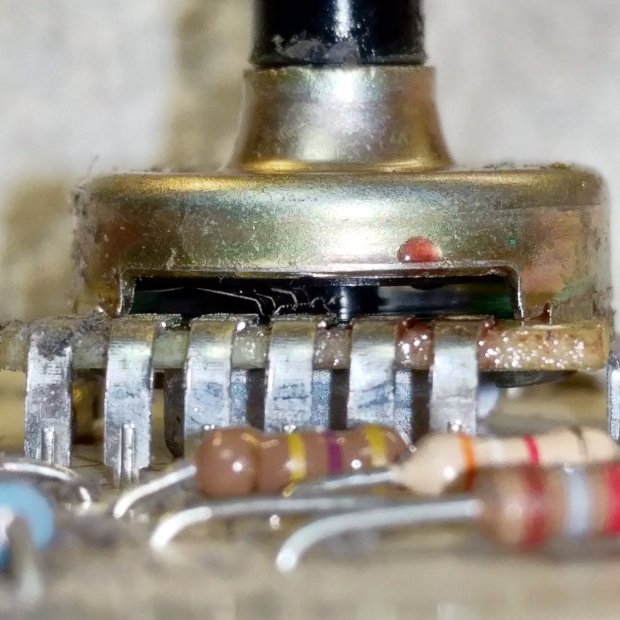
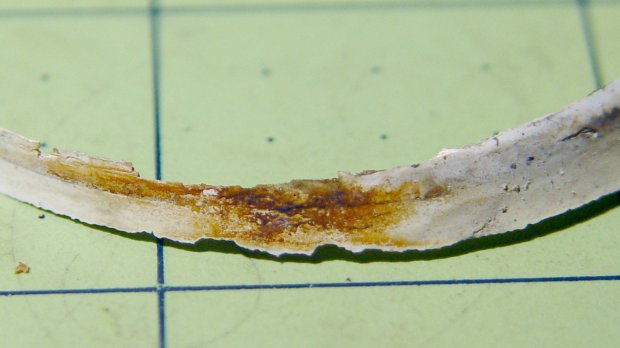
    The red droplet is DeoxIT, the rest of which went inside, just ahead of the contact fingers, and got vigorously massaged across the switch contacts on the wafer by spinning the shaft.

    Some time ago, the membrane over the TIMER ON/OFF switch cracked and I applied a small square of Kapton tape. Having the entire controller in hand, I replaced the square with a strip of 2 inch Kapton, carefully aligned with the bezel marks embossed on the membrane, and now it’s smooth all over:

    Kenmore oven control - Kapton tape cover
    Kenmore oven control – Kapton tape cover

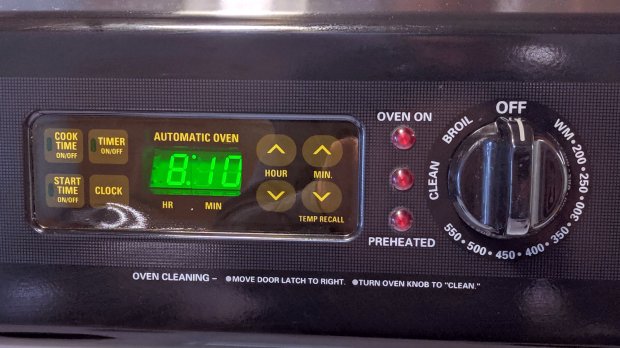
    The MIN(ute) ^ switch required a much firmer than usual push, so I tucked a shim cut from a polypropylene clamshell between the membrane and the pin actuating the switch.

    Reassembled, it works perfectly once more.

    Gotta love a zero-dollar appliance repair!

  • Tire FOD

    We rented a van to haul our bikes on a vacation trip, but the tire pressure warning alarm sounded when I turned into the driveway. Measuring the tire pressures showed the left rear tire was at 51 psi, far below the 72 psi shown on the doorframe sticker, and a quick check showed a possible problem:

    Tire FOD - in place
    Tire FOD – in place

    The small circle in the tread to the left of that mark turned out to be a metal tube:

    Tire FOD object
    Tire FOD object

    Their tire contractor determined the tire wasn’t leaking, the metal tube hadn’t punctured the carcass, and all was right with the world. After, of course, two hours when we expected to be loading the van.

    The rental company was good about it, perhaps because I reported they sent the van out with the other rear tire grossly overinflated to 86 psi (!); obviously, their prep didn’t include checking the tires. Somewhat to my surprise, the space under the passenger seat for a jack was empty.

    During the trip, the van laid an egg:

    Transit Van with Egg
    Transit Van with Egg

    A good time was had by all, but our next bicycling vacation will definitely have much more bicycling and much less driving!

  • Hiatus

    Several home projects of steadily increasing priority will interfere with writing up Basement Laboratory projects through early November:

    Mary - R foot - complete
    Mary – R foot – complete

    Ground truths:

    • No barnacles on her foot
    • No sea creature eating her leg

    I’ll be posting infrequently during the next few weeks.

    All remains right with our world …

  • Raspberry Pi vs. eBay Camera: Assembly Completion

    I picked up a pair of Raspberry Pi V1 cameras, both of which arrived unstuck to their breakout board:

    RPi V1 camera adhesive
    RPi V1 camera adhesive

    Requiring the customer to peel off the white layer and stick the camera to the PCB helps keep costs low. They’re $4 if you’re willing to wait two months or $7 from a “USA Seller”.

  • Bathroom Sink Drain: Epoxy FAIL

    Apparently, “porcelain chip fix” epoxy survives about a year in a bathroom sink:

    Bathroom sink epoxy - top
    Bathroom sink epoxy – top

    It came loose from the drain rim while I was cleaning the sink; I wasn’t doing anything particularly vigorous.

    The stain in the lower right goes all the way around the epoxy:

    Bathroom sink epoxy - bottom
    Bathroom sink epoxy – bottom

    For what should be obvious reasons, I was loathe to scuff up the sink surface to give the epoxy a better grip, so it couldn’t make a watertight seal all the way around.

    A closer look at the stain:

    Bathroom sink epoxy - detail
    Bathroom sink epoxy – detail

    I’m reasonably sure that’s iron bacteria colony, rather than actual rust, as there’s no iron to be found anywhere nearby.

    For lack of anything smarter, I’ll apply another dose of the same epoxy, although this time I won’t be expecting a long-term fix.

  • Monthly Science: Concrete Bridge Flexing

    Riding south on Rt 376 takes us across the Mighty Wappinger Creek on a four-lane concrete bridge built about 1995. This Dutchess County Aerial Access photo shows it in 2016:

    Rt 376 - Wappinger Bridge - 2016 overhead
    Rt 376 – Wappinger Bridge – 2016 overhead

    A pothole opened up on the south end of the span last year:

    Rt 376 bridge deterioration - marker 1102 - 2018-05-07
    Rt 376 bridge deterioration – marker 1102 – 2018-05-07

    NYS DOT patched it a while ago:

    Rt 376 - Wapp Bridge - 2019-09-11 - 0490
    Rt 376 – Wapp Bridge – 2019-09-11 – 0490

    This year, we’ve been avoiding a new pothole opening on the north end:

    Rt 376 - Wapp Bridge - 2019-09-11 - 0295
    Rt 376 – Wapp Bridge – 2019-09-11 – 0295

    It’s difficult to ride between the right side of the hole and the weeds growing from the curb joint under the guide rail, so we take the lane whenever we can. The extensive vegetation growing in the bridge structure can’t possibly be a good thing.

    The bridge deck rests on steel beams across the creek, with plenty of corroded concrete along the edge:

    Red Oaks Mill bridge - dangling concrete
    Red Oaks Mill bridge – dangling concrete

    The concrete seems to be failing by tension overload as the beams flex downward under traffic loading and pull the top surface apart. The surface has irregular transverse cracks across the deck width, not all of which look like control joints.

    With potholes and surrounding cracks allowing brine into the deck, we expect much worse deterioration during the next few years.

    My Professional Engineer license has long lapsed, not that I ever knew anything about bridge design, so this is mostly observational.

  • Suet Feeder Bracket Painting

    The 4 inch column on the rear patio holds a bracket, probably intended for a welcoming sign or some such, which keeps the suet feeder mostly out of reach. It desperately wanted a coat of black paint to match the railing, so I stripped the old paint and applied Evapo-Rust:

    Suet Feeder Bracket Hardware - Evapo-Rust bath
    Suet Feeder Bracket Hardware – Evapo-Rust bath

    The dark areas are iron oxide being converted to loose iron sulfide, which is what Evapo-Rust does for a living.

    One could, of course, simply buy new eye screws & nuts, but we’re deep into historical preservation around here.

    An hour of soaking and a few minutes of wire-wheeling got everything down to bare metal, ready for some rattle-can primer and black paint action:

    Suet Feeder Bracket Hardware - installed
    Suet Feeder Bracket Hardware – installed

    It’s a version of what Eks calls a “used car finish”: high shine over deep pits.

    Discussion of why one should not paint threaded parts will be unavailing; in this case, paint serves as permanent threadlock. I re-spritzed the eyescrews & nuts after getting everything aligned, so as to produce a lovely two-coat over-all finish.

    The birds won’t care one way or the other and, as long as the paint lasts, neither will we.