Ed Nisley's Blog: Shop notes, electronics, firmware, machinery, 3D printing, laser cuttery, and curiosities. Contents: 100% human thinking, 0% AI slop.
I cable-tied the mic/earphone cable on Mary’s bike helmet to a rib on the fancy air vents near the back end, hoping that would reduce the inevitable flexing. Alas, it didn’t work out that way and the cable lasted only two seasons. This cut-away view shows the pulverized shield braid inside the jacket:
Fatigue-failed helmet cable
The symptoms were totally baffling: the mic worked perfectly, but the earphones cut out for at most a few syllables. Of course, I can’t wear her helmet and it only failed occasionally while riding. I barked up several wrong trees, until it got so bad that I could make it fail in the garage while listening to the local NWS weather radio station.
I spliced in a new USB male-A connector and (re-)discovered that the braid seems to be aluminum, rather than tinned copper. In any event, the wire is completely unsolderable; I crimped the braid from the new connector to a clean section of the old braid. The braid serves only as an electrostatic shield, as it’s not connected to anything on the helmet end. That should suffice until I rebuild the headsets this winter.
Come to find out that Ubuntu 11.10 uses NFS V4 by default, which means the various clients scattered around here, all of which use NFS V3 by default, report all files have user & group 232 – 2: an awkward and unforgettable unsigned 4294967294. That’s -2 in 2’s complement notation with 32 bit hex numbers, corresponding to the unsigned 16-bit 65534 = -2 for the nobody user & group.
Fix that by editing /etc/default/nfs-common to set NEED_IDMAPD=yes. Unmount the NFS share, do sudo start idmapd, remount, and it’s all good. The next time the client boots, the idmapd daemon starts automagically, and that’s all good, too.
Adding the -t nfs4 filetype in /etc/fstab seems to be not necssary.
How I got into this mess: the Intel Atom D525 that had been driving the Thing-O-Matic has a bog-standard Intel graphics chip that, despite (or perhaps because of) having an open-source video driver, reports doing only OpenGL 1.4. OpenSCAD, however, requires OpenGL 2.0 and those hacks don’t allow it to run properly, which makes it awkward for demos. The AMD that’s currently the file server has, IIRC, better graphics that might improve the situation; I think it sports a somewhat peppier processor, too. The fact that it’s running Ubuntu 8.10 says that it’s time for an update.
Soooo, I swapped in a new 1.5 TB SATA drive, installed hot-from-the-oven Ubuntu 11.10, replaced Unity with XFCE, inhaled all the current data from the file server’s external USB backup drive, configured ssh / nfs / etc, and I’m now doing some simpleminded tests before I swap the IP addresses.
Now, if the AMD has craptastic graphics hardware, it’s unhappy dance time…
As part of sawing a kitchen countertop apart to fit it into the bathroom, this happened:
Sawed-off sawhorse
I’d very carefully checked the clearance for the first two cuts, but …
The sawhorse is polyethylene, which cannot be glued, so I drilled holes in the internal bulkheads, slobbered JB Industro-Weld epoxy through them, and filled the gaps with wood blocks:
Wood-epoxy PE repair
The goal being to not have metallic fasteners where the saw blade can find them.
This should work for a while:
Sawhorse cap repaired
If that’s never happened to you, I’d say you aren’t doing enough circular saw work…
I’ve carried all my stuff in a belt pack since long before such things were fashionable and, quite some years ago, a friend made me a custom-sized one that’s been in constant use ever since. Of late, one of the zippers got cranky and finally failed completely.
An autopsy showed the middle of the cross bar on the tab had worn completely through, the stubs had bent outward, and the remains no longer engage the zipper tooth lock.
Worn-through zipper tab
I replaced the tab with a short length of chain and a jump ring, but I fear the pack fabric is also reaching end of life.
The keyboard on my trusty HP 48GX calculator finally deteriorated to the point of unusability, so I tore the thing apart following the useful instructions there. The warning about applying force to the rivets that hold the case halves together gives you not the faintest concept of how much force is actually required to pry the mumble thing apart at the battery compartment; I finally invoked force majeure with a chisel scraper…
HP-48GX case rivets
I expected the calculator would not survive this operation and I wasn’t disappointed.
An HP 50g is now in hand. Here in late 2011 I’d expect HP’s top-of-the-line RPN calculator to sport a crisp high-resolution display, but noooo the low-contrast 131×80 LCD seems teleported directly from the latter part of the last millennium. The manuals are PDFs, which is OK, but their content is far inferior to the HP 48GX manuals. In particular, the editing / proofreading is terrible. I infer that the HP calculator division can barely fog a mirror and is on advanced life support; HP’s diverting all their money to, uh, executive buyouts or some other non-productive purpose.
The fact that HP sells new-manufacture HP 15C calculators doesn’t crank my tractor, even though I lived and died by one for many years. A one-line 7-segment display doesn’t cut it any more, even if the new machinery inside allegedly runs like a bat out of hell.
My HP 16C, now, that one you’ll pry out of my cold, dead hands. At one point in the dim past, I’d programmed the Mandelbrot iteration into it to provide bit-for-bit verification of the 8051 firmware for the Mandelbrot Engine array processor I did for Circuit Cellar: slow, but perfect. That calculator has a low duty cycle these days, but when I need it, I need it bad.
Of late, something in the pile of input devices attached to my main PC has been feeding occasional bursts of upward scroll commands, to the extent that editing long documents (something I do quite a bit of, oddly enough) was becoming difficult. By process of elimination, the culprit turned out to be the Kensington trackball to the left of the keyboard: unplugging it eliminated the problem.
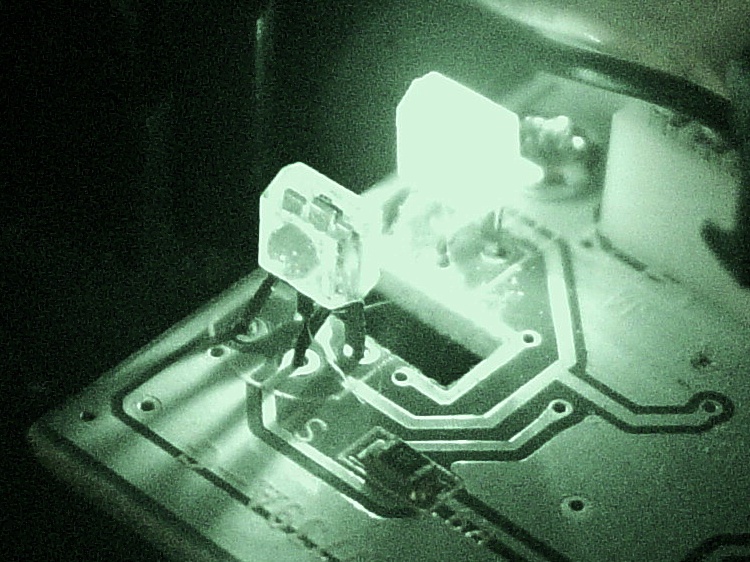
Having had problems with that thing before and having gotten considerable feedback from other folks, I had a general idea of how to proceed: putz with the IR emitter-detector pair, but not very much. A side view of the pair with the trackball cup and scroll ring removed:
Scroll ring IR emitter-detector quadrature pair
Now, what’s weird about that setup is that the detector lens seems to be pointing in the wrong direction: away from the emitter’s lens. You know it’s the detector because it’s tinted: there’s no point in filtering the emitter’s output (although I have seen gray-tinted IR LEDs, which I think is just to mark them as different from visible LEDs). Here’s proof: a pure IR picture from my Sony DSC-F717 in Nightshot (a.k.a. IR) mode through a Hoya R72 visible-block filter:
Quadrature pair in pure IR
Some possibilities for why the detector is backwards:
It’s an assembly screwup (unlikely, but possible)
That’s not a lens, it’s a locating tab (different on emitter & detector?)
The backside uses the metal conductors as slits to enhance the signal (my favorite)
Here’s a grossly image-enhanced blowup of the detector from that picture:
Quadrature IR detector in pure IR – detail
The case becomes transparent in pure IR, so you can see the metal lead frame inside. I think they’re using the gaps between the leads to enhance the contrast of the scroll ring edges passing through the beam: absolutely no IR except when a gap aligns with a scroll ring opening.
[Update: read the comments for a different interpretation; I’m probably wrong.]
That would also explain why the pair seems so sensitive to alignment: there’s very little IR hitting the detector, because the IR illumination passes through the transparent-to-IR case and vanishes out the far side, with only a tiny bit reflected to the sensor!
Anyhow, I pushed the pair minutely toward each other, just enough to feel the leads bend, and put everything back together. So far it seems to be working perfectly, but it’s done that before …
[Comment: Jack found a different solution that might produce better results:
Just got the Problem with my Scroll ring and thanks to your blog i digged a bit deeper.
here is the Solution for my Problem:
I checked this while connected and i found that bending worked only for a short time, so i gave a closer look to the contacts.
all are soldered from below BUT two contacts are on the upper side. normaly solder should flow into but here it was as simple as just resolder the receiver with enough solder an its now working again. (btw a realigned the magnet to get a better response)
Thanks Jack
ps. the size of the cuts in the metall from the scroll ring differ, a shame for that price..
It’s certainly worth trying, particularly when your Expert Mouse trackball isn’t working…
Some years back I replaced the shower stall faucets; they’d lasted about half a century, which is good enough. The new faucets were American Standard Cadet/Colony (their choice of name, the current Colony valves seem similar) with a nice, smooth exterior. Of late, both handles had become slightly loose and I finally got around to tightening them.
Shower faucet valve stem
The handle setscrews accept a 5/64 inch hex key and pop easily off the stems, revealing the splined plastic (noncorrosive!) mount on the valve stem. The Philips screw in that is what’s loose and allows the whole handle to wiggle just a bit; tightening the setscrew doesn’t help.
Of course, tightening the screw in the cold water stem tends to open the valve, so you must firmly wedge the splined mount. I’m sure there’s a special wrench for that, but I just held it tightly; next time I’ll try a strap wrench.
One would ordinarily dose the screws with threadlocker, so as to never have to endure this dance again, but these screws have coarse threads that engage another plastic doodad that engages two wings on the splined mount. So I guess I must retighten them twice a decade or so.
The handle interiors sport a bit of corrosion (which does not respond to vinegar, so it’s not hard water mineralization), but nothing terrible. The setscrew, mirabile dictu, seems to be stainless steel…