Of late, something in the pile of input devices attached to my main PC has been feeding occasional bursts of upward scroll commands, to the extent that editing long documents (something I do quite a bit of, oddly enough) was becoming difficult. By process of elimination, the culprit turned out to be the Kensington trackball to the left of the keyboard: unplugging it eliminated the problem.
Having had problems with that thing before and having gotten considerable feedback from other folks, I had a general idea of how to proceed: putz with the IR emitter-detector pair, but not very much. A side view of the pair with the trackball cup and scroll ring removed:

Now, what’s weird about that setup is that the detector lens seems to be pointing in the wrong direction: away from the emitter’s lens. You know it’s the detector because it’s tinted: there’s no point in filtering the emitter’s output (although I have seen gray-tinted IR LEDs, which I think is just to mark them as different from visible LEDs). Here’s proof: a pure IR picture from my Sony DSC-F717 in Nightshot (a.k.a. IR) mode through a Hoya R72 visible-block filter:
Some possibilities for why the detector is backwards:
- It’s an assembly screwup (unlikely, but possible)
- That’s not a lens, it’s a locating tab (different on emitter & detector?)
- The backside uses the metal conductors as slits to enhance the signal (my favorite)
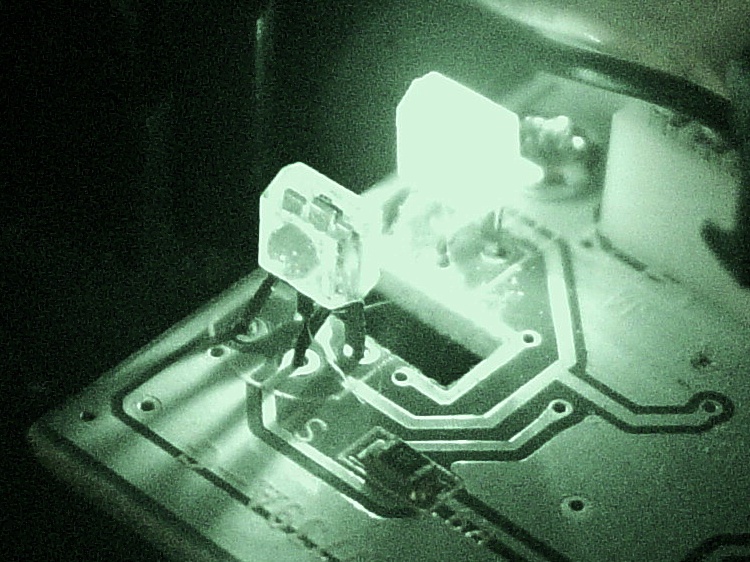
Here’s a grossly image-enhanced blowup of the detector from that picture:

The case becomes transparent in pure IR, so you can see the metal lead frame inside. I think they’re using the gaps between the leads to enhance the contrast of the scroll ring edges passing through the beam: absolutely no IR except when a gap aligns with a scroll ring opening.
[Update: read the comments for a different interpretation; I’m probably wrong.]
That would also explain why the pair seems so sensitive to alignment: there’s very little IR hitting the detector, because the IR illumination passes through the transparent-to-IR case and vanishes out the far side, with only a tiny bit reflected to the sensor!
Anyhow, I pushed the pair minutely toward each other, just enough to feel the leads bend, and put everything back together. So far it seems to be working perfectly, but it’s done that before …
[Comment: Jack found a different solution that might produce better results:
Just got the Problem with my Scroll ring and thanks to your blog i digged a bit deeper.
here is the Solution for my Problem:
I checked this while connected and i found that bending worked only for a short time, so i gave a closer look to the contacts.
all are soldered from below BUT two contacts are on the upper side.
normaly solder should flow into but here it was as simple as just resolder the receiver with enough solder an its now working again. (btw a realigned the magnet to get a better response)Thanks
Jackps. the size of the cuts in the metall from the scroll ring differ, a shame for that price..
It’s certainly worth trying, particularly when your Expert Mouse trackball isn’t working…
Update: Nine years in the future, a real fix appears!

Comments
20 responses to “Kensington Trackball: Scroll Ring Tweakage”
It is a PCB screw up. IT works and so they have left it that way. If you could get it the right way around and bend the legs to the right holes on the PCB it might work like it was intended to.
I have a problem on my Vaio, the web pages zoom in and out by themselves. Turns out to be the 2.4 GHz wireless mouse/keyboard combo. Just unplugging it out and in again solves the problem. I think it is getting affected by the WiFi a foot away!
That may just be the simplest explanation that covers all the observed facts… [sigh]
If I could find datasheets for the emitter & detector pair, I’d be more confident about rearranging them!
I think my next step would be to take an IR photomicrograph of the detector. Mostly because it would be fun to assemble that stack of equipment. Finding a data sheet on it should be simple enough, if you can get a part number. That said, it sure looks backward to me. I rather doubt the alignment is critical if they’re actually aimed at each other.
Apparently, it’s not backwards, a little searching turned up this page which describes the various
detectors used, and helpfully mentions that the 4-lead detectors have the detector surface on the flat side (opposite the bump).
A tip o’ the keyboard for finding that!
The puzzling part is that he reports those detectors to be insensitive to the LED location, but that’s certainly not the case here: very slight motions result in very large behavioral changes. Perhaps the scroll ring image on the detector is just the right size to tease the output?
Aye, there’s the rub!
I haven’t found anything like those parts, anywhere, which just means my search-fu isn’t up to spec.
Well that saved me a bit of money – my Expert Mouse lives to scroll again! Many thanks.
Excellent!
The evidence certainly suggests those emitters and detectors are way too sensitive for their own good… glad to hear yours are back in alignment.
[…] on the Kensington Expert Mouse trackball at my left hand failed completely. Unlike the previous repair attempts, tweaking the IR emitter-detector pair positions did nothing. Tried it on three different […]
I finally figured out what real problem was!!!!
It explains all intermittent dust ball issues, IR emitter/receiver, the accidental fixes, etc. Its not s/w, drivers, versions, etc,
I had disassembled the unit and cleaned it out and piddled around with the positions on the IR emitter/receiver components.
The results were better, but I noticed that there was something else going on as well, because the cleaning and re-positioning of the IR unit just was not ‘stable’ enough.
It was a pure mechanical, wear/deformation issue, and also accounts for issue from dropping dropping the unit, too.
What I found was the real problem was the position of the ring itself was ‘off’ vertically at the IR beam path.
The ball cup and ring assembly can rock, or be mispositioned, or become deformed in the ‘fore/aft’ axis, and cause the problem!
The ball cup and ring assembly is ‘positioned’ by the two little plastic ”tits’ on the assembly sticking into holes in the small tilted PCB.
The PCB itself is positioned by the two plastic ramps on the upper end (that would be the cord end) of the ball cup assembly.
The fulcrum (or rocking point) point is the cup assembly mounting two screws.
If the upper end of the assembly sits a hair too low, the other end (where the ring slots (windows) pass between the IR emitter and receiver), sits to high, thus blocking the beam pathe with some lower ‘window sill’.
So, not enough of the slot ‘opens’ to allow the beam to shine through. A little bit of dust can make it intermittent.
The beam sees the bottom of the ‘window frame sill’ almost all the time, and ‘thinks’ there are no windows passing in front of it.
Therefore the scroll signal does not get sent, reliably
The fix is NOT to bend the IT emitter/receiver components on the PCB.
The FIX is to raise the upper end of the cup assembly, a hair, so that other end is lowered, and the full window height on the other end will open/block the IR beam.
All I did was insert shims between the ramps and the PCB board, thus raising PCB and thus raising the upper end, and lowering ‘window/beam end of the ball/cup assembly.
I used a single thickness of a business card for each of the two shims.
Adjusting the IR components is only compensating for the symptoms of real problem, and does not fix the root cause of the problem, which was deformation, primarily from use, or dropping, and compounded by dust balls.
Worked perfectly!
Scrolling is now rock solid.
That makes a certain perverse sense: the electronics still work fine, but the optical signal doesn’t get through.
I’ll dig out a failed trackball and get some pictures of the scroll ring apertures in relation to the IR emitter-detector pair. The problem ought to be painfully obvious!
Thanks for the debugging and report… somebody will certainly put it to good use!
Ed,
After working perfectly all day, yesterday, this morning, it worked for about 10-15 minutes, and then completely quit scrolling. I took it apart again and looked everything over, but could not find the problem. So I put it back together and gave up. Another 10 minutes later, it working perfectly!
However, as I’m writing this, it quit scrolling AGAIN.
Perverse is right!
Since the unit is less that five years old (in warranty) I’m getting ready to get Kensington to send me a new one.
Thanks for your help. Sorry for the ‘temporary’ solution, which I offered.
Well, even negative information is helpful. In a certain perverse sense, of course. [grin]
It’s not mechanical, it’s not optical, so it might be electrical. That’s where we started, but now we’re a bit more certain.
I’m surprisingly reluctant to tear into a working trackball to measure the signals for comparison with a failed unit, though…
Seems like it might be revealing to connect an o’scope to the sensor diode. Perhaps add a connector to the device for the scope probe. Then when it’s malfunctioning, spin the ball.
A trackball with a preemptive diagnostic connector: you seem very close to the spirit of the thing…
Hmm. It’s almost certainly a quadrature sensor, so we need two channels. Time for a bit of rummaging, methinks.
[…] That comment suggested scroll ring failures on a Kensington Expert Mouse (it’s a trackball) might occur when the apertures become misaligned from the IR emitter-detector pair, although later results were equivocal. I tore apart a failed unit to see what the alignment looked like for a known-bad scroll ring. […]
Hi Ed, thanks for these excellent posts. My scroll ring died this week so I followed your advice. I tried a good old fashioned clean – no luck. I tried bending the LED – still no luck. However, fiddling a bit with the height of the plastic ring seems to have worked. I think tightening/loosening the two screws on the trackball seat has allowed the tiny adjustment elvisbubba wrote about. I’ve got it working again and, for reference, my trackball is five years old and has had moderate use over that period.
Such a tiny change shouldn’t make much of a difference, so I think there’s something else going on. Alas, none of us really has a clue.
My crystal ball predicts a new trackball in your future…
Hi guys,
I am the proud owner of the “original” kensington turbo trackball, but the bearings were just gone, too much play in them.
So I bought myself a new “Expert Mouse[sic]” and so far so good, I thank you guys for the expertise written down here, I just hope this page doesn’t disappear like countless other pages on this cost}{greed-forced-centralization planet of ours.
I shall use your expertise when the time arrives.
However, I do have one extra question for you fellow trackballers… which is:
==> eating a nice pepperoni pizza, while watching a movie via mplayer on my 3rd HDMI output connected to my 50 inch TV, I find myself smudging the ball a few times trying to get the cursor back to the movie screen to hit spacebar for a loo-pause….. Ergo, after the event I find myself trying to clean the device……. HOW, i.e. what is the best way to clean the trackball and its mini-ballbearings so that it rolls again smoothly, without me having to wait another 30 minutes of usage until the “grease sheen” builds up again for a nice smooth ride. ????
Well, it’ll be around as long as I am, if that’s any help. As far as I can tell, when I stop turning the crank, the world stops going around; after that, the Internet Archives may be your copilot!
The consensus says nose grease works pretty well: clean the ball as usual, rub it on the side of your nose, drop it back in its socket, and give it a few spins.
But with all that pepperoni around, you might not have much of a problem re-greasing it! [grin]